Note
Access to this page requires authorization. You can try signing in or changing directories.
Access to this page requires authorization. You can try changing directories.
Cloud-native apps often require connections to various services such as databases, storage and caching solutions, messaging providers, or other web services. Aspire is designed to streamline connections and configurations between these types of services. This quickstart shows how to create an Aspire Starter Application template solution.
In this quickstart, you explore the following tasks:
- Create a basic .NET app that is set up to use Aspire.
- Add and configure an Aspire integration to implement caching at project creation time.
- Create an API and use service discovery to connect to it.
- Orchestrate communication between a front end UI, a back end API, and a local Redis cache.
Prerequisites
To work with Aspire, you need the following installed locally:
- .NET 8.0 or .NET 9.0.
- Starting with Aspire 9.4, .NET 10 Preview 5 or later is supported.
- An OCI compliant container runtime, such as:
- Docker Desktop or Podman. For more information, see Container runtime.
- An Integrated Developer Environment (IDE) or code editor, such as:
- Visual Studio 2022 version 17.9 or higher (Optional)
- Visual Studio Code (Optional)
- C# Dev Kit: Extension (Optional)
- JetBrains Rider with Aspire plugin (Optional)
For more information, see Aspire setup and tooling, and Aspire SDK.
Create the Aspire template
To create a new Aspire Starter Application, you can use either Visual Studio, Visual Studio Code, or the .NET CLI.
Visual Studio provides Aspire templates that handle some initial setup configurations for you. Complete the following steps to create a project for this quickstart:
At the top of Visual Studio, navigate to File > New > Project.
In the dialog window, search for Aspire and select Aspire Starter App. Select Next.

On the Configure your new project screen:
- Enter a Project Name of AspireSample.
- Leave the rest of the values at their defaults and select Next.
On the Additional information screen:
- Make sure .NET 9.0 (Standard Term Support) is selected.
- Ensure that Use Redis for caching (requires a supported container runtime) is checked and select Create.
- Optionally, you can select Create a tests project. For more information, see Write your first Aspire test.

Visual Studio creates a new solution that is structured to use Aspire.
Visual Studio Code provides Aspire project templates that handle some initial setup configurations for you. Complete the following steps to create a project for this quickstart:
From a new instance of Visual Studio Code (without a folder open), select Create .NET project button.
Select the Aspire Starter App template.

Select a folder for the new project, and the enter a name for it.

If you haven't already installed the Aspire templates, run the following dotnet new install command:
dotnet new install Aspire.ProjectTemplates
The preceding .NET CLI command ensures that you have the Aspire templates available. To create the Aspire Starter App from the template, run the following dotnet new command:
dotnet new aspire-starter --use-redis-cache --output AspireSample
For more information, see dotnet new. The .NET CLI creates a new solution that is structured to use Aspire.
For more information on the available templates, see Aspire templates.
Test the app locally
The sample app includes a frontend Blazor app that communicates with a Minimal API project. The API project is used to provide fake weather data to the frontend. The frontend app is configured to use service discovery to connect to the API project. The API project is configured to use output caching with Redis. The sample app is now ready for testing. You want to verify the following conditions:
- Weather data is retrieved from the API project using service discovery and displayed on the weather page.
- Subsequent requests are handled via the output caching configured by the Aspire Redis integration.
In Visual Studio, set the AspireSample.AppHost project as the startup project by right-clicking on the project in the Solution Explorer and selecting Set as Startup Project. It might already have been automatically set as the startup project. Once set, press F5 or (Ctrl + F5 to run without debugging) to run the app.
You need to trust the ASP.NET Core localhost certificate before running the app. Run the following command:
dotnet dev-certs https --trust
For more information, see Troubleshoot untrusted localhost certificate in Aspire. For in-depth details about troubleshooting localhost certificates on Linux, see ASP.NET Core: GitHub repository issue #32842.
In Visual Studio Code, press F5 to launch the app. You're prompted to select which language, and C# is suggested. Select C# and then select the AspireSample.AppHost project with the Default Configuration:

If this is the first time you're running Aspire, or it's a new machine with a new .NET installation, you're prompted to install a self-signed localhost certificate—and the project will fail to launch:

Select Yes, and you see an informational message indicating that the Self-signed certificate successfully created:

If you're still having an issue, close all browser windows and try again. For more information, see Troubleshoot untrusted localhost certificate in Aspire.
Tip
If you're on MacOS and using Safari, when your browser opens if the page is blank, you might need to manually refresh the page.
dotnet run --project AspireSample/AspireSample.AppHost
For more information, see dotnet run.
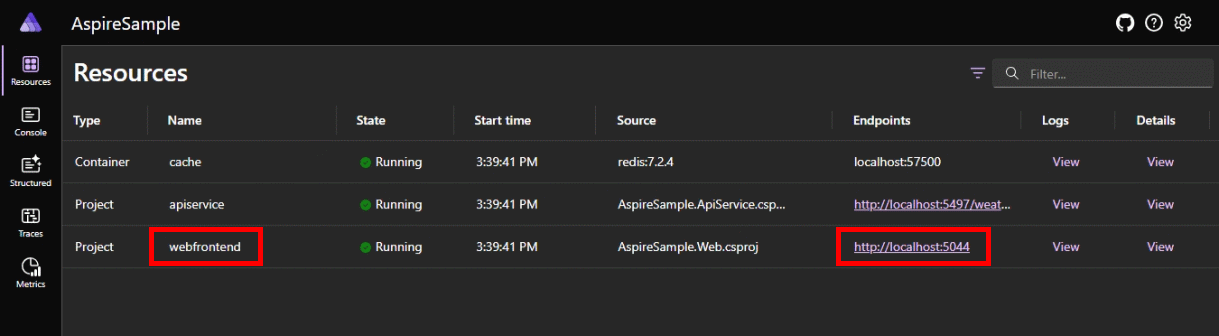
The app displays the Aspire dashboard in the browser. You look at the dashboard in more detail later. For now, find the webfrontend project in the list of resources and select the project's localhost endpoint.
The home page of the webfrontend app displays "Hello, world!"
Navigate from the home page to the weather page in the using the left side navigation. The weather page displays weather data. Make a mental note of some of the values represented in the forecast table.
Continue occasionally refreshing the page for 10 seconds. Within 10 seconds, the cached data is returned. Eventually, a different set of weather data appears, since the data is randomly generated and the cache is updated.


🤓 Congratulations! You created and ran your first Aspire solution! To stop the app, close the browser window.
To stop the app in Visual Studio, select the Stop Debugging from the Debug menu.
To stop the app in Visual Studio Code, press Shift + F5, or select the Stop button at the top center of the window:

To stop the app, press Ctrl + C in the terminal window.
Next, investigate the structure and other features of your new Aspire solution.
Explore the Aspire dashboard
When you run an Aspire project, a dashboard launches that you use to monitor various parts of your app. The dashboard resembles the following screenshot:

Visit each page using the left navigation to view different information about the Aspire resources:
Resources: Lists basic information for all of the individual .NET projects in your Aspire project, such as the app state, endpoint addresses, and the environment variables that were loaded in.
Console: Displays the console output from each of the projects in your app.
Structured: Displays structured logs in table format. These logs support basic filtering, free-form search, and log level filtering as well. You should see logs from the
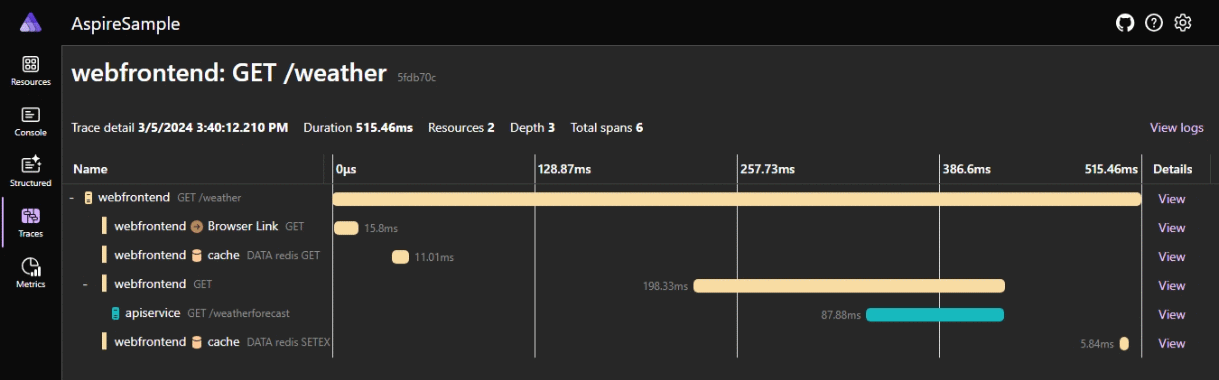
apiserviceand thewebfrontend. You can expand the details of each log entry by selecting the View button on the right end of the row.Traces: Displays the traces for your application, which can track request paths through your apps. Locate a request for /weather and select View on the right side of the page. The dashboard should display the request in stages as it travels through the different parts of your app.
Metrics: Displays various instruments and meters that are exposed and their corresponding dimensions for your app. Metrics conditionally expose filters based on their available dimensions.


For more information, see Aspire dashboard overview.
Understand the Aspire solution structure
The solution consists of the following projects:
- AspireSample.ApiService: An ASP.NET Core Minimal API project is used to provide data to the front end. This project depends on the shared AspireSample.ServiceDefaults project.
- AspireSample.AppHost: An orchestrator project designed to connect and configure the different projects and services of your app. The orchestrator should be set as the Startup project, and it depends on the AspireSample.ApiService and AspireSample.Web projects.
- AspireSample.ServiceDefaults: A Aspire shared project to manage configurations that are reused across the projects in your solution related to resilience, service discovery, and telemetry.
- AspireSample.Web: An ASP.NET Core Blazor App project with default Aspire service configurations, this project depends on the AspireSample.ServiceDefaults project. For more information, see Aspire service defaults.
Your AspireSample directory should resemble the following structure:
└───📂 AspireSample
     ├───📂 AspireSample.ApiService
     │    ├───📂 Properties
     │    │    └─── launchSettings.json
     │    ├─── appsettings.Development.json
     │    ├─── appsettings.json
     │    ├─── AspireSample.ApiService.csproj
     │    └─── Program.cs
     ├───📂 AspireSample.AppHost
     │    ├───📂 Properties
     │    │    └─── launchSettings.json
     │    ├─── appsettings.Development.json
     │    ├─── appsettings.json
     │    ├─── AspireSample.AppHost.csproj
     │    └─── AppHost.cs
     ├───📂 AspireSample.ServiceDefaults
     │    ├─── AspireSample.ServiceDefaults.csproj
     │    └─── Extensions.cs
     ├───📂 AspireSample.Web
     │    ├───📂 Components
     │    │    ├───📂 Layout
     │    │    │    ├─── MainLayout.razor
     │    │    │    ├─── MainLayout.razor.css
     │    │    │    ├─── NavMenu.razor
     │    │    │    └─── NavMenu.razor.css
     │    │    ├───📂 Pages
     │    │    │    ├─── Counter.razor
     │    │    │    ├─── Error.razor
     │    │    │    ├─── Home.razor
     │    │    │    └─── Weather.razor
     │    │    ├─── _Imports.razor
     │    │    ├─── App.razor
     │    │    └─── Routes.razor
     │    ├───📂 Properties
     │    │    └─── launchSettings.json
     │    ├───📂 wwwroot
     │    │    ├───📂 bootstrap
     │    │    │    ├─── bootstrap.min.css
     │    │    │    └─── bootstrap.min.css.map
     │    │    ├─── app.css
     │    │    └─── favicon.png
     │    ├─── appsettings.Development.json
     │    ├─── appsettings.json
     │    ├─── AspireSample.Web.csproj
     │    ├─── Program.cs
     │    └─── WeatherApiClient.cs
     └─── AspireSample.sln
Explore the starter projects
Each project in an Aspire solution plays a role in the composition of your app. The *.Web project is a standard ASP.NET Core Blazor App that provides a front end UI. For more information, see What's new in ASP.NET Core 9.0: Blazor. The *.ApiService project is a standard ASP.NET Core Minimal API template project. Both of these projects depend on the *.ServiceDefaults project, which is a shared project that's used to manage configurations that are reused across projects in your solution.
The two projects of interest in this quickstart are the *.AppHost and *.ServiceDefaults projects detailed in the following sections.
Aspire host project
The *.AppHost project is responsible for acting as a local dev-orchestrator:
<Project Sdk="Microsoft.NET.Sdk">

  <Sdk Name="Aspire.AppHost.Sdk" Version="9.5.2" />

  <PropertyGroup>
    <OutputType>Exe</OutputType>
    <TargetFramework>net9.0</TargetFramework>
    <ImplicitUsings>enable</ImplicitUsings>
    <Nullable>enable</Nullable>
    <UserSecretsId>2aa31fdb-0078-4b71-b953-d23432af8a36</UserSecretsId>
  </PropertyGroup>

  <ItemGroup>
    <ProjectReference Include="..\AspireSample.ApiService\AspireSample.ApiService.csproj" />
    <ProjectReference Include="..\AspireSample.Web\AspireSample.Web.csproj" />
  </ItemGroup>

  <ItemGroup>
    <PackageReference Include="Aspire.Hosting.AppHost" Version="13.0.0" />
    <PackageReference Include="Aspire.Hosting.Redis" Version="13.0.0" />
  </ItemGroup>

</Project>
For more information, see Aspire orchestration overview and Aspire SDK.
Consider the AppHost.cs file of the AspireSample.AppHost project:
var builder = DistributedApplication.CreateBuilder(args);

var cache = builder.AddRedis("cache");

var apiService = builder.AddProject<Projects.AspireSample_ApiService>("apiservice");

builder.AddProject<Projects.AspireSample_Web>("webfrontend")
    .WithExternalHttpEndpoints()
    .WithReference(cache)
    .WaitFor(cache)
    .WithReference(apiService)
    .WaitFor(apiService);

builder.Build().Run();
If you've used either the .NET Generic Host or the ASP.NET Core Web Host before, the AppHost programming model and builder pattern should be familiar to you. The preceding code:
- Creates an IDistributedApplicationBuilder instance from calling DistributedApplication.CreateBuilder().
- Calls AddRedis with the name
"cache"to add a Redis server to the app, assigning the returned value to a variable namedcache, which is of typeIResourceBuilder<RedisResource>. - Calls AddProject given the generic-type parameter with the project's details, adding the
AspireSample.ApiServiceproject to the application model. This is one of the fundamental building blocks of Aspire, and it's used to configure service discovery and communication between the projects in your app. The name argument"apiservice"is used to identify the project in the application model, and used later by projects that want to communicate with it. - Calls
AddProjectagain, this time adding theAspireSample.Webproject to the application model. It also chains multiple calls to WithReference passing thecacheandapiServicevariables. TheWithReferenceAPI is another fundamental API of Aspire, which injects either service discovery information or connection string configuration into the project being added to the application model. Additionally, calls to theWaitForAPI are used to ensure that thecacheandapiServiceresources are available before theAspireSample.Webproject is started. For more information, see Aspire orchestration: Waiting for resources.
Finally, the app is built and run. The DistributedApplication.Run() method is responsible for starting the app and all of its dependencies. For more information, see Aspire orchestration overview.
Tip
The call to AddRedis creates a local Redis container for the app to use. If you'd rather simply point to an existing Redis instance, you can use the AddConnectionString method to reference an existing connection string. For more information, see Reference existing resources.
Aspire service defaults project
The *.ServiceDefaults project is a shared project that's used to manage configurations that are reused across the projects in your solution. This project ensures that all dependent services share the same resilience, service discovery, and OpenTelemetry configuration. A shared Aspire project file contains the IsAspireSharedProject property set as true:
<Project Sdk="Microsoft.NET.Sdk">

  <PropertyGroup>
    <TargetFramework>net9.0</TargetFramework>
    <ImplicitUsings>enable</ImplicitUsings>
    <Nullable>enable</Nullable>
    <IsAspireSharedProject>true</IsAspireSharedProject>
  </PropertyGroup>

  <ItemGroup>
    <FrameworkReference Include="Microsoft.AspNetCore.App" />

    <PackageReference Include="Microsoft.Extensions.Http.Resilience" Version="10.0.0" />
    <PackageReference Include="Microsoft.Extensions.ServiceDiscovery" Version="10.0.0" />
    <PackageReference Include="OpenTelemetry.Exporter.OpenTelemetryProtocol" Version="1.14.0" />
    <PackageReference Include="OpenTelemetry.Extensions.Hosting" Version="1.14.0" />
    <PackageReference Include="OpenTelemetry.Instrumentation.AspNetCore" Version="1.14.0" />
    <PackageReference Include="OpenTelemetry.Instrumentation.Http" Version="1.14.0" />
    <PackageReference Include="OpenTelemetry.Instrumentation.Runtime" Version="1.14.0" />
  </ItemGroup>

</Project>
The service defaults project exposes an extension method on the IHostApplicationBuilder type, named AddServiceDefaults. The service defaults project from the template is a starting point, and you can customize it to meet your needs. For more information, see Aspire service defaults.
Orchestrate service communication
Aspire provides orchestration features to assist with configuring connections and communication between the different parts of your app. The AspireSample.AppHost project added the AspireSample.ApiService and AspireSample.Web projects to the application model. It also declared their names as "webfrontend" for Blazor front end, "apiservice" for the API project reference. Additionally, a Redis server resource labeled "cache" was added. These names are used to configure service discovery and communication between the projects in your app.
The front end app defines a typed HttpClient that's used to communicate with the API project.
namespace AspireSample.Web;

public class WeatherApiClient(HttpClient httpClient)
{
    public async Task<WeatherForecast[]> GetWeatherAsync(
        int maxItems = 10,
        CancellationToken cancellationToken = default)
    {
        List<WeatherForecast>? forecasts = null;

        await foreach (var forecast in
            httpClient.GetFromJsonAsAsyncEnumerable<WeatherForecast>(
                "/weatherforecast", cancellationToken))
        {
            if (forecasts?.Count >= maxItems)
            {
                break;
            }
            if (forecast is not null)
            {
                forecasts ??= [];
                forecasts.Add(forecast);
            }
        }

        return forecasts?.ToArray() ?? [];
    }
}

public record WeatherForecast(DateOnly Date, int TemperatureC, string? Summary)
{
    public int TemperatureF => 32 + (int)(TemperatureC / 0.5556);
}
The HttpClient is configured to use service discovery. Consider the following code from the Program.cs file of the AspireSample.Web project:
using AspireSample.Web;
using AspireSample.Web.Components;

var builder = WebApplication.CreateBuilder(args);

// Add service defaults & Aspire client integrations.
builder.AddServiceDefaults();
builder.AddRedisOutputCache("cache");

// Add services to the container.
builder.Services.AddRazorComponents()
    .AddInteractiveServerComponents();

builder.Services.AddHttpClient<WeatherApiClient>(client =>
    {
        // This URL uses "https+http://" to indicate HTTPS is preferred over HTTP.
        // Learn more about service discovery scheme resolution at https://aka.ms/dotnet/sdschemes.
        client.BaseAddress = new("https+http://apiservice");
    });

var app = builder.Build();

if (!app.Environment.IsDevelopment())
{
    app.UseExceptionHandler("/Error", createScopeForErrors: true);
    // The default HSTS value is 30 days. You may want to change this for production scenarios, see https://aka.ms/aspnetcore-hsts.
    app.UseHsts();
}

app.UseHttpsRedirection();

app.UseAntiforgery();

app.UseOutputCache();

app.MapStaticAssets();

app.MapRazorComponents<App>()
    .AddInteractiveServerRenderMode();

app.MapDefaultEndpoints();

app.Run();
The preceding code:
- Calls
AddServiceDefaults, configuring the shared defaults for the app. - Calls AddRedisOutputCache with the same
connectionNamethat was used when adding the Redis container"cache"to the application model. This configures the app to use Redis for output caching. - Calls AddHttpClient and configures the HttpClient.BaseAddress to be
"https+http://apiservice". This is the name that was used when adding the API project to the application model, and with service discovery configured, it automatically resolves to the correct address to the API project.
For more information, see Make HTTP requests with the HttpClient class.
Aspire CLI
The Aspire CLI (aspire command) is a cross-platform tool that provides command-line functionality to create, manage, run, and publish polyglot Aspire projects. Use the Aspire CLI to streamline development workflows and coordinate services for distributed applications.
For more information, see Aspire CLI Overview and Install Aspire CLI.
See also
- Aspire integrations overview
- Service discovery in Aspire
- Aspire service defaults
- Health checks in Aspire
- Aspire telemetry
- Troubleshoot untrusted localhost certificate in Aspire
Next steps
Collaborate with us on GitHub
The source for this content can be found on GitHub, where you can also create and review issues and pull requests. For more information, see our contributor guide.