Σημείωση
Η πρόσβαση σε αυτή τη σελίδα απαιτεί εξουσιοδότηση. Μπορείτε να δοκιμάσετε να συνδεθείτε ή να αλλάξετε καταλόγους.
Η πρόσβαση σε αυτή τη σελίδα απαιτεί εξουσιοδότηση. Μπορείτε να δοκιμάσετε να αλλάξετε καταλόγους.
APPLIES TO: All API Management tiers
You can import AI model endpoints deployed in Azure OpenAI in Foundry Models to your API Management instance as a REST API. Use AI gateway policies and other capabilities in API Management to simplify integration, improve observability, and enhance control over the model endpoints.
This article shows two options to import an Azure OpenAI API into an Azure API Management instance as a REST API:
Import an Azure OpenAI API directly from a deployment in Microsoft Foundry (recommended)
Download and edit the OpenAPI specification for Azure OpenAI and add it to API Management as an OpenAPI API.
Learn more about managing LLM APIs in API Management:
AI gateway capabilities in Azure API Management
Note
API Management policies such as azure-openai-token-limit and azure-openai-emit-token-metric support certain API endpoints exposed through specific Azure OpenAI models. For more information, see Supported Azure OpenAI models.
Prerequisites
An existing API Management instance. Create one if you haven't already.
(For import from Microsoft Foundry) A Microsoft Foundry project with an Azure OpenAI model deployed. For more information about model deployment in Azure OpenAI, see the resource deployment guide.
Make a note of the ID (name) of the deployment. You need it when you test the imported API in API Management.
Permissions to grant access to the Azure OpenAI resource from the API Management instance.
Option 1. Import OpenAI API from Microsoft Foundry
You can import an Azure OpenAI model deployment directly from Microsoft Foundry to API Management. For details, see Import a Microsoft Foundry API.
When you import the API:
- Specify the Microsoft Foundry service that hosts the Azure OpenAI model deployment.
- Specify the Azure OpenAI client compatibility option. This option configures the API Management API with a
/openaiendpoint.
Option 2. Add an OpenAPI specification to API Management
Alternatively, manually download the OpenAPI specification for the Azure OpenAI REST API and add it to API Management as an OpenAPI API.
Download the OpenAPI specification
Download the OpenAPI specification for the Azure OpenAI REST API, such as the 2024-10-21 GA version.
In a text editor, open the specification file that you downloaded.
In the
serverselement in the specification, substitute the name of your Azure OpenAI endpoint in the placeholder values ofurlanddefaultendpoint. For example, if your Azure OpenAI endpoint iscontoso.openai.azure.com, update theserverselement with the following values:- url:
https://contoso.openai.azure.com/openai - default endpoint:
contoso.openai.azure.com
[...] "servers": [ { "url": "https://contoso.openai.azure.com/openai", "variables": { "endpoint": { "default": "contoso.openai.azure.com" } } } ], [...]- url:
Make a note of the value of the API
versionin the specification. You need it to test the API. Example:2024-10-21.
Add OpenAPI specification to API Management
- In the Azure portal, go to your API Management instance.
- In the left menu, select APIs > + Add API.
- Under Define a new API, select OpenAPI. Enter a Display name and Name for the API.
- Enter an API URL suffix ending in
/openaito access the Azure OpenAI API endpoints in your API Management instance. For example:my-openai-api/openai. - Select Create.
API Management imports the API and displays operations from the OpenAPI specification.
Configure authentication to Azure OpenAI API
To authenticate to the Azure OpenAI API, provide an API key or use a managed identity. If you imported the Azure OpenAI API directly from Microsoft Foundry, authentication by using the API Management instance's managed identity is automatically configured.
If you added the Azure OpenAI API from its OpenAPI specification, you need to configure authentication. For more information about configuring authentication by using API Management policies, see Authenticate and authorize to LLM APIs.
Test the Azure OpenAI API
To make sure your Azure OpenAI API works as expected, test it in the API Management test console. You need to provide a model deployment ID (name) that you configured in the Microsoft Foundry project resource and the API version to test the API.
Select the API you created in the previous step.
Select the Test tab.
Select an operation that's compatible with the model you deployed in the Azure OpenAI resource. The page displays fields for parameters and headers.
In Template parameters, enter the following values:
deployment-id- the ID of an Azure OpenAI model deployment in Microsoft Foundryapi-version- a valid Azure OpenAI API version, such as the API version you selected when you imported the API.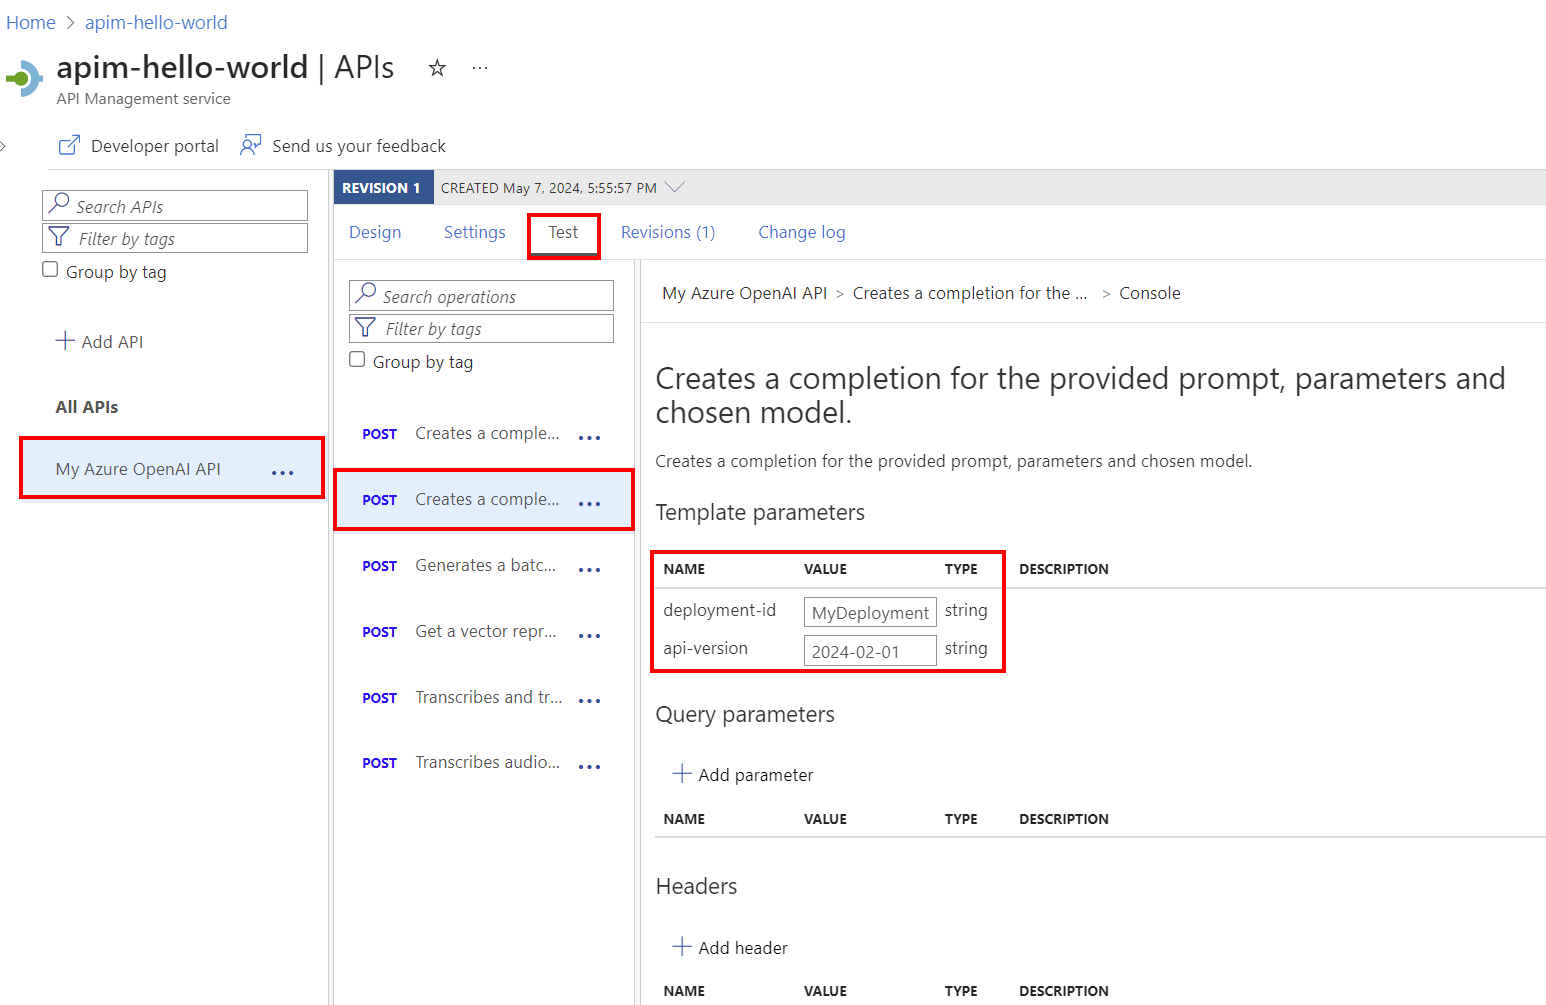
Enter other parameters and headers as needed. Depending on the operation and model, you might need to configure or update a Request body. For example, here's a basic request body for a chat completions operation:
{
  "model": "any",
  "messages": [
    {
      "role": "user",
      "content": "Help me plan a vacation trip to Paris."
    }
  ],
  "max_tokens": 100
}
Note
In the test console, API Management automatically adds an Ocp-Apim-Subscription-Key header and sets the subscription key for the built-in all-access subscription. This key provides access to every API in the API Management instance. To optionally display the Ocp-Apim-Subscription-Key header, select the "eye" icon next to the HTTP Request.
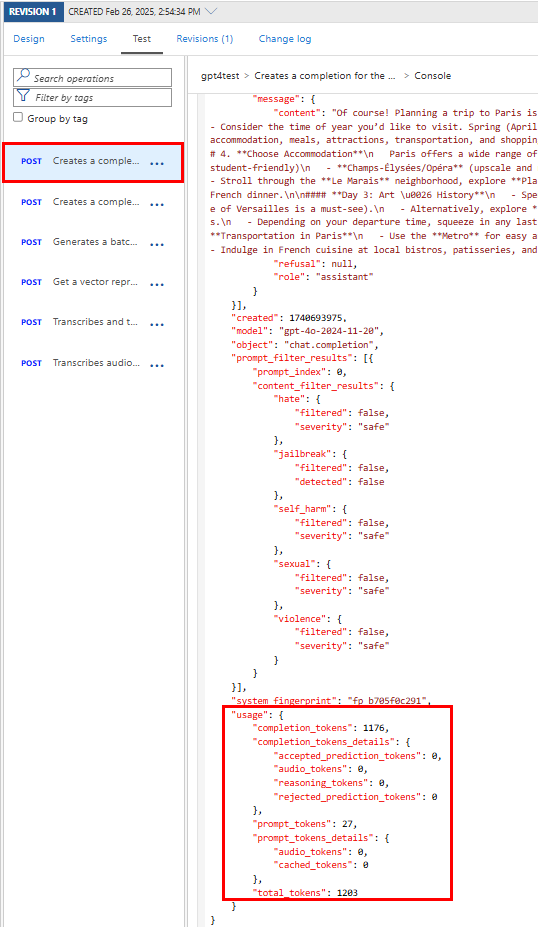
Select Send.
When the test succeeds, the backend responds with a successful HTTP response code and some data. The response includes token usage data to help you monitor and manage your Azure OpenAI API token consumption.

Related content
- API import limitations
- Import an OpenAPI specification
- Import a SOAP API
- Import a SOAP API and convert it to REST
- Import an App Service API
- Import a container app API
- Import a WebSocket API
- Import a GraphQL API
- Import a GraphQL schema and set up field resolvers
- Import a function app API
- Import a logic app API
- Import a Service Fabric service
- Import an Azure AI Foundry API
- Import an Azure OpenAI API
- Import an LLM API
- Import an OData API
- Export a REST API as an MCP server
- Expose an existing MCP server
- Import an A2A agent API
- Import SAP OData metadata
- Import a gRPC API
- Edit an API