Quickstart: Deploy RESTful API application to Azure Spring Apps
Note
The first 50 vCPU hours and 100 GB hours of memory are free each month. For more information, see Price Reduction - Azure Spring Apps does more, costs less! on the Apps on Azure Blog.
Note
Azure Spring Apps is the new name for the Azure Spring Cloud service. Although the service has a new name, you'll see the old name in some places for a while as we work to update assets such as screenshots, videos, and diagrams.
This article describes how to deploy a RESTful API application protected by Microsoft Entra ID to Azure Spring Apps. The sample project is a simplified version based on the Simple Todo web application, which only provides the backend service and uses Microsoft Entra ID to protect the RESTful APIs.
These RESTful APIs are protected by applying role-based access control (RBAC). Anonymous users can't access any data and aren't allowed to control access for different users. Anonymous users only have the following three permissions:
- Read: With this permission, a user can read the ToDo data.
- Write: With this permission, a user can add or update the ToDo data.
- Delete: With this permission, a user can delete the ToDo data.
After the deployment is successful, you can view and test the APIs through the Swagger UI.

The following diagram shows the architecture of the system:

This article describes the following options for creating resources and deploying them to Azure Spring Apps:
- The Azure portal + Maven plugin option provides a more conventional way to create resources and deploy applications step by step. This option is suitable for Spring developers using Azure cloud services for the first time.
- The Azure Developer CLI option is a more efficient way to automatically create resources and deploy applications through simple commands. The Azure Developer CLI uses a template to provision the Azure resources needed and to deploy the application code. This option is suitable for Spring developers who are familiar with Azure cloud services.
This article describes the following options for creating resources and deploying them to Azure Spring Apps:
- The Azure portal + Maven plugin option provides a more conventional way to create resources and deploy applications step by step. This option is suitable for Spring developers using Azure cloud services for the first time.
- The Azure CLI option uses a powerful command line tool to manage Azure resources. This option is suitable for Spring developers who are familiar with Azure cloud services.
1. Prerequisites
An Azure subscription. If you don't have an Azure subscription, create an Azure free account before you begin.
One of the following roles:
- Global Administrator or Privileged Role Administrator, for granting consent for apps requesting any permission, for any API.
- Cloud Application Administrator or Application Administrator, for granting consent for apps requesting any permission for any API, except Microsoft Graph app roles (application permissions).
- A custom directory role that includes the permission to grant permissions to applications, for the permissions required by the application.
For more information, see Grant tenant-wide admin consent to an application.
If you're deploying an Azure Spring Apps Enterprise plan instance for the first time in the target subscription, see the Requirements section of Enterprise plan in Azure Marketplace.
Git.
Java Development Kit (JDK), version 17.
A Microsoft Entra tenant. For instructions on creating one, see Quickstart: Create a new tenant in Microsoft Entra ID.
An Azure subscription, If you don't have an Azure subscription, create an Azure free account before you begin.
One of the following roles:
- Global Administrator or Privileged Role Administrator, for granting consent for apps requesting any permission, for any API.
- Cloud Application Administrator or Application Administrator, for granting consent for apps requesting any permission for any API, except Microsoft Graph app roles (application permissions).
- A custom directory role that includes the permission to grant permissions to applications, for the permissions required by the application.
For more information, see Grant tenant-wide admin consent to an application.
Git.
Java Development Kit (JDK), version 17.
A Microsoft Entra tenant. For instructions on creating one, see Quickstart: Create a new tenant in Microsoft Entra ID.
2. Prepare the Spring project
To deploy the RESTful API app, the first step is to prepare the Spring project to run locally.
Use the following steps to clone and run the app locally:
Use the following command to clone the sample project from GitHub:
git clone https://github.com/Azure-Samples/ASA-Samples-Restful-Application.gitIf you want to run the app locally, complete the steps in the Expose RESTful APIs and Update the application configuration sections first, and then use the following command to run the sample application with Maven:
cd ASA-Samples-Restful-Application
./mvnw spring-boot:run
3. Prepare the cloud environment
The main resources required to run this sample app are an Azure Spring Apps instance and an Azure Database for PostgreSQL instance. The following sections describe how to create these resources.
3.1. Sign in to the Azure portal
Go to the Azure portal and enter your credentials to sign in to the portal. The default view is your service dashboard.
3.2. Create an Azure Spring Apps instance
Use the following steps to create an Azure Spring Apps service instance:
Select Create a resource in the corner of the Azure portal.
Select Compute > Azure Spring Apps.
Fill out the Basics form with the following information:
Setting Suggested value Description Subscription Your subscription name. The Azure subscription that you want to use for your server. If you have multiple subscriptions, choose the subscription in which you'd like to be billed for the resource. Resource group myresourcegroup A new resource group name or an existing one from your subscription. Name myasa A unique name that identifies your Azure Spring Apps service. The name must be between 4 and 32 characters long and can contain only lowercase letters, numbers, and hyphens. The first character of the service name must be a letter and the last character must be either a letter or a number. Plan Enterprise The pricing plan that determines the resource and cost associated with your instance. Region The region closest to your users. The location that is closest to your users. Zone Redundant Unchecked The option to create your Azure Spring Apps service in an Azure availability zone. This feature isn't currently supported in all regions. Software IP plan Pay-as-You-Go The pricing plan that lets you pay as you go with Azure Spring Apps. Terms Selected The agreement checkbox associated with Marketplace offering. You're required to select this checkbox. Deploy sample project Unchecked The option to use the built-in sample application. Select Review and Create to review your selections. Then, select Create to provision the Azure Spring Apps instance.
On the toolbar, select the Notifications icon (a bell) to monitor the deployment process. After the deployment finishes, you can select Pin to dashboard, which creates a tile for this service on your Azure portal dashboard as a shortcut to the service's Overview page.
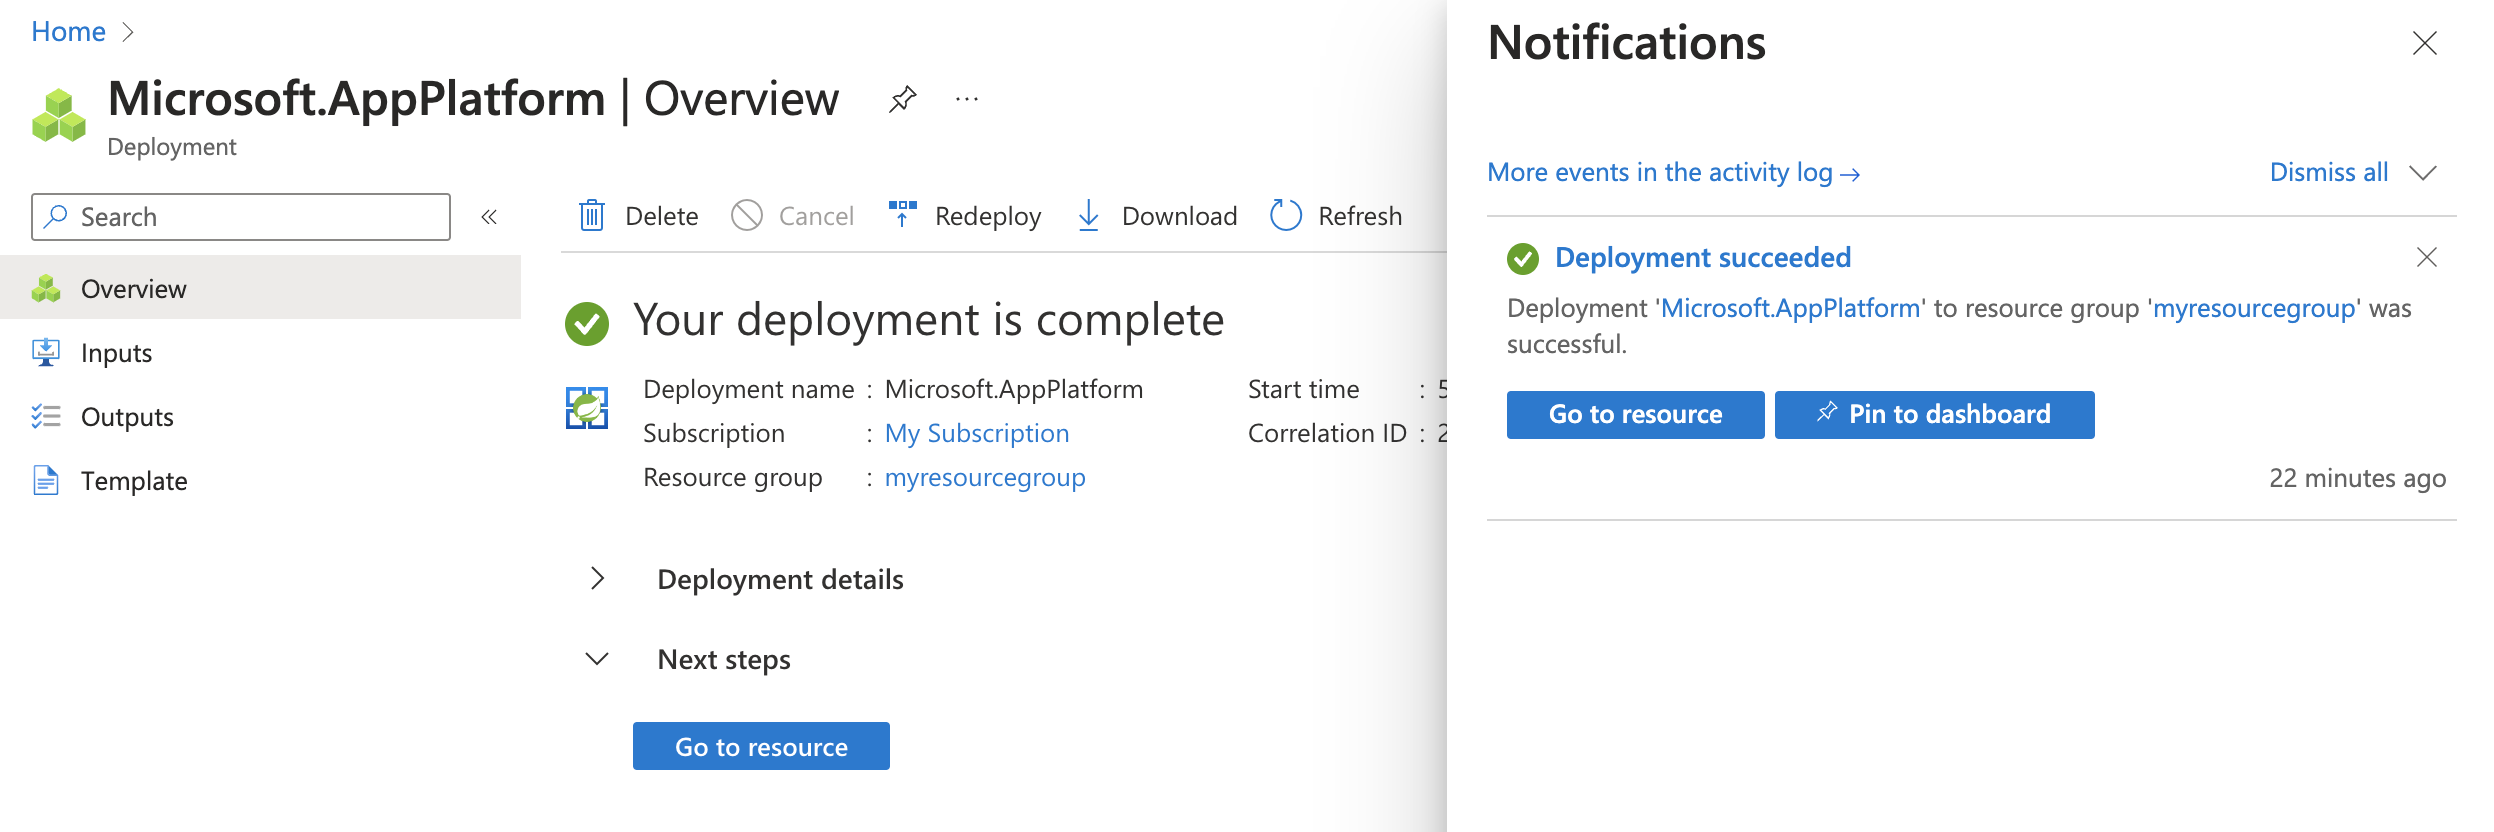
Select Go to resource to go to the Azure Spring Apps Overview page.

3.3. Prepare the PostgreSQL instance
Use the following steps to create an Azure Database for PostgreSQL server:
Go to the Azure portal and select Create a resource.
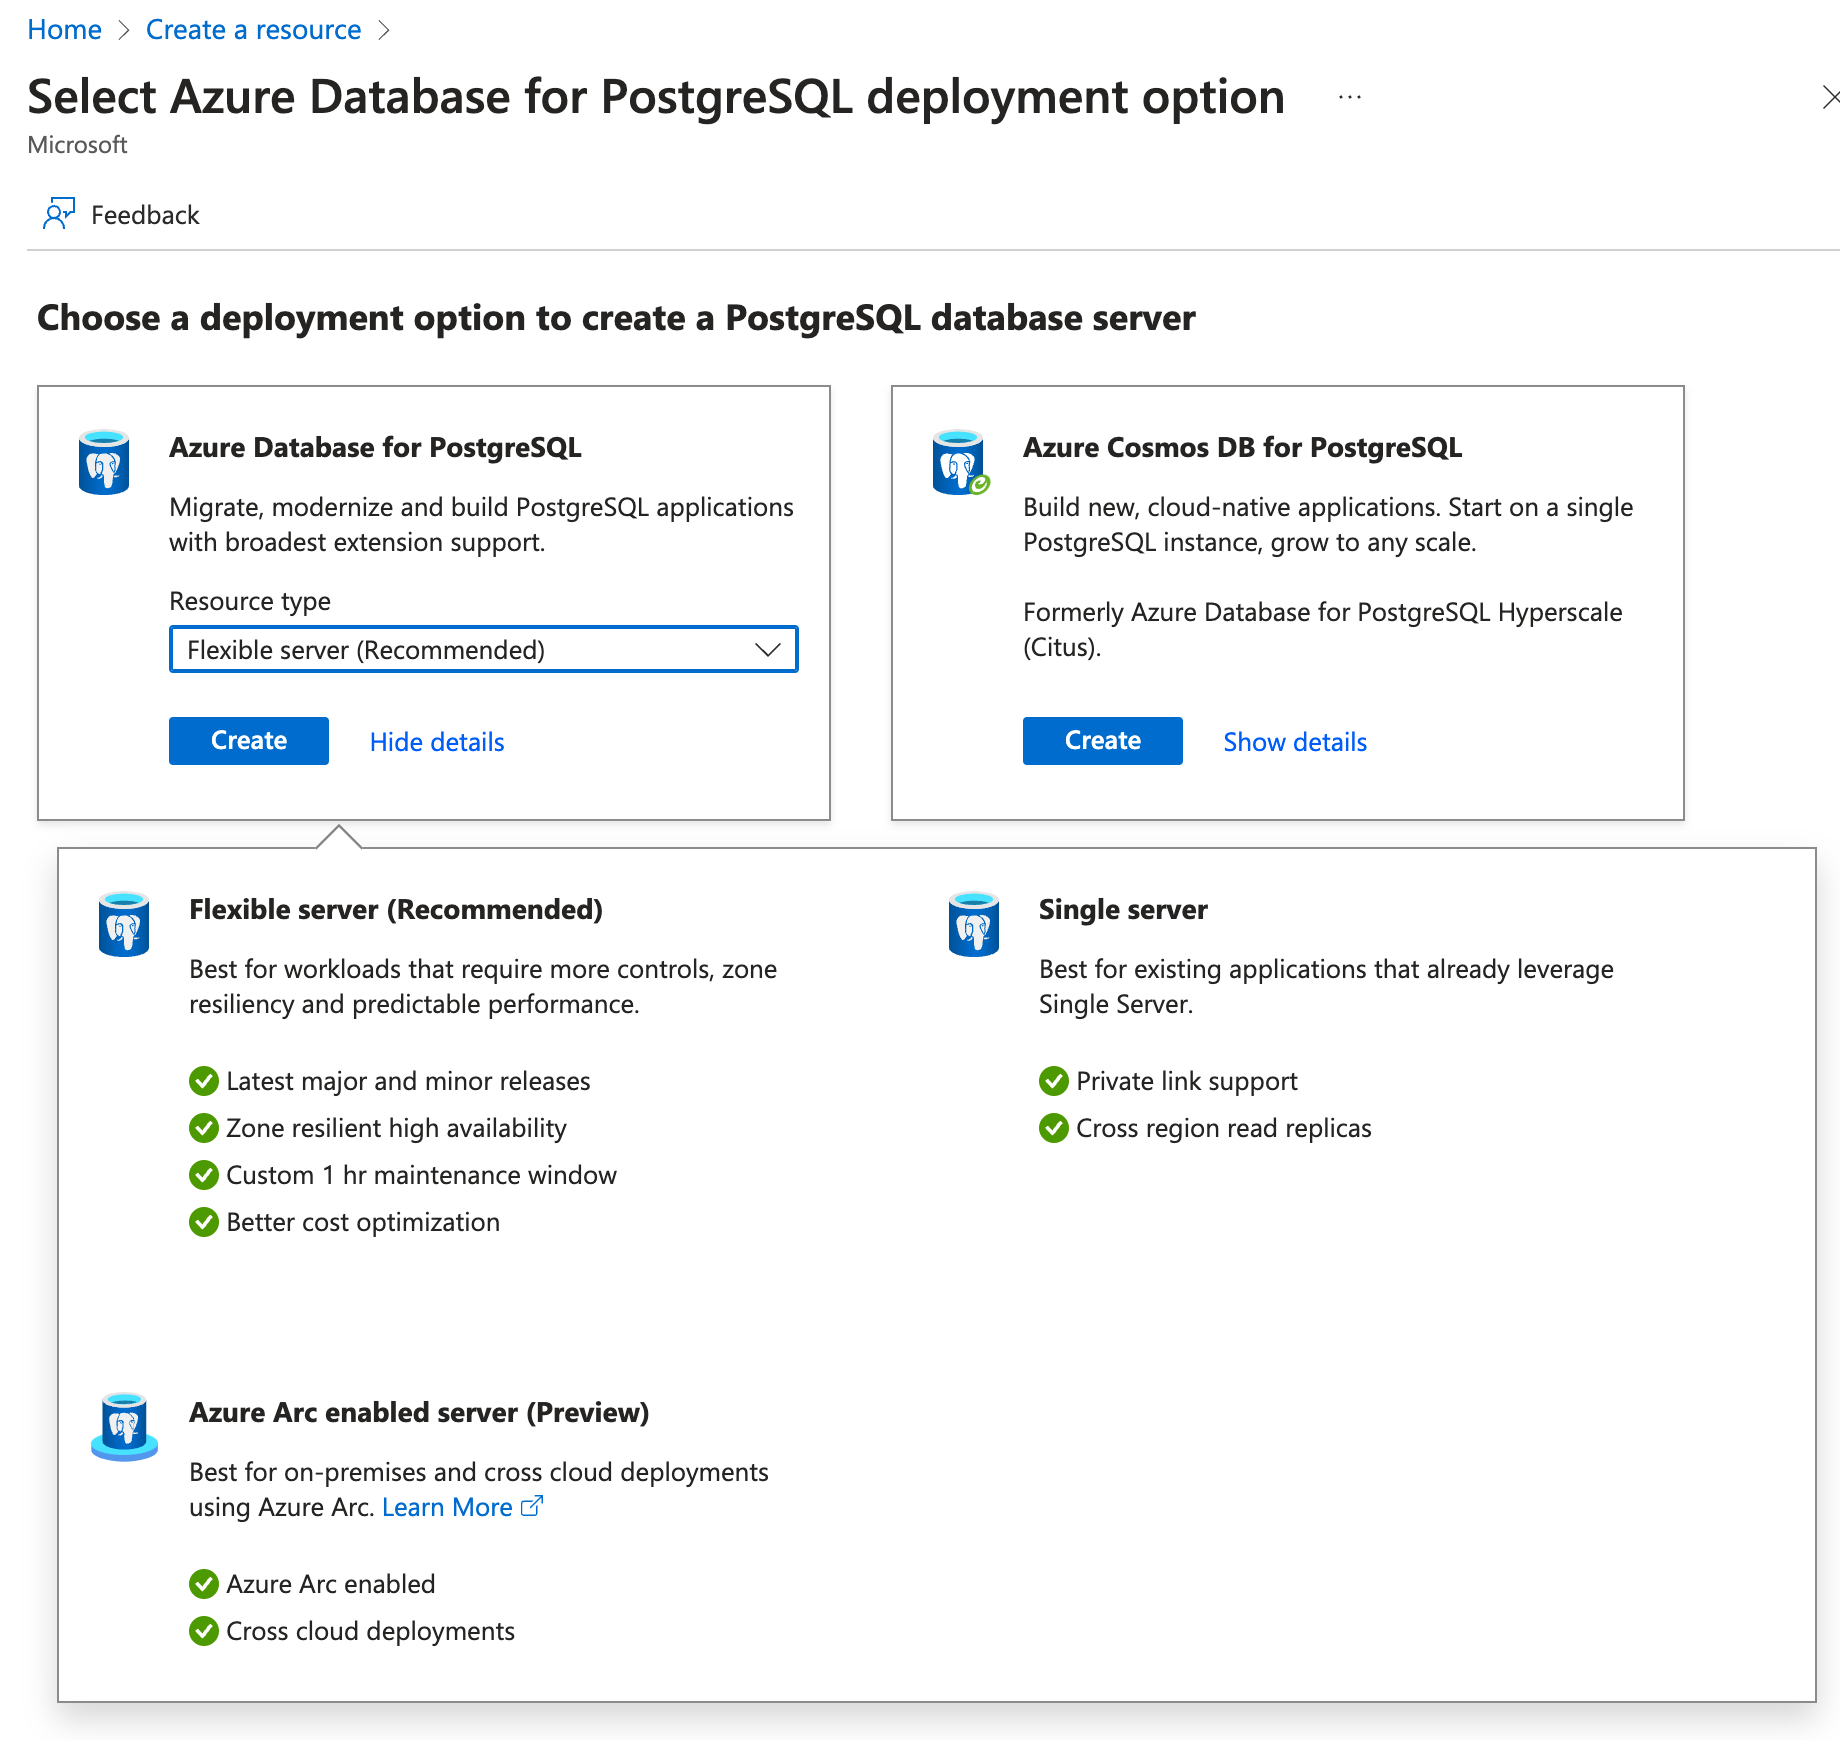
Select Databases > Azure Database for PostgreSQL.
Select the Flexible server deployment option.
Fill out the Basics tab with the following information:
- Server name: my-demo-pgsql
- Region: East US
- PostgreSQL version: 14
- Workload type: Development
- Enable high availability: unselected
- Authentication method: PostgreSQL authentication only
- Admin username: myadmin
- Password and Confirm password: Enter a password.
Use the following information to configure the Networking tab:
- Connectivity method: Public access (allowed IP addresses)
- Allow public access from any Azure service within Azure to this server: selected
Select Review + create to review your selections, and select Create to provision the server. This operation might take a few minutes.
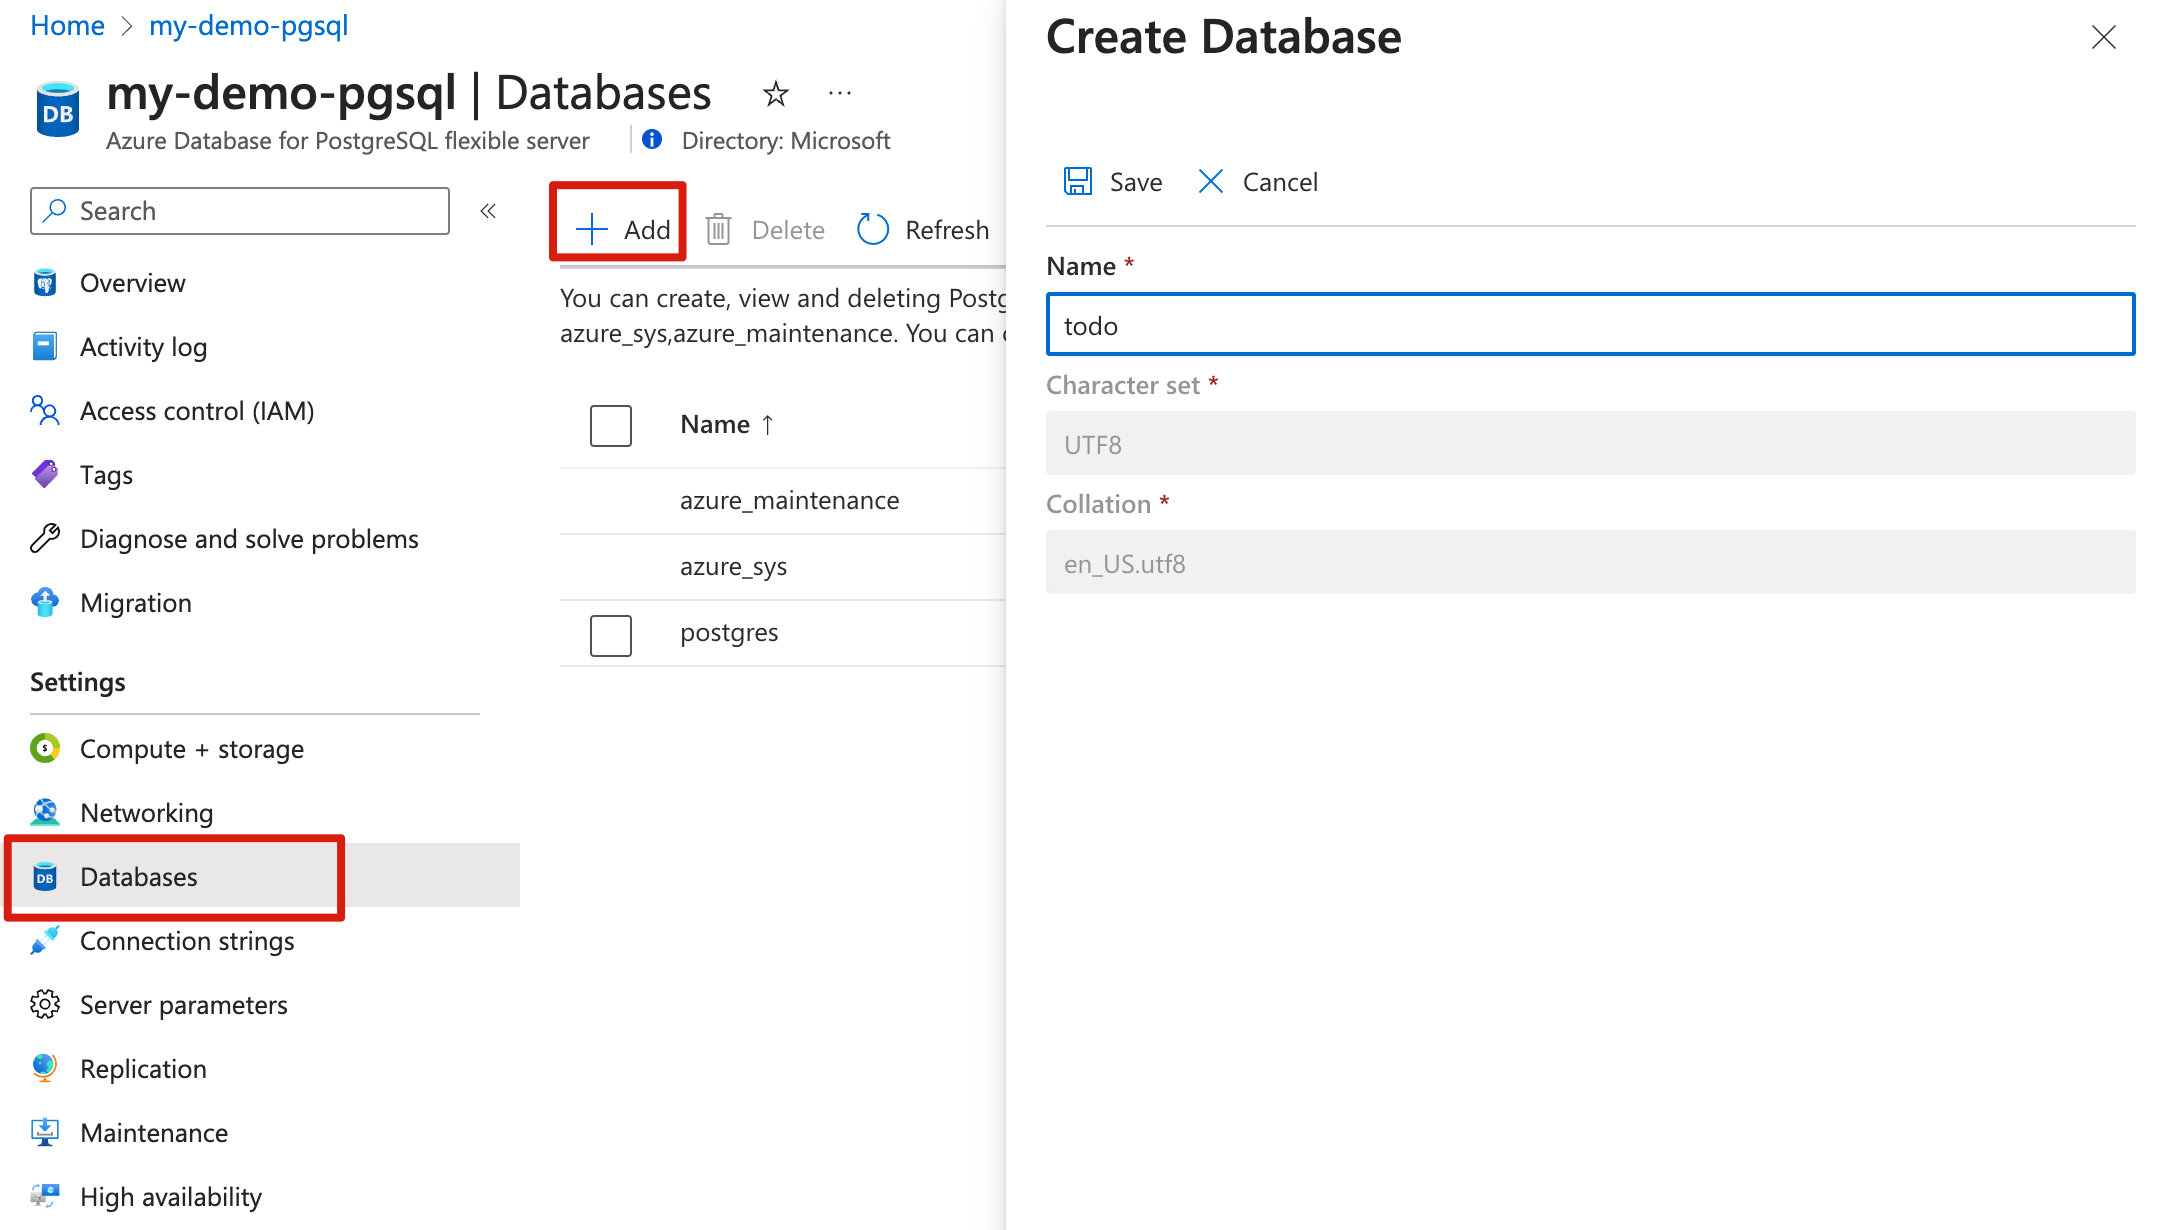
Go to your PostgreSQL server in the Azure portal. On the Overview page, look for the Server name value, and then record it for later use. You need it to configure the environment variables for the app in Azure Spring Apps.
Select Databases from the navigation menu to create a database - for example, todo.


3.4. Connect app instance to PostgreSQL instance
Use the following steps to connect your service instances:
Go to your Azure Spring Apps instance in the Azure portal.
From the navigation menu, open Apps, and then select Create App.
On the Create App page, fill in the app name simple-todo-api, and then select Java artifacts as the deployment type.
Select Create to finish the app creation and then select the app to view the details.
Go to the app you created in the Azure portal. On the Overview page, select Assign endpoint to expose the public endpoint for the app. Save the URL for accessing the app after deployment.
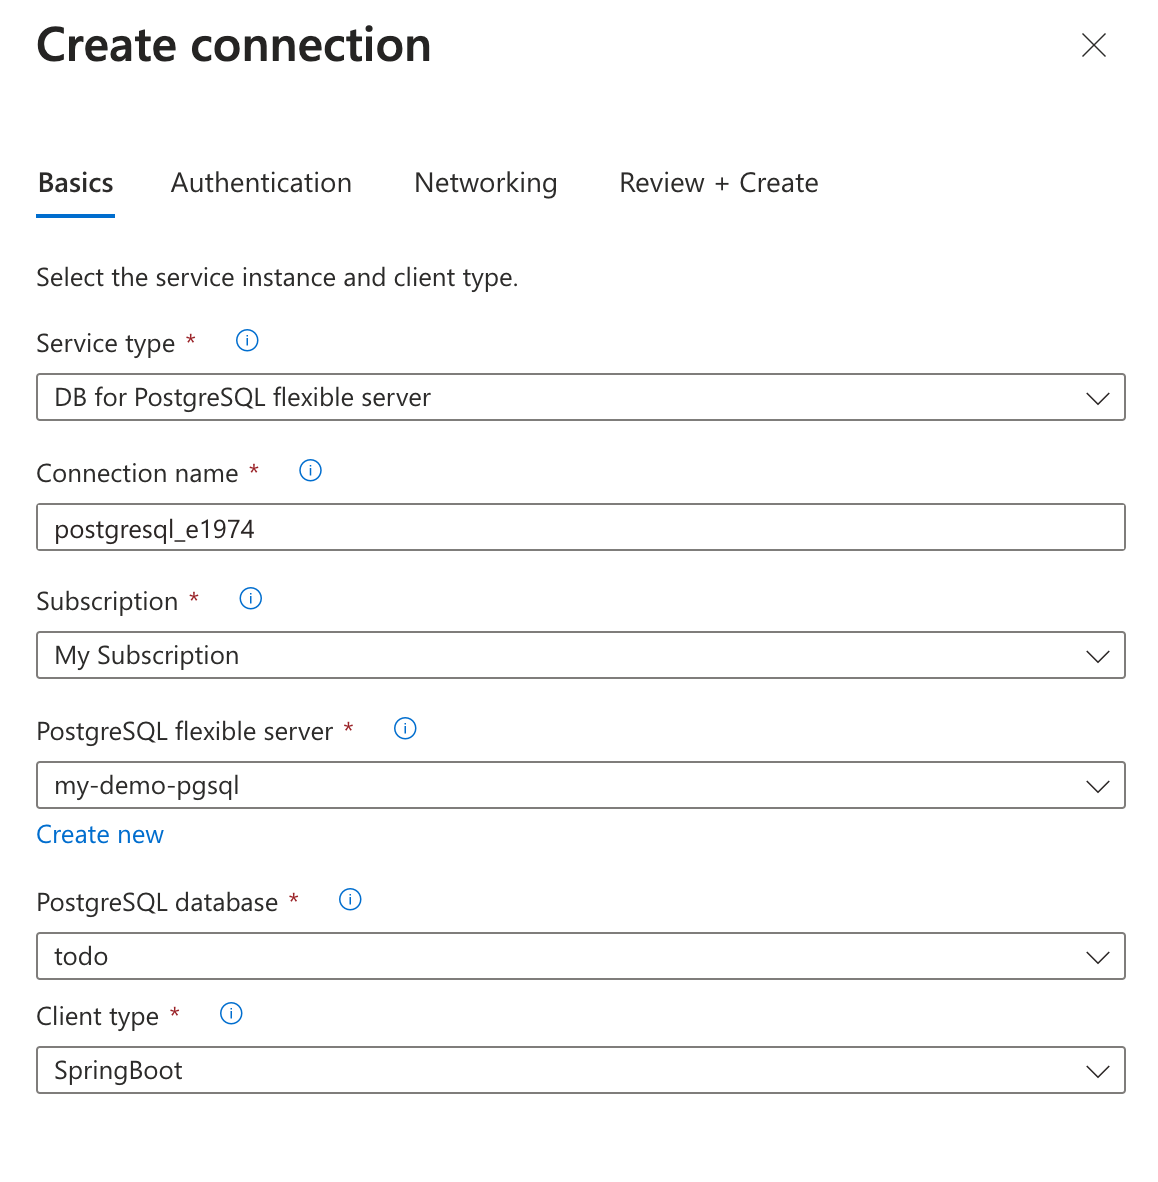
Select Service Connector from the navigation pane, then select Create to create a new service connection.
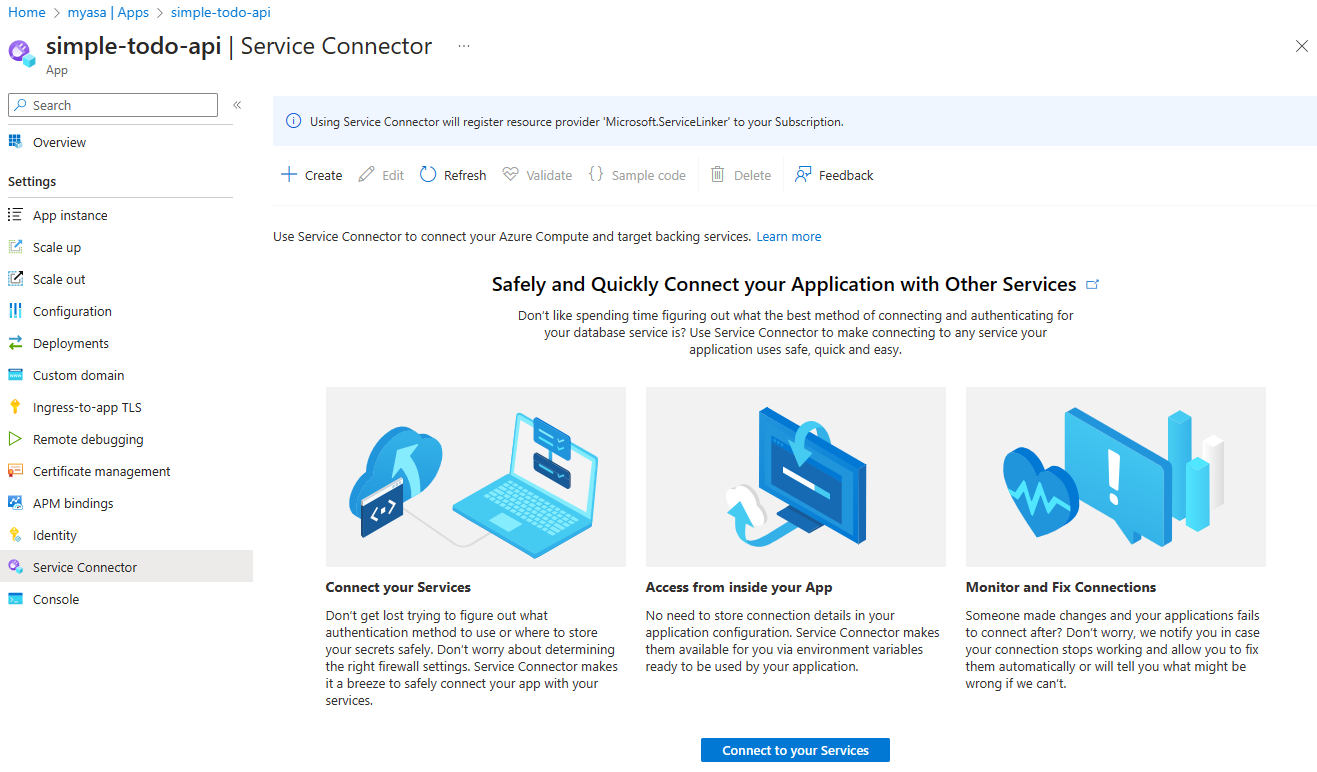
Fill out the Basics tab with the following information:
- Service type: DB for PostgreSQL flexible server
- Connection name: An automatically generated name is populated, which can also be modified.
- Subscription: Select your subscription.
- PostgreSQL flexible server: my-demo-pgsql
- PostgreSQL database: Select the database you created.
- Client type: SpringBoot
Configure the Next: Authentication tab with the following information:
- Select the authentication type you'd like to use between your compute service and target service.: Select Connection string.
- Continue with...: Select Database credentials
- Username: myadmin
- Password: Enter your password.
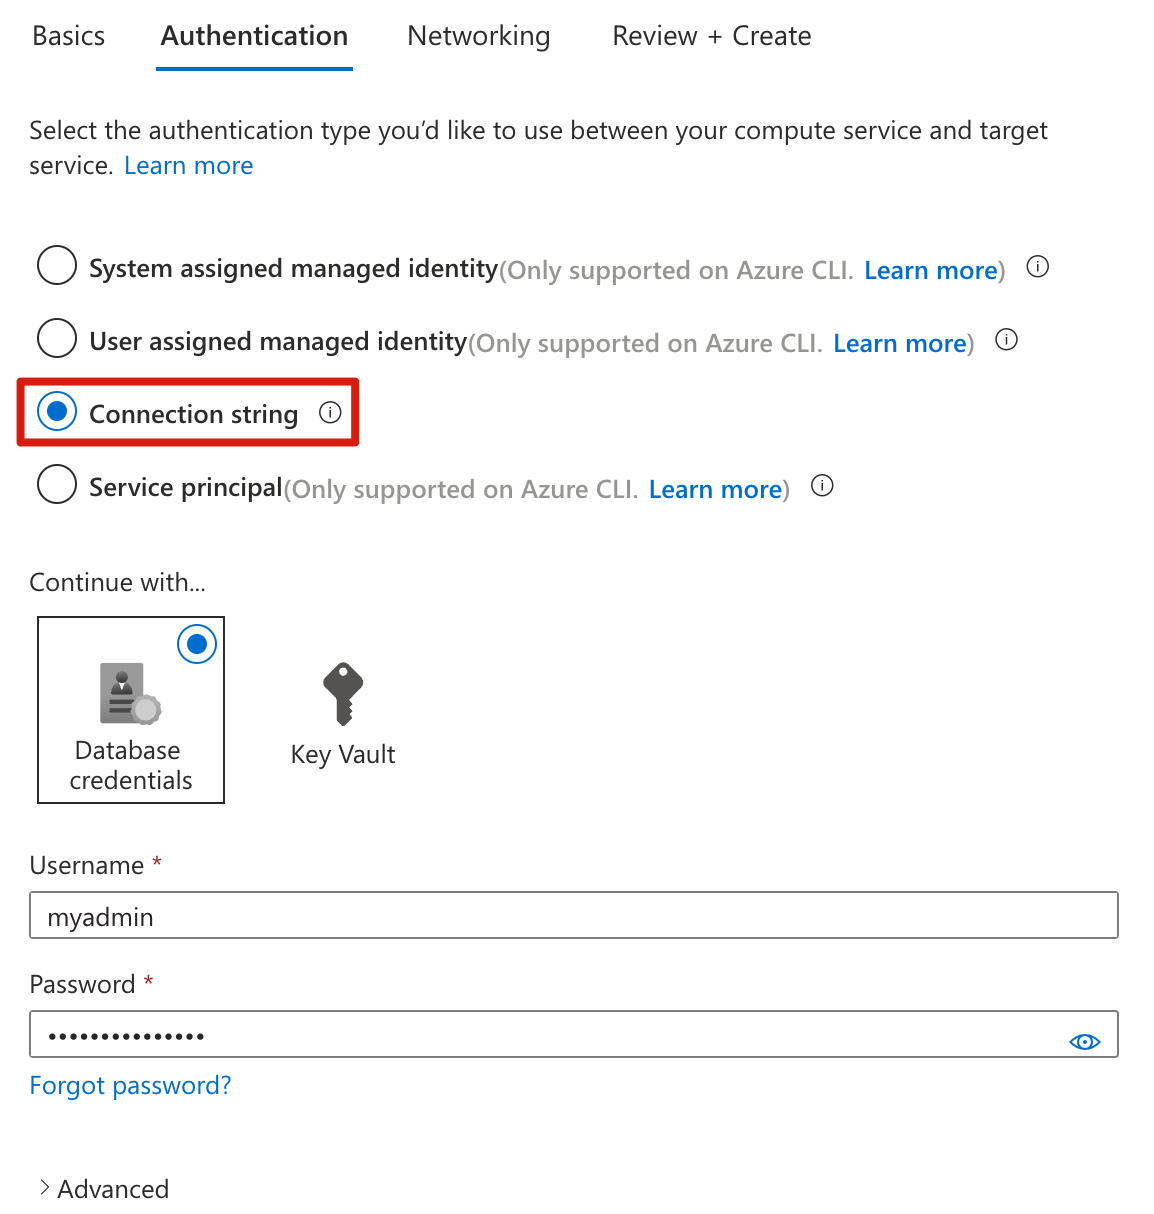
Select Next: Networking. Use the default option Configure firewall rules to enable access to target service.
Select Next: Review and Create to review your selections, then select Create to create the connection.


3.5. Expose RESTful APIs
Use the following steps to expose your RESTful APIs in Microsoft Entra ID:
Sign in to the Azure portal.
If you have access to multiple tenants, use the Directory + subscription filter (
 ) to select the tenant in which you want to register an application.
Search for and select Microsoft Entra ID.
Under Manage, select App registrations > New registration.
Enter a name for your application in the Name field - for example, Todo. Users of your app might see this name, and you can change it later.
For Supported account types, select Accounts in any organizational directory (Any Microsoft Entra directory - Multitenant) and personal Microsoft accounts.
Select Register to create the application.
On the app Overview page, look for the Application (client) ID value, and then record it for later use. You need it to configure the YAML configuration file for this project.
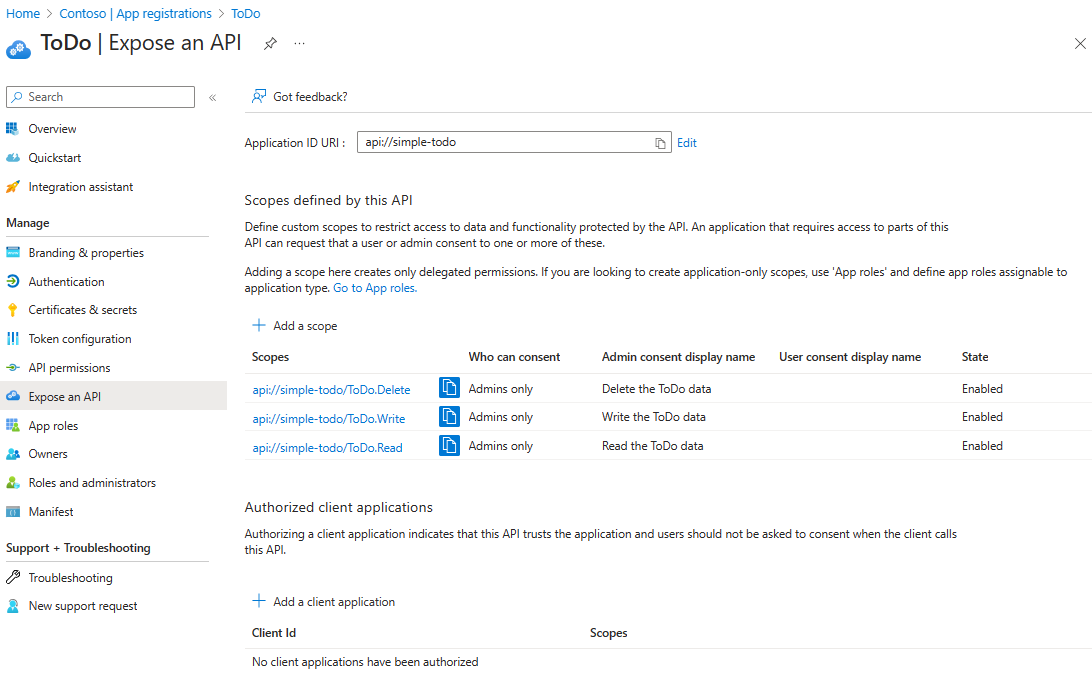
Under Manage, select Expose an API, find the Application ID URI at the beginning of the page, and then select Add.
On the Edit application ID URI page, accept the proposed Application ID URI (
api://{client ID}) or use a meaningful name instead of the client ID, such asapi://simple-todo, and then select Save.Under Manage, select Expose an API > Add a scope, and then enter the following information:
- For Scope name, enter ToDo.Read.
- For Who can consent, select Admins only.
- For Admin consent display name, enter Read the ToDo data.
- For Admin consent description, enter Allows authenticated users to read the ToDo data..
- For State, keep it enabled.
- Select Add scope.
Repeat the previous steps to add the other two scopes: ToDo.Write and ToDo.Delete.

3.6. Update the application configuration
Use the following steps to update the YAML file to use your Microsoft Entra registered application information to establish a relationship with the RESTful API application:
Locate src/main/resources/application.yml file for the
simple-todo-apiapp. Update the configuration in thespring.cloud.azure.active-directorysection to match the following example. Be sure to replace the placeholders with the values you created previously.spring: cloud: azure: active-directory: profile: tenant-id: <tenant> credential: client-id: <your-application-ID-of-ToDo> app-id-uri: <your-application-ID-URI-of-ToDo>Note
In v1.0 tokens, the configuration requires the client ID of the API, while in v2.0 tokens, you can use the client ID or the application ID URI in the request. You can configure both to properly complete the audience validation.
The values allowed for
tenant-idare:common,organizations,consumers, or the tenant ID. For more information about these values, see the Used the wrong endpoint (personal and organization accounts) section of Error AADSTS50020 - User account from identity provider does not exist in tenant. For information on converting your single-tenant app, see Convert single-tenant app to multitenant on Microsoft Entra ID.Use the following command to rebuild the sample project:
./mvnw clean package
4. Deploy the app to Azure Spring Apps
You can now deploy the app to Azure Spring Apps.
Use the following steps to deploy using the Maven plugin for Azure Spring Apps:
Navigate to the complete directory, and then run the following command to configure the app in Azure Spring Apps:
./mvnw com.microsoft.azure:azure-spring-apps-maven-plugin:1.19.0:configThe following list describes the command interactions:
- OAuth2 login: You need to authorize the sign in to Azure based on the OAuth2 protocol.
- Select subscription: Select the subscription list number of the Azure Spring Apps instance you created, which defaults to the first subscription in the list. If you use the default number, press Enter directly.
- Use existing Azure Spring Apps in Azure: Press y to use the existing Azure Spring Apps instance.
- Select Azure Spring Apps for deployment: Select the number of the Azure Spring Apps instance you created. If you use the default number, press Enter directly.
- Use existing app in Azure Spring Apps <your-instance-name>: Press y to use the app created.
- Confirm to save all the above configurations: Press y. If you press n, the configuration isn't saved in the POM files.
Use the following command to deploy the app:
./mvnw azure-spring-apps:deployThe following list describes the command interaction:
- OAuth2 login: You need to authorize the sign in to Azure based on the OAuth2 protocol.
After the command is executed, you can see from the following log messages that the deployment was successful:
[INFO] Deployment Status: Running
[INFO]   InstanceName:simple-todo-api-default-15-xxxxxxxxx-xxxxx  Status:Running Reason:null       DiscoverStatus:N/A
[INFO] Getting public url of app(simple-todo-api)...
[INFO] Application url: https://<your-Azure-Spring-Apps-instance-name>-simple-todo-api.azuremicroservices.io
5. Validate the app
You can now access the RESTful API to see if it works.
5.1. Request an access token
The RESTful APIs act as a resource server, which is protected by Microsoft Entra ID. Before acquiring an access token, you must register another application in Microsoft Entra ID and grant permissions to the client application, which is named ToDoWeb.
Register the client application
Use the following steps to register an application in Microsoft Entra ID, which is used to add the permissions for the ToDo app:
Sign in to the Azure portal.
If you have access to multiple tenants, use the Directory + subscription filter (
) to select the tenant in which you want to register an application.Search for and select Microsoft Entra ID.
Under Manage, select App registrations > New registration.
Enter a name for your application in the Name field - for example, ToDoWeb. Users of your app might see this name, and you can change it later.
For Supported account types, use the default value Accounts in this organizational directory only.
Select Register to create the application.
On the app Overview page, look for the Application (client) ID value, and then record it for later use. You need it to acquire an access token.
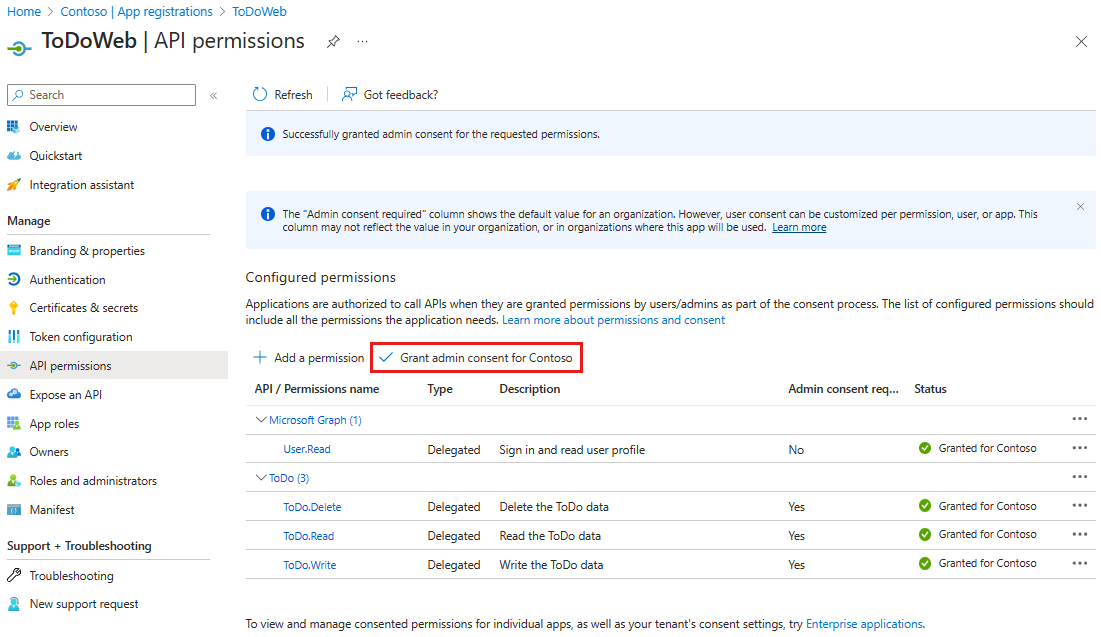
Select API permissions > Add a permission > My APIs. Select the
ToDoapplication that you registered earlier, and then select the ToDo.Read, ToDo.Write, and ToDo.Delete permissions. Select Add permissions.Select Grant admin consent for <your-tenant-name> to grant admin consent for the permissions you added.

Add user to access the RESTful APIs
Use the following steps to create a member user in your Microsoft Entra tenant. Then, the user can manage the data of the ToDo application through RESTful APIs.
Under Manage, select Users > New user > Create new user.
On the Create new user page, enter the following information:
- User principal name: Enter a name for the user.
- Display name: Enter a display name for the user.
- Password: Copy the autogenerated password provided in the Password box.
Note
New users must complete the first sign-in authentication and update their passwords, otherwise, you receive an
AADSTS50055: The password is expirederror when you get the access token.When a new user logs in, they receive an Action Required prompt. They can choose Ask later to skip the validation.
Select Review + create to review your selections. Select Create to create the user.
Update the OAuth2 configuration for Swagger UI authorization
Use the following steps to update the OAuth2 configuration for Swagger UI authorization. Then, you can authorize users to acquire access tokens through the ToDoWeb app.
Open your Microsoft Entra ID tenant in the Azure portal, and go to the registered
ToDoWebapp.Under Manage, select Authentication, select Add a platform, and then select Single-page application.
Use the format
<your-app-exposed-application-URL-or-endpoint>/swagger-ui/oauth2-redirect.htmlas the OAuth2 redirect URL in the Redirect URIs field, and then select Configure.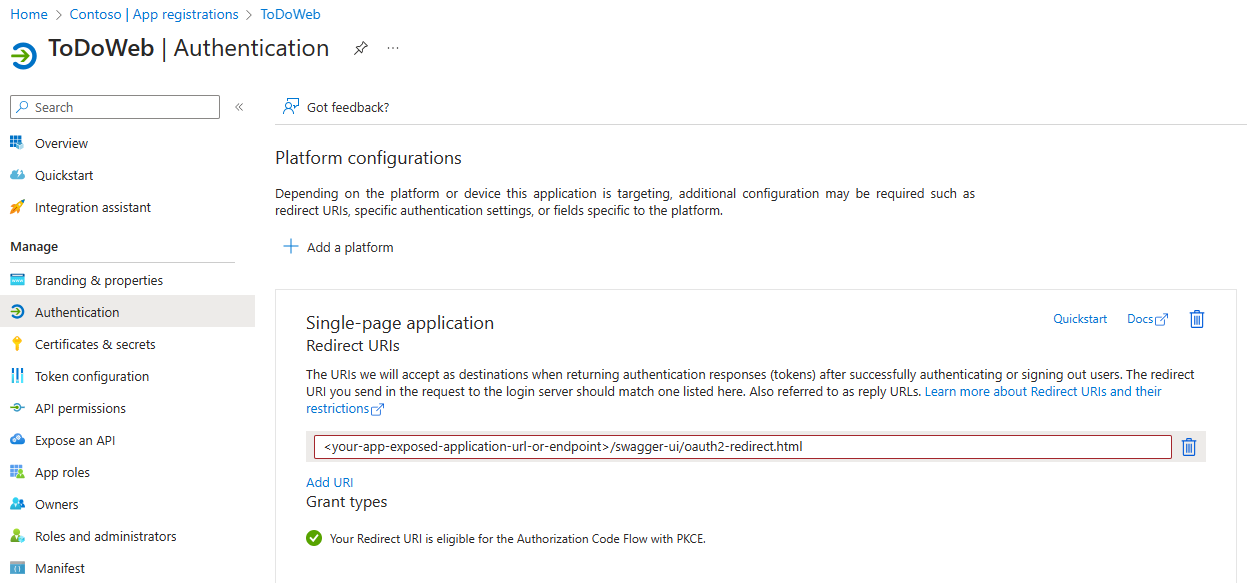

2. Prepare the Spring project
To deploy the RESTful API app, the first step is to prepare the Spring project to run locally.
Use the following steps to clone and run the app locally:
Use the following command to clone the sample project from GitHub:
git clone https://github.com/Azure-Samples/ASA-Samples-Restful-Application.gitIf you want to run the app locally, complete the steps in the Expose RESTful APIs and Update the application configuration sections first, and then use the following command to run the sample application with Maven:
cd ASA-Samples-Restful-Application
./mvnw spring-boot:run
3. Prepare the cloud environment
The main resources required to run this sample app are an Azure Spring Apps instance and an Azure Database for PostgreSQL instance. The following sections describe how to create these resources.
3.1. Sign in to the Azure portal
Go to the Azure portal and enter your credentials to sign in to the portal. The default view is your service dashboard.
3.2. Create an Azure Spring Apps instance
Use the following steps to create a service instance:
Select Create a resource in the corner of the portal.
Select Compute > Azure Spring Apps.
Fill out the Basics form. Use the following table as a guide for completing the form. The recommended Plan value is Standard consumption & dedicated (preview).
Setting Suggested value Description Subscription Your subscription name. The Azure subscription that you want to use for your server. If you have multiple subscriptions, choose the subscription in which you'd like to be billed for the resource. Resource group myresourcegroup A new resource group name or an existing one from your subscription. Name myasa A unique name that identifies your Azure Spring Apps service. The name must be between 4 and 32 characters long and can contain only lowercase letters, numbers, and hyphens. The first character of the service name must be a letter and the last character must be either a letter or a number. Plan Standard consumption & dedicated (preview) The pricing plan determines the resources and cost associated with your instance. Region The region closest to your users. The location that's closest to your users. Container Apps Environment myenvironment The option to select which Container Apps environment instance to share the same virtual network with other services and resources. Use the following table as a guide for the Container Apps Environment creation:
Setting Suggested value Description Environment name myenvironment A unique name that identifies your Azure Container Apps Environment service. Plan Consumption The pricing plan determines the resources and cost associated with your instance. Zone Redundant Disabled The option to create your Container Apps Environment service in an Azure availability zone. Select Review and Create to review your selections. Then, select Create to provision the Azure Spring Apps instance.
On the toolbar, select the Notifications icon (a bell) to monitor the deployment process. After the deployment finishes, you can select Pin to dashboard, which creates a tile for this service on your Azure portal dashboard as a shortcut to the service's Overview page.
Select Go to resource to open the service's Overview page.
Important
The Consumption workload profile has a pay-as-you-go billing model, with no starting cost. You're billed for the dedicated workload profile based on the provisioned resources. For more information, see Workload profiles in Azure Container Apps and Azure Spring Apps pricing.
3.3. Prepare the PostgreSQL instance
Use the following steps to create an Azure Database for PostgreSQL server:
Go to the Azure portal and select Create a resource.
Select Databases > Azure Database for PostgreSQL.
Select the Flexible server deployment option.
Fill out the Basics tab with the following information:
- Server name: my-demo-pgsql
- Region: East US
- PostgreSQL version: 14
- Workload type: Development
- Enable high availability: unselected
- Authentication method: PostgreSQL authentication only
- Admin username: myadmin
- Password and Confirm password: Enter a password.
Use the following information to configure the Networking tab:
- Connectivity method: Public access (allowed IP addresses)
- Allow public access from any Azure service within Azure to this server: selected
Select Review + create to review your selections, and select Create to provision the server. This operation might take a few minutes.
Go to your PostgreSQL server in the Azure portal. On the Overview page, look for the Server name value, and then record it for later use. You need it to configure the environment variables for the app in Azure Spring Apps.
Select Databases from the navigation menu to create a database - for example, todo.
3.4. Connect app instance to PostgreSQL instance
Use the following steps to connect your service instances:
Go to your Azure Spring Apps instance in the Azure portal.
From the navigation menu, open Apps, and then select Create App.
On the Create App page, fill in the app name simple-todo-api and select Java artifacts as the deployment type.
Select Create to finish the app creation and select the app to view the details.
Go to the app you created in the Azure portal. On the Overview page, select Assign endpoint to expose the public endpoint for the app. Save the URL for accessing the app after deployment.
Go to the app you created, expand Settings and select Configuration from the navigation menu, and then select Environment variables to set the environment variables.
Add the following environment variables for the PostgreSQL connection, and then select Save to finish the app configuration update. Be sure to replace the placeholders with your own values that you created previously.
Environment variable Value SPRING_DATASOURCE_URLjdbc:postgresql://<your-PostgreSQL-server-name>:5432/<your-PostgreSQL-database-name>SPRING_DATASOURCE_USERNAME<your-PostgreSQL-admin-user>SPRING_DATASOURCE_PASSWORD<your-PostgreSQL-admin-password>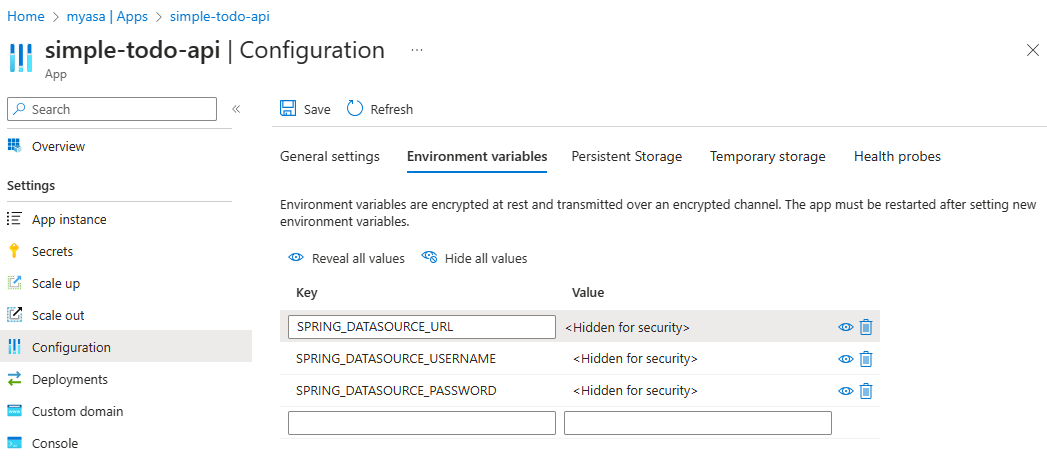

3.5. Expose RESTful APIs
Use the following steps to expose your RESTful APIs in Microsoft Entra ID:
Sign in to the Azure portal.
If you have access to multiple tenants, use the Directory + subscription filter (
) to select the tenant in which you want to register an application.Search for and select Microsoft Entra ID.
Under Manage, select App registrations > New registration.
Enter a name for your application in the Name field - for example, Todo. Users of your app might see this name, and you can change it later.
For Supported account types, select Accounts in any organizational directory (Any Microsoft Entra directory - Multitenant) and personal Microsoft accounts.
Select Register to create the application.
On the app Overview page, look for the Application (client) ID value, and then record it for later use. You need it to configure the YAML configuration file for this project.
Under Manage, select Expose an API, find the Application ID URI at the beginning of the page, and then select Add.
On the Edit application ID URI page, accept the proposed Application ID URI (
api://{client ID}) or use a meaningful name instead of the client ID, such asapi://simple-todo, and then select Save.Under Manage, select Expose an API > Add a scope, and then enter the following information:
- For Scope name, enter ToDo.Read.
- For Who can consent, select Admins only.
- For Admin consent display name, enter Read the ToDo data.
- For Admin consent description, enter Allows authenticated users to read the ToDo data..
- For State, keep it enabled.
- Select Add scope.
Repeat the previous steps to add the other two scopes: ToDo.Write and ToDo.Delete.
3.6. Update the application configuration
Use the following steps to update the YAML file to use your Microsoft Entra registered application information to establish a relationship with the RESTful API application:
Locate src/main/resources/application.yml file for the
simple-todo-apiapp. Update the configuration in thespring.cloud.azure.active-directorysection to match the following example. Be sure to replace the placeholders with the values you created previously.spring: cloud: azure: active-directory: profile: tenant-id: <tenant> credential: client-id: <your-application-ID-of-ToDo> app-id-uri: <your-application-ID-URI-of-ToDo>Note
In v1.0 tokens, the configuration requires the client ID of the API, while in v2.0 tokens, you can use the client ID or the application ID URI in the request. You can configure both to properly complete the audience validation.
The values allowed for
tenant-idare:common,organizations,consumers, or the tenant ID. For more information about these values, see the Used the wrong endpoint (personal and organization accounts) section of Error AADSTS50020 - User account from identity provider does not exist in tenant. For information on converting your single-tenant app, see Convert single-tenant app to multitenant on Microsoft Entra ID.Use the following command to rebuild the sample project:
./mvnw clean package
4. Deploy the app to Azure Spring Apps
You can now deploy the app to Azure Spring Apps.
Use the following steps to deploy using the Maven plugin for Azure Spring Apps:
Navigate to the complete directory, and then run the following command to configure the app in Azure Spring Apps:
./mvnw com.microsoft.azure:azure-spring-apps-maven-plugin:1.19.0:configThe following list describes the command interactions:
- OAuth2 login: You need to authorize the sign in to Azure based on the OAuth2 protocol.
- Select subscription: Select the subscription list number of the Azure Spring Apps instance you created, which defaults to the first subscription in the list. If you use the default number, press Enter directly.
- Use existing Azure Spring Apps in Azure: Press y to use the existing Azure Spring Apps instance.
- Select Azure Spring Apps for deployment: Select the number of the Azure Spring Apps instance you created. If you use the default number, press Enter directly.
- Use existing app in Azure Spring Apps <your-instance-name>: Press y to use the app created.
- Confirm to save all the above configurations: Press y. If you press n, the configuration isn't saved in the POM files.
Use the following command to deploy the app:
./mvnw azure-spring-apps:deployThe following list describes the command interaction:
- OAuth2 login: You need to authorize the sign in to Azure based on the OAuth2 protocol.
After the command is executed, you can see from the following log messages that the deployment was successful:
[INFO] Deployment(default) is successfully created
[INFO] Starting Spring App after deploying artifacts...
[INFO] Deployment Status: Running
[INFO]   InstanceName:demo--default-xxxxxxx-xxxxxxxxx-xxxxx  Status:Running Reason:null       DiscoverStatus:NONE
[INFO] Getting public url of app(demo)...
[INFO] Application url: https://demo.<unique-identifier>.<region-name>.azurecontainerapps.io
5. Validate the app
You can now access the RESTful API to see if it works.
5.1. Request an access token
The RESTful APIs act as a resource server, which is protected by Microsoft Entra ID. Before acquiring an access token, you must register another application in Microsoft Entra ID and grant permissions to the client application, which is named ToDoWeb.
Register the client application
Use the following steps to register an application in Microsoft Entra ID, which is used to add the permissions for the ToDo app:
Sign in to the Azure portal.
If you have access to multiple tenants, use the Directory + subscription filter (
) to select the tenant in which you want to register an application.Search for and select Microsoft Entra ID.
Under Manage, select App registrations > New registration.
Enter a name for your application in the Name field - for example, ToDoWeb. Users of your app might see this name, and you can change it later.
For Supported account types, use the default value Accounts in this organizational directory only.
Select Register to create the application.
On the app Overview page, look for the Application (client) ID value, and then record it for later use. You need it to acquire an access token.
Select API permissions > Add a permission > My APIs. Select the
ToDoapplication that you registered earlier, and then select the ToDo.Read, ToDo.Write, and ToDo.Delete permissions. Select Add permissions.Select Grant admin consent for <your-tenant-name> to grant admin consent for the permissions you added.
Add user to access the RESTful APIs
Use the following steps to create a member user in your Microsoft Entra tenant. Then, the user can manage the data of the ToDo application through RESTful APIs.
Under Manage, select Users > New user > Create new user.
On the Create new user page, enter the following information:
- User principal name: Enter a name for the user.
- Display name: Enter a display name for the user.
- Password: Copy the autogenerated password provided in the Password box.
Note
New users must complete the first sign-in authentication and update their passwords, otherwise, you receive an
AADSTS50055: The password is expirederror when you get the access token.When a new user logs in, they receive an Action Required prompt. They can choose Ask later to skip the validation.
Select Review + create to review your selections. Select Create to create the user.
Update the OAuth2 configuration for Swagger UI authorization
Use the following steps to update the OAuth2 configuration for Swagger UI authorization. Then, you can authorize users to acquire access tokens through the ToDoWeb app.
Open your Microsoft Entra ID tenant in the Azure portal, and go to the registered
ToDoWebapp.Under Manage, select Authentication, select Add a platform, and then select Single-page application.
Use the format
<your-app-exposed-application-URL-or-endpoint>/swagger-ui/oauth2-redirect.htmlas the OAuth2 redirect URL in the Redirect URIs field, and then select Configure.
Obtain the access token
Use the following steps to use OAuth 2.0 authorization code flow method to obtain an access token with Microsoft Entra ID, then access the RESTful APIs of the ToDo app:
Open the URL exposed by the app, then select Authorize to prepare the OAuth2 authentication.
In the Available authorizations window, enter the client ID of the
ToDoWebapp in the client_id field, select all the scopes for Scopes field, ignore the client_secret field, and then select Authorize to redirect to the Microsoft Entra sign-in page.
After completing the sign in with the previous user, you're returned to the Available authorizations window.
5.2. Access the RESTful APIs
Use the following steps to access the RESTful APIs of the ToDo app in the Swagger UI:
Select the API POST /api/simple-todo/lists and then select Try it out. Enter the following request body, and then select Execute to create a ToDo list.
{
  "name": "My List"
}
After the execution is complete, you see the following Response body:
{
  "id": "<ID-of-the-ToDo-list>",
  "name": "My List",
  "description": null
}
Select the API POST /api/simple-todo/lists/{listId}/items and then select Try it out. For listId, enter the ToDo list ID you created previously, enter the following request body, and then select Execute to create a ToDo item.
{
  "name": "My first ToDo item",
  "listId": "<ID-of-the-ToDo-list>",
  "state": "todo"
}
This action returns the following ToDo item:
{
  "id": "<ID-of-the-ToDo-item>",
  "listId": "<ID-of-the-ToDo-list>",
  "name": "My first ToDo item",
  "description": null,
  "state": "todo",
  "dueDate": "2023-07-11T13:59:24.9033069+08:00",
  "completedDate": null
}
Select the API GET /api/simple-todo/lists and then select Execute to query ToDo lists. This action returns the following ToDo lists:
[
  {
    "id": "<ID-of-the-ToDo-list>",
    "name": "My List",
    "description": null
  }
]
Select the API GET /api/simple-todo/lists/{listId}/items and then select Try it out. For listId, enter the ToDo list ID you created previously, and then select Execute to query the ToDo items. This action returns the following ToDo item:
[
  {
    "id": "<ID-of-the-ToDo-item>",
    "listId": "<ID-of-the-ToDo-list>",
    "name": "My first ToDo item",
    "description": null,
    "state": "todo",
    "dueDate": "2023-07-11T13:59:24.903307+08:00",
    "completedDate": null
  }
]
Select the API PUT /api/simple-todo/lists/{listId}/items/{itemId} and then select Try it out. For listId, enter the ToDo list ID. For itemId, enter the ToDo item ID, enter the following request body, and then select Execute to update the ToDo item.
{
  "id": "<ID-of-the-ToDo-item>",
  "listId": "<ID-of-the-ToDo-list>",
  "name": "My first ToDo item",
  "description": "Updated description.",
  "dueDate": "2023-07-11T13:59:24.903307+08:00",
  "state": "inprogress"
}
This action returns the following updated ToDo item:
{
  "id": "<ID-of-the-ToDo-item>",
  "listId": "<ID-of-the-ToDo-list>",
  "name": "My first ToDo item",
  "description": "Updated description.",
  "state": "inprogress",
  "dueDate": "2023-07-11T05:59:24.903307Z",
  "completedDate": null
}
Select the API DELETE /api/simple-todo/lists/{listId}/items/{itemId} and then select Try it out. For listId, enter the ToDo list ID. For itemId, enter the ToDo item ID, and then select Execute to delete the ToDo item. You should see that the server response code is
204.
6. Clean up resources
You can delete the Azure resource group, which includes all the resources in the resource group.
Use the following steps to delete the entire resource group, including the newly created service:
Locate your resource group in the Azure portal.
On the navigation menu, select Resource groups. Then, select the name of your resource group - for example, myresourcegroup.
On your resource group page, select Delete. Enter the name of your resource group in the text box to confirm deletion - for example, myresourcegroup. Then, select Delete.
7. Next steps
For more information, see the following articles:
Σχόλια
Σύντομα διαθέσιμα: Καθ' όλη τη διάρκεια του 2024 θα καταργήσουμε σταδιακά τα ζητήματα GitHub ως μηχανισμό ανάδρασης για το περιεχόμενο και θα το αντικαταστήσουμε με ένα νέο σύστημα ανάδρασης. Για περισσότερες πληροφορίες, ανατρέξτε στο θέμα: https://aka.ms/ContentUserFeedback.
Υποβολή και προβολή σχολίων για