Onboard Windows devices using a local script
Applies to:
- Microsoft Defender for Endpoint Plan 1
- Microsoft Defender for Endpoint Plan 2
- Microsoft Defender XDR
Want to experience Defender for Endpoint? Sign up for a free trial.
You can also manually onboard individual devices to Defender for Endpoint. You might want to onboard some devices when you're testing the service before you commit to onboarding all devices in your network.
Important
The script described in this article is recommended for manually onboarding devices to Defender for Endpoint. It should only be used on a limited number of devices. If you're deploying to a production environment, see other deployment options, such as Intune, Group Policy, or Configuration Manager.
Check out Identify Defender for Endpoint architecture and deployment method to see the various paths in deploying Defender for Endpoint.
Onboard devices
Open the configuration package .zip file (WindowsDefenderATPOnboardingPackage.zip) that you downloaded from the service onboarding wizard. You can also get the package from Microsoft Defender portal:
In the navigation pane, select Settings > Endpoints > Device management > Onboarding.
Select Windows 10 or Windows 11 as the operating system.
In the Deployment method field, select Local Script.
Select Download package and save the .zip file.
Extract the contents of the configuration package to a location on the device you want to onboard (for example, the Desktop). You should have a file named WindowsDefenderATPLocalOnboardingScript.cmd.
Open an elevated command-line prompt on the device and run the script:
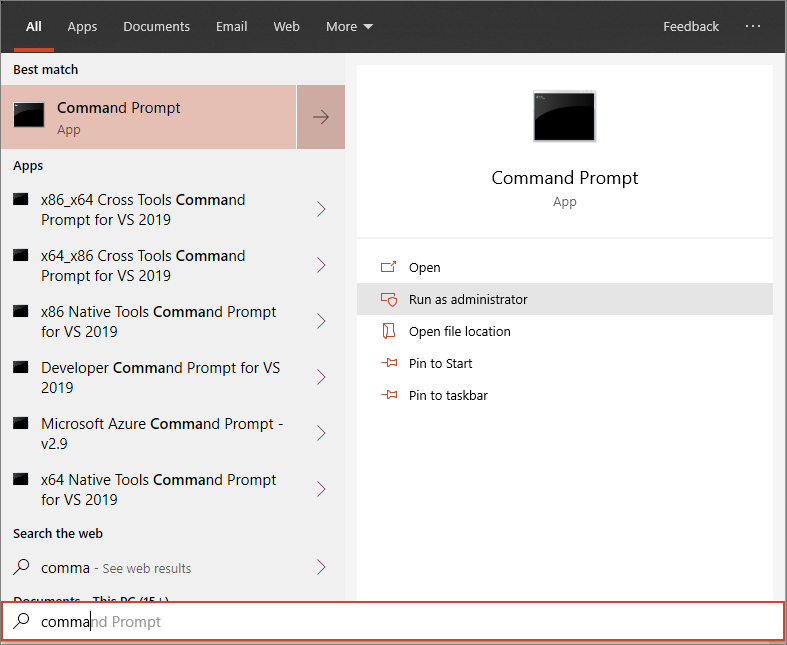
Go to Start and type cmd.
Right-click Command prompt and select Run as administrator.
Type the location of the script file. If you copied the file to the desktop, type:
%userprofile%\Desktop\WindowsDefenderATPLocalOnboardingScript.cmdPress the Enter key or select OK.
Type "Y" and enter when prompted.
After the script completes, it will display "Press any key to continue...". Press any key to complete the steps on the device.
For information on how you can manually validate that the device is compliant and correctly reports sensor data see, Troubleshoot Microsoft Defender for Endpoint onboarding issues.
Tip
After onboarding the device, you can choose to run a detection test to verify that a device is properly onboarded to the service. For more information, see Run a detection test on a newly onboarded Microsoft Defender for Endpoint endpoint.
Configure sample collection settings
For each device, you can set a configuration value to state whether samples can be collected from the device when a request is made through Microsoft Defender XDR to submit a file for deep analysis.
You can manually configure the sample sharing setting on the device by using regedit or creating and running a .reg file.
The configuration is set through the following registry key entry:
Path: "HKLM\SOFTWARE\Policies\Microsoft\Windows Advanced Threat Protection"
Name: "AllowSampleCollection"
Value: 0 or 1
Where Name type is a D-WORD. Possible values are:
- 0 - doesn't allow sample sharing from this device
- 1 - allows sharing of all file types from this device
The default value in case the registry key doesn't exist is 1.
Run a detection test to verify onboarding
After onboarding the device, you can choose to run a detection test to verify that a device is properly onboarded to the service. For more information, see Run a detection test on a newly onboarded Microsoft Defender for Endpoint device.
Offboard devices using a local script
For security reasons, the package used to offboard devices expires seven days after the date it was downloaded. Expired offboarding packages sent to a device are rejected. When downloading an offboarding package, you're notified of the package's expiry date, and that date is included in the package file name.
Note
Onboarding and offboarding policies must not be deployed on the same device at the same time. Otherwise, unpredictable collisions might occur.
Get the offboarding package from Microsoft Defender portal:
In the navigation pane, select Settings > Endpoints > Device management > Offboarding.
Select Windows 10 or Windows 11 as the operating system.
In the Deployment method field, select Local Script.
Select Download package and save the .zip file.
Extract the contents of the .zip file to a shared, read-only location that devices can access. You should have a file named
WindowsDefenderATPOffboardingScript_valid_until_YYYY-MM-DD.cmd.Open an elevated command-line prompt on the device and run the script:
Type the location of the script file. If you copied the file to the desktop, type:
%userprofile%\Desktop\WindowsDefenderATPOffboardingScript_valid_until_YYYY-MM-DD.cmdPress the Enter key or select OK.
Important
Offboarding causes the device to stop sending sensor data to the portal but data from the device, including reference to any alerts it has had will be retained for up to 6 months.
Monitor device configuration
You can follow the different verification steps in the Troubleshoot onboarding issues to verify that the script completed successfully and the agent is running.
Monitoring can also be done directly on the portal, or by using the different deployment tools.
Monitor devices using the portal
Go to Microsoft Defender portal.
Select Devices inventory.
Verify that devices are appearing.
Related articles
- Onboard Windows devices using Group Policy
- Onboard Windows devices using Microsoft Endpoint Configuration Manager
- Onboard Windows devices using Mobile Device Management tools
- Onboard non-persistent virtual desktop infrastructure (VDI) devices
- Run a detection test on a newly onboarded Microsoft Defender for Endpoint device
- Troubleshoot Microsoft Defender for Endpoint onboarding issues
Tip
Do you want to learn more? Engage with the Microsoft Security community in our Tech Community: Microsoft Defender for Endpoint Tech Community.
