Extend outbound marketing forms using code
Note
Dynamics 365 Marketing and Dynamics 365 Customer Insights are now Customer Insights - Journeys and Customer Insights - Data. For more information, see Dynamics 365 Customer Insights FAQs
New Customer Insights - Journeys customers receive real-time journeys features only. For more information, see Default real-time journeys installation.
Important
This article only applies to outbound marketing, which will be removed from the product on June 30, 2025. To avoid interruptions, transition to real-time journeys before this date. More information: Transition overview
A marketing form defines a set of input fields arranged into a form layout. You'll probably build a small library of reusable forms that you can place on all your various marketing pages as needed. To add a marketing form to a specific marketing page, use a form element to position the form, and choose local settings for it, which applies to that page only. More information Outbound marketing forms
Outbound marketing forms can be extended using JavaScript to perform custom business actions in the Dynamics 365 Customer Insights - Journeys. Following are the methods that are available to extend outbound marketing forms.
JavaScript API
We're consuming the latest version of the JavaScript API. Make sure that your references to form-loader.js or loader.js script look like https://mktdplp102cdn.azureedge.net/public/latest/js/form-loader.js?v=[version tag] or https://mktdplp102cdn.azureedge.net/public/latest/js/loader.js?v=[version tag], respectively. The ?v=[version tag] section can be omitted. Older scripts (scripts that look like https://mktdplp102cdn.azureedge.net/public/static/[version tag]/js/form-loader.js or https://mktdplp102cdn.azureedge.net/public/static/[version tag]/js/loader.js) are obsolete and no longer supported.
Place the custom code right after the form-loader.js script.
Code sample:
<script src="https://mktdplp102cdn.azureedge.net/public/latest/js/form-loader.js?v=..."></script>
<script>
// correct - the script will attach event handlers right after form loader script
MsCrmMkt.MsCrmFormLoader.on("afterFormLoad", function() {});

// wrong - the script will attach event handlers after window has finished loading, form already might have been loaded in the meantime and no events will trigger anymore
// window.onload = function() { MsCrmMkt.MsCrmFormLoader.on("afterFormLoad", function() {}); };
</script>
MsCrmMkt.MsCrmFormLoader methods
| Function Name | Description | Parameter name | Parameter type | Parameter Description | Returns |
|---|---|---|---|---|---|
.on(eventType,callback) |
Registers a callback to a type of form lifecycle event | eventType |
string, one of "afterFormLoad", "afterFormRender", "afterFormSubmit", "formLoad", "formRender", "formSubmit" |
Event type to hook to | undefined |
callback |
Callback function | Function |
|||
.off(eventType) |
Unregister a callback(s) of given form lifecycle event | eventType optional |
string, one of "afterFormLoad", "afterFormRender", "afterFormSubmit", "formLoad", "formRender", "formSubmit" |
Event type to hook to | undefined |
.sendFormCaptureToCrm(form) |
Send a form submission to Dynamics 365 Customer Insights - Journeys, supported only for form capturing scenario | form |
DOM element representing the form or JQuery selector representing the form | Form DOM element | Promise<string> |
Form events
| Event Name | Triggered for captured forms | Syntax | Description |
|---|---|---|---|
formLoad |
Yes | MsCrmMkt.MsCrmFormLoader .on("formLoad", function(event) {}) |
Triggers when the form placeholder is recognized before the actual form content is fetched, for captured forms triggers when form is recognized |
formRender |
No | MsCrmMkt.MsCrmFormLoader .on("formRender", function(event) {}) |
Triggers after the form content is fetched and before the form content is injected to a page. |
afterFormRender |
No | MsCrmMkt.MsCrmFormLoader .on("afterFormRender", function(event) {}) |
Triggers after the form content is injected to a page before the validation hooks are attached. |
afterFormLoad |
No | MsCrmMkt.MsCrmFormLoader .on("afterFormLoad", function(event) {}) |
Triggers after the form content is injected to a page and after the validation hooks are attached. |
formSubmit |
No | MsCrmMkt.MsCrmFormLoader .on("formSubmit", function(event) {}) |
Triggers on form submit before the form submission is sent to the server. |
afterFormSubmit |
Yes | MsCrmMkt.MsCrmFormLoader .on("afterFormSubmit", function(event) {}) |
Triggers on form submit after the form submission is sent to the server. It triggers only when the submission is successful. It triggers before the redirect or showing the confirmation message. |
For each event callback following methods are available:
| Method Name | Description | Return type |
|---|---|---|
.getType() |
Gets the event type | string, one of "afterFormLoad", "afterFormRender", "afterFormSubmit", "formLoad", "formRender", "formSubmit" |
.getFormPageId() |
Gets the form page ID - this relates to msdyncrm_formpage entity unique identifier |
string |
.getFormPlaceholder() |
Gets the DOM element representing the form | DOM element |
.preventDefault() |
Cancels the form submission, valid only for event of formSubmit type |
undefined |
.preventFormLoadingProgressBar() |
Hides the spinner while the form is loading, valid only for event formLoad type |
undefined |
.setFormNotification(function (n) {}) |
Overrides a callback for rendering form notification (like a form submission message). Without a function body, no notifications will be rendered. Valid only for an event of formLoad type. |
undefined |
Form capturing behavior customization
The form capturing is directed by the configuration element that looks like <div class="d365-mkt-config" style="display:none" data-website-id="..." data-hostname="...">. You can change the behavior of the form capturing by adding the following attributes:
| Attribute name | Description |
|---|---|
data-ignore-prevent-default="true" |
When specified, the form will be submitted regardless of the fact that .preventDefault() was invoked on the event. |
data-no-submit="true" |
When specified, the form capturing script won't capture the form submit event, you should trigger the MsCrmMkt.MsCrmFormLoader.sendFormCaptureToCrm(form) explicitly. This is useful for cases when you want to do your form submission first and sync to Dynamics 365 Customer Insights - Journeys later. |
Note
The Javascript API is available only for forms hosted as a script, it is not supported for the iframe hosting option.
Add your code snippet while using Portals
To add the JavaScript code, you need to follow the steps below:
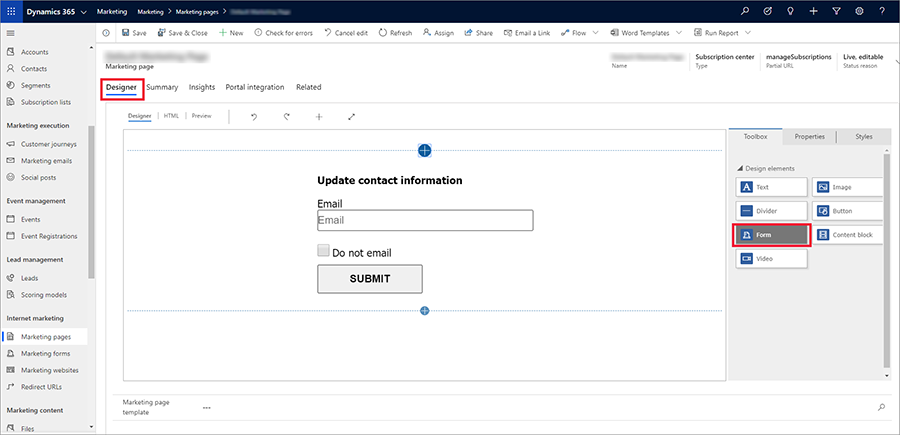
Navigate to the Customer Insights - Journeys app and go to Marketing pages.
Choose New to create a new marketing page.
Drag and drop Form element from the Toolbox tab into the Designer tab and select the marketing form you want to use.
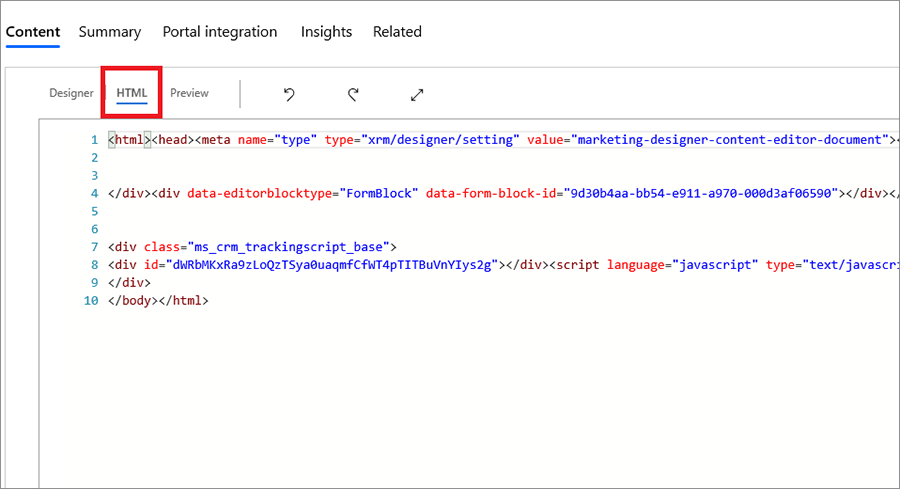
Switch to HTML tab and your code snippet.
Select Save to save your changes and then select Go live.
Add your code snippet when you're using your own CMS and form hosting
To add the code snippet, you need to follow the steps below:
Navigate to the Customer Insights - Journeys app and go to Marketing forms in the Outbound marketing area
Choose New to create a new marketing form.
Select Go live.
Select the Form hosting tab and under the Available domains for form hosting, select the domain if it is available, or select + Create new domain.
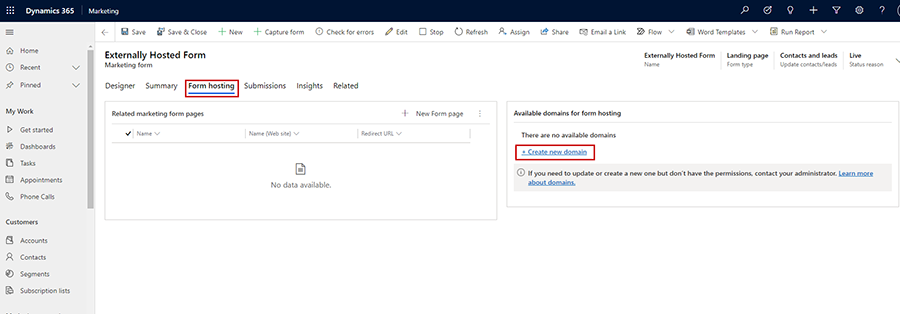
Add your own CMS domain and select Save.
In the From hosting tab, under the Related marketing form pages tab, select ... and + New Form Page to add a marketing form page.
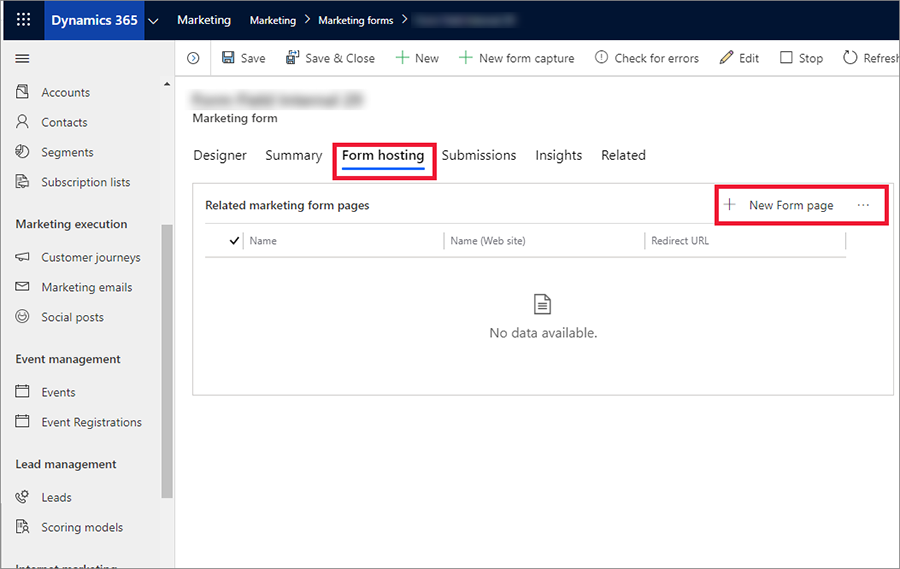
Select Save.
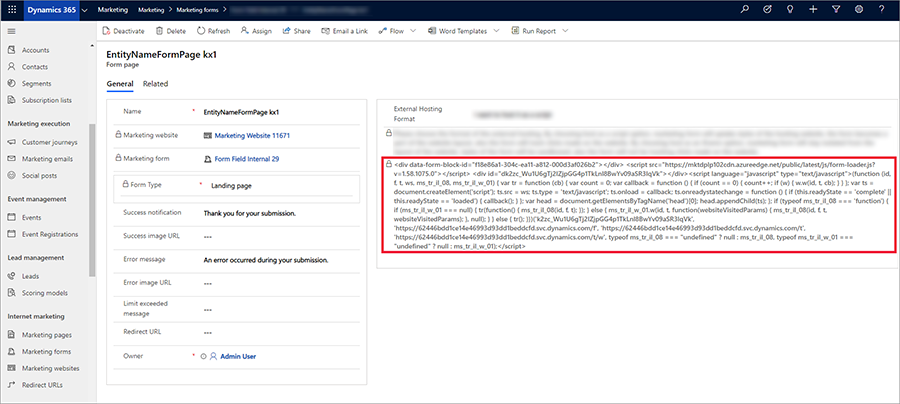
Now select the form page you have created and copy the script to the clipboard.
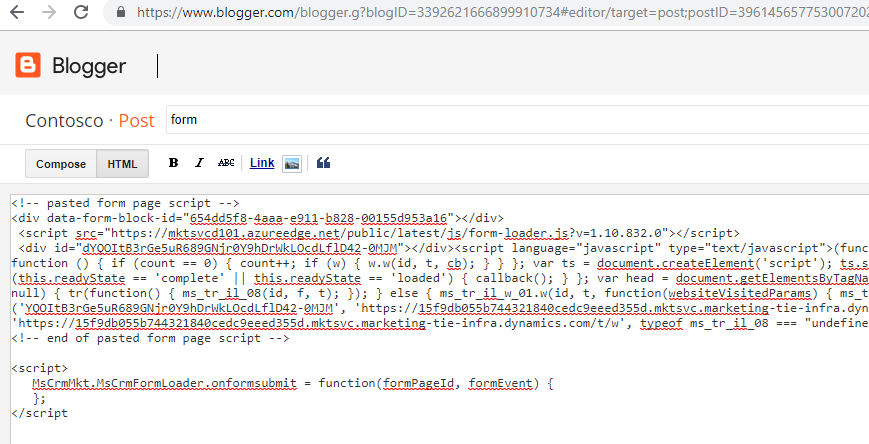
Now in your CMS, edit the page where you want to include the form, add your customizations and script.
Examples
Sample validation - checks if the textbox is either Fabricam or Contoso, otherwise prevents the form submission.
MsCrmMkt.MsCrmFormLoader.on('formSubmit', function(event) {
  // sample validation - check if
  document.getElementById('txt-company-name-message').style.visibility = 'hidden';
  var companyName = document.getElementById('txt-company-name').value;
  if (companyName !== 'Fabricam' && companyName != 'Contoso')
  {
    document.getElementById('txt-company-name-message').style.visibility = 'visible';
    event.preventDefault();
  }
});
Filling the incoming query string parameters to hidden fields.
MsCrmMkt.MsCrmFormLoader.on('afterFormLoad', function(event) {
  var self = window.location.toString();
  var queryString = self.split("?");
  var hiddenFields = document.querySelectorAll("input[type=hidden]");
  if (queryString.length > 1)
  {
    var pairs = queryString[1].split("&");
    for (var pairIndex in pairs)
    {
      var pair = pairs[pairIndex].split("=");
      if (pair.length !== 2)
      {
        continue;
      }
      var key = pair[0];
      var value = pair[1];
      if (key && value)
      {
        for (var i = 0; i < hiddenFields.length; i++)
        {
          if (hiddenFields[i].id === key)
          {
            hiddenFields[i].value = value;
          }
        }
      }
    }
  }
});
Localize the form (picklist) - You can use client-side extensibility to localize outbound marketing forms. Localization must occur after the form is loaded (
afterFormLoadevent). Inside the marketing page (or in the CMS where you host the form), add the following localization script:<script> function translatePicklists(lcid) { var picklists = document.querySelectorAll("select"); for(var i = 0; i < picklists.length; i++) { var picklist = picklists[i]; var relatedDatalist = document.getElementById("localize-" + picklist.name + "-" + lcid.toString()); if (relatedDatalist) { for(var j = 0; j < picklist.options.length; j++) { if (j >= relatedDatalist.options.length) { break; } picklist.options[j].text = relatedDatalist.options[j].text; } } } } MsCrmMkt.MsCrmFormLoader.on("afterFormLoad", function(event) { translatePicklists(1029); }); </script>In the marketing form, make sure that you have prepared the translations. Edit the marketing form in the HTML designer, format it (right-click in the designer, then choose format), and add the necessary translations.
<div data-editorblocktype="Field-dropdown">
    <div class="marketing-field">
        <div class="lp-form-field" data-required-field="false">
            <label for="f7ae1a98-0d83-4592-afe0-272c85ce607d" class="lp-ellipsis" title="">Marital status</label>
            <select id="f7ae1a98-0d83-4592-afe0-272c85ce607d" name="f7ae1a98-0d83-4592-afe0-272c85ce607d" class="lp-form-fieldInput" title="" style="width: 100%; box-sizing: border-box;">
              <option value=""></option>
              <option value="1">Single</option>
              <option value="2">Married</option>
              <option value="3">Divorced</option>
              <option value="4">Widowed</option>
            </select>
        </div>
    </div>
</div>
<!-- format is localize-fieldid-lcid -->
<datalist id="localize-f7ae1a98-0d83-4592-afe0-272c85ce607d-1029">
    <option></option>
    <option>Svobodny(a)</option>
    <option>Zenaty(a)</option>
    <option>Rozvedeny(a)</option>
    <option>Vdovec(vdova)</option>
</datalist>