Exercise - Create a business process flow
This unit shows how to create a business process flow by using Microsoft Power Automate. A business process flow is designed to guide a user through a process from start to finish.
For more about how to create a mobile task flow, see Create a mobile task flow.
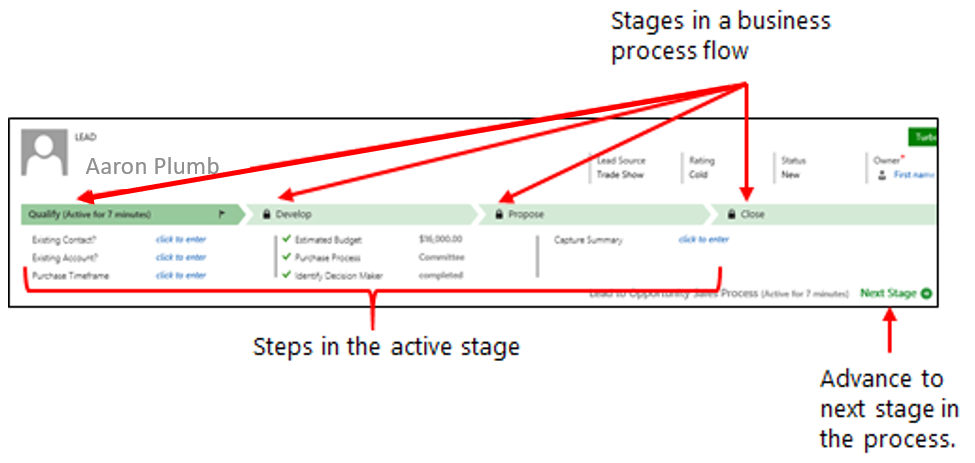
When a user starts a business process flow, the process bar at the top of the page shows the stages and steps of the process.
Prerequisites
To create business process flows, you need a Power Apps or Power Automate per user (or Premium) license, or a Dynamics 365 license that includes business process flow use rights.
Access to Power Automate.
An environment with a Microsoft Dataverse database. (Applicable only for work or school accounts).
A table the business process flow is associated with. If the business process flow isn't related to an existing table, create a new table before you create the flow.
Tip
When you create a business process flow definition, you can define who has privileges to create, read, update, or delete instances of the business process flow. For example, for service-related processes, you might give customer service reps full access to change the business process flow instance. But you might give sales reps just read-only access to the instance, so that they can monitor post-sales activities for their customers. To set security for a business process flow definition that you create, select Enable Security Roles on the action bar.
Create a business process flow
Important
As of August 2022, you can no longer create or manage business process flows from Power Automate outside of the solution explorer. Business process flows and instances continue to be supported through the solution explorer, Power Apps, and Dataverse table views.
Launch Power Automate and sign in using your organizational account.
In the left pane, select Solutions.

You can either select an existing Solution or create a new one.
Inside the solution select + New, Automation, Process, and then Business process flow.

In the Build a business process flow pane, fill in the required fields:
Display name: The display name of the process doesn't have to be unique, but it should be meaningful for people who must choose a process. You can change this name later.
Name: A unique name based on the display name. You can change the name when you create the process, but you can't change it after the process is created. Power Automate can generate this for you.
Table: Select the Microsoft Dataverse Table on which to base the process.
The Table that you select affects the fields that are available for steps that can be added to the first stage of the process flow. If you can't find the table that you want, make sure that the Business process flows (fields will be created) option is set for the table in the table definition. You can't change the table after you save the process. In our example, we use the 'Account' table which is a standard Dataverse table.

Select Create and wait for Power Automate to create your new process in the solution.
Select the business process flow you created from the solution menu. Power Automate opens a new browser tab to edit it.
The business process flow (BPF) designer is now on your screen. The designer page has three sections:
On the left, a single stage named [Your table name] New Stage was created for you. (In our image below, we use the Account table.)
Beneath this stage is the mini map, which is a visual navigator for your BPF that lets you see the whole process or quickly go to a part of the process. The mini map toggle icon expands and contracts the map. With just one step in your process, the map will just show a "stage" icon filling a small portion in the top left corner of the map and a grey background filling the rest of the map.
On the right side of your screen is a panel depicting BPF components. This two-tabbed panel allows you to drag and drop components into the BPF from the Components tab. The Properties tab shows properties of the first (if you haven't selected a stage) or the selected stage. When you select any stage in your BPF, the properties of that stage appear in this panel.

As you add any components that you decide you don't want to include in the BPF, you can delete them simply by selecting the component or detail and then selecting the Delete button in the editor header.
Add stages so that users can proceed from one business stage to another in the process:
Drag a Stage component from the Components tab to the designer canvas. Notice a plus sign (+) in a dashed rectangle appears to the right of the initial stage. Drop the new stage into the plus sign rectangle to anchor it onto the canvas. Upon completion, you now have two stages in your BPF.

Select the new stage, and then, on the Properties tab on the right, set the properties:
Enter a stage Display Name.
Optional: Select a Category from the dropdown for the stage (for example, Qualify or Develop).
This category appears as a chevron on the process bar in your model-driven app. It will not appear here
When you finish setting the properties, select Apply.
Steps in each stage can entail multiple fields of data entry (one Data Step per field), as well as Workflows, Actions, and (Power Automate) Flows. Let's add a Data step to this stage with the following actions:
Tip
To see the steps in a stage, select Details in the lower-right corner of the stage.
Tab to the Components in the right side panel and drag a Data Step component to the first stage and drop it there. Your BPF should now resemble the image below.

Next we define what we want the user to do with the data. Select the first Data Step (Data Step #1) in the stage and set the properties as follows:
Enter a Step Name (up to you).
Define a Data Field your user fills out.
If you want users to fill in the selected field to finish the step before they can proceed to the next stage of the process, select Required.
At this point, you can leave the Sequence as 1, but you see how when you add other Data Steps, you can adjust this number. When you adjust this number, Power Apps automatically adjusts the other Data Steps accordingly. You can also simply drag and drop to adjust the order of steps within the stage, and the BPF editor will automatically adjust the Sequence.
When you finish, select Apply. Your Data Step displays the changes to the Step Name as well as the selected Data Field from your table.
Add a Condition to the process:
Switch your panel back to Components and drag a Condition component to the plus sign (+) box between two stages and drop it there. In other words, at this point, based on data input in the first stage, we create a condition that affects how we proceed in the BPF. The Condition expects a Stage for both outcomes. You can't validate the BCF without a stage for true and a stage for false (don't be confused by the line connecting the true side with the next stage).

With your new condition selected, look at the Properties panel and set the desired properties under the Rules section, according to your data. When you finish, select Apply.
Notice that your condition includes a green box check, representing the course of your BPF if the condition is true, and an orange box, representing the course if condition is false. Add a new stage, by dragging and dropping from the Components, under the orange box.
Adjust the Display Name, Category, and Entity (or table) and select Apply.
Select the Components tab and drag and drop another Stage to the "green check" side of the condition.
Adjust the Display Name, Category, and Entity for this stage and select Apply.
Notice how both stages line up in the same column of your BPF, that's because they're considered to be in the same Category of your BPF. The Condition simply represents a branching option for the Category, so they can include separate Data Steps, flows or actions.
Add a workflow to the process:
You can add an existing workflow, or you can create a new workflow to add to your BPF via the Workflow component. However, Microsoft is continuing to develop the Power Automate flow step (currently in preview) as an option to add a workflow. A Workflow is a legacy feature that many organizations still use, but it doesn't use a modern interface, whereas a Power Automate flow performs similar actions and has a modern interface.
There are two options for adding a workflow to your BPF. You can drag a Workflow component from the Components tab to either a specific stage or the Global Workflow item (in the bottom right corner of the screen):
Drag the Workflow component to a specific stage if the workflow should be triggered when the process enters or exits that stage. The Workflow component must be based on the same primary table as the stage. You see it appear under the Triggered Process section of the stage.
Drag the Workflow component to the Global Workflow item if the workflow should be triggered when the process is activated or archived (that is, when the status changes to Completed or Abandoned). The Workflow component must be based on the same primary table as the process.
Notice that you must use or create an active, on-demand workflow made for the same table as the one used in this stage. Select the Workflow process, and then, on the Properties tab, set the properties:
Enter a display name.
Select when the workflow should be triggered (Stage entry or Stage exit)
Search for an existing on-demand active workflow that matches the stage table.
It is beyond the scope of this exercise to create a new workflow. If you want to learn how to create one, see Dataverse workflows (listed under "Classic Dataverse").
When you finish, select Apply.
Validation of your BPF verifies completion of all of your stages, and alerts you to where you need to make adjustments. It's a means of error checking. To validate the business process flow, select Validate on the action bar. If errors exit, you'll see a header error message in red text with the total number of errors, and each stage or condition will show an error message with the number of errors in that stage/condition.
At this point, you can select each Stage/Condition individually and try to resolve the errors. For example, if you added a 'Workflow' process but didn't have a selected workflow, simply select the 'Workflow' under your stage and select the Delete button on the Command Bar.
As you work through the errors, the red error messages disappear.
You don't have to resolve all of the errors before saving your BPF, if you need to save it prior to completing the validation. To save the process as a draft while you continue to work on it, select Save on the action bar.
Important
No one can use a BPF while it's a draft.
Once you've validated your BPF, the Activate button in your action bar becomes enabled, and you can activate the BPF for use in your model-driven apps. To activate the process and make it available to your team, select Activate on the action bar.
After a few moments while Power Apps "Activates" your BPF, the loading dialog disappears and you'll notice a Deactivate button on the action bar. If required, at any time you can select this button to remove this BPF from availability to your team. It doesn't delete the BPF, it merely puts it in stand-by.
To define who has privileges to create, read, update, or delete the business process flow instance, select Edit Security Roles on the action bar. For example, for service-related processes, you might give customer service reps full access to change the business process flow instance. But you might give sales reps read-only access to the instance, so that they can monitor post-sales activities for their customers.
In the Security Roles pane, select the name of a role to open the details page for that role.
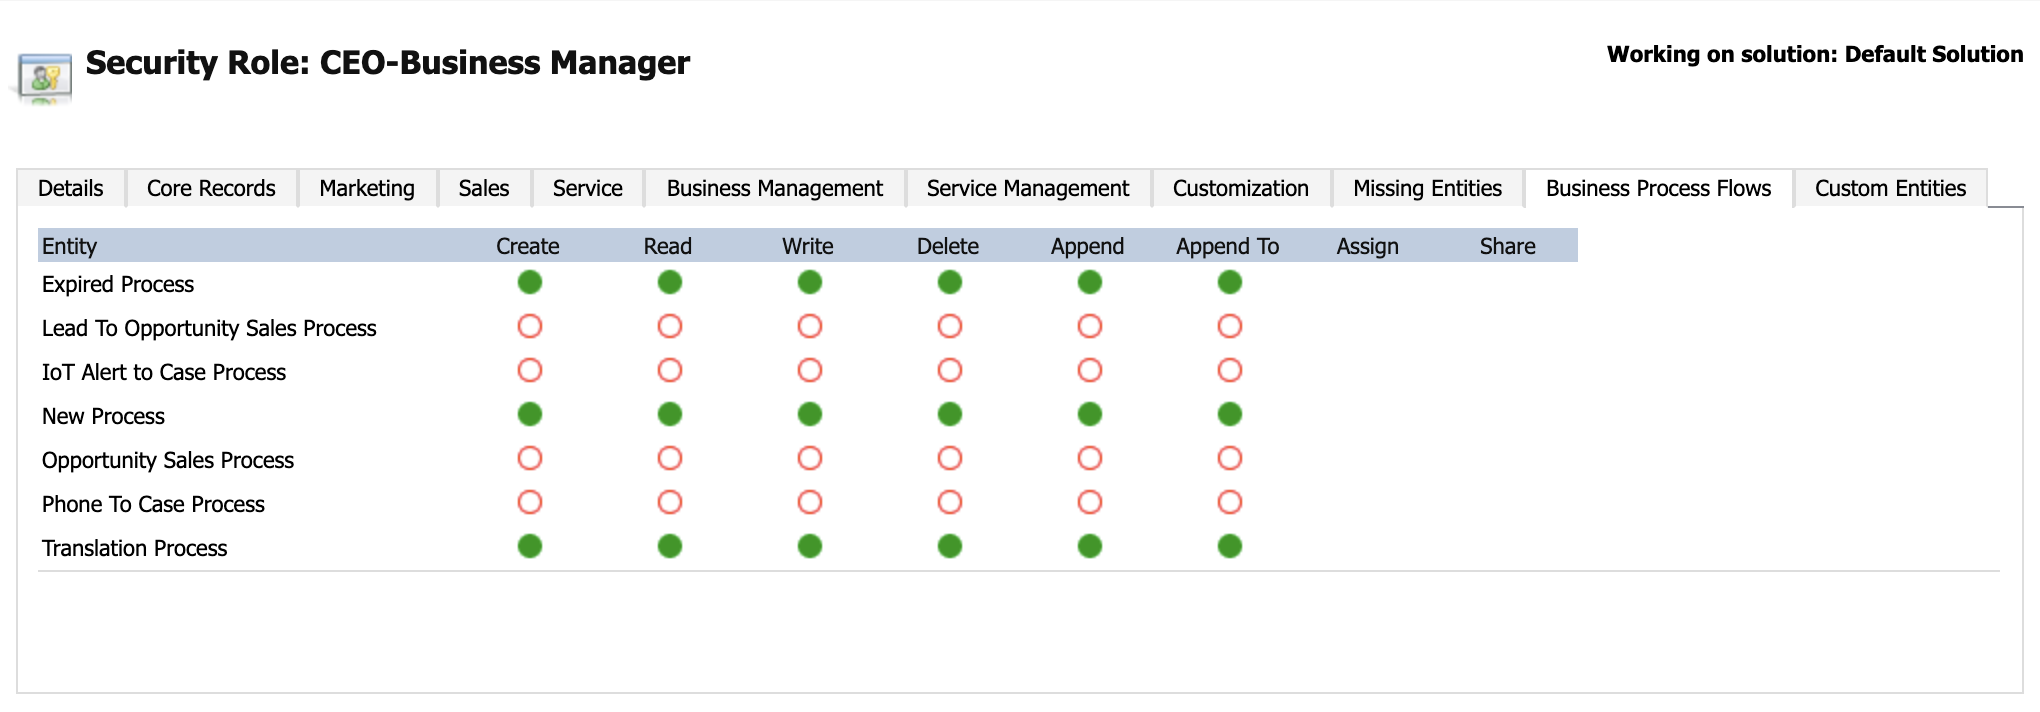
Select the Business Process Flows tab, then select the options to assign the role appropriate CRUD privileges for the business process flow. The option buttons behave like "radio buttons" and are either selected (filled with green) or not (unfilled circle with red outline).
Note
By default, the System Administrator and System Customizer security roles have access to new business process flows.
Select Save.
Tip
Keep these tips in mind as you work on your business process flow in the designer:
To take a snapshot of everything in the business process flow designer, select Snapshot on the action bar, which downloads a "png" file of your BPF into the "Downloads" folder of your browser. This option is useful if you want to share and get comments about the process from a team member.
Use the mini map to quickly go to different parts of the process. This option is useful when you have a complicated process that scrolls off the screen.
To add a description of the business process, select the down arrow immediately to the right of the process name in the upper-left corner of the page. You can enter up to 2,000 characters in the description field.
When you're complete with the BPF editor, simply close the browser tab to return to your Solution objects.
Edit a business process flow
You can edit the business process flow after it's created.
On the Power Automate main page, select Solutions in the left pane. Select your solution.
In the solution, select Processes, then select your process to edit it.
Keep the following points in mind when you edit the stages of a business process flow:
Business process flows can have up to 30 stages.
You can add or change the following properties of a stage:
Name: You can change the stage name after you create the stage.
Table: You can change the table for any stage except the first one.
Stage Category: Remember, a category lets you group stages by the type of action. It's useful for reports that will group records by the stage that they're in. The options for the stage category come from the Stage Category global choice set. You can add more choices to this global choice set and change the labels of existing choices. You can also delete choices, but we recommend that you keep the existing choices. If you delete a choice, you can't add it back later. If you don't want a choice to be used, change the label to Don't use.
Relationship: Enter a relationship when the preceding stage in the process is based on a different table than the current stage. For the current stage, select Select relationships, and then specify the relationship that should be used when the flow moves between the two stages. We recommend that you specify relationships because they provide the following benefits:
Attribute maps are often defined for relationships. These attribute maps automatically carry over data between records. Therefore, they help minimize the amount of data entry required.
When you select Next Stage on the process bar for a record, any records that use the relationship are listed in the process flow. Therefore, the reuse of records in the process is promoted. In addition, you can use workflows to automate the creation of records. Users then just have to select the workflow instead of creating a record. Therefore, the process is streamlined.
Set Order Process Flow: If you have more than one business process flow for a table, you must specify which process is automatically assigned to new records. On the action bar, select Order Process Flow. For new records or records that don't already have a process flow associated with them, the first business process flow to which a user has access is used.
Enable Security Roles: A user's access to a business process flow depends on the privileges defined for the business process flow in the security role assigned to the user. By default, only the System Administrator and System Customizer security roles can view a new business process flow.
Now that you learned how to add a business process flow to your solution, let's explore using them to guide your business processes.