Enable sign-in for Java WebSphere apps using MSAL4J with Azure Active Directory B2C
This article demonstrates a Java Servlet application that authenticates users against Azure Active Directory B2C (Azure AD B2C) using the Microsoft Authentication Library for Java (MSAL4J).
The following diagram shows the topology of the app:
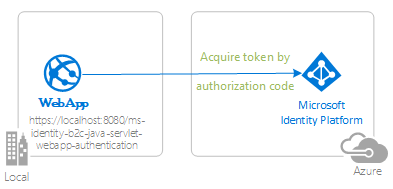
The app uses MSAL4J to sign in users and obtain an ID token from Azure AD B2C. The ID token proves that the user is authenticated against a Azure AD B2C tenant.
Prerequisites
- JDK version 8 or higher
- Maven 3
- An Azure AD B2C tenant. For more information, see Tutorial: Create an Azure Active Directory B2C tenant
- A user account in your Azure AD B2C tenant.
Recommendations
- Some familiarity with the Java / Jakarta Servlets.
- Some familiarity with Linux/OSX terminal or Windows PowerShell.
- jwt.ms for inspecting your tokens.
- Fiddler for monitoring your network activity and troubleshooting.
- Follow the Microsoft Entra ID Blog to stay up-to-date with the latest developments.
Set up the sample
The following sections show you how to set up the sample application.
Clone or download the sample repository
To clone the sample, open a Bash window and use the following command:
git clone https://github.com/Azure-Samples/ms-identity-java-servlet-webapp-authentication.git
cd 1-Authentication/sign-in-b2c
Alternatively, navigate to the ms-identity-java-servlet-webapp-authentication repository, then download it as a .zip file and extract it to your hard drive.
Important
To avoid file path length limitations on Windows, clone or extract the repository into a directory near the root of your hard drive.
Register the sample application with your Azure AD B2C tenant
The sample comes with a preregistered application for testing purposes. If you would like to use your own Azure AD B2C tenant and application, follow the steps in the following sections to register and configure the application in the Azure portal. Otherwise, continue with the steps for Run the sample.
Choose the Azure AD B2C tenant where you want to create your applications
To choose your tenant, use the following steps:
Sign in to the Azure portal.
If your account is present in more than one Azure AD B2C tenant, select your profile in the corner of the Azure portal, and then select Switch directory to change your session to the desired Azure AD B2C tenant.
Create user flows and custom policies
To create common user flows like sign-up, sign-in, profile edit, and password reset, see Tutorial: Create user flows in Azure Active Directory B2C.
You should consider creating Custom policies in Azure Active Directory B2C as well, however, this is beyond the scope of this tutorial.
Add external identity providers
See Tutorial: Add identity providers to your applications in Azure Active Directory B2C.
Register the app (ms-identity-b2c-java-servlet-webapp-authentication)
To register the app, use the following steps:
Navigate to the Azure portal and select Azure AD B2C.
Select App Registrations on the navigation pane, then select New registration.
In the Register an application page that appears, enter the following application registration information:
- In the Name section, enter a meaningful application name for display to users of the app - for example,
ms-identity-b2c-java-servlet-webapp-authentication. - Under Supported account types, select Accounts in any organizational directory and personal Microsoft accounts (e.g. Skype, Xbox, Outlook.com).
- In the Redirect URI (optional) section, select Web in the combo-box and enter the following redirect URI:
http://localhost:8080/ms-identity-b2c-java-servlet-webapp-authentication/auth_redirect.
- In the Name section, enter a meaningful application name for display to users of the app - for example,
Select Register to create the application.
On the app's registration page, find and copy the Application (client) ID value to use later. You use this value in your app's configuration file or files.
Select Save to save your changes.
On the app's registration page, select Certificates & secrets on the navigation pane to open the page where you can generate secrets and upload certificates.
In the Client secrets section, select New client secret.
Type a description - for example, app secret.
Select one of the available durations: In 1 year, In 2 years, or Never Expires.
Select Add. The generated value is displayed.
Copy and save the generated value for use in later steps. You need this value for your code's configuration files. This value isn't displayed again, and you can't retrieve it by any other means. So, be sure to save it from the Azure portal before you navigate to any other screen or pane.
Configure the app (ms-identity-b2c-java-servlet-webapp-authentication) to use your app registration
Use the following steps to configure the app:
Note
In the following steps, ClientID is the same as Application ID or AppId.
Open the project in your IDE.
Open the ./src/main/resources/authentication.properties file.
Find the
aad.clientIdproperty and replace the existing value with the application ID orclientIdof thems-identity-b2c-java-servlet-webapp-authenticationapplication from the Azure portal.Find the
aad.secretproperty and replace the existing value with the value you saved during the creation of thems-identity-b2c-java-servlet-webapp-authenticationapplication from the Azure portal.Find the
aad.scopesproperty and replace the existing application clientId with the value you placed intoaad.clientIdin step 1 of this section.Find the
aad.authorityproperty and replace the first instance offabrikamb2cwith the name of the Azure AD B2C tenant in which you created thems-identity-b2c-java-servlet-webapp-authenticationapplication in the Azure portal.Find the
aad.authorityproperty and replace the second instance offabrikamb2cwith the name of the Azure AD B2C tenant in which you created thems-identity-b2c-java-servlet-webapp-authenticationapplication in the Azure portal.Find the
aad.signInPolicyproperty and replace it with the name of the sign-up/sign-in user-flow policy you created in the Azure AD B2C tenant in which you created thems-identity-b2c-java-servlet-webapp-authenticationapplication in the Azure portal.Find the
aad.passwordResetPolicyproperty and replace it with the name of the password reset user-flow policy you created in the Azure AD B2C tenant in which you created thems-identity-b2c-java-servlet-webapp-authenticationapplication in the Azure portal.Find the
aad.editProfilePolicyproperty and replace it with the name of the edit profile user-flow policy you created in the Azure AD B2C tenant in which you created thems-identity-b2c-java-servlet-webapp-authenticationapplication in the Azure portal.
Build the sample
To build the sample using Maven, navigate to the directory containing the pom.xml file for the sample, and then run the following command:
mvn clean package
This command generates a .war file that you can run on a variety of application servers.
Run the sample
These instructions assume that you installed WebSphere and set up a server. You can use the guidance at Deploy WebSphere Application Server (traditional) Cluster on Azure Virtual Machines for a basic server setup.
Before you can deploy to WebSphere, use the following steps to make some configuration changes in the sample itself and then build or rebuild the package:
Navigate to your app's authentication.properties file and change the value of
app.homePageto your server URL and port number you're planning to use, as shown in the following example:# app.homePage is by default set to dev server address and app context path on the server # for apps deployed to azure, use https://your-sub-domain.azurewebsites.net app.homePage=https://<server-url>:<port-number>/msal4j-servlet-auth/After saving this file, use the following command to rebuild your app:
mvn clean packageAfter the code finishes building, copy the .war file over to your target server's file system.
You also need to make the same change in the Azure app registration, where you set it in the Azure portal as the Redirect URI value on the Authentication tab.
Navigate to the Microsoft identity platform for developers App registrations page.
Use the search box to search for your app registration - for example,
java-servlet-webapp-authentication.Open your app registration by selecting its name.
Select Authentication from the menu.
In the Web - Redirect URIs section, select Add URI.
Fill out the URI of your app, appending /auth/redirect - for example,
https://<server-url>:<port-number>/auth/redirect.Select Save.
Use the following steps to deploy the sample using the WebSphere's Integrated Solutions Console:
On the Applications tab, select New Application, then New Enterprise Application.
Choose the .war file you built, then select Next until you get to the Map context roots for Web modules installation step. The other default settings should be fine.
For the context root, set it to the same value as after the port number in the 'Redirect URI' you set in sample configuration/Azure app registration. That is, if the redirect URI is
http://<server-url>:9080/msal4j-servlet-auth/, then the context root should bemsal4j-servlet-auth.Select Finish.
After the application finishes installing, go to the WebSphere enterprise applications section of the Applications tab.
Select the .war file you installed from the list of applications and then select Start to deploy.
After it finishes deploying, navigate to
http://<server-url>:9080/{whatever you set as the context root}and you should be able to see the application.
Explore the sample
Use the following steps to explore the sample:
- Notice the signed-in or signed-out status displayed at the center of the screen.
- Select the context-sensitive button in the corner. This button reads Sign In when you first run the app.
- On the next page, follow the instructions and sign in with an account of your chosen identity provider.
- Notice that the context-sensitive button now says Sign out and displays your username.
- Select ID Token Details to see some of the ID token's decoded claims.
- You also have the option of editing your profile. Select the link to edit details like your display name, place of residence, and profession.
- Use the button in the corner to sign out.
- After signing out, navigate to the following URL for the token details page:
http://localhost:8080/ms-identity-b2c-java-servlet-webapp-authentication/auth_token_details. Here, you can observe how the app displays a401: unauthorizederror instead of the ID token claims.
About the code
This sample demonstrates how to use MSAL4J to sign in users into your Azure AD B2C tenant.
Contents
The following table shows the contents of the sample project folder:
| File/folder | Description |
|---|---|
| AuthHelper.java | Helper functions for authentication. |
| Config.java | Runs on startup and configures properties reader and logger. |
| authentication.properties | Microsoft Entra ID and program configuration. |
| AuthenticationFilter.java | Redirects unauthenticated requests to protected resources to a 401 page. |
| MsalAuthSession | Instantiated with an HttpSession. Stores all MSAL related session attributes in session attribute. |
| ____Servlet.java | All of the endpoints available are defined in .java classes ending in ____Servlet.java. |
| CHANGELOG.md | List of changes to the sample. |
| CONTRIBUTING.md | Guidelines for contributing to the sample. |
| LICENSE | The license for the sample. |
ConfidentialClientApplication
A ConfidentialClientApplication instance is created in the AuthHelper.java file, as shown in the following example. This object helps craft the Azure AD B2C authorization URL and also helps exchange the authentication token for an access token.
IClientSecret secret = ClientCredentialFactory.createFromSecret(SECRET);
confClientInstance = ConfidentialClientApplication
                     .builder(CLIENT_ID, secret)
                     .b2cAuthority(AUTHORITY + policy)
                     .build();
The following parameters are used for instantiation:
- The Client ID of the app.
- The client secret, which is a requirement for Confidential Client Applications.
- The Azure AD B2C Authority concatenated with the appropriate
UserFlowPolicyfor sign-up, sign-in, profile-edit, or password-reset.
In this sample, these values are read from the authentication.properties file using a properties reader in the Config.java file.
Step-by-step walkthrough
The following steps provide a walkthrough of the app's functionality:
The first step of the sign-in process is to send a request to the
/authorizeendpoint for your Azure Active Directory B2C tenant. The MSAL4JConfidentialClientApplicationinstance is used to construct an authorization request URL, and the app redirects the browser to this URL, as shown in the following example:final ConfidentialClientApplication client = getConfidentialClientInstance(policy); final AuthorizationRequestUrlParameters parameters = AuthorizationRequestUrlParameters .builder(REDIRECT_URI, Collections.singleton(SCOPES)).responseMode(ResponseMode.QUERY) .prompt(Prompt.SELECT_ACCOUNT).state(state).nonce(nonce).build(); final String redirectUrl = client.getAuthorizationRequestUrl(parameters).toString(); Config.logger.log(Level.INFO, "Redirecting user to {0}", redirectUrl); resp.setStatus(302); resp.sendRedirect(redirectUrl);The following list describes the features of this code:
AuthorizationRequestUrlParameters: Parameters that must be set in order to build an AuthorizationRequestUrl.REDIRECT_URI: Where Azure AD B2C redirects the browser - along with the auth code - after collecting the user credentials.SCOPES: Scopes are permissions requested by the application.Normally, the three scopes
openid profile offline_accesswould suffice for receiving an ID token response. However, MSAL4J requires all responses from Azure AD B2C to also contain an access token.In order for Azure AD B2C to dispense an access token as well as an ID token, the request must include an additional resource scope. Because this app doesn't actually require an external resource scope, it adds its own client ID as a fourth scope in order to receive an access token.
You can find a full list of scopes requested by the app in the authentication.properties file.
ResponseMode.QUERY: Azure AD B2C can return the response as form params in an HTTP POST request or as query string params in an HTTP GET request.Prompt.SELECT_ACCOUNT: Azure AD B2C should ask the user to select the account that they intend to authenticate against.state: A unique variable set by the app into the session on each token request and destroyed after receiving the corresponding Azure AD B2C redirect callback. The state variable ensures that Azure AD B2C requests to the/auth_redirect endpointare actually from Azure AD B2C authorization requests originating from this app and this session, thereby preventing CSRF attacks. This is done in the AADRedirectServlet.java file.nonce: A unique variable set by the app into the session on each token request, and destroyed after receiving the corresponding token. This nonce is transcribed to the resulting tokens dispensed Azure AD B2C, thereby ensuring that there's no token-replay attack occurring.
The user is presented with a sign-in prompt by Azure Active Directory B2C. If the sign-in attempt is successful, the user's browser is redirected to the app's redirect endpoint. A valid request to this endpoint contains an authorization code.
The
ConfidentialClientApplicationinstance then exchanges this authorization code for an ID token and access token from Azure Active Directory B2C, as shown in the following example:final AuthorizationCodeParameters authParams = AuthorizationCodeParameters .builder(authCode, new URI(REDIRECT_URI)) .scopes(Collections.singleton(SCOPES)).build(); final ConfidentialClientApplication client = AuthHelper .getConfidentialClientInstance(policy); final Future<IAuthenticationResult> future = client.acquireToken(authParams); final IAuthenticationResult result = future.get();The following list describes the features of this code:
AuthorizationCodeParameters: Parameters that must be set in order to exchange the Authorization Code for an ID and/or access token.authCode: The authorization code that was received at the redirect endpoint.REDIRECT_URI: The redirect URI used in the previous step must be passed again.SCOPES: The scopes used in the previous step must be passed again.
If
acquireTokenis successful, the token claims are extracted and the nonce claim is validated against the nonce stored in the session, as shown in the following example:parseJWTClaimsSetAndStoreResultInSession(msalAuth, result, serializedTokenCache); validateNonce(msalAuth) processSuccessfulAuthentication(msalAuth);If the nonce is successfully validated, authentication status is put into a server-side session, leveraging methods exposed by the
MsalAuthSessionclass, as shown in the following example:msalAuth.setAuthenticated(true); msalAuth.setUsername(msalAuth.getIdTokenClaims().get("name"));
More information
- What is Azure Active Directory B2C?
- Application types that can be used in Active Directory B2C
- Recommendations and best practices for Azure Active Directory B2C
- Azure AD B2C session
- Microsoft Authentication Library (MSAL) for Java
For more information about how OAuth 2.0 protocols work in this scenario and other scenarios, see Authentication Scenarios for Microsoft Entra ID.
Next step
Deploy Java WebSphere apps to Traditional WebSphere on Azure Virtual Machines
Feedback
Coming soon: Throughout 2024 we will be phasing out GitHub Issues as the feedback mechanism for content and replacing it with a new feedback system. For more information see: https://aka.ms/ContentUserFeedback.
Submit and view feedback for