Set up a sign-up and sign-in flow for a local account by using Azure Active Directory B2C custom policy
In Create and read a user account by using Azure Active Directory B2C custom policy article, a user creates a new user account but doesn't sign in to it.
In this article, you learn how to write an Azure Active Directory B2C (Azure AD B2C) custom policy that allows a user to either create an Azure AD B2C local account or sign in into one. A local account refers to an account that is created in your Azure AD B2C tenant when a user signs up into your application.
Overview
Azure AD B2C uses OpenID Connect authentication protocol to verify user credentials. In Azure AD B2C, you send the user credentials alongside other information to a secure endpoint, which then determines if the credentials are valid or not. In a nutshell, when you use Azure AD B2C's implementation of OpenID Connect, you can outsource sign-up, sign in, and other identity management experiences in your web applications to Microsoft Entra ID.
Azure AD B2C custom policy provides a OpenID Connect technical profile, which you use to make a call to a secure Microsoft endpoint. Learn more about OpenID Connect technical profile.
Prerequisites
If you don't have one already, create an Azure AD B2C tenant that is linked to your Azure subscription.
Register a web application, and enable ID token implicit grant. For the Redirect URI, use https://jwt.ms.
You must have Visual Studio Code (VS Code) installed in your computer.
Complete the steps in Create and read a user account by using Azure Active Directory B2C custom policy. This article is a part of Create and run your own custom policies how-to guide series.
Note
This article is part of the Create and run your own custom policies in Azure Active Directory B2C how-to guide series. We recommend that you start this series from the first article.
Step 1 - Configure OpenID Connect technical profile
To configure an OpenID Connect technical profile, you need to perform three steps:
- Declare more claims.
- Register apps in your Azure portal.
- Finally, configure OpenID Connect Technical Profile itself
Step 1.1 - Declare more claims
In the ContosoCustomPolicy.XML file, locate the ClaimsSchema section, and then add more claims by using the following code:
    <!--<ClaimsSchema>-->
        ...
        <ClaimType Id="grant_type">
            <DisplayName>grant_type</DisplayName>
            <DataType>string</DataType>
            <UserHelpText>Special parameter passed for local account authentication to login.microsoftonline.com.</UserHelpText>
        </ClaimType>

        <ClaimType Id="scope">
            <DisplayName>scope</DisplayName>
            <DataType>string</DataType>
            <UserHelpText>Special parameter passed for local account authentication to login.microsoftonline.com.</UserHelpText>
        </ClaimType>

        <ClaimType Id="nca">
            <DisplayName>nca</DisplayName>
            <DataType>string</DataType>
            <UserHelpText>Special parameter passed for local account authentication to login.microsoftonline.com.</UserHelpText>
        </ClaimType>

        <ClaimType Id="client_id">
            <DisplayName>client_id</DisplayName>
            <DataType>string</DataType>
            <AdminHelpText>Special parameter passed to EvoSTS.</AdminHelpText>
            <UserHelpText>Special parameter passed to EvoSTS.</UserHelpText>
        </ClaimType>

        <ClaimType Id="resource_id">
            <DisplayName>resource_id</DisplayName>
            <DataType>string</DataType>
            <AdminHelpText>Special parameter passed to EvoSTS.</AdminHelpText>
            <UserHelpText>Special parameter passed to EvoSTS.</UserHelpText>
        </ClaimType>
    <!--</ClaimsSchema>-->
Step 1.2 - Register Identity Experience Framework applications
Azure AD B2C requires you to register two applications that it uses to sign up and sign in users with local accounts: IdentityExperienceFramework, a web API, and ProxyIdentityExperienceFramework, a native app with delegated permission to the IdentityExperienceFramework app.
If you haven't already done so, register the following applications. To automate the walk-through below, visit the IEF Setup App and follow the instructions:
Use the steps in Register the IdentityExperienceFramework application to register the Identity Experience Framework application. Copy the Application (client) ID, appID, for the Identity Experience Framework application registration for use on the next step.
Use the steps in Register the ProxyIdentityExperienceFramework application to register Proxy Identity Experience Framework application. Copy the Application (client) ID, proxyAppID, for the Proxy Identity Experience Framework application registration for use on the next step.
Step 1.3 - Configure OpenID Connect technical profile
In the ContosoCustomPolicy.XML file, locate the ClaimsProviders section, and then add a Claims Provider element that holds your OpenID Connect Technical Profile by using the following code:
    <!--<ClaimsProviders>-->
        ...
        <ClaimsProvider>
            <DisplayName>OpenID Connect Technical Profiles</DisplayName>
            <TechnicalProfiles>
                <TechnicalProfile Id="SignInUser">
                    <DisplayName>Sign in with Local Account</DisplayName>
                    <Protocol Name="OpenIdConnect" />
                    <Metadata>
                        <Item Key="UserMessageIfClaimsPrincipalDoesNotExist">We didn't find this account</Item>
                        <Item Key="UserMessageIfInvalidPassword">Your password or username is incorrect</Item>
                        <Item Key="UserMessageIfOldPasswordUsed">You've used an old password.</Item>
                        <Item Key="ProviderName">https://sts.windows.net/</Item>
                        <Item Key="METADATA">https://login.microsoftonline.com/{tenant}/.well-known/openid-configuration</Item>
                        <Item Key="authorization_endpoint">https://login.microsoftonline.com/{tenant}/oauth2/token</Item>
                        <Item Key="response_types">id_token</Item>
                        <Item Key="response_mode">query</Item>
                        <Item Key="scope">email openid</Item>
                        <!-- Policy Engine Clients -->
                        <Item Key="UsePolicyInRedirectUri">false</Item>
                        <Item Key="HttpBinding">POST</Item>
                        <Item Key="client_id">proxyAppID</Item>
                        <Item Key="IdTokenAudience">appID</Item>
                    </Metadata>
                    <InputClaims>
                        <InputClaim ClaimTypeReferenceId="email" PartnerClaimType="username" Required="true" />
                        <InputClaim ClaimTypeReferenceId="password" PartnerClaimType="password" Required="true" />
                        <InputClaim ClaimTypeReferenceId="grant_type" DefaultValue="password" />
                        <InputClaim ClaimTypeReferenceId="scope" DefaultValue="openid" />
                        <InputClaim ClaimTypeReferenceId="nca" PartnerClaimType="nca" DefaultValue="1" />
                        <InputClaim ClaimTypeReferenceId="client_id" DefaultValue="proxyAppID" />
                        <InputClaim ClaimTypeReferenceId="resource_id" PartnerClaimType="resource" DefaultValue="appID" />
                    </InputClaims>
                    <OutputClaims>
                        <OutputClaim ClaimTypeReferenceId="objectId" PartnerClaimType="oid" />
                    </OutputClaims>
                </TechnicalProfile>
            </TechnicalProfiles>
        </ClaimsProvider>
    <!--</ClaimsProviders>-->
Replace both instances of:
appID with Application (client) ID of the Identity Experience Framework application you copied in step 1.2.
proxyAppID with Application (client) ID of the Proxy Identity Experience Framework application you copied in step 1.2.
Step 2 - Configure the sign-in user interface
When your policy runs, the user needs to see a user interface that allows them to sign in. The user interface also has an option to sign up if they don't already have an account. To do so, you need to perform two steps:
- Configure a self-asserted technical profile, which displays the sign-in form to the user.
- Configure content definition for the sign-in user interface.
Step 2.1 - Configure a sign-in user interface technical profile
In the ContosoCustomPolicy.XML file, locate the SignInUser technical profile and add a SelfAsserted Technical Profile after it by using the following code:
    <TechnicalProfile Id="UserSignInCollector">
        <DisplayName>Local Account Signin</DisplayName>
        <Protocol Name="Proprietary"
            Handler="Web.TPEngine.Providers.SelfAssertedAttributeProvider, Web.TPEngine, Version=1.0.0.0, Culture=neutral, PublicKeyToken=null" />
        <Metadata>
            <Item Key="setting.operatingMode">Email</Item>
            <Item Key="SignUpTarget">AccountTypeInputCollectorClaimsExchange</Item>
        </Metadata>
        <DisplayClaims>
            <DisplayClaim ClaimTypeReferenceId="email" Required="true" />
            <DisplayClaim ClaimTypeReferenceId="password" Required="true" />
        </DisplayClaims>
        <OutputClaims>
            <OutputClaim ClaimTypeReferenceId="email" />
            <OutputClaim ClaimTypeReferenceId="password"  />
            <OutputClaim ClaimTypeReferenceId="objectId" />
        </OutputClaims>
        <ValidationTechnicalProfiles>
            <ValidationTechnicalProfile ReferenceId="SignInUser" />
        </ValidationTechnicalProfiles>
    </TechnicalProfile>
We've added a SelfAsserted Technical Profile, UserSignInCollector, which displays the sign-in form to the user. We've configured the technical profile to collect the user’s email address as their sign-in name as indicated in the setting.operatingMode metadata. The sign-in form includes a sign-up link, which leads the user to a sign-up form as indicated by the SignUpTarget metadata. You'll see how we set up the SignUpWithLogonEmailExchange ClaimsExchange in the orchestration steps.
Also, we've added the SignInUser OpenID Connect Technical Profile as a ValidationTechnicalProfile. So, the SignInUser technical profile executes when the user selects the Sign in button (see screenshot in step 5).
In the next step (step 2.2), we configure a content definition that we'll use in this SelfAsserted Technical Profile.
Step 2.2 - Configure sign-in interface content definition
In the ContosoCustomPolicy.XML file, locate the ContentDefinitions section, and then sign-in Content Definition by using the following code:
    <!--<ContentDefinitions>-->
        ...
            <ContentDefinition Id="SignupOrSigninContentDefinition">
                <LoadUri>~/tenant/templates/AzureBlue/unified.cshtml</LoadUri>
                <RecoveryUri>~/common/default_page_error.html</RecoveryUri>
                <DataUri>urn:com:microsoft:aad:b2c:elements:contract:unifiedssp:2.1.7</DataUri>
                <Metadata>
                    <Item Key="DisplayName">Signin and Signup</Item>
                </Metadata>
            </ContentDefinition>
    <!--</ContentDefinitions>-->
We've configured a content definition for our self-asserted technical profile, SignupOrSigninContentDefinition. We can specify it in the technical profile using the metadata element or specify it when we reference the technical profile in the orchestration steps. Previously, we learned how to specify a content definition directly in the self-asserted technical profile, so in this article, we'll learn how to specify it when we reference the technical profile in the orchestration steps, step 3.
Step 3 - Update the User journey orchestration steps
In the ContosoCustomPolicy.XML file, locate the HelloWorldJourney user journey and replace all its orchestration steps collection with the following code:
    <!--<OrchestrationSteps>-->
        ...
        <OrchestrationStep Order="1" Type="CombinedSignInAndSignUp" ContentDefinitionReferenceId="SignupOrSigninContentDefinition">
            <ClaimsProviderSelections>
                <ClaimsProviderSelection ValidationClaimsExchangeId="LocalAccountSigninEmailExchange" />
            </ClaimsProviderSelections>
            <ClaimsExchanges>
                <ClaimsExchange Id="LocalAccountSigninEmailExchange" TechnicalProfileReferenceId="UserSignInCollector" />
            </ClaimsExchanges>
        </OrchestrationStep>

        <OrchestrationStep Order="2" Type="ClaimsExchange">
            <Preconditions>
                <Precondition Type="ClaimsExist" ExecuteActionsIf="true">
                    <Value>objectId</Value>
                    <Action>SkipThisOrchestrationStep</Action>
                </Precondition>
            </Preconditions>
            <ClaimsExchanges>
                <ClaimsExchange Id="AccountTypeInputCollectorClaimsExchange" TechnicalProfileReferenceId="AccountTypeInputCollector"/>
            </ClaimsExchanges>
        </OrchestrationStep>

        <OrchestrationStep Order="3" Type="ClaimsExchange">
            <Preconditions>
                <Precondition Type="ClaimsExist" ExecuteActionsIf="true">
                    <Value>objectId</Value>
                    <Action>SkipThisOrchestrationStep</Action>
                </Precondition>
                <Precondition Type="ClaimEquals" ExecuteActionsIf="true">
                  <Value>accountType</Value>
                  <Value>company</Value>
                  <Action>SkipThisOrchestrationStep</Action>
                </Precondition>
            </Preconditions>
            <ClaimsExchanges>
                <ClaimsExchange Id="GetAccessCodeClaimsExchange" TechnicalProfileReferenceId="AccessCodeInputCollector" />
            </ClaimsExchanges>
        </OrchestrationStep>

        <OrchestrationStep Order="4" Type="ClaimsExchange">
            <Preconditions>
                <Precondition Type="ClaimsExist" ExecuteActionsIf="true">
                    <Value>objectId</Value>
                    <Action>SkipThisOrchestrationStep</Action>
                </Precondition>
            </Preconditions>
            <ClaimsExchanges>
                <ClaimsExchange Id="SignUpWithLogonEmailExchange" TechnicalProfileReferenceId="UserInformationCollector" />
            </ClaimsExchanges>
        </OrchestrationStep>

        <OrchestrationStep Order="5" Type="ClaimsExchange">
            <ClaimsExchanges>
            <ClaimsExchange Id="AADUserReaderExchange" TechnicalProfileReferenceId="AAD-UserRead"/>
            </ClaimsExchanges>
        </OrchestrationStep>

        <OrchestrationStep Order="6" Type="ClaimsExchange">
            <ClaimsExchanges>
            <ClaimsExchange Id="GetMessageClaimsExchange" TechnicalProfileReferenceId="UserInputMessageClaimGenerator"/>
            </ClaimsExchanges>
        </OrchestrationStep>

        <OrchestrationStep Order="7" Type="SendClaims" CpimIssuerTechnicalProfileReferenceId="JwtIssuer" />
    <!--</OrchestrationSteps>-->
In orchestration steps two to five, we've used preconditions to determine if Orchestration Step should run. We need to determine if the user is signing in or signing up.
When the custom policy runs:
Orchestration Step 1 - Displays sign-in page, so the user can sign in or select the Sign up now link. Notice that we specify the content definition that the UserSignInCollector self-asserted technical profile uses to display the sign-in form.
Orchestration Step 2 - This step runs if the user signs up (
objectIddoesn't exist), so we display the account type selection form by invoking the AccountTypeInputCollector self-asserted technical profile.Orchestration Step 3 - This step runs if the user signs up (
objectIddoesn't exist), and that a user doesn't select a companyaccountType. So we've to ask the user to input anaccessCodeby invoking the AccessCodeInputCollector self-asserted technical profile.Orchestration Step 4 - This step runs if the user signs up (objectId doesn't exist), so we display the sign-up form by invoking the UserInformationCollector self-asserted technical profile.
Orchestration Step 5 - This step reads account information from Microsoft Entra ID (we invoke
AAD-UserReadMicrosoft Entra ID technical profile), so it runs whether a user signs up or signs in.Orchestration Step 6 - This step invokes the UserInputMessageClaimGenerator technical profile to assemble the user’s greeting message.
Orchestration Step 7 - Finally, step 8 assembles and returns the JWT token at the end of the policy’s execution.
Step 4 - Upload policy
Follow the steps in Upload custom policy file to upload your policy file. If you're uploading a file with same name as the one already in the portal, make sure you select Overwrite the custom policy if it already exists.
Step 5 - Test policy
Follow the steps in Test the custom policy to test your custom policy. Once the policy runs, you'll see an interface similar to the screenshot below:
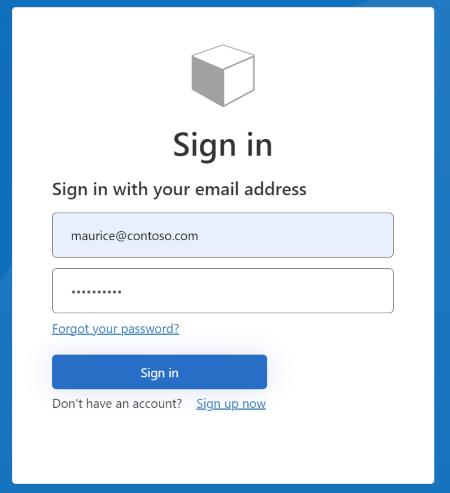
You can sign in by entering the Email Address and Password of an existing account. If you don't already have an account, you need to select the Sign up now link to create a new user account.
Next steps
Learn how to Set up a sign-up and sign-in flow with a social account by using Azure Active Directory B2C custom policy.
Learn how to Remove the sign-up link, so users can just sign in.
Learn more about OpenID Connect technical profile.
Feedback
Coming soon: Throughout 2024 we will be phasing out GitHub Issues as the feedback mechanism for content and replacing it with a new feedback system. For more information see: https://aka.ms/ContentUserFeedback.
Submit and view feedback for