Set up a sign-up and sign-in flow with a social account by using Azure Active Directory B2C custom policy
In Set up a sign-up and sign-in flow by using Azure Active Directory B2C custom policy article, we set up sign-in flow for a local account by using Azure Active Directory B2C (Azure AD B2C).
In this article, we add a sign-in flow for an external account, such as a social account like Facebook. In this case, Azure AD B2C allows a user to sign in to your application with credentials from an external social identity provider (IdP).
For local accounts, a user account is uniquely identified by using the objectId user attribute. For external IdP, we use alternativeSecurityId user attribute though an objectId still exists.
Prerequisites
If you don't have one already, create an Azure AD B2C tenant that is linked to your Azure subscription.
Register a web application, and enable ID token implicit grant. For the Redirect URI, use https://jwt.ms.
You must have Visual Studio Code (VS Code) installed in your computer.
Complete the steps in Set up a sign-up and sign-in flow for local account by using Azure Active Directory B2C custom policy. This article is a part of Create and run your own custom policies how-to guide series.
Note
This article is part of the Create and run your own custom policies in Azure Active Directory B2C how-to guide series. We recommend that you start this series from the first article.
Step 1 - Create Facebook application
Use the steps outlined in Create a Facebook application to obtain Facebook App ID and App Secret. Skip the prerequisites and the rest of the steps in the Set up sign up and sign in with a Facebook account article.
Step 2 - Create Facebook policy key
Use the steps outlined in Create the Facebook key store a policy key in your Azure AD B2C tenant. Skip the prerequisites and the rest of the steps in the Set up sign up and sign in with a Facebook account article.
Step 3 - Configure sign-in with Facebook
To configure sign in with Facebook, you need to perform the following steps:
- Declare more claims
- Define more claims transformations to help with claims manipulations such as creating
AlternativeSecurityId. - Configure Facebook claims provider
- Configure Microsoft Entra technical profiles to read and write the social account from and to the Microsoft Entra database.
- Configure a self-asserted technical profile (for accepting additional input from user or updating user details) and its content definition.
Step 3.1 - Declare more claims
In the ContosoCustomPolicy.XML file, locate the ClaimsSchema section, and then declare more claims by using the following code:
    <!--<ClaimsSchema>-->
        ...
        <ClaimType Id="issuerUserId">
            <DisplayName>Username</DisplayName>
            <DataType>string</DataType>
            <UserHelpText/>
            <UserInputType>TextBox</UserInputType>
            <Restriction>
                <Pattern RegularExpression="^[a-zA-Z0-9]+[a-zA-Z0-9_-]*$" HelpText="The username you provided is not valid. It must begin with an alphabet or number and can contain alphabets, numbers and the following symbols: _ -" />
            </Restriction>
        </ClaimType>

        <ClaimType Id="identityProvider">
            <DisplayName>Identity Provider</DisplayName>
            <DataType>string</DataType>
            <UserHelpText/>
        </ClaimType>

        <ClaimType Id="authenticationSource">
            <DisplayName>AuthenticationSource</DisplayName>
            <DataType>string</DataType>
            <UserHelpText>Specifies whether the user was authenticated at Social IDP or local account.</UserHelpText>
        </ClaimType>

        <ClaimType Id="upnUserName">
            <DisplayName>UPN User Name</DisplayName>
            <DataType>string</DataType>
            <UserHelpText>The user name for creating user principal name.</UserHelpText>
        </ClaimType>

        <ClaimType Id="alternativeSecurityId">
            <DisplayName>AlternativeSecurityId</DisplayName>
            <DataType>string</DataType>
            <UserHelpText/>
        </ClaimType>

        <ClaimType Id="mailNickName">
            <DisplayName>MailNickName</DisplayName>
            <DataType>string</DataType>
            <UserHelpText>Your mail nick name as stored in the Azure Active Directory.</UserHelpText>
        </ClaimType>

        <ClaimType Id="newUser">
            <DisplayName>User is new or not</DisplayName>
            <DataType>boolean</DataType>
            <UserHelpText/>
        </ClaimType>
    <!--</ClaimsSchema>-->
Step 3.2 - Define claims transformations
In the ContosoCustomPolicy.XML file, locate the ClaimsTransformations element, and add claims transformations by using the following code:
   <!--<ClaimsTransformations>-->
       ...
       <ClaimsTransformation Id="CreateRandomUPNUserName" TransformationMethod="CreateRandomString">
           <InputParameters>
               <InputParameter Id="randomGeneratorType" DataType="string" Value="GUID" />
           </InputParameters>
           <OutputClaims>
               <OutputClaim ClaimTypeReferenceId="upnUserName" TransformationClaimType="outputClaim" />
           </OutputClaims>
       </ClaimsTransformation>

       <ClaimsTransformation Id="CreateAlternativeSecurityId" TransformationMethod="CreateAlternativeSecurityId">
           <InputClaims>
               <InputClaim ClaimTypeReferenceId="issuerUserId" TransformationClaimType="key" />
               <InputClaim ClaimTypeReferenceId="identityProvider" TransformationClaimType="identityProvider" />
           </InputClaims>
           <OutputClaims>
               <OutputClaim ClaimTypeReferenceId="alternativeSecurityId" TransformationClaimType="alternativeSecurityId" />
           </OutputClaims>
       </ClaimsTransformation>

       <ClaimsTransformation Id="CreateUserPrincipalName" TransformationMethod="FormatStringClaim">
           <InputClaims>
               <InputClaim ClaimTypeReferenceId="upnUserName" TransformationClaimType="inputClaim" />
           </InputClaims>
           <InputParameters>
               <InputParameter Id="stringFormat" DataType="string" Value="cpim_{0}@{RelyingPartyTenantId}" />
           </InputParameters>
           <OutputClaims>
               <OutputClaim ClaimTypeReferenceId="userPrincipalName" TransformationClaimType="outputClaim" />
           </OutputClaims>
       </ClaimsTransformation>
   <!--</ClaimsTransformations>-->
We've defined three Claims Transformations, which we use to generate values for alternativeSecurityId and userPrincipalName claims. These ClaimsTransformations are invoked in the OAuth2 technical profile in step 3.3.
Step 3.3 - Configure Facebook claims provider
To enable users to sign in using a Facebook account, you need to define the account as a claims provider that Azure AD B2C can communicate with through an endpoint. You can define a Facebook account as a claims provider.
In the ContosoCustomPolicy.XML file, locate ClaimsProviders element, add a new claims provider by using the following code:
    <!--<ClaimsProviders>-->
        ...
        <ClaimsProvider>
            <!-- The following Domain element allows this profile to be used if the request comes with domain_hint
                    query string parameter, e.g. domain_hint=facebook.com  -->
            <Domain>facebook.com</Domain>
            <DisplayName>Facebook</DisplayName>
            <TechnicalProfiles>
                <TechnicalProfile Id="Facebook-OAUTH">
                <!-- The text in the following DisplayName element is shown to the user on the claims provider
                        selection screen. -->
                <DisplayName>Facebook</DisplayName>
                <Protocol Name="OAuth2" />
                <Metadata>
                    <Item Key="ProviderName">facebook</Item>
                    <Item Key="authorization_endpoint">https://www.facebook.com/dialog/oauth</Item>
                    <Item Key="AccessTokenEndpoint">https://graph.facebook.com/oauth/access_token</Item>
                    <Item Key="HttpBinding">GET</Item>
                    <Item Key="UsePolicyInRedirectUri">0</Item>
                    <Item Key="client_id">facebook-app-id</Item>
                    <Item Key="scope">email public_profile</Item>
                    <Item Key="ClaimsEndpoint">https://graph.facebook.com/me?fields=id,first_name,last_name,name,email</Item>
                    <Item Key="AccessTokenResponseFormat">json</Item>
                </Metadata>
                <CryptographicKeys>
                    <Key Id="client_secret" StorageReferenceId="facebook-policy-key" />
                </CryptographicKeys>
                <InputClaims />
                <OutputClaims>
                    <OutputClaim ClaimTypeReferenceId="issuerUserId" PartnerClaimType="id" />
                    <OutputClaim ClaimTypeReferenceId="givenName" PartnerClaimType="first_name" />
                    <OutputClaim ClaimTypeReferenceId="surname" PartnerClaimType="last_name" />
                    <OutputClaim ClaimTypeReferenceId="displayName" PartnerClaimType="name" />
                    <OutputClaim ClaimTypeReferenceId="email" PartnerClaimType="email" />
                    <OutputClaim ClaimTypeReferenceId="identityProvider" DefaultValue="facebook.com" AlwaysUseDefaultValue="true" />
                    <OutputClaim ClaimTypeReferenceId="authenticationSource" DefaultValue="socialIdpAuthentication" AlwaysUseDefaultValue="true" />
                </OutputClaims>
                <OutputClaimsTransformations>
                    <OutputClaimsTransformation ReferenceId="CreateRandomUPNUserName" />
                    <OutputClaimsTransformation ReferenceId="CreateUserPrincipalName" />
                    <OutputClaimsTransformation ReferenceId="CreateAlternativeSecurityId" />
                </OutputClaimsTransformations>
                </TechnicalProfile>
            </TechnicalProfiles>
        </ClaimsProvider>
    <!--</ClaimsProviders>-->
Replace:
facebook-app-idwith the value of FacebookappIDyou obtained in step 1.facebook-policy-keywith the name of the Facebook policy key you obtained in step 2.
Notice the claims transformations we defined in step 3.2 in the OutputClaimsTransformations collection.
Step 3.4 - Create Microsoft Entra technical profiles
Just like in sign-in with a local account, you need to configure the Microsoft Entra Technical Profiles, which you use to connect to Microsoft Entra ID storage, to store or read a user social account.
In the
ContosoCustomPolicy.XMLfile, locate theAAD-UserReadtechnical profile and then add a new technical profile by using the following code:<TechnicalProfile Id="AAD-UserWriteUsingAlternativeSecurityId"> <DisplayName>Azure Active Directory technical profile for handling social accounts</DisplayName> <Protocol Name="Proprietary" Handler="Web.TPEngine.Providers.AzureActiveDirectoryProvider, Web.TPEngine, Version=1.0.0.0, Culture=neutral, PublicKeyToken=null" /> <Metadata> <Item Key="Operation">Write</Item> <Item Key="RaiseErrorIfClaimsPrincipalAlreadyExists">true</Item> </Metadata> <CryptographicKeys> <Key Id="issuer_secret" StorageReferenceId="B2C_1A_TokenSigningKeyContainer" /> </CryptographicKeys> <InputClaims> <InputClaim ClaimTypeReferenceId="alternativeSecurityId" PartnerClaimType="alternativeSecurityId" Required="true" /> </InputClaims> <PersistedClaims> <!-- Required claims --> <PersistedClaim ClaimTypeReferenceId="alternativeSecurityId" /> <PersistedClaim ClaimTypeReferenceId="userPrincipalName" /> <PersistedClaim ClaimTypeReferenceId="mailNickName" DefaultValue="unknown" /> <PersistedClaim ClaimTypeReferenceId="displayName" DefaultValue="unknown" /> <!-- Optional claims --> <PersistedClaim ClaimTypeReferenceId="givenName" /> <PersistedClaim ClaimTypeReferenceId="surname" /> </PersistedClaims> <OutputClaims> <OutputClaim ClaimTypeReferenceId="objectId" /> <OutputClaim ClaimTypeReferenceId="newUser" PartnerClaimType="newClaimsPrincipalCreated" /> </OutputClaims> </TechnicalProfile>We've added a new Microsoft Entra Technical Profile
AAD-UserWriteUsingAlternativeSecurityIdthat writes a new social account into Microsoft Entra ID.Replace B2C_1A_TokenSigningKeyContainer with the token signing key you created in Configure the signing.
In the
ContosoCustomPolicy.XMLfile, add another Microsoft Entra technical profile after theAAD-UserWriteUsingAlternativeSecurityIdTechnical Profile by using the following code:<TechnicalProfile Id="AAD-UserReadUsingAlternativeSecurityId"> <DisplayName>Azure Active Directory</DisplayName> <Protocol Name="Proprietary" Handler="Web.TPEngine.Providers.AzureActiveDirectoryProvider, Web.TPEngine, Version=1.0.0.0, Culture=neutral, PublicKeyToken=null" /> <Metadata> <Item Key="Operation">Read</Item> <Item Key="RaiseErrorIfClaimsPrincipalDoesNotExist">false</Item> </Metadata> <CryptographicKeys> <Key Id="issuer_secret" StorageReferenceId="B2C_1A_TokenSigningKeyContainer" /> </CryptographicKeys> <InputClaims> <InputClaim ClaimTypeReferenceId="alternativeSecurityId" PartnerClaimType="alternativeSecurityId" Required="true" /> </InputClaims> <OutputClaims> <!-- Required claims --> <OutputClaim ClaimTypeReferenceId="objectId" /> <!-- Optional claims --> <OutputClaim ClaimTypeReferenceId="userPrincipalName" /> <OutputClaim ClaimTypeReferenceId="displayName" /> <OutputClaim ClaimTypeReferenceId="givenName" /> <OutputClaim ClaimTypeReferenceId="surname" /> </OutputClaims> </TechnicalProfile>We've added a new Microsoft Entra Technical Profile
AAD-UserReadUsingAlternativeSecurityIdthat reads a new social account from Microsoft Entra ID. It usesalternativeSecurityIdas a unique identifier for the social account.Replace B2C_1A_TokenSigningKeyContainer with the token signing key you created in Configure the signing.
Step 3.5 - Configure content definition
After a user signs in, you can collect some information from them by using a self-asserted technical profile. So, you need to configure content definition for the self-asserted technical profile.
In the ContosoCustomPolicy.XML file, locate the ContentDefinitions element, and then add a new content definition in the ContentDefinitions collection by using the following code:
    <ContentDefinition Id="socialAccountsignupContentDefinition">
        <LoadUri>~/tenant/templates/AzureBlue/selfAsserted.cshtml</LoadUri>
        <RecoveryUri>~/common/default_page_error.html</RecoveryUri>
        <DataUri>urn:com:microsoft:aad:b2c:elements:contract:selfasserted:2.1.7</DataUri>
        <Metadata>
            <Item Key="DisplayName">Collect information from user page alongside those from social Idp.</Item>
        </Metadata>
    </ContentDefinition>
We use this content definition as a metadata in a self-asserted technical profile on the next step (step 3.6).
Step 3.6 - Configure a self-asserted technical profile
The self-asserted technical profile you configure in this step is used to collect more information from the user or update similar information obtained from the social account.
In the ContosoCustomPolicy.XML file, locate the ClaimsProviders section, and then add a new claims provider by using the following code:
    <!--<ClaimsProviders>-->
        ...
        <ClaimsProvider>
            <DisplayName>Self Asserted for social sign in</DisplayName>
            <TechnicalProfiles>
                <TechnicalProfile Id="SelfAsserted-Social">
                    <DisplayName>Collect more info during social signup</DisplayName>
                    <Protocol Name="Proprietary" Handler="Web.TPEngine.Providers.SelfAssertedAttributeProvider, Web.TPEngine, Version=1.0.0.0, Culture=neutral, PublicKeyToken=null" />
                    <Metadata>
                      <Item Key="ContentDefinitionReferenceId">socialAccountsignupContentDefinition</Item>
                    </Metadata>
                    <CryptographicKeys>
                      <Key Id="issuer_secret" StorageReferenceId="B2C_1A_TokenSigningKeyContainer" />
                    </CryptographicKeys>
                    <InputClaims>
                      <!-- These claims ensure that any values retrieved in the previous steps (e.g. from an external IDP) are prefilled.
                           Note that some of these claims may not have any value, for example, if the external IDP did not provide any of
                           these values, or if the claim did not appear in the OutputClaims section of the IDP.
                           In addition, if a claim is not in the InputClaims section, but it is in the OutputClaims section, then its
                           value will not be prefilled, but the user will still be prompted for it (with an empty value). -->
                      <InputClaim ClaimTypeReferenceId="displayName" />
                      <InputClaim ClaimTypeReferenceId="givenName" />
                      <InputClaim ClaimTypeReferenceId="surname" />
                    </InputClaims>
                    <!---User will be asked to input or update these values-->
                    <DisplayClaims>
                        <DisplayClaim ClaimTypeReferenceId="displayName"/>
                        <DisplayClaim ClaimTypeReferenceId="givenName"/>
                        <DisplayClaim ClaimTypeReferenceId="surname"/>
                    </DisplayClaims>

                    <OutputClaims>
                      <!-- These claims are not shown to the user because their value is obtained through the "ValidationTechnicalProfiles"
                           referenced below, or a default value is assigned to the claim. A claim is only shown to the user to provide a
                           value if its value cannot be obtained through any other means. -->
                      <OutputClaim ClaimTypeReferenceId="objectId" />
                      <OutputClaim ClaimTypeReferenceId="newUser" />
                      <!---<OutputClaim ClaimTypeReferenceId="executed-SelfAsserted-Input" DefaultValue="true" />-->

                      <!-- Optional claims. These claims are collected from the user and can be modified. If a claim is to be persisted in the directory after having been
                           collected from the user, it needs to be added as a PersistedClaim in the ValidationTechnicalProfile referenced below, i.e.
                           in AAD-UserWriteUsingAlternativeSecurityId. -->
                      <OutputClaim ClaimTypeReferenceId="displayName" />
                      <OutputClaim ClaimTypeReferenceId="givenName" />
                      <OutputClaim ClaimTypeReferenceId="surname" />
                    </OutputClaims>
                    <ValidationTechnicalProfiles>
                      <ValidationTechnicalProfile ReferenceId="AAD-UserWriteUsingAlternativeSecurityId" />
                    </ValidationTechnicalProfiles>
                  </TechnicalProfile>
            </TechnicalProfiles>
        </ClaimsProvider>
    <!--</ClaimsProviders>-->
The claims provider we've added contains a self-asserted technical profile, SelfAsserted-Social. The self-asserted technical profile uses the AAD-UserWriteUsingAlternativeSecurityId Technical Profile as a validation technical profile. So, the AAD-UserWriteUsingAlternativeSecurityId Technical Profile executes when the user selects the Continue button (see screenshot in step 7).
Also, notice that we've added the content definition, socialAccountsignupContentDefinition, that we configured in step 3.5 in the metadata section.
Step 4 - Update the User journey orchestration steps
In the ContosoCustomPolicy.XML file, locate the HelloWorldJourney user journey and replace all the orchestration steps with the steps shown in the following code:
    <!--<OrchestrationSteps>-->
        ...
        <OrchestrationStep Order="1" Type="CombinedSignInAndSignUp">
            <ClaimsProviderSelections>
                <ClaimsProviderSelection TargetClaimsExchangeId="FacebookExchange" />
            </ClaimsProviderSelections>
        </OrchestrationStep>

        <OrchestrationStep Order="2" Type="ClaimsExchange">
            <ClaimsExchanges>
                <ClaimsExchange Id="FacebookExchange"
                    TechnicalProfileReferenceId="Facebook-OAUTH" />
            </ClaimsExchanges>
        </OrchestrationStep>

        <!-- For social IDP authentication, attempt to find the user account in the
        directory. -->
        <OrchestrationStep Order="3" Type="ClaimsExchange">
            <ClaimsExchanges>
                <ClaimsExchange Id="AADUserReadUsingAlternativeSecurityId" TechnicalProfileReferenceId="AAD-UserReadUsingAlternativeSecurityId" />
            </ClaimsExchanges>
        </OrchestrationStep>

        <!-- Show self-asserted page only if the directory does not have the user account
        already (i.e. we don't have an objectId).  -->
        <OrchestrationStep Order="4" Type="ClaimsExchange">
            <Preconditions>
                <Precondition Type="ClaimsExist" ExecuteActionsIf="true">
                    <Value>objectId</Value>
                    <Action>SkipThisOrchestrationStep</Action>
                </Precondition>
            </Preconditions>
            <ClaimsExchanges>
                <ClaimsExchange Id="SelfAsserted-Social" TechnicalProfileReferenceId="SelfAsserted-Social" />
            </ClaimsExchanges>
        </OrchestrationStep>

        <OrchestrationStep Order="5" Type="ClaimsExchange">
            <Preconditions>
                <Precondition Type="ClaimsExist" ExecuteActionsIf="true">
                    <Value>objectId</Value>
                    <Action>SkipThisOrchestrationStep</Action>
                </Precondition>
            </Preconditions>
            <ClaimsExchanges>
                <ClaimsExchange Id="AADUserWrite" TechnicalProfileReferenceId="AAD-UserWriteUsingAlternativeSecurityId" />
            </ClaimsExchanges>
        </OrchestrationStep>
        <OrchestrationStep Order="6" Type="SendClaims" CpimIssuerTechnicalProfileReferenceId="JwtIssuer" />
    <!--</OrchestrationSteps>-->
In the orchestration, we've used make reference to technical profiles that enable a user to sign in by using a social account.
When the custom policy runs:
Orchestration Step 1 - This step includes a
ClaimsProviderSelectionselement, which lists the available sign-in options a user can choose from. In this case, we've only have one option,FacebookExchange, so when the policy runs, users are taken directly to Facebook.com in step 2 as shown by theTargetClaimsExchangeIdattribute.Orchestration Step 2 - The
Facebook-OAUTHtechnical profile executes, so the user is redirected to Facebook to sign in.Orchestration Step 3 - In step 3, the
AAD-UserReadUsingAlternativeSecurityIdtechnical profile executes to try to read the user social account from Microsoft Entra ID storage. If the social account is found,objectIdis returned as an output claim.Orchestration Step 4 - This step runs if the user doesn't already exist (
objectIddoesn't exist). It shows the form that collects more information from the user or updates similar information obtained from the social account.Orchestration Step 5 - This step runs if the user doesn't already exist (
objectIddoesn't exist), so theAAD-UserWriteUsingAlternativeSecurityIdTechnical Profile executes to write the social account into Microsoft Entra ID.Orchestration Step 6 - Finally, step 6 assembles and returns the JWT token at the end of the policy’s execution.
Step 5 - Update relying party output claims
In the ContosoCustomPolicy.XML file, locate the RelyingParty element, and then replace all the output claims collection with the following code:
    <OutputClaim ClaimTypeReferenceId="displayName" />
    <OutputClaim ClaimTypeReferenceId="givenName" />
    <OutputClaim ClaimTypeReferenceId="surname" />
    <OutputClaim ClaimTypeReferenceId="email" />
    <OutputClaim ClaimTypeReferenceId="objectId" PartnerClaimType="sub"/>
    <OutputClaim ClaimTypeReferenceId="identityProvider" />
We've added the identity provider (identityProvider) as an output claim, so it will be included in the JWT token returned to the relying party application.
Step 6 - Upload policy
Follow the steps in Upload custom policy file to upload your policy file. If you're uploading a file with same name as the one already in the portal, make sure you select Overwrite the custom policy if it already exists.
Step 7 - Test policy
Follow the steps in Test the custom policy to test your custom policy.
You're redirected to a Facebook sign-in page. Enter your Facebook credentials, and then select Log In. You're directly redirected to Facebook as we set it so in our orchestration steps since we don't have multiple sign-in options to choose from. Typically, in an app, you'd add a button like Sign in with Facebook, which when selected, runs the policy.
If it's the first time running this policy (social account doesn't already exist in Microsoft Entra storage), you see a screenshot such as the one shown below. You won't see this screen in subsequent policy executions as the social account already exist in Microsoft Entra storage.

Enter or update Display Name, Given Name and the Surname, and then select Continue button.
After the policy finishes execution, you're redirected to https://jwt.ms, and you see a decoded JWT token. It looks similar to the following JWT token snippet:
{
  "typ": "JWT",
  "alg": "RS256",
  "kid": "pxLOMWFgP4T..."
}.{
   ...
  "acr": "b2c_1a_contosocustompolicy",
   ...
  "given_name": "Maurice",
  "family_name": "Paulet",
  "name": "Maurice Paulet",
  "email": "maurice.p@contoso.com",
  "idp": "facebook.com"
}.[Signature]
Notice the identity provider, "idp": "facebook.com", has been included in the JWT token.
A combined local and social sign-in
In this article, our user journey orchestration steps only reference technical profiles that enable a user to sign in by using a social account. We can modify the orchestration steps to enable a user to sign in by using either a local account or a social account. To do so, the first orchestration step's ClaimsProviderSelections element lists the sign-in options available to the user.
Use the following steps to add a combined local and social account:
In the
ContosoCustomPolicy.XMLfile, locate theAccountTypeInputCollectorself-asserted technical profile, and then addauthenticationSourceclaim in its output claims collection by using the following code:<OutputClaim ClaimTypeReferenceId="authenticationSource" DefaultValue="localIdpAuthentication" AlwaysUseDefaultValue="true" />In the
UserJourneyssection, add a new user journey,LocalAndSocialSignInAndSignUpby using the following code:<!--<UserJourneys>--> ... <UserJourney Id="LocalAndSocialSignInAndSignUp"> <OrchestrationSteps> <!--Orchestration steps will be added here--> </OrchestrationSteps> </UserJourney> <!--</UserJourneys>-->In the user journey you've created,
LocalAndSocialSignInAndSignUp, add orchestration steps by using the following code:<!--<UserJourneys> ... <UserJourney Id="LocalAndSocialSignInAndSignUp"> <OrchestrationSteps>--> <OrchestrationStep Order="1" Type="CombinedSignInAndSignUp" ContentDefinitionReferenceId="SignupOrSigninContentDefinition"> <ClaimsProviderSelections> <ClaimsProviderSelection TargetClaimsExchangeId="FacebookExchange" /> <ClaimsProviderSelection ValidationClaimsExchangeId="LocalAccountSigninEmailExchange" /> </ClaimsProviderSelections> <ClaimsExchanges> <ClaimsExchange Id="LocalAccountSigninEmailExchange" TechnicalProfileReferenceId="UserSignInCollector" /> </ClaimsExchanges> </OrchestrationStep> <!-- Check if the user has selected to sign in using one of the social providers --> <OrchestrationStep Order="2" Type="ClaimsExchange"> <Preconditions> <Precondition Type="ClaimsExist" ExecuteActionsIf="true"> <Value>objectId</Value> <Action>SkipThisOrchestrationStep</Action> </Precondition> </Preconditions> <ClaimsExchanges> <ClaimsExchange Id="FacebookExchange" TechnicalProfileReferenceId="Facebook-OAUTH" /> <ClaimsExchange Id="AccountTypeInputCollectorClaimsExchange" TechnicalProfileReferenceId="AccountTypeInputCollector"/> </ClaimsExchanges> </OrchestrationStep> <!--For Local sign in option start--> <OrchestrationStep Order="3" Type="ClaimsExchange"> <Preconditions> <Precondition Type="ClaimsExist" ExecuteActionsIf="true"> <Value>objectId</Value> <Action>SkipThisOrchestrationStep</Action> </Precondition> <Precondition Type="ClaimEquals" ExecuteActionsIf="true"> <Value>accountType</Value> <Value>work</Value> <Action>SkipThisOrchestrationStep</Action> </Precondition> <Precondition Type="ClaimEquals" ExecuteActionsIf="true"> <Value>authenticationSource</Value> <Value>socialIdpAuthentication</Value> <Action>SkipThisOrchestrationStep</Action> </Precondition> </Preconditions> <ClaimsExchanges> <ClaimsExchange Id="GetAccessCodeClaimsExchange" TechnicalProfileReferenceId="AccessCodeInputCollector" /> </ClaimsExchanges> </OrchestrationStep> <OrchestrationStep Order="4" Type="ClaimsExchange"> <Preconditions> <Precondition Type="ClaimsExist" ExecuteActionsIf="true"> <Value>objectId</Value> <Action>SkipThisOrchestrationStep</Action> </Precondition> <Precondition Type="ClaimEquals" ExecuteActionsIf="true"> <Value>authenticationSource</Value> <Value>socialIdpAuthentication</Value> <Action>SkipThisOrchestrationStep</Action> </Precondition> </Preconditions> <ClaimsExchanges> <ClaimsExchange Id="SignUpWithLogonEmailExchange" TechnicalProfileReferenceId="UserInformationCollector" /> </ClaimsExchanges> </OrchestrationStep> <OrchestrationStep Order="5" Type="ClaimsExchange"> <Preconditions> <Precondition Type="ClaimEquals" ExecuteActionsIf="true"> <Value>authenticationSource</Value> <Value>socialIdpAuthentication</Value> <Action>SkipThisOrchestrationStep</Action> </Precondition> </Preconditions> <ClaimsExchanges> <ClaimsExchange Id="AADUserReaderExchange" TechnicalProfileReferenceId="AAD-UserRead"/> </ClaimsExchanges> </OrchestrationStep> <!--For Local sign in option end--> <!--For social sign in option start--> <!-- For social IDP authentication, attempt to find the user account in the directory. --> <OrchestrationStep Order="6" Type="ClaimsExchange"> <Preconditions> <Precondition Type="ClaimEquals" ExecuteActionsIf="true"> <Value>authenticationSource</Value> <Value>localIdpAuthentication</Value> <Action>SkipThisOrchestrationStep</Action> </Precondition> </Preconditions> <ClaimsExchanges> <ClaimsExchange Id="AADUserReadUsingAlternativeSecurityId" TechnicalProfileReferenceId="AAD-UserReadUsingAlternativeSecurityId" /> </ClaimsExchanges> </OrchestrationStep> <!-- Show self-asserted page only if the directory does not have the user account already (i.e. we do not have an objectId). --> <OrchestrationStep Order="7" Type="ClaimsExchange"> <Preconditions> <Precondition Type="ClaimsExist" ExecuteActionsIf="true"> <Value>objectId</Value> <Action>SkipThisOrchestrationStep</Action> </Precondition> <Precondition Type="ClaimEquals" ExecuteActionsIf="true"> <Value>authenticationSource</Value> <Value>localIdpAuthentication</Value> <Action>SkipThisOrchestrationStep</Action> </Precondition> </Preconditions> <ClaimsExchanges> <ClaimsExchange Id="SelfAsserted-Social" TechnicalProfileReferenceId="SelfAsserted-Social" /> </ClaimsExchanges> </OrchestrationStep> <OrchestrationStep Order="8" Type="ClaimsExchange"> <Preconditions> <Precondition Type="ClaimsExist" ExecuteActionsIf="true"> <Value>objectId</Value> <Action>SkipThisOrchestrationStep</Action> </Precondition> <Precondition Type="ClaimEquals" ExecuteActionsIf="true"> <Value>authenticationSource</Value> <Value>localIdpAuthentication</Value> <Action>SkipThisOrchestrationStep</Action> </Precondition> </Preconditions> <ClaimsExchanges> <ClaimsExchange Id="AADUserWrite" TechnicalProfileReferenceId="AAD-UserWriteUsingAlternativeSecurityId" /> </ClaimsExchanges> </OrchestrationStep> <!--For social sign in option end--> <OrchestrationStep Order="9" Type="ClaimsExchange"> <ClaimsExchanges> <ClaimsExchange Id="GetMessageClaimsExchange" TechnicalProfileReferenceId="UserInputMessageClaimGenerator"/> </ClaimsExchanges> </OrchestrationStep> <OrchestrationStep Order="10" Type="SendClaims" CpimIssuerTechnicalProfileReferenceId="JwtIssuer" /> <!-- </OrchestrationSteps> </UserJourney> </UserJourneys>-->In the first step, we specify the options a user needs to choose from in their journey, local or social authentication. In the steps that follow, we use preconditions to track the option the user picked or the stage of the journey at which the user is. For example, we use the
authenticationSourceclaim to differentiate between a local authentication journey and a social authentication journey.In the
RelyingPartysection, change DefaultUserJourney'sReferenceIdtoLocalAndSocialSignInAndSignUpUse the procedure in step 6 and step 7 to upload and run your policy. After you run the policy, you'll see a screen similar to the following screenshot.
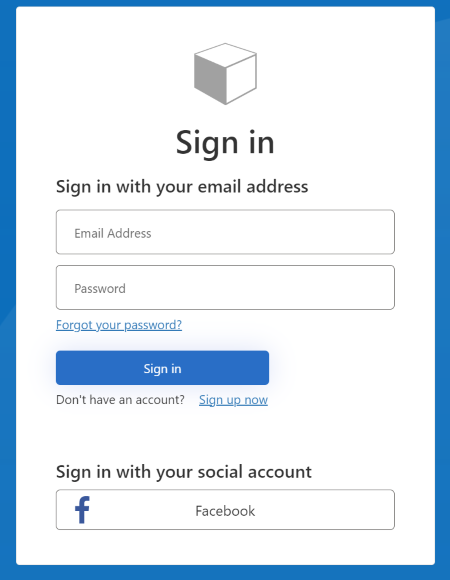
You can observe that a user can sign up or sign in by using either a local account or a social account.
Next steps
- Learn more about how to Define an OAuth2 technical profile in an Azure Active Directory B2C custom policy.
Feedback
Coming soon: Throughout 2024 we will be phasing out GitHub Issues as the feedback mechanism for content and replacing it with a new feedback system. For more information see: https://aka.ms/ContentUserFeedback.
Submit and view feedback for