Note
Access to this page requires authorization. You can try signing in or changing directories.
Access to this page requires authorization. You can try changing directories.
This article describes how to restore an Elastic SAN volume backup by using the Azure portal.
Prerequisites
Before you restore an Elastic SAN volume backup by using the Azure portal, ensure that you meet the following prerequisites:
- Use a protected Elastic SAN backup instance with at least one recovery point.
- Use a target Elastic SAN instance and volume group for the restored volume.
- Check that the Elastic SAN volume size is 16 TB or less.
- Review the supported scenarios, limitations, and region availability for Elastic SAN volume operational backup and restore.
Restore the Elastic SAN volume backup by using the Azure portal
To restore the Elastic SAN volume backup, follow these steps:
In the Azure portal, go to Resiliency, and select Recover.
On the Recover pane, select Datasource type as Elastic SAN volumes, and under Protected item, select Select.
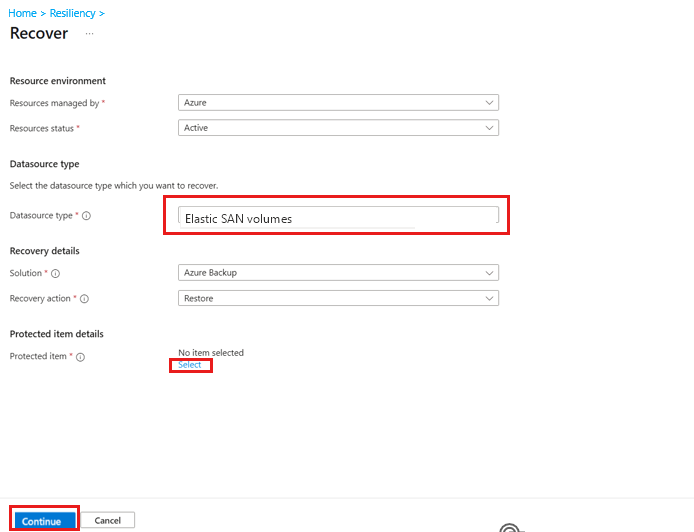
On the Select protected item pane, select the Elastic SAN instance that you want to restore, and select Select.
On the Recover pane, select Continue.
On the Restore pane, on the Restore point tab, under Restore point, select Select restore point.
On the Select restore point pane, select the required restore point from the list.
On the Restore pane, on the Restore parameters tab, select Select to specify the restore configuration parameters.
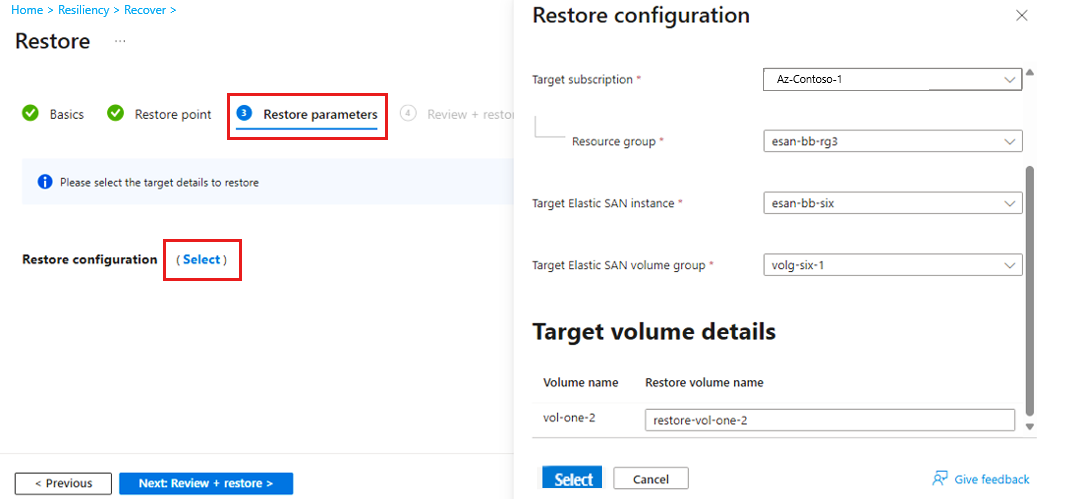
On the Restore configuration pane, select the Target subscription, Resource group, Target Elastic SAN instance, and Target Elastic SAN volume group.
Under Target volume details, select the volumes you want to restore.
Under Volume name, enter a name for the volume to create, and select Select.
Important
- An Elastic SAN volume name, once assigned, can't be changed.
- You can't overwrite an existing volume. If a volume with the same name exists, the restore operation fails.
On the Restore pane, on the Restore parameters tab, select Validate to verify that Azure Backup has the required permissions to restore the selected backup to the target Elastic SAN volume.
Validation checks the restore prerequisites and identifies any missing permissions before you start the restore operation.
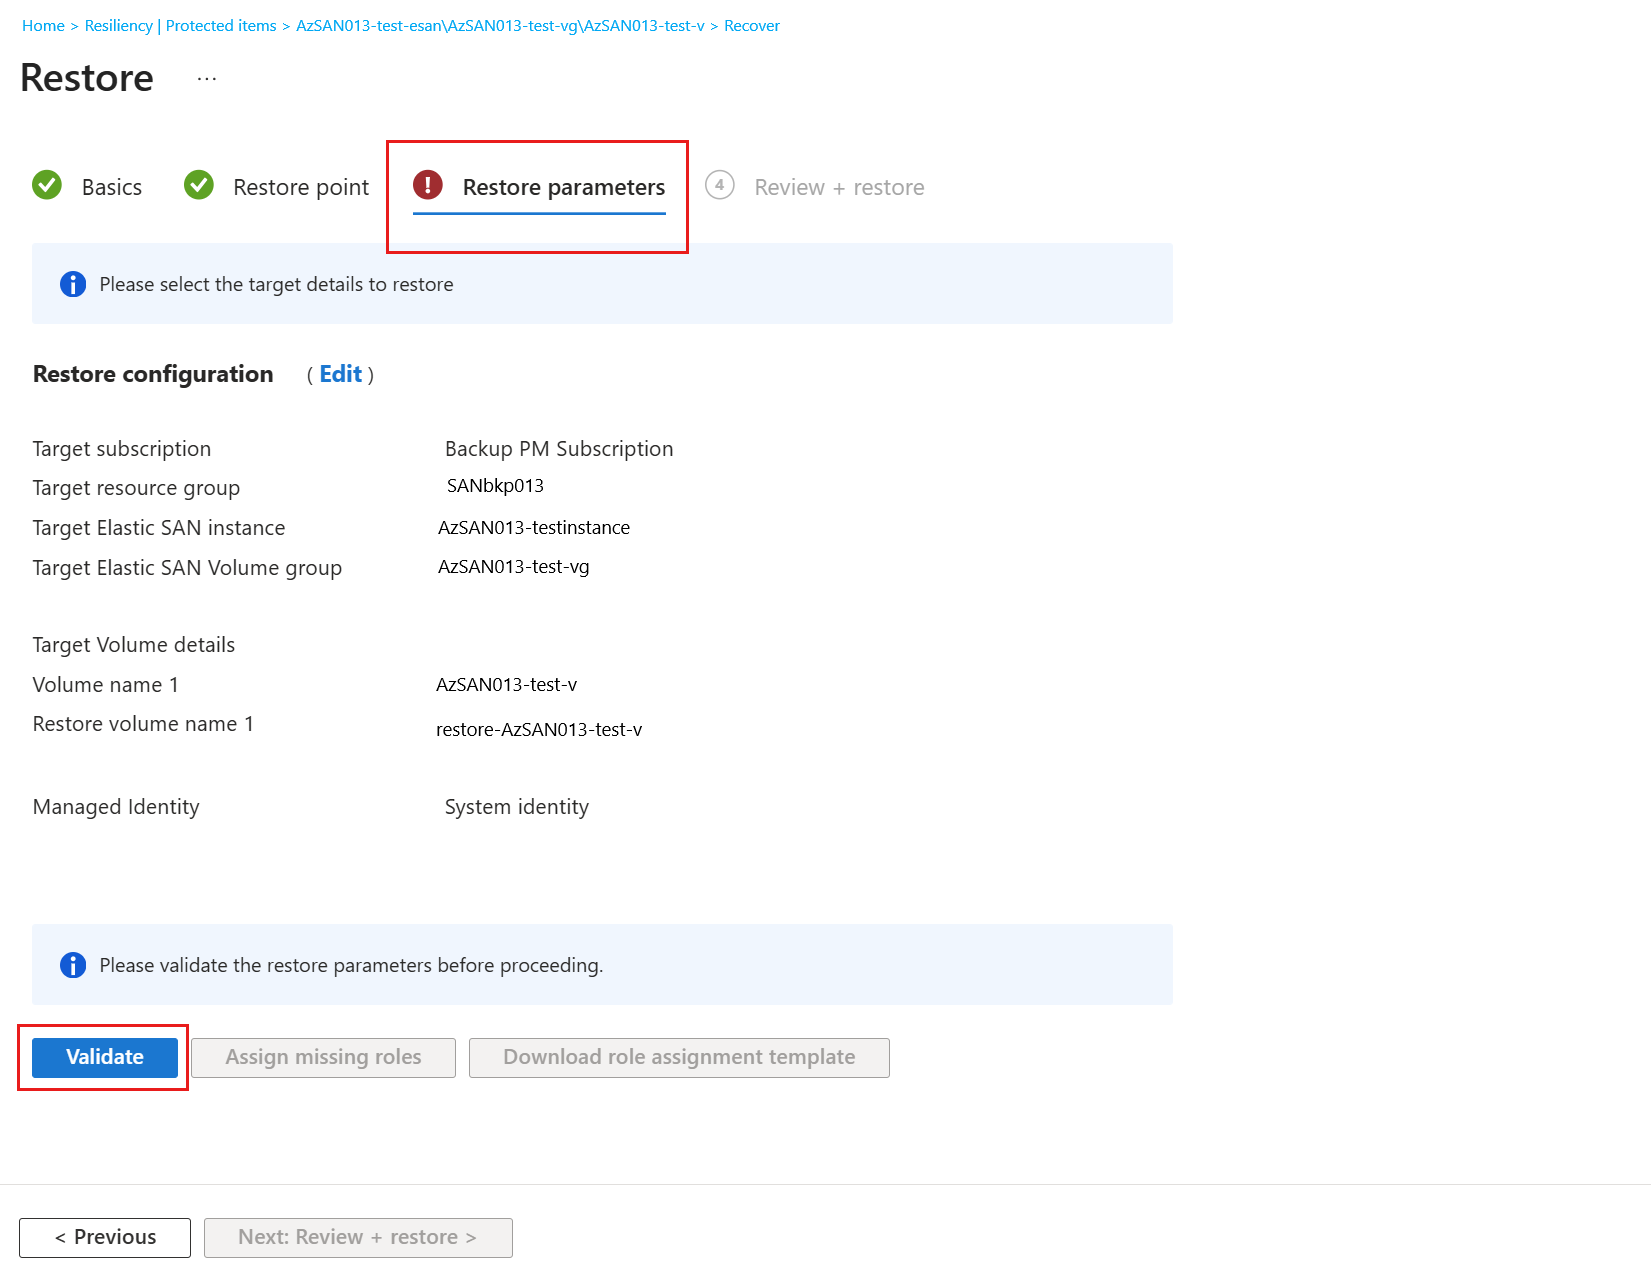
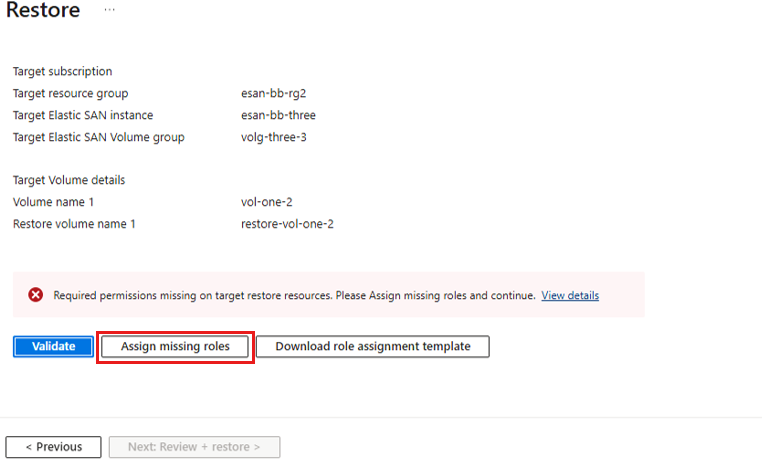
Validation errors appear if the selected Backup vault's managed identity doesn't have the Elastic SAN Volume Importer and Reader (on the snapshot resource group) roles assigned.
To assign the required roles, select Assign missing roles.
Note
If you don't have Role-Based Access Control Administrator permissions, the Assign missing roles option is disabled.
On the Grant missing permissions pane, select the scope at which the access permissions must be granted, and then select Next.
When the role assignment is complete, on the Restore pane, on the Restore parameter tab, select Validate.
On the Review + restore tab, select Restore to start the restore operation.
You can track the progress of restore under Backup Jobs.
This article describes how to restore an Elastic SAN volume backup by using Azure CLI.
Prerequisites
Before you restore an Elastic SAN volume backup by using Azure CLI, ensure that you meet the following prerequisites:
- Verify that you use the Azure CLI and the dataprotection extension 1.12.0 or later.
- Check that the protected Elastic SAN backup instance has at least one recovery point.
- Use a target Elastic SAN instance and volume group for the restored volume.
Sign in to Azure CLI
To sign in and select a subscription to restore an Azure Elastic SAN volume, run the following command:
az login
az account set --subscription "<subscription_id>"
Set variables for Azure Elastic SAN volume restore by using Azure CLI
To set the variables for Azure Elastic SAN volume restore for your environment, update the configuration values and run the following command:
sub="<subscription_id>"
rg="<resource_group>"
vault="<backup_vault_name>"
location="<region>"
esanName="<target_elastic_san_name>"
vgName="<target_volume_group_name>"
volume="<source_volume>"
restoreVol="<restored_volume>"

vgId="/subscriptions/$sub/resourceGroups/$rg/providers/Microsoft.ElasticSan/elasticSans/$esanName/volumeGroups/$vgName"
snapshotRgId="/subscriptions/$sub/resourceGroups/$rg"
Restore the Elastic SAN volume backup by using Azure CLI
To restore the Azure Elastic SAN volume backup by using Azure CLI, run the following commands:
Resolve the backup instance and recovery point.
biName=$(az dataprotection backup-instance list \
    --resource-group $rg \
    --vault-name $vault \
    --query "[?contains(properties.friendlyName, 'esan-bi')].name | [0]" \
    --output tsv)

rpId=$(az dataprotection recovery-point list \
    --resource-group $rg \
    --vault-name $vault \
    --backup-instance-name $biName \
    --query "[0].name" \
    --output tsv)
Create the restore configuration.
az dataprotection backup-instance initialize-restoreconfig \
    --datasource-type AzureElasticSAN \
    --resource-identifiers $volume \
    --resource-name-overrides "{\"$volume\":\"$restoreVol\"}" \
    > esan_restore_config.json
Initialize the restore request.
az dataprotection backup-instance restore initialize-for-item-recovery \
    --datasource-type AzureElasticSAN \
    --source-datastore OperationalStore \
    --restore-location $location \
    --recovery-point-id $rpId \
    --target-resource-id $vgId \
    --restore-configuration @esan_restore_config.json \
    > esan_restore_request.json
Grant restore permissions.
az dataprotection backup-instance update-msi-permissions \
    --datasource-type AzureElasticSAN \
    --operation Restore \
    --permissions-scope Resource \
    --resource-group $rg \
    --vault-name $vault \
    --restore-request-object @esan_restore_request.json \
    --snapshot-resource-group-id $snapshotRgId \
    --yes
Validate the restore request.
az dataprotection backup-instance validate-for-restore \
    --resource-group $rg \
    --vault-name $vault \
    --backup-instance-name $biName \
    --restore-request-object @esan_restore_request.json
Trigger restore.
az dataprotection backup-instance restore trigger \
    --resource-group $rg \
    --vault-name $vault \
    --backup-instance-name $biName \
    --restore-request-object @esan_restore_request.json
Next step
Manage Azure Elastic SAN volume backup by using the Azure portal or Azure CLI.