Note
Access to this page requires authorization. You can try signing in or changing directories.
Access to this page requires authorization. You can try changing directories.
This article describes how to manage the Azure Elastic SAN volume backups by using the Azure portal.
Prerequisites
Before you manage Azure Elastic SAN volume backups by using the Azure portal, ensure that you meet the following prerequisites:
- Use an existing Elastic SAN backup instance.
- Check that the Elastic SAN volume size is 16 TB or less.
- Review the supported scenarios, limitations, and region availability for Elastic SAN volume backup and restore.
Run an on-demand backup for Azure Elastic SAN volume by using the Azure portal
To run an on-demand backup for an Azure Elastic SAN volume, follow these steps:
Go to Resiliency, and select Protection Inventory > Protected items.
On the Protected items pane, filter Datasource type by Elastic SAN volumes, and select the Elastic SAN instance you want to back up.
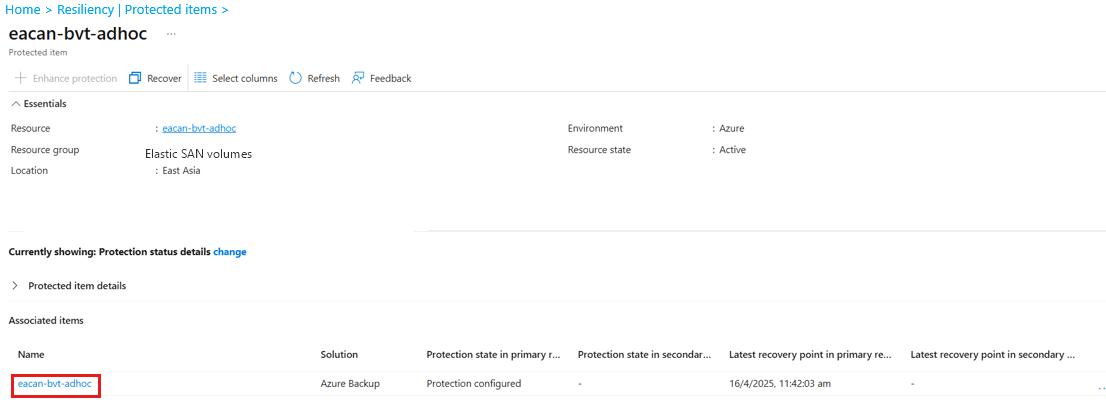
On the selected Elastic SAN instance pane, under Associated items, select a protected item from the list.
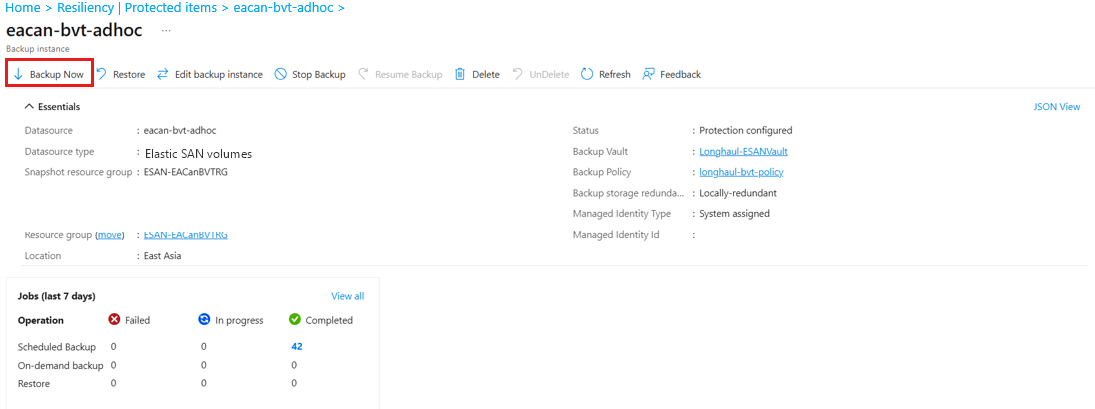
On the selected protected item pane, select Backup Now.
When a backup job finishes, the service creates a Managed Disk incremental snapshot (restore point) in the snapshot resource group with the name pattern AzureBackup_<datasource guid>_<timestamp>. The backup policy retains the restore point according to the retention duration you set.
View the Elastic SAN volume backup and restore jobs by using the Azure portal
To view Elastic SAN backup and restore jobs by using the Azure portal, follow these steps:
- Go to Resiliency, and select Monitoring + Reporting > Jobs.
- On the Jobs pane, filter Datasource type by Elastic SAN volumes.
Change the backup policy for an Elastic SAN volume backup instance by using the Azure portal
To change the backup policy for an Elastic SAN volume backup instance by using the Azure portal, follow these steps:
- Go to Resiliency, and select Protection Inventory > Protected items.
- On the Protected items pane, filter Datasource type by Elastic SAN volumes, and select the Elastic SAN instance for which you want to change the backup policy.
- On the selected Elastic SAN instance pane, select Change Policy.
- On the Change Policy pane, under the Backup policies section, choose a new policy from the list, and select Apply.
Caution
Both existing and future restore points follow the retention duration set in the new backup policy.
Stop Azure Elastic SAN volume backup by using the Azure portal
Azure Backup provides the following options to stop protection of Elastic SAN:
- Stop protection and retain backup data (Retain forever): Stops all future backup jobs from protecting an Elastic SAN and retains the existing backup data in the Backup vault forever. This retention incurs a storage cost as per Azure managed disks pricing. If needed, you can use the backup data to restore the Elastic SAN and use the Resume backup option to resume protection.
- Stop protection and retain backup data (Retain as per policy): Stops all future backup jobs from protecting an Elastic SAN and retains the existing backup data in the Backup vault as per policy. However, the latest recovery point is retained forever. This retention incurs a storage cost as per Azure managed disks pricing. If needed, you can use the backup data to restore the Elastic SAN and use the Resume backup option to resume protection.
- Stop protection and delete backup data: Stops future backup jobs for Elastic SAN and deletes all backup data. You can't restore the Elastic SAN or use the Resume backup option.
To stop protection for Elastic SAN, follow these steps:
- Go to Resiliency, and then select Protection Inventory > Protected items.
- On the Protected items pane, filter Datasource type by Elastic SAN volumes, and then select the Elastic SAN instance for which you want to stop protection.
- On the selected Elastic SAN instance pane, select Stop Backup.
Stop protection and retain backup data for an Azure Elastic SAN volume
To stop backups and retain data for an Elastic SAN volume, follow these steps:
- On the Stop Backup pane, under Stop backup level, choose Retain Backup Data.
- Under Backup data retention, choose one of the retention options - Retain forever or Retain as per policy.
- Under Reason, choose a reason for stopping backup operation from the dropdown list.
- Under Comments, enter more details for stopping backups.
- Select Stop backup, and then select Confirm.
Stop protection and delete backup data for an Azure Elastic SAN volume
To stop backups and delete data for an Elastic SAN, follow these steps:
On the Stop Backup pane, under Stop backup level, choose Delete Backup Data.
Warning
This is a destructive operation. After completing the delete operation, the backed-up data is retained in the Soft deleted state for 14 days, and then deletes forever. After the backups are deleted, the restore operation for the Elastic SAN instance isn't possible.
If immutability is enabled on the vault, the restore points are deleted only after all the recovery points expire.
Select Stop backup, and then select Confirm.
On the Delete Backup Data pane, under Type the name of Backup Item, enter the Elastic SAN instance name that you want to delete.
Under Reason, choose a reason for deletion from the dropdown list.
Under Comments, enter more details about deletion.
Select Delete.
This article describes how to manage Azure Elastic SAN volume backups by using Azure CLI.
Prerequisites
Before you manage Azure Elastic SAN volume backups by using Azure CLI, ensure that you meet the following prerequisites:
- Verify that you use the Azure CLI and the dataprotection extension 1.12.0 or later.
- Use an existing Elastic SAN backup instance.
Sign in to Azure CLI
To sign in and select a subscription to manage an Azure Elastic SAN volume backups, run the following command:
az login
az account set --subscription "<subscription_id>"
Set variables to manage Azure Elastic SAN volume backups by using Azure CLI
To set the variables to manage Azure Elastic SAN volume backups for your environment, run the following commands:
Update the backup policy values for your environment.
rg="<resource_group>"
vault="<backup_vault_name>"
policyName="<current_policy_name>"
newPolicyName="<new_policy_name>"
Resolve the backup instance.
biName=$(az dataprotection backup-instance list \
    --resource-group $rg \
    --vault-name $vault \
    --query "[?properties.dataSourceInfo.datasourceType=='Microsoft.ElasticSan/elasticSans/volumeGroups'].name | [0]" \
    --output tsv)
Run an on-demand backup for Azure Elastic SAN volume backup by using Azure CLI
Resolve the backup rule name and trigger an on-demand backup for Azure Elastic SAN volume by running the following command:
ruleName=$(az dataprotection backup-policy show \
    --resource-group $rg \
    --vault-name $vault \
    --name $policyName \
    --query "properties.policyRules[?objectType=='AzureBackupRule'].name | [0]" \
    --output tsv)

az dataprotection backup-instance adhoc-backup \
    --resource-group $rg \
    --vault-name $vault \
    --name $biName \
    --rule-name $ruleName
View the Azure Elastic SAN backup and restore jobs by using Azure CLI
To view backup and restore jobs by using Azure CLI, run the following command:
az dataprotection job list \
    --resource-group $rg \
    --vault-name $vault \
    --query "[].{Name:name,Operation:properties.operation,Status:properties.status,StartTime:properties.startTime}" \
    --output table
Change the backup policy for an Azure Elastic SAN backup instance by using Azure CLI
Get the new backup policy ID and update the policy associated with the backup instance by using Azure CLI, run the following command:
newPolicyId=$(az dataprotection backup-policy show \
    --resource-group $rg \
    --vault-name $vault \
    --name $newPolicyName \
    --query id \
    --output tsv)

az dataprotection backup-instance update-policy \
    --resource-group $rg \
    --vault-name $vault \
    --backup-instance-name $biName \
    --policy-id $newPolicyId
Caution
Both existing and future restore points follow the retention duration set in the new backup policy.
Stop Azure Elastic SAN volume backup by using Azure CLI
Azure Backup supports the following stop-protection modes:
- Stop protection and retain backup data forever: Stops future backup jobs and retains existing backup data indefinitely.
- Stop backups and retain backup data as per policy: Stops future backup jobs and retains existing recovery points according to the backup policy. The latest recovery point is retained forever.
- Stop protection and delete backup data: Stops future backup jobs and deletes backup data. You can't restore the Elastic SAN or resume protection after backup data is deleted.
Stop protection and retain backups forever
To stop protection and retain backup data forever, run the following command:
az dataprotection backup-instance stop-protection \
    --resource-group $rg \
    --vault-name $vault \
    --name $biName
Stop protection and retain backups as per policy
To stop backups and retain backup data as per policy, run the following command:
az dataprotection backup-instance suspend-backup \
    --resource-group $rg \
    --vault-name $vault \
    --name $biName
Stop protection and delete backups
To stop protection and delete backup data, run the following command:
az dataprotection backup-instance delete \
    --resource-group $rg \
    --vault-name $vault \
    --name $biName \
    --yes