Quickstart: Get started using GPT-4 Turbo with Vision on your images and videos in Azure AI Studio
Important
Items marked (preview) in this article are currently in public preview. This preview is provided without a service-level agreement, and we don't recommend it for production workloads. Certain features might not be supported or might have constrained capabilities. For more information, see Supplemental Terms of Use for Microsoft Azure Previews.
Use this article to get started using Azure AI Studio to deploy and test the GPT-4 Turbo with Vision model.
GPT-4 Turbo with Vision and Azure AI Vision offer advanced functionality including:
- Optical Character Recognition (OCR): Extracts text from images and combines it with the user's prompt and image to expand the context.
- Object grounding: Complements the GPT-4 Turbo with Vision text response with object grounding and outlines salient objects in the input images.
- Video prompts: GPT-4 Turbo with Vision can answer questions by retrieving the video frames most relevant to the user's prompt.
Extra usage fees might apply when using GPT-4 Turbo with Vision and Azure AI Vision functionality.
Prerequisites
- An Azure subscription - Create one for free.
- Once you have your Azure subscription, create an Azure OpenAI resource .
- An AI Studio hub with your Azure OpenAI resource added as a connection.
Prepare your media
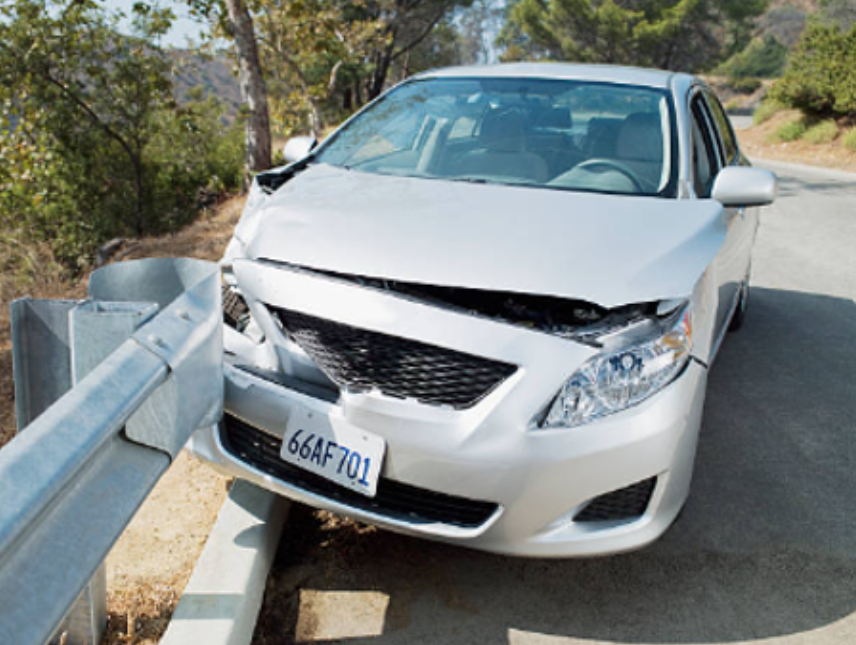
You need an image to complete the image quickstarts. You can use this sample image or any other image you have available.
For video prompts, you need a video that's under three minutes in length.
Deploy a GPT-4 Turbo with Vision model
- Sign in to Azure AI Studio and select the hub you'd like to work in.
- On the left nav menu, select AI Services. Select the Try out GPT-4 Turbo panel.
- On the gpt-4 page, select Deploy. In the window that appears, select your Azure OpenAI resource. Select
vision-previewas the model version. - Select Deploy.
- Next, go to your new model's page and select Open in playground. In the chat playground, the GPT-4 deployment you created should be selected in the Deployment dropdown.
In this chat session, you instruct the assistant to aid in understanding images that you input.
- In the System message text box on the System message tab, provide this prompt to guide the assistant:
"You're an AI assistant that helps people find information."You can tailor the prompt to your image or scenario. - Select Apply changes to save your changes.
- In the chat session pane, select the attachment button and then Upload image. Choose your image.
- Add the following question in the chat field:
"Describe this image", and then select the right arrow icon to send. - The right arrow icon is replaced by a Stop button. If you select it, the assistant stops processing your request. For this quickstart, let the assistant finish its reply.
- The assistant replies with a description of the image.
- Ask a follow-up question related to the analysis of your image. You could enter,
"What should I highlight about this image to my insurance company?". - You should receive a relevant response similar to what's shown here:
When reporting the incident to your insurance company, you should highlight the following key points from the image:

1. **Location of Damage**: Clearly state that the front end of the car, particularly the driver's side, is damaged. Mention the crumpled hood, broken front bumper, and the damaged left headlight.

2. **Point of Impact**: Indicate that the car has collided with a guardrail, which may suggest that no other vehicles were involved in the accident.

3. **Condition of the Car**: Note that the damage seems to be concentrated on the front end, and there is no visible damage to the windshield or rear of the car from this perspective.

4. **License Plate Visibility**: Mention that the license plate is intact and can be used for identification purposes.

5. **Environment**: Report that the accident occurred near a roadside with a guardrail, possibly in a rural or semi-rural area, which might help in establishing the accident location and context.

6. **Other Observations**: If there were any other circumstances or details not visible in the image that may have contributed to the accident, such as weather conditions, road conditions, or any other relevant information, be sure to include those as well.

Remember to be factual and descriptive, avoiding speculation about the cause of the accident, as the insurance company will conduct its own investigation.
View and export code
At any point in the chat session, you can enable the Show raw JSON switch at the top of the chat window to see the conversation formatted as JSON. Heres' what it looks like at the beginning of the quickstart chat session:
[
	{
		"role": "system",
		"content": [
			"You are an AI assistant that helps people find information."
		]
	},
]
Clean up resources
To avoid incurring unnecessary Azure costs, you should delete the resources you created in this quickstart if they're no longer needed. To manage resources, you can use the Azure portal.
Next steps
- Create a project
- Learn more about Azure AI Vision.
- Learn more about Azure OpenAI models.
