Note
Access to this page requires authorization. You can try signing in or changing directories.
Access to this page requires authorization. You can try changing directories.
Applies to: Azure Logic Apps (Consumption)
This tutorial shows how to build an example workflow that runs on a recurring schedule by using Azure Logic Apps. This example specifically creates a Consumption logic app workflow that checks the travel time, including the traffic, between two places and runs every weekday morning. If the time exceeds a specific limit, the workflow sends you an email that includes the travel time and the extra time necessary to arrive at your destination. The workflow includes various steps, which start with a schedule-based trigger followed by a Bing Maps action, a data operations action, a control flow action, and an email notification action.
When you finish, your workflow looks like the following high level example:

Tip
To learn more, you can ask Azure Copilot these questions:
- What's Azure Logic Apps?
- What's a Consumption logic app workflow?
- What's the Bing Maps connector?
- What's a Data Operations action?
- What's a control flow action?
- What's the Office 365 Outlook connector?
To find Azure Copilot, on the Azure portal toolbar, select Copilot.
You can create a similar workflow with a Standard logic app resource. However, the user experience and tutorial steps vary slightly from the Consumption version.
Prerequisites
An Azure account and subscription. If you don't have a subscription, sign up for a free Azure account.
An email account from an email provider that's supported by Azure Logic Apps, such as Office 365 Outlook or Outlook.com. For other supported email providers, see Connectors for Azure Logic Apps.
This tutorial uses Office 365 Outlook with a work or school account. If you use a different email account, the general steps stay the same, but the user experience might slightly differ. If you use Outlook.com, use your personal Microsoft account instead to sign in.
Important
If you want to use the Gmail connector, only G-Suite business accounts can use this connector without restriction in logic app workflows. If you have a Gmail consumer account, you can use this connector with only specific Google-approved services, or you can create a Google client app to use for authentication with your Gmail connector. For more information, see Data security and privacy policies for Google connectors in Azure Logic Apps.
To get the travel time for a route, you need an access key for the Bing Maps API. To get this key, follow the steps for how to get a Bing Maps key.
If your workflow needs to communicate through a firewall that limits traffic to specific IP addresses, that firewall needs to allow access for both the inbound and outbound IP addresses used by Azure Logic Apps in the Azure region where your logic app resource exists. If your workflow also uses managed connectors, such as the Office 365 Outlook connector or SQL connector, or uses custom connectors, the firewall also needs to allow access for all the managed connector outbound IP addresses in your logic app resource's Azure region.
Create a Consumption logic app resource
In the Azure portal, sign in with your Azure account.
In the Azure portal search box, enter logic app, and select Logic apps.

On the Logic apps page toolbar, select Add.
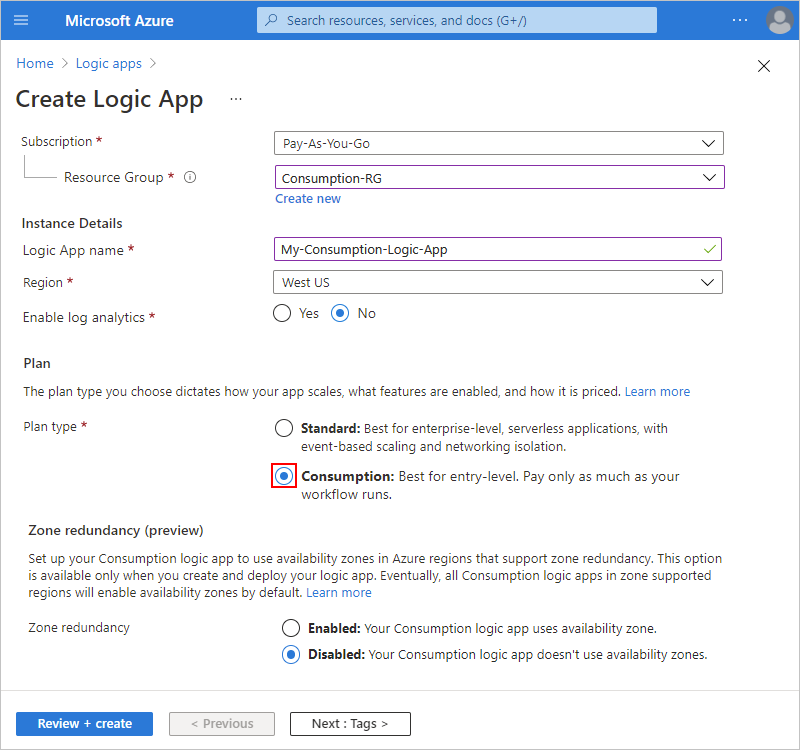
The Create Logic App page appears and shows the following options:
Plan Description Consumption Creates a logic app resource that supports only one workflow that runs in multitenant Azure Logic Apps and uses the Consumption model for billing. Standard Creates a logic app resource that supports multiple workflows. You have the following options:
- Workflow Service Plan: Workflows run in single-tenant Azure Logic Apps and use the Standard model for billing.
- App Service Environment V3: Workflows run in single-tenant Azure Logic Apps and use an App Service Environment plan for billing.
- Hybrid: Workflows run on-premises and in multiple clouds using Kubernetes Event-driven Autoscaling (KEDA). For more information, see Create Standard workflows for hybrid deployment.On the Create Logic App page, select Consumption (Multi-tenant).
On the Basics tab, provide the following information about your logic app resource:
Property Required Value Description Subscription Yes <Azure-subscription-name> Your Azure subscription name.
This example uses Pay-As-You-Go.Resource Group Yes <Azure-resource-group-name> The Azure resource group where you create your logic app and related resources. This name must be unique across regions and can contain only letters, numbers, hyphens (-), underscores (_), parentheses (()), and periods (.).
This example creates a resource group named LA-TravelTime-RG.Logic App name Yes <logic-app-resource-name> Your logic app resource name, which must be unique across regions and can contain only letters, numbers, hyphens (-), underscores (_), parentheses (()), and periods (.).
This example creates a logic app resource named LA-TravelTime.Region Yes <Azure-region> The Azure datacenter region for your app.
This example uses West US.Enable log analytics Yes No Change this option only when you want to enable diagnostic logging. For this tutorial, keep the default selection.
Note: This option is available only with Consumption logic apps.Note
Availability zones are automatically enabled for new and existing Consumption logic app workflows in Azure regions that support availability zones. For more information, see Reliability in Azure Functions and Protect logic apps from region failures with zone redundancy and availability zones.
After you finish, your settings look similar to the following example:
When you finish, select Review + create. After Azure validates the information about your logic app resource, select Create.
After Azure deploys your logic app resource, select Go to resource. Or, find and select your logic app resource by using the Azure search box.


Next, add the Schedule trigger named Recurrence, which runs the workflow based on a specified schedule. Every workflow must start with a trigger, which fires when a specific event happens or when new data meets a specific condition.
Add the Recurrence trigger
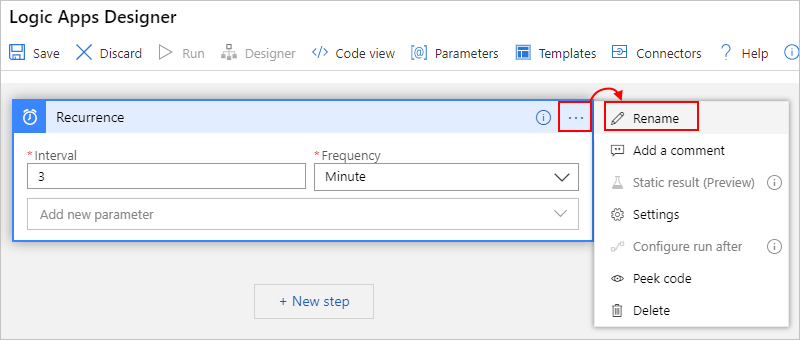
On the workflow designer, follow these general steps to add the Schedule trigger named Recurrence.
Rename the Recurrence trigger with the following title: Check travel time every weekday morning.
In the trigger information box, provide the following information:
Parameter Value Description Interval 1 The number of intervals to wait between checks Frequency Week The unit of time to use for the recurrence On these days Monday, Tuesday, Wednesday, Thursday, Friday This setting is available only when you set the Frequency to Week. At these hours 7, 8, 9 This setting is available only when you set the Frequency to Week or Day. For this recurrence, select the hours of the day. This example runs at the 7, 8, and 9-hour marks. At these minutes 0, 15, 30, 45 This setting is available only when you set the Frequency to Week or Day. For this recurrence, select the minutes of the day. This example starts at the zero-hour mark and runs every 15 minutes. When you finish, the trigger information box appears similar to the following example:
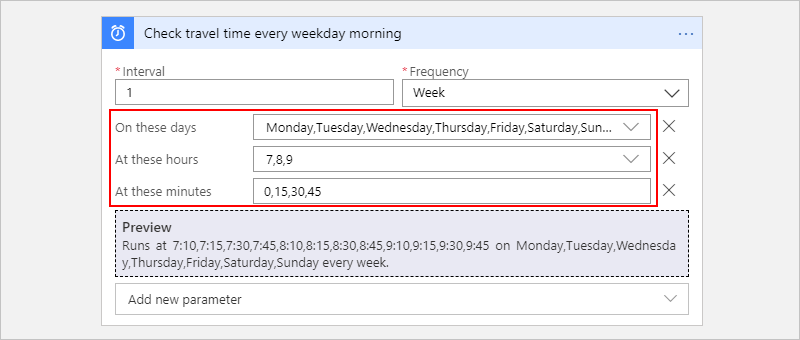
This trigger fires every weekday, every 15 minutes, starting at 7:00 AM and ending at 9:45 AM. The Preview box shows the recurrence schedule. For more information, see Schedule tasks and workflows and Workflow actions and triggers.
Save your workflow. On the designer toolbar, select Save.


Your logic app resource and updated workflow are now live in the Azure portal. However, the workflow only triggers based on the specified schedule and doesn't perform other actions. So, add an action that responds when the trigger fires.
Get the travel time for a route
Now that you have a trigger, add a Bing Maps action that gets the travel time between two places. Azure Logic Apps provides a connector for the Bing Maps API so that you can easily get this information. Before you start this task, make sure that you have a Bing Maps API key as described in this tutorial's prerequisites.
In the workflow designer, under the Recurrence trigger, follow these general steps to add a Bing Maps action named Get route.
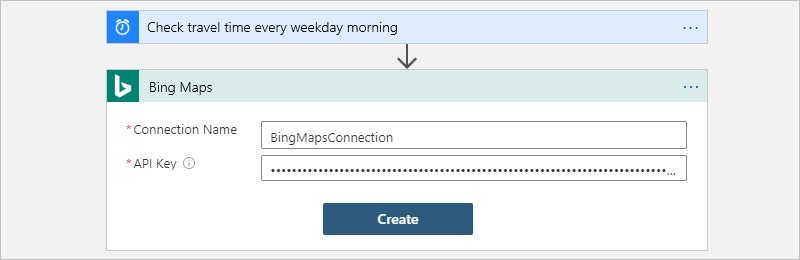
If you don't have a Bing Maps connection, you're asked to create a connection. Provide the following connection information, and select Create.
Parameter Required Value Description Connection Name Yes <Bing-Maps-connection-name> Provide a name for your connection. This example uses BingMapsConnection. API Key Yes <Bing-Maps-API-key> Enter the Bing Maps API key that you previously received. If you don't have a Bing Maps key, learn how to get a key. The following example shows sample connection information:
Rename the Get route action with the following title: Get route and travel time with traffic.
In the action, open the Advanced parameters list, and add the following properties:
- Optimize
- Distance Unit
- Travel Mode
Now enter the values for the following action's properties:
Parameter Value Description Waypoint 1 <start-location> Your route's origin. This example specifies an example starting address. Waypoint 2 <end-location> Your route's destination. This example specifies an example destination address. Optimize timeWithTraffic A parameter to optimize your route, such as distance, travel time with current traffic, and so on. Select the parameter value, timeWithTraffic. Distance Unit <your-preference> The unit of distance for your route. This example uses Mile as the unit. Travel Mode Driving The travel mode for your route. Select Driving mode. For more information about these parameters and values, see Calculate a route.
The following example shows sample action information:

On the designer toolbar, select Save.


Next, create a variable so that you can convert and store the current travel time as minutes, rather than seconds. That way, you can avoid repeating the conversion and use the value more easily in later steps.
Create a variable to store travel time
Sometimes, you might want to run operations on data in your workflow, and then use the results in later actions. To save these results so that you can easily reuse or reference them, you can create variables that store those results after processing. You can create variables only at the top level in your workflow.
By default, the Get route action returns the current travel time with traffic in seconds from the Travel Duration Traffic property. By converting and storing this value as minutes instead, you make the value easier to reuse later without converting again.
Under the Get route action, follow these general steps to add a Variables action named Initialize variable.
Rename Initialize variable action with the following title: Create variable to store travel time.
Provide the following action information:
Parameter Value Description Name travelTime The name for your variable. This example uses travelTime.Type Integer The data type for your variable Value <initial-value> An expression that converts the current travel time from seconds to minutes (see the steps under this table). To create the expression for the Value property, follow these steps:
Select inside the Value box, which shows the options for the dynamic content list (lightning icon) and expression editor (formula icon), and then select the expression editor.
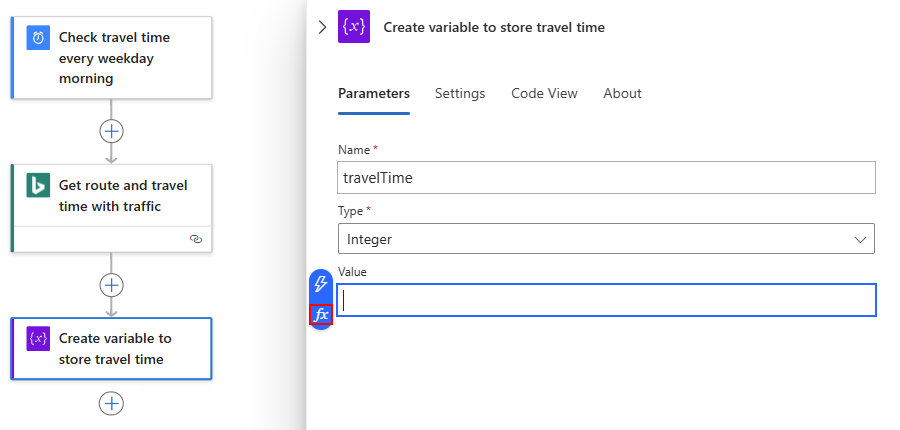
The expression editor provides functions that you can use to perform operations in your expression. The dynamic content list provides the outputs from previous actions that you can select as inputs to use with subsequent actions in your workflow.
In the expression editor, enter the following expression: div(,60)
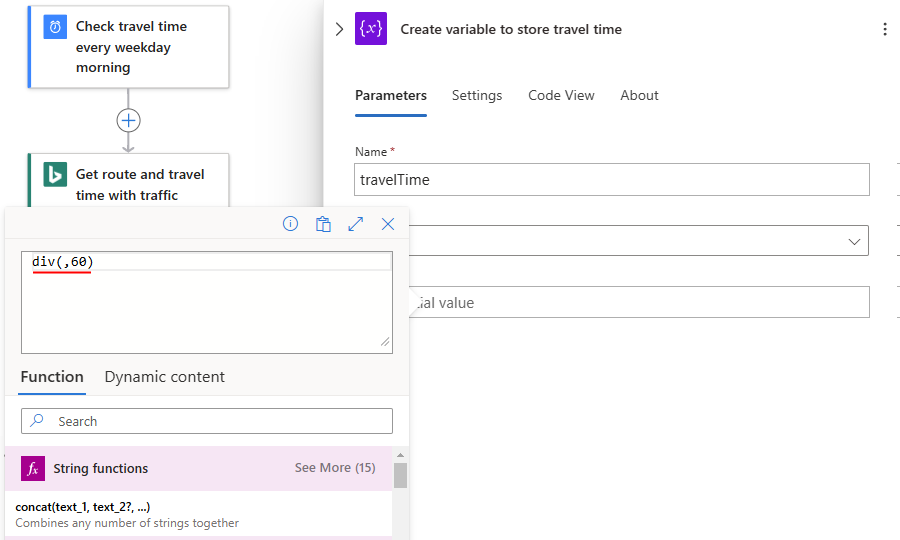
Within the expression, put your cursor between the left parenthesis (() and the comma (,), and select Dynamic content.

In the dynamic content list, under select the output value, Travel Duration Traffic.
If the output doesn't appear, in the dynamic content list, next to the action name, select See more.

After the output value resolves inside the expression, select Add.

The following example shows how the Value property now appears:

Save your workflow. On the designer toolbar, select Save.


Next, add a condition that checks whether the current travel time is greater than a specific limit.
Compare the travel time with limit
Under the Create variable to store travel time action, follow these general steps to add a Control action named Condition.
Rename the condition with the following title: If travel time exceeds limit
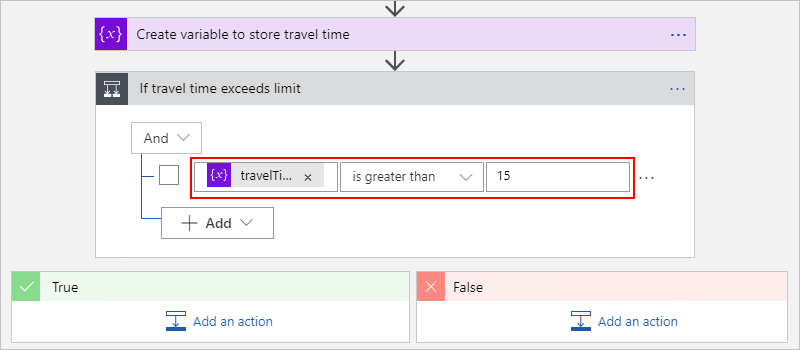
Build a condition that checks whether the travelTime output value exceeds your specified limit as described and shown here:
In the condition, on the condition's left side, select inside the Choose a value box, and then select the option for the dynamic content list (lightning icon).
Under Variables, select the output named travelTime.

In the middle comparison box, select the operator named is greater than.
On the condition's right side, in the Choose a value box, enter the following value: 15
When you finish, the condition looks like the following example:
Save your workflow. On the designer toolbar, select Save.


Next, add the action to run when the travel time exceeds your limit.
Send email when limit exceeded
Now, add an action that sends email when the travel time exceeds your limit. This email includes the current travel time and the extra time necessary to travel the specified route.
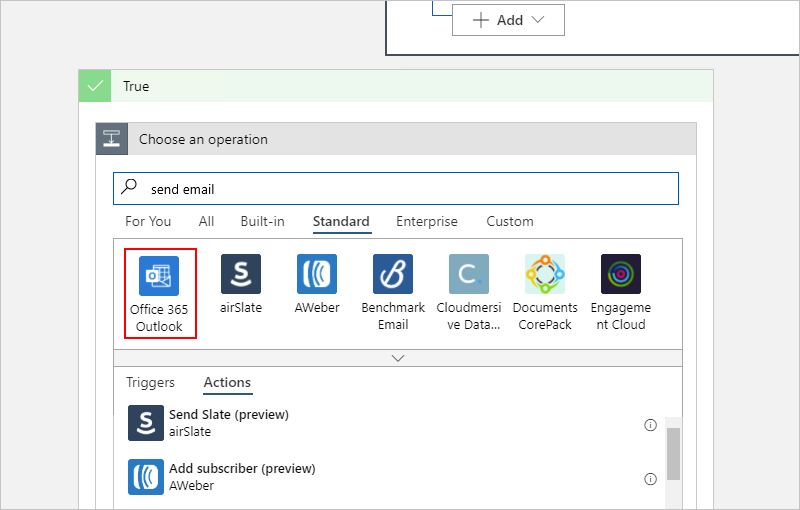
In the condition's True branch, select the plus sign (+), and then select Add an action.
Follow these general steps to add an Office 365 Outlook action named Send an email.
- For Azure work or school accounts, select the Office 365 Outlook version.
- For personal Microsoft accounts, select the Outlook.com version.
This example continues by selecting Office 365 Outlook.
If you don't already have a connection, sign in and authenticate access to your email account when prompted.
Azure Logic Apps creates a connection to your email account.
Rename the action with the following title: Send email with travel time
For the To property, enter the recipient's email address. For testing purposes, you can use your email address.
For the Subject property, specify the email's subject, and include the travelTime variable by following these steps:
Enter the text Current travel time (minutes): with a trailing space. Keep your cursor in the Subject box, and select the option for the dynamic content list (lightning icon).
In the dynamic content list, in the Variables section, select the variable named travelTime.
Note
If the dynamic content list doesn't automatically show the travelTime variable, next to the Variables label, select See more. The variable might not appear because the Subject property expects a string value, while travelTime is an integer.
For the Body property, specify the content for the email body by following these steps:
Enter the text Add extra travel time (minutes): with a trailing space. Keep your cursor in the Body box, and select the option for the expression editor (formula icon).
In the expression editor, enter sub(,15) so that you can calculate the number of minutes that exceed your limit:

Within the expression, put your cursor between the left parenthesis (() and the comma (,), and select Dynamic content.

Under Variables, select travelTime.

After the variable resolves inside the expression, select Add.
The Body property now appears as shown here:

Save your workflow. On the designer toolbar, select Save.


Next, test and run your workflow, which now looks similar to the following example:

Run your workflow
To manually start your workflow, on the designer toolbar, select Run > Run.
If the current travel time stays under your limit, your workflow does nothing else and waits or the next interval before checking again.
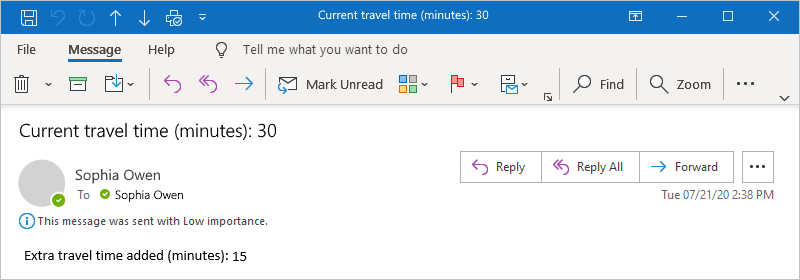
If the current travel time exceeds your limit, you get an email with the current travel time and the number of minutes above your limit. The following example shows a sample email that your workflow sends:
Tip
If you don't get any emails, check your email's junk folder. Your email junk filter might redirect these kinds of mails. Otherwise, if you're unsure that your workflow ran correctly, see Troubleshoot your workflow.

Congratulations, you created and ran a schedule-based recurring workflow!
Clean up resources
Your workflow continues running until you disable or delete the logic app resource. When you no longer need this sample, delete the resource group that contains your logic app and related resources.
In the Azure portal search box, enter resource groups, and select Resource groups.
From the Resource groups list, select the resource group for this tutorial.
On the resource group menu, select Overview.
On the Overview page toolbar, select Delete resource group.
When the confirmation pane appears, enter the resource group name, and select Delete.
Next step
In this tutorial, you created a logic app workflow that checks traffic based on a specified schedule (on weekday mornings), and takes action (sends an email) when the travel time exceeds a specified limit. Now, learn how to build a workflow that sends mailing list requests for approval by integrating Azure services, Microsoft services, and other Software-as-a-Service (SaaS) apps.