Note
Access to this page requires authorization. You can try signing in or changing directories.
Access to this page requires authorization. You can try changing directories.
Azure Logic Apps, Microsoft Power Automate, Microsoft Power Apps, and Microsoft Copilot Studio offer over 1,000 connectors to connect to Microsoft and verified services, but you might want to communicate with services that aren't available as prebuilt connectors. Custom connectors address this scenario by allowing you to create (and even share) a connector with its own triggers and actions.

Lifecycle
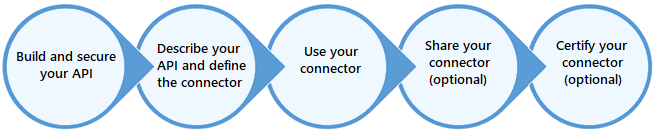
1. Build your API
A custom connector is a wrapper around a REST API that allows Logic Apps, Power Automate, Power Apps, or Copilot Studio to communicate with that REST or SOAP API. These APIs can be:
- Public (visible on the public internet) such as Spotify, Slack, Rackspace, or an API you manage.
- Private (visible only to your network).
Logic Apps also supports SOAP APIs.
For public APIs that you plan to create and manage, consider using one of these Microsoft Azure products:
For private APIs, Microsoft offers on-premises data connectivity through an on-premises data gateway.
2. Secure your API
Use one of these standard authentication methods for your APIs and connectors (Microsoft Entra ID is recommended):
- Generic OAuth 2.0
- OAuth 2.0 for specific services, including Microsoft Entra ID, Dropbox, GitHub, and SalesForce
- Basic authentication
- API Key
You can set up Microsoft Entra ID authentication for your API in the Azure portal so you don't have to implement authentication. Or, you can require and enforce authentication in your API's code. For more information about Microsoft Entra ID for custom connectors, see Secure your API and connector with Microsoft Entra ID.
2.1. OAuth 2.0
Newly created custom connectors that use OAuth 2.0 to authenticate automatically have a per connector redirect URI. Existing OAuth 2.0 connectors must be updated to use a per-connector redirect URI before February 17, 2024.
- If you created your custom connectors with the web interface, edit your custom connectors, go to the Security tab and check the box, Update to unique redirect URL, and then save to enable the per connector redirect URI.
- If you created your custom connectors with multi-auth using the command line interface (CLI) tool, you need to update your connector using the CLI tool to set
"redirectMode": "GlobalPerConnector". - Once custom connectors are updated to use the per-connector redirect URI either through the setting in the Security tab or the CLI tool, remove the global redirect URI from your OAuth 2.0 apps. You should add the newly generated unique redirect URL to your OAuth 2.0 apps.
- We'll enforce this update for existing OAuth 2.0 custom connectors starting on February 17, 2024. Any custom connector not updated to use a per-connector redirect URI stops working for new connections and shows an error message to the user.
- To find out which custom connectors need an update to migrate to per-connector redirect URL, you can create a flow that uses the Get Custom Connectors as Admin action of Power Apps for Admin connector and parse its result. The flow attached later in this article fetches all the custom connectors using the same. It then applies a filter condition on the connection parameter's property to filter out non-Oauth custom connector, followed by another filter to select only connectors that don't use the per connector unique redirect URL. Finally, it puts the selected custom connectors into an array variable initialized in the beginning of the flow and generates an HTML table showing name and creator of those connectors. You can import this flow into your environment by importing this solution. You can extend the flow further to send the HTML table as an email to yourself. or you can extend it to send emails to the connector creators directly and provide them with the names of the connector that needs to be updated.
3. Describe the API and define the custom connector
Once you have an API with authenticated access, the next thing to do is to describe your API so that Logic Apps, Power Automate, Power Apps, or Copilot Studio can communicate with your API. The following approaches are supported:
An OpenAPI definition (formerly known as a Swagger file)
A Postman collection
Start from scratch using the custom connector portal (Power Automate and Power Apps only)
OpenAPI definitions and Postman collections use different formats, but both are language-agnostic, machine-readable documents that describe your API. You can generate these documents from various tools based on the language and platform used by your API. Behind the scenes, Logic Apps, Power Automate, Power Apps, and Copilot Studio use OpenAPI to define connectors.
4. Use your connector in Copilot Studio, Logic Apps, Power Automate, or a Power Apps app
Custom connectors are used the same way prebuilt connectors are used. You need to create a connection to your API in order to use that connection to call any operations that you expose in your custom connector.
Connectors created in Power Automate are available in Power Apps and Copilot Studio, and connectors created in Power Apps are available in Power Automate and Copilot Studio. This availability isn't true for connectors created in Logic Apps. However, you can reuse the OpenAPI definition or Postman collection to recreate the connector in any of these services. For more information, see the appropriate tutorial:
- Use a custom connector from a flow
- Use a custom connector from an app
- Use a custom connector from a logic app
- Use connector actions in Copilot Studio
Tip
If you update (remove, add, or change) a field in the API, perform these steps:
- Republish the connector so it looks at the updated Swagger for the API.
- Remove any connection / data source in any app that used that connector.
- Re-add the connection / data source for that connector back into the apps.
5. Share your connector
You can share your connector with users in your organization the same way that you share resources in Copilot Studio, Logic Apps, Power Automate, or Power Apps. Sharing is optional, but you might have scenarios where you want to share your connectors with other users.
Learn more in Share custom connectors in your organization.
6. Certify your connector
If you want to share your connector with all users of Copilot Studio, Logic Apps, Power Automate, and Power Apps, you need to submit your connector for Microsoft certification. Microsoft reviews your connector, checks for technical and content compliance, and validates functionality.
Virtual Network support
When the connector is used in a Power Platform environment linked to a Virtual Network, limitations apply:
When custom code is used, limitations are explained in Write code in a custom connector.
Custom connectors created before the environment was associated to a Virtual Network need to be resaved.
Triggers that return location header which do not call back into custom connector are not supported.
Provide feedback
We greatly appreciate feedback on issues with our connector platform, or new feature ideas. To provide feedback, go to Submit issues or get help with connectors and select your feedback type.