What are solutions and projects in Visual Studio?
This article describes the difference between a project and a solution in Visual Studio. It also briefly covers how to create a new project and how to use the Solution Explorer window to interact with your projects and solutions.
Projects
When you create an app or website in Visual Studio, you start with a project. In a logical sense, a project contains all files that are compiled into an executable project, library, or website. Those files can include source code, icons, images, data files, and more. A project also contains compiler settings and other configuration files that your program might need to communicate with various services or components.
Project file
Visual Studio uses MSBuild to build each project in a solution, and each project contains an MSBuild project file. The file extension reflects the type of project, for example, a C# project (.csproj), a Visual Basic project (.vbproj), or a database project (.dbproj). The project file is an XML document that contains all the information and instructions that MSBuild needs to build your project. Such information and instructions include the content, platform requirements, versioning information, web server or database server settings, and the tasks to perform.
Project files are based on the MSBuild XML schema. To look at the contents of newer, SDK-style project files in Visual Studio, right-click the project node in Solution Explorer and select Edit Project File. To look at the contents of .NET projects, first unload the project (right-click the project node in Solution Explorer and select Unload Project). Then, right-click the project and select Edit Project File.
Project files are based on the MSBuild XML schema. To look at the contents of newer, SDK-style project files in Visual Studio, right-click the project node in Solution Explorer and select Edit <projectname>. To look at the contents of .NET projects, first unload the project (right-click the project node in Solution Explorer and select Unload Project). Then, right-click the project and choose Edit <projectname>.
Note
You don't have to use solutions or projects in Visual Studio to edit, build, and debug code. You can simply open the folder that contains your source files in Visual Studio and start editing. For more information, see Develop code in Visual Studio without projects or solutions.
Create new projects
The easiest way to create a new project is to use a project template for the project type you want. A project template includes a basic set of pregenerated code files, config files, assets, and settings. Use File > New > Project to select a project template. For more information, see Create a new project in Visual Studio.
You can also create a custom project template that you can use to create new projects from. For more information, see Create project templates.
When you create a new project, Visual Studio saves it to the default location, %USERPROFILE%\source\repos. To change the default location, go to Tools > Options > Projects and Solutions > Locations. For more information, see Options dialog box: Projects and Solutions > Locations.
Solutions
A project is contained within a solution. Despite its name, a solution isn't an "answer." It's simply a container for one or more related projects, along with build information, Visual Studio window settings, and any miscellaneous files that aren't associated with a particular project.
Solution file
Visual Studio uses two file types (.sln and .suo) to store settings for solutions:
| Extension | Name | Description |
|---|---|---|
| .sln | Visual Studio Solution | Organizes projects, project items, and solution items in the solution. |
| .suo | Solution User Options | Stores user-level settings and customizations, such as breakpoints. |
Important
A solution is described by a text file (extension .sln) that has its own unique format; it's not intended to be edited by hand. Conversely, the .suo file is a hidden file that isn't displayed under the default File Explorer settings. To show hidden files, on the View menu in File Explorer, select Show > Hidden items.
Important
A solution is described by a text file (extension .sln) with its own unique format; it's not intended to be edited by hand. Conversely, the .suo file is a hidden file that is not displayed under the default File Explorer settings. To show hidden files, on the View menu in File Explorer, select the Hidden Items checkbox.
Solution folder
A solution folder is a virtual folder that exists only in Solution Explorer, where you can use it to group projects in a solution. If you want to locate a solution file on a computer, go to Tools > Options > Projects and Solutions > Locations. For more information, see Options dialog box: Projects and Solutions > Locations.
Tip
To construct a project and solution as an exercise, see Introduction to projects and solutions.
Solution Explorer
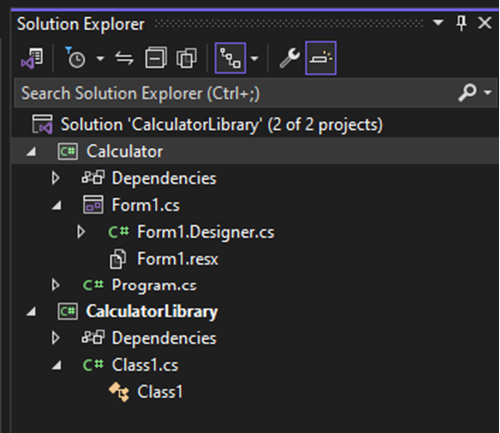
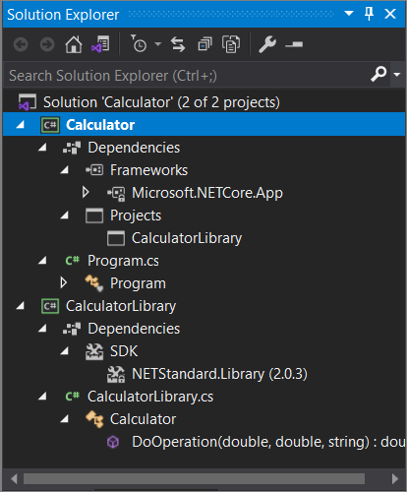
After you create a new project, you can use Solution Explorer to view and manage the project and solution and their associated items. The following illustration shows a C# solution that contains two projects in Solution Explorer:
The toolbar across the top of Solution Explorer contains buttons to switch from a solution view to a folder view, filter pending changes, show all files, collapse all nodes, view properties pages, preview code in the code editor, and more.
Many menu commands are available from the right-click context menu on various items in Solution Explorer. These commands include building a project, managing NuGet packages, adding a reference, renaming a file, and running tests, just to name a few. For more information, see Learn about Solution Explorer.
Starting with version 17.7, you can also compare files in Solution Explorer by using the right-click context menu options. For more information, see The file comparison tool in Learn about Solution Explorer.
For ASP.NET Core projects, you can customize how files are nested in Solution Explorer. For more information, see File nesting in Solution Explorer.
Tip
If you close Solution Explorer and want to open it again, select View > Solution Explorer on the menu bar, or select Ctrl+Alt+L. If you close side tabs and want to restore them to their default locations, select Window > Reset Window Layout on the menu bar.
Note
To view the application images and icons that appear in Visual Studio, download the Visual Studio Image Library.