Note
Access to this page requires authorization. You can try signing in or changing directories.
Access to this page requires authorization. You can try changing directories.
This article walks you through the complete orchestration workflow lifecycle in Microsoft Foundry: build your schema, label your utterances, train and evaluate a model, deploy it, and send prediction requests. Each stage links to the relevant concepts and reference content if you want to go deeper.
For the broader process, see the project development lifecycle.
Prerequisites
- An orchestration workflow project created with a configured Azure blob storage account.
Build your schema
In orchestration workflow projects, the schema is the combination of intents within your project. Schema design is a crucial part of your project's success. When creating a schema, think about which intents to include in your project, and which connected service or model each intent routes to (a conversational language understanding project, a custom question answering knowledge base, or a LUIS application).
Guidelines and recommendations
Consider the following guidelines when building your schema:
Build orchestration projects when you need to combine several language capabilities or connected services behind a single deployment.
Orchestrate between projects that handle different domains. For example, an app that routes to a Human resources conversational language understanding project, an IT support knowledge base, and a LUIS application for expense reports.
If you have an overlap of similar intents across domains, separate them into different connected domains so the orchestration model can route accurately.
Add general intents, such as Greeting, Confirm, and Reject, to the orchestration project itself when they aren't specific to any connected domain.
You can orchestrate to a Custom question answering knowledge base to answer general or frequently asked questions.
When you find a misclassified utterance, add similar utterances to the correct intent to improve routing.
Add test data that represents real user input to validate routing decisions.
Label your utterances
After you build your schema, add training and testing utterances to your project in Microsoft Foundry. The utterances should be similar to what your users use when interacting with the project. When you add an utterance, you assign which intent it belongs to.
Adding utterances is a crucial step in the project development lifecycle; this data is used in the next step when training your model so the model can learn from the added data. If you already have utterances, you can directly import them into your project, but you need to make sure that your data follows the accepted data format. Labeled data informs the model how to interpret text and is used for training and evaluation.
How to add utterances
Use the following steps to add utterances in Foundry:
Open your orchestration workflow project in Microsoft Foundry.
From the left navigation menu, select Manage Data and then Add utterances.
Use the Training set and Testing set views to manage your data. For more information about training and testing sets and how they're used for model training and evaluation, see the linked article.
From the Select intent dropdown menu, select one of the intents. Type your utterance, and then press
Enterto add it. You can also upload utterances directly by selecting Upload utterance file from the top menu. Make sure the utterances follow the accepted format.Note
If you plan to use Automatically split the testing set from training data, add all your utterances to the training set. You can add training utterances to nonconnected intents only.

Under Distribution, view the distribution across training and testing sets. You can also view utterances per intent:
- Utterances per nonconnected intent
- Utterances per connected intent

Train your model
Training is the process where the model learns from your labeled utterances. After training completes, you can view model performance.
To train a model, start a training job. Only successfully completed jobs create a model. Training jobs expire after seven days. After this time, you can't retrieve the job details. If your training job completes successfully and creates a model, the model isn't affected if the job expires. You can only have one training job running at a time, and you can't start other jobs in the same project.
Training times can range from a few seconds when dealing with simple projects, up to a couple of hours when you reach the maximum limit of utterances.
Model evaluation is triggered automatically after training completes successfully. The evaluation process starts by using the trained model to run predictions on the utterances in the testing set. It compares the predicted results with the provided labels, which establishes a baseline of truth. The results are returned so you can review the model's performance.
Data splitting
Before you start the training process, the system divides labeled utterances in your project into a training set and a testing set. Each set serves a different function. The training set is used to train the model. The model learns the labeled utterances from this set. The testing set is a blind set that the model doesn't see during training but only during evaluation.
After the model trains successfully, you can use the model to make predictions from the utterances in the testing set. These predictions are used to calculate evaluation metrics.
Ensure that all your intents are adequately represented in both the training and testing set.
The orchestration workflow supports two methods for data splitting:
- Automatically splitting the testing set from training data: The system splits your tagged data between the training and testing sets, according to the percentages you choose. The recommended percentage split is 80% for training and 20% for testing.
Note
If you choose the Automatically splitting the testing set from training data option, only the data assigned to training set is split according to the percentages provided.
- Use a manual split of training and testing data: This method enables you to define which utterances belong to which set. This step is only enabled if you add utterances to your testing set during labeling.
Note
You can only add utterances in the training dataset for non-connected intents.
Train the model
To start training your model from within the Foundry:
- Select Training jobs from the left navigation menu.
- Select Start a training job from the top menu.
- To train a new model, select Train a new model and enter a new model name. Otherwise, to replace an existing model with a model trained on the new data, select Overwrite an existing model and then select an existing model.
- Select the data splitting method: either Automatically splitting the testing set from training data or Use a manual split of training and testing data.
- Select the Train button.
- Choose the training job ID from the list. A panel appears that details the training progress, job status, and other details for this job.
Note
- Only successfully completed training jobs generate models.
- Training can take from a few seconds to a couple of hours based on the size of your training data.
- You can only have one training job running at a time. You can't start other training jobs within the same project until the running job is completed.
View model details
After your model finishes training, you can review the model's performance to determine whether to improve it before deploying.
Note
Using the Automatically split the testing set from training data option may result in different model evaluation result every time you train a new model, as the test set is selected randomly from the utterances. To make sure that the evaluation is calculated on the same test set every time you train a model, make sure to use the Use a manual split of training and testing data option when starting a training job and define your Testing set utterances when labeling.
Model details
Create a GET request using the following URL, headers, and JSON body to get the trained model evaluation summary.
Request URL
{ENDPOINT}/language/authoring/analyze-conversations/projects/{projectName}/models/{trainedModelLabel}/evaluation/summary-result?api-version={API-VERSION}
| Placeholder | Value | Example |
|---|---|---|
{ENDPOINT} |
The endpoint for authenticating your API request. | https://<your-custom-subdomain>.cognitiveservices.azure.com |
{PROJECT-NAME} |
The name for your project. This value is case-sensitive. | myProject |
{trainedModelLabel} |
The name for your trained model. This value is case-sensitive. | Model1 |
{API-VERSION} |
The version of the API you're calling. | 2023-04-01 |
Headers
Use the following header to authenticate your request.
| Key | Value |
|---|---|
Ocp-Apim-Subscription-Key |
The key to your resource. Used for authenticating your API requests. |
Response Body
Once you send the request, you get the following response.
{
  "entitiesEvaluation": {
    "confusionMatrix": {
      "additionalProp1": {
        "additionalProp1": {
          "normalizedValue": 0,
          "rawValue": 0
        },
        "additionalProp2": {
          "normalizedValue": 0,
          "rawValue": 0
        },
        "additionalProp3": {
          "normalizedValue": 0,
          "rawValue": 0
        }
      },
      "additionalProp2": {
        "additionalProp1": {
          "normalizedValue": 0,
          "rawValue": 0
        },
        "additionalProp2": {
          "normalizedValue": 0,
          "rawValue": 0
        },
        "additionalProp3": {
          "normalizedValue": 0,
          "rawValue": 0
        }
      },
      "additionalProp3": {
        "additionalProp1": {
          "normalizedValue": 0,
          "rawValue": 0
        },
        "additionalProp2": {
          "normalizedValue": 0,
          "rawValue": 0
        },
        "additionalProp3": {
          "normalizedValue": 0,
          "rawValue": 0
        }
      }
    },
    "entities": {
      "additionalProp1": {
        "f1": 0,
        "precision": 0,
        "recall": 0,
        "truePositivesCount": 0,
        "trueNegativesCount": 0,
        "falsePositivesCount": 0,
        "falseNegativesCount": 0
      },
      "additionalProp2": {
        "f1": 0,
        "precision": 0,
        "recall": 0,
        "truePositivesCount": 0,
        "trueNegativesCount": 0,
        "falsePositivesCount": 0,
        "falseNegativesCount": 0
      },
      "additionalProp3": {
        "f1": 0,
        "precision": 0,
        "recall": 0,
        "truePositivesCount": 0,
        "trueNegativesCount": 0,
        "falsePositivesCount": 0,
        "falseNegativesCount": 0
      }
    },
    "microF1": 0,
    "microPrecision": 0,
    "microRecall": 0,
    "macroF1": 0,
    "macroPrecision": 0,
    "macroRecall": 0
  },
  "intentsEvaluation": {
    "confusionMatrix": {
      "additionalProp1": {
        "additionalProp1": {
          "normalizedValue": 0,
          "rawValue": 0
        },
        "additionalProp2": {
          "normalizedValue": 0,
          "rawValue": 0
        },
        "additionalProp3": {
          "normalizedValue": 0,
          "rawValue": 0
        }
      },
      "additionalProp2": {
        "additionalProp1": {
          "normalizedValue": 0,
          "rawValue": 0
        },
        "additionalProp2": {
          "normalizedValue": 0,
          "rawValue": 0
        },
        "additionalProp3": {
          "normalizedValue": 0,
          "rawValue": 0
        }
      },
      "additionalProp3": {
        "additionalProp1": {
          "normalizedValue": 0,
          "rawValue": 0
        },
        "additionalProp2": {
          "normalizedValue": 0,
          "rawValue": 0
        },
        "additionalProp3": {
          "normalizedValue": 0,
          "rawValue": 0
        }
      }
    },
    "intents": {
      "additionalProp1": {
        "f1": 0,
        "precision": 0,
        "recall": 0,
        "truePositivesCount": 0,
        "trueNegativesCount": 0,
        "falsePositivesCount": 0,
        "falseNegativesCount": 0
      },
      "additionalProp2": {
        "f1": 0,
        "precision": 0,
        "recall": 0,
        "truePositivesCount": 0,
        "trueNegativesCount": 0,
        "falsePositivesCount": 0,
        "falseNegativesCount": 0
      },
      "additionalProp3": {
        "f1": 0,
        "precision": 0,
        "recall": 0,
        "truePositivesCount": 0,
        "trueNegativesCount": 0,
        "falsePositivesCount": 0,
        "falseNegativesCount": 0
      }
    },
    "microF1": 0,
    "microPrecision": 0,
    "microRecall": 0,
    "macroF1": 0,
    "macroPrecision": 0,
    "macroRecall": 0
  },
  "evaluationOptions": {
    "kind": "percentage",
    "trainingSplitPercentage": 0,
    "testingSplitPercentage": 0
  }
}
Load or export model data
Load model data
Create a POST request using the following URL, headers, and JSON body to load your model data to your project.
Request URL
Use the following URL when creating your API request. Replace the placeholder values with your own values.
{ENDPOINT}/language/authoring/analyze-conversations/projects/{PROJECT-NAME}/models/{MODEL-NAME}:load-snapshot?stringIndexType=Utf16CodeUnit&api-version={API-VERSION}
| Placeholder | Value | Example |
|---|---|---|
{ENDPOINT} |
The endpoint for authenticating your API request. | https://<your-custom-subdomain>.cognitiveservices.azure.com |
{PROJECT-NAME} |
The name for your project. This value is case-sensitive. | EmailApp |
{API-VERSION} |
The version of the API you're calling. | 2022-10-01-preview |
{MODEL-NAME} |
The name of your model. This value is case-sensitive. | v1 |
Headers
Use the following header to authenticate your request.
| Key | Value |
|---|---|
Ocp-Apim-Subscription-Key |
The key to your resource. Used for authenticating your API requests. |
Once you send your API request, you receive a 202 response indicating success. In the response headers, extract the operation-location value formatted like this:
{ENDPOINT}/language/authoring/analyze-conversations/projects/{PROJECT-NAME}/models/{MODEL-NAME}/jobs/{JOB-ID}?api-version={API-VERSION}
JOB-ID is used to identify your request, since this operation is asynchronous. Use this URL to get the status of your model data loading, using the same authentication method.
Export model data
Create a POST request using the following URL, headers, and JSON body to export your model data.
Request URL
Use the following URL when creating your API request. Replace the placeholder values with your own values.
{ENDPOINT}/language/authoring/analyze-conversations/projects/{PROJECT-NAME}/:export?stringIndexType=Utf16CodeUnit&api-version={API-VERSION}&trainedModelLabel={MODEL-NAME}
| Placeholder | Value | Example |
|---|---|---|
{ENDPOINT} |
The endpoint for authenticating your API request. | https://<your-custom-subdomain>.cognitiveservices.azure.com |
{PROJECT-NAME} |
The name for your project. This value is case-sensitive. | EmailApp |
{API-VERSION} |
The version of the API you're calling. | 2022-10-01-preview |
{MODEL-NAME} |
The name of your model. This value is case-sensitive. | v1 |
Headers
Use the following header to authenticate your request.
| Key | Value |
|---|---|
Ocp-Apim-Subscription-Key |
The key to your resource. Used for authenticating your API requests. |
Once you send your API request, you receive a 202 response indicating success. In the response headers, extract the operation-location value formatted like this:
{ENDPOINT}/language/authoring/analyze-conversations/projects/{PROJECT-NAME}/jobs/{JOB-ID}?api-version={API-VERSION}
JOB-ID is used to identify your request, since this operation is asynchronous. Use this URL to get the exported project JSON, using the same authentication method.
Delete model
Create a DELETE request using the following URL, headers, and JSON body to delete a model.
Request URL
{ENDPOINT}/language/authoring/analyze-conversations/projects/{projectName}/models/{trainedModelLabel}?api-version={API-VERSION}
| Placeholder | Value | Example |
|---|---|---|
{YOUR-ENDPOINT} |
The endpoint for authenticating your API request. | https://<your-custom-subdomain>.cognitiveservices.azure.com |
{PROJECT-NAME} |
The name for your project. This value is case-sensitive. | myProject |
{trainedModelLabel} |
The name for your model name. This value is case-sensitive. | model1 |
{API-VERSION} |
The version of the API you're calling. | 2023-04-01 |
Headers
Use the following header to authenticate your request.
| Key | Value |
|---|---|
Ocp-Apim-Subscription-Key |
The key to your resource. Used for authenticating your API requests. |
Once you send your API request, you receive a 204 response indicating success, which means your model is deleted.
As you review how your model performs, learn about the evaluation metrics that are used.
Deploy your model
Once you're satisfied with how your model performs, it's ready to be deployed and used to predict intents. Deploying a model makes it available for use through the prediction API.
Submit deployment job
Create a PUT request using the following URL, headers, and JSON body to start deploying an orchestration workflow model.
Request URL
{ENDPOINT}/language/authoring/analyze-conversations/projects/{PROJECT-NAME}/deployments/{DEPLOYMENT-NAME}?api-version={API-VERSION}
| Placeholder | Value | Example |
|---|---|---|
{ENDPOINT} |
The endpoint for authenticating your API request. | https://<your-custom-subdomain>.cognitiveservices.azure.com |
{PROJECT-NAME} |
The name for your project. This value is case-sensitive. | myProject |
{DEPLOYMENT-NAME} |
The name for your deployment. This value is case-sensitive. | staging |
{API-VERSION} |
The version of the API you're calling. | 2023-04-01 |
Headers
Use the following header to authenticate your request.
| Key | Value |
|---|---|
Ocp-Apim-Subscription-Key |
The key to your resource. Used for authenticating your API requests. |
Request Body
{
  "trainedModelLabel": "{MODEL-NAME}",
}
| Key | Placeholder | Value | Example |
|---|---|---|---|
| trainedModelLabel | {MODEL-NAME} |
The model name that is assigned to your deployment. You can only assign successfully trained models. This value is case-sensitive. | myModel |
Once you send your API request, you receive a 202 response indicating success. In the response headers, extract the operation-location value formatted like this:
{ENDPOINT}/language/authoring/analyze-conversations/projects/{PROJECT-NAME}/deployments/{DEPLOYMENT-NAME}/jobs/{JOB-ID}?api-version={API-VERSION}
You can use this URL to get the deployment job status.
Get deployment job status
Use the following GET request to get the status of your deployment job. Replace the placeholder values with your own values.
Request URL
{ENDPOINT}/language/authoring/analyze-conversations/projects/{PROJECT-NAME}/deployments/{DEPLOYMENT-NAME}/jobs/{JOB-ID}?api-version={API-VERSION}
| Placeholder | Value | Example |
|---|---|---|
{ENDPOINT} |
The endpoint for authenticating your API request. | https://<your-custom-subdomain>.cognitiveservices.azure.com |
{PROJECT-NAME} |
The name for your project. This value is case-sensitive. | myProject |
{DEPLOYMENT-NAME} |
The name for your deployment. This value is case-sensitive. | staging |
{JOB-ID} |
The ID for locating your model's training status. It's in the location header value you received from the API in response to your model deployment request. |
xxxxxxxx-xxxx-xxxx-xxxx-xxxxxxxxxxxxx |
{API-VERSION} |
The version of the API you're calling. | 2023-04-01 |
Headers
Use the following header to authenticate your request.
| Key | Value |
|---|---|
Ocp-Apim-Subscription-Key |
The key to your resource. Used for authenticating your API requests. |
Response Body
Once you send the request, you get the following response. Keep polling this endpoint until the status parameter changes to "succeeded".
{
    "jobId":"{JOB-ID}",
    "createdDateTime":"{CREATED-TIME}",
    "lastUpdatedDateTime":"{UPDATED-TIME}",
    "expirationDateTime":"{EXPIRATION-TIME}",
    "status":"running"
}
Swap deployments
You can swap deployments after testing a model assigned to one deployment, and want to assign it to another. Swapping deployments involves taking the model assigned to the first deployment, and assigning it to the second deployment. Then taking the model assigned to second deployment, and assigning it to the first deployment.
Create a POST request using the following URL, headers, and JSON body to start a swap deployments job.
Request URL
{ENDPOINT}/language/authoring/analyze-conversations/projects/{PROJECT-NAME}/deployments/:swap?api-version={API-VERSION}
| Placeholder | Value | Example |
|---|---|---|
{ENDPOINT} |
The endpoint for authenticating your API request. | https://<your-custom-subdomain>.cognitiveservices.azure.com |
{PROJECT-NAME} |
The name for your project. This value is case-sensitive. | myProject |
{API-VERSION} |
The version of the API you're calling. | 2023-04-01 |
Headers
Use the following header to authenticate your request.
| Key | Value |
|---|---|
Ocp-Apim-Subscription-Key |
The key to your resource. Used for authenticating your API requests. |
Request Body
{
  "firstDeploymentName": "{FIRST-DEPLOYMENT-NAME}",
  "secondDeploymentName": "{SECOND-DEPLOYMENT-NAME}"
}
| Key | Placeholder | Value | Example |
|---|---|---|---|
| firstDeploymentName | {FIRST-DEPLOYMENT-NAME} |
The name for your first deployment. This value is case-sensitive. | production |
| secondDeploymentName | {SECOND-DEPLOYMENT-NAME} |
The name for your second deployment. This value is case-sensitive. | staging |
Once you send your API request, you receive a 202 response indicating success.
Delete deployment
Create a DELETE request using the following URL, headers, and JSON body to delete a conversational language understanding deployment.
Request URL
{ENDPOINT}/language/authoring/analyze-conversations/projects/{projectName}/deployments/{deploymentName}?api-version={API-VERSION}
| Placeholder | Value | Example |
|---|---|---|
{ENDPOINT} |
The endpoint for authenticating your API request. | https://<your-custom-subdomain>.cognitiveservices.azure.com |
{PROJECT-NAME} |
The name for your project. This value is case-sensitive. | myProject |
{DEPLOYMENT-NAME} |
The name for your deployment name. This value is case-sensitive. | staging |
{API-VERSION} |
The version of the API you're calling. | 2023-04-01 |
Headers
Use the following header to authenticate your request.
| Key | Value |
|---|---|
Ocp-Apim-Subscription-Key |
The key to your resource. Used for authenticating your API requests. |
Once you send your API request, you receive a 202 response indicating success, which means your deployment is deleted.
Assign deployment resources
You can deploy your project to multiple regions by assigning different Language resources that exist in different regions.
Assigning deployment resources programmatically requires Microsoft Entra authentication**. Microsoft Entra ID is used to confirm you have access to the resources you're interested in assigning to your project for multi-region deployment. To programmatically use Microsoft Entra authentication when making REST API calls, see the Foundry Tools authentication documentation.
Assign resource
Submit a POST request using the following URL, headers, and JSON body to assign deployment resources.
Request URL
Use the following URL when creating your API request. Replace the placeholder values with your own values.
{ENDPOINT}/language/authoring/analyze-conversations/projects/{PROJECT-NAME}/resources/:assign?api-version={API-VERSION}
| Placeholder | Value | Example |
|---|---|---|
{ENDPOINT} |
The endpoint for authenticating your API request. | https://<your-custom-subdomain>.cognitiveservices.azure.com |
{PROJECT-NAME} |
The name for your project. This value is case-sensitive. | myProject |
{API-VERSION} |
The version of the API you're calling. | 2022-10-01-preview |
Headers
Use Microsoft Entra authentication to authenticate this API.
Body
Use the following sample JSON as your body.
{
  "resourcesMetadata": [
    {
      "azureResourceId": "{AZURE-RESOURCE-ID}",
      "customDomain": "{CUSTOM-DOMAIN}",
      "region": "{REGION-CODE}"
    }
  ]
}
| Key | Placeholder | Value | Example |
|---|---|---|---|
azureResourceId |
{AZURE-RESOURCE-ID} |
The full resource ID path you want to assign. Found in the Azure portal under the Properties tab for the resource, within the Resource ID field. | /subscriptions/a0a0a0a0-bbbb-cccc-dddd-e1e1e1e1e1e1/resourceGroups/ContosoResourceGroup/providers/Microsoft.CognitiveServices/accounts/ContosoResource |
customDomain |
{CUSTOM-DOMAIN} |
The custom subdomain of the resource you want to assign. Found in the Azure portal under the Keys and Endpoint tab for the resource, part of the Endpoint field in the URL https://<your-custom-subdomain>.cognitiveservices.azure.com/ |
contosoresource |
region |
{REGION-CODE} |
A region code specifying the region of the resource you want to assign. Found in the Azure portal under the Keys and Endpoint tab for the resource, as part of the Location/Region field. | eastus |
Get assign resource status
Use the following GET request to get the status of your assign deployment resource job. Replace the placeholder values with your own values.
Request URL
{ENDPOINT}/language/authoring/analyze-conversations/projects/{PROJECT-NAME}/resources/assign/jobs/{JOB-ID}?api-version={API-VERSION}
| Placeholder | Value | Example |
|---|---|---|
{ENDPOINT} |
The endpoint for authenticating your API request. | https://<your-custom-subdomain>.cognitiveservices.azure.com |
{PROJECT-NAME} |
The name for your project. This value is case-sensitive. | myProject |
{JOB-ID} |
The job ID for getting your assign deployment status. It's in the operation-location header value you received from the API in response to your assign deployment resource request. |
xxxxxxxx-xxxx-xxxx-xxxx-xxxxxxxxxxxxx |
{API-VERSION} |
The version of the API you're calling. | 2022-10-01-preview |
Headers
Use the following header to authenticate your request.
| Key | Value |
|---|---|
Ocp-Apim-Subscription-Key |
The key to your resource. Used for authenticating your API requests. |
Response Body
Once you send the request, you get the following response. Keep polling this endpoint until the status parameter changes to "succeeded".
{
    "jobId":"{JOB-ID}",
    "createdDateTime":"{CREATED-TIME}",
    "lastUpdatedDateTime":"{UPDATED-TIME}",
    "expirationDateTime":"{EXPIRATION-TIME}",
    "status":"running"
}
Unassign deployment resources
When you unassign or remove a deployment resource from a project, you also delete all the deployments previously deployed to that resource region.
Unassign resource
Submit a POST request using the following URL, headers, and JSON body to unassign or remove deployment resources from your project.
Request URL
Use the following URL when creating your API request. Replace the placeholder values with your own values.
{ENDPOINT}/language/authoring/analyze-conversations/projects/{PROJECT-NAME}/resources/:unassign?api-version={API-VERSION}
| Placeholder | Value | Example |
|---|---|---|
{ENDPOINT} |
The endpoint for authenticating your API request. | https://<your-custom-subdomain>.cognitiveservices.azure.com |
{PROJECT-NAME} |
The name for your project. This value is case-sensitive. | myProject |
{API-VERSION} |
The version of the API you're calling. | 2022-10-01-preview |
Headers
Use the following header to authenticate your request.
| Key | Value |
|---|---|
Ocp-Apim-Subscription-Key |
The key to your resource. Used for authenticating your API requests. |
Body
Use the following sample JSON as your body.
{
  "assignedResourceIds": [
    "{AZURE-RESOURCE-ID}"
  ]
}
| Key | Placeholder | Value | Example |
|---|---|---|---|
assignedResourceIds |
{AZURE-RESOURCE-ID} |
The full resource ID path you want to unassign. Found in the Azure portal under the Properties tab for the resource as the Resource ID field. | /subscriptions/a0a0a0a0-bbbb-cccc-dddd-e1e1e1e1e1e1/resourceGroups/ContosoResourceGroup/providers/Microsoft.CognitiveServices/accounts/ContosoResource |
Get unassign resource status
Use the following GET request to get the status of your unassign deployment resources job. Replace the placeholder values with your own values.
Request URL
{ENDPOINT}/language/authoring/analyze-conversations/projects/{PROJECT-NAME}/resources/unassign/jobs/{JOB-ID}?api-version={API-VERSION}
| Placeholder | Value | Example |
|---|---|---|
{ENDPOINT} |
The endpoint for authenticating your API request. | https://<your-custom-subdomain>.cognitiveservices.azure.com |
{PROJECT-NAME} |
The name for your project. This value is case-sensitive. | myProject |
{JOB-ID} |
The job ID for getting your assign deployment status. It's in the operation-location header value you received from the API in response to your unassign deployment resource request. |
xxxxxxxx-xxxx-xxxx-xxxx-xxxxxxxxxxxxx |
{API-VERSION} |
The version of the API you're calling. | 2022-10-01-preview |
Headers
Use the following header to authenticate your request.
| Key | Value |
|---|---|
Ocp-Apim-Subscription-Key |
The key to your resource. Used for authenticating your API requests. |
Response Body
Once you send the request, you get the following response. Keep polling this endpoint until the status parameter changes to "succeeded".
{
    "jobId":"{JOB-ID}",
    "createdDateTime":"{CREATED-TIME}",
    "lastUpdatedDateTime":"{UPDATED-TIME}",
    "expirationDateTime":"{EXPIRATION-TIME}",
    "status":"running"
}
Send prediction requests
After the deployment is added successfully, you can query the deployment for intent and entities predictions from your utterance based on the model you assigned to the deployment. You can query the deployment programmatically through the prediction API or through the client libraries (Azure SDK).
Test deployed model
First you need to get your resource key and endpoint:
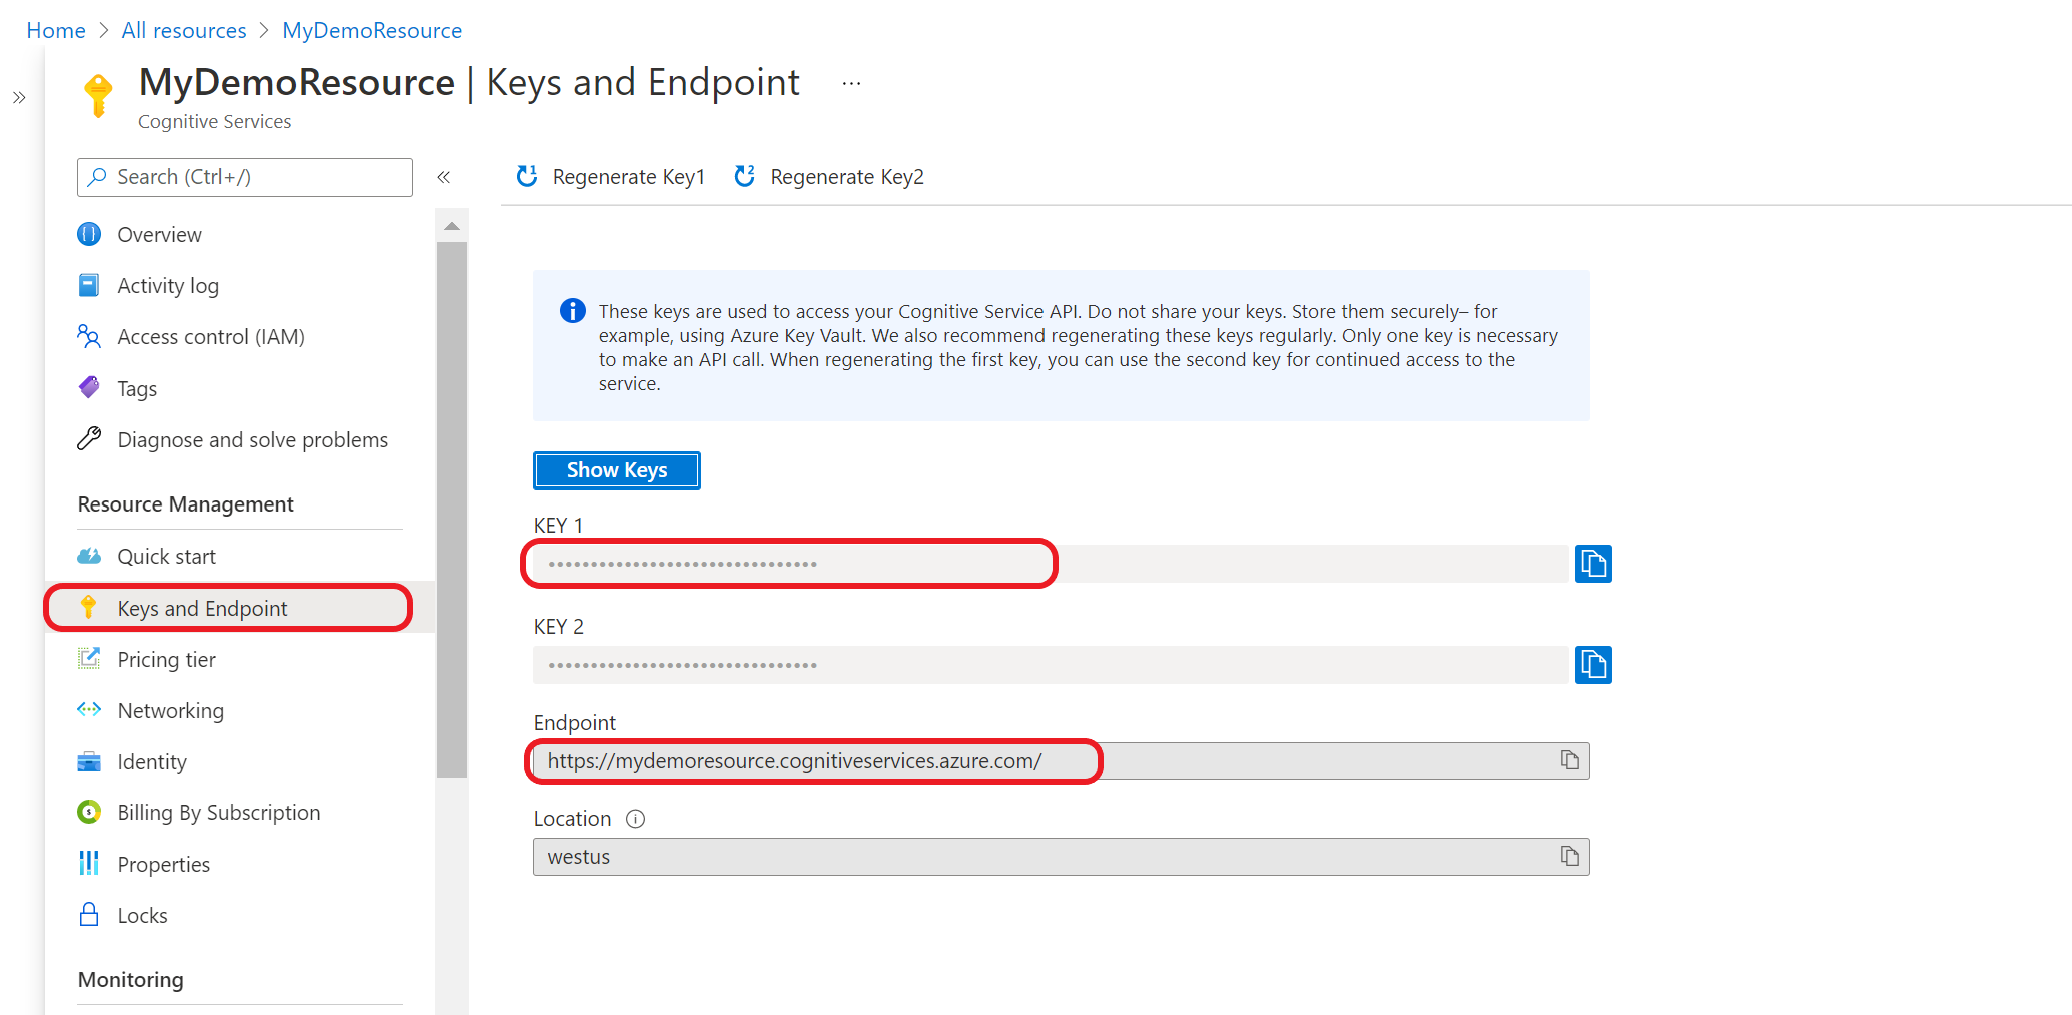
Go to your resource overview page in the Azure portal. From the menu on the left side, select Keys and Endpoint. You will use the endpoint and key for API requests.
Query your model
Create a POST request using the following URL, headers, and JSON body to start testing an orchestration workflow model.
Request URL
{ENDPOINT}/language/:analyze-conversations?api-version={API-VERSION}
| Placeholder | Value | Example |
|---|---|---|
{ENDPOINT} |
The endpoint for authenticating your API request. | https://<your-custom-subdomain>.cognitiveservices.azure.com |
{API-VERSION} |
The version of the API you're calling. | 2023-04-01 |
Headers
Use the following header to authenticate your request.
| Key | Value |
|---|---|
Ocp-Apim-Subscription-Key |
The key to your resource. Used for authenticating your API requests. |
Request Body
{
  "kind": "Conversation",
  "analysisInput": {
    "conversationItem": {
      "text": "Text1",
      "participantId": "1",
      "id": "1"
    }
  },
  "parameters": {
    "projectName": "{PROJECT-NAME}",
    "deploymentName": "{DEPLOYMENT-NAME}",
    "directTarget": "qnaProject",
    "targetProjectParameters": {
      "qnaProject": {
        "targetProjectKind": "QuestionAnswering",
        "callingOptions": {
          "context": {
            "previousUserQuery": "Meet Surface Pro 4",
            "previousQnaId": 4
          },
          "top": 1,
          "question": "App Service overview"
        }
      }
    }
  }
}
Response Body
Once you send the request, you get the following response for the prediction!
{
  "kind": "ConversationResult",
  "result": {
    "query": "App Service overview",
    "prediction": {
      "projectKind": "Orchestration",
      "topIntent": "qnaTargetApp",
      "intents": {
        "qnaTargetApp": {
          "targetProjectKind": "QuestionAnswering",
          "confidenceScore": 1,
          "result": {
            "answers": [
              {
                "questions": [
                  "App Service overview"
                ],
                "answer": "The compute resources you use are determined by the *App Service plan* that you run your apps on.",
                "confidenceScore": 0.7384000000000001,
                "id": 1,
                "source": "https://learn.microsoft.com/azure/app-service/overview",
                "metadata": {},
                "dialog": {
                  "isContextOnly": false,
                  "prompts": []
                }
              }
            ]
          }
        }
      }
    }
  }
}
Use the client libraries (Azure SDK)
You can also use the client libraries provided by the Azure SDK to send requests to your model.
Note
The client library for conversational language understanding is only available for .NET and Python.
Go to your resource overview page in the Azure portal
From the menu on the left side, select Keys and Endpoint. Use endpoint for the API requests and you need the key for
Ocp-Apim-Subscription-Keyheader.
Download and install the client library package for your language of choice:
Language Package version .NET 1.0.0 Python 1.0.0 After you install the client library, use the following samples on GitHub to start calling the API.
See the following reference documentation for more information: