Create a new Works Hours Template in Planner Premium

Allen Cook 40 Reputation points
2026-03-11T16:43:22.69+00:00

I need to assign tasks on weekend days in a Planner Premium project. All documentation online refers to Project for the Web. Following those steps for Planner Premium results in an insufficient permissions error in PowerApps.

I am the administrator of our M365 account. How do I update work hours and more importantly how do I create a new template?

If Planner only works on the week days, I can't use it.

Microsoft 365 and Office | Project | For business | Windows
0 comments No comments

Answer accepted by question author
Alexis-NG 18,065 Reputation points Microsoft External Staff Moderator
2026-03-11T19:26:59.5933333+00:00

Hi @Allen Cook,

Thank you for the update.

The steps I shared earlier were based on the permission issues you’re currently experiencing, under the assumption that the appropriate licenses are already assigned. As you correctly pointed out, Planner Plan 1 does not support weekend task assignments, and upgrading to Planner Plan 3 or Plan 5 is required to use that functionality.

For reference, this behavior is described in the following article: Custom working calendars in Project for the web | Microsoft Community Hub.

I completely understand how this limitation and the additional steps may impact your workflow. Clearer guidance around this would certainly be helpful, and your experience highlights an area that could be improved.

I highly encourage you to share this suggestion with the product team by submitting feedback here: Ideas · Community. This is the most direct way for your request to be reviewed and considered for future enhancements.

Once you've submitted your feedback, feel free to share the link here in the comments. I’ll be happy to upvote it to help bring more visibility.  

Additionally, since many other users have expressed similar concerns but may not know where to submit feedback, if my response has helped you better understand the situation and guided you toward a possible next step, please mark it as the “Accepted Answer.” Your action will help pin this post to the top, making it easier for others in the community who are experiencing the same issue to find your feedback and support it.  

Thank you again for your time and for raising this important usability concern. 

Was this answer helpful?

0 comments No comments

Answer accepted by question author
Alexis-NG 18,065 Reputation points Microsoft External Staff Moderator
2026-03-11T18:13:31.6366667+00:00

Hi @Allen Cook,

Thank you for the outlining the issue you're experiencing.

According to Project calendars in Microsoft Project for the web - Microsoft Support, Microsoft Project for the web will soon become Microsoft Planner. Planner Premium inherits Project for the web scheduling behavior and runs a default 9-5 weekdays template. Weekend scheduling is only possible if a non‑default calendar template exists. Calendar templates are created in Power Platform with admin roles only, and not exposed in Planner UI. If no custom template exists, Planner Premium behaves as weekday‑only

To create a new Work Hours Template that allows for weekend tasks in Planner Premium (the 2026 successor to Project for the Web), you must navigate through the Power Platform backend.

The "insufficient permissions" error you are seeing even as an M365 Global Admin is usually because you haven't been assigned the specific System Administrator or Project Manager security role within the Dataverse Environment where Planner data is stored.

You can find this information via: Role-based security roles for Dataverse - Power Platform | Microsoft Learn

User's image

Before you can create a template, you must grant yourself the correct role inside the Power Platform:

  1. Go to the Power Platform Admin Center.
  2. Select Environments on the left, then click on the Default environment (or the specific one used for your projects).
  3. On the right, click the 3 dots, navigate to Membership: User's image
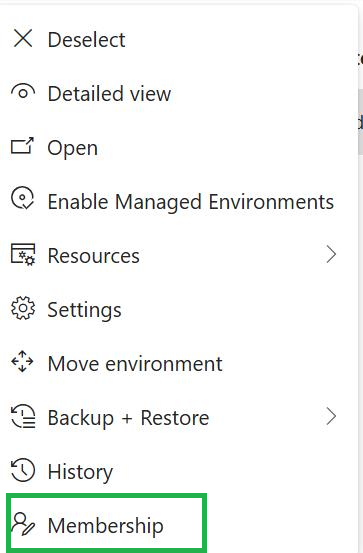
  4. Add yourself into being a Systems administrators
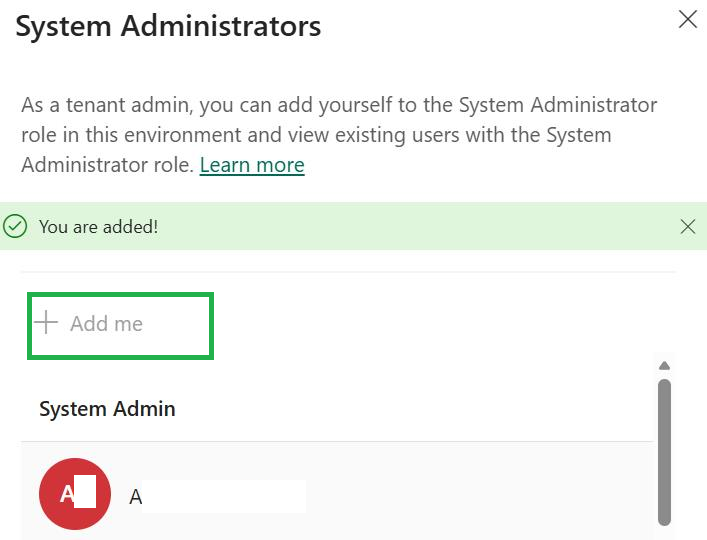
User's image

Then click on the Default environment (or the specific one used for your projects). On the right, under Users, click See all.
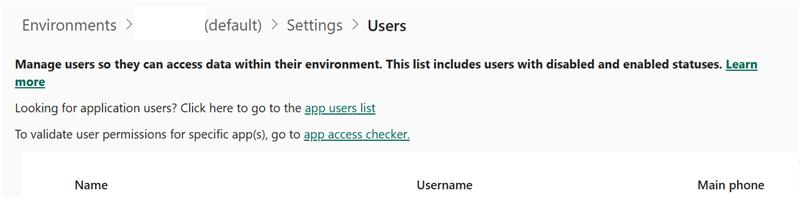
User's image

  1. Find your name, click the three dots (...), and select Manage security roles.
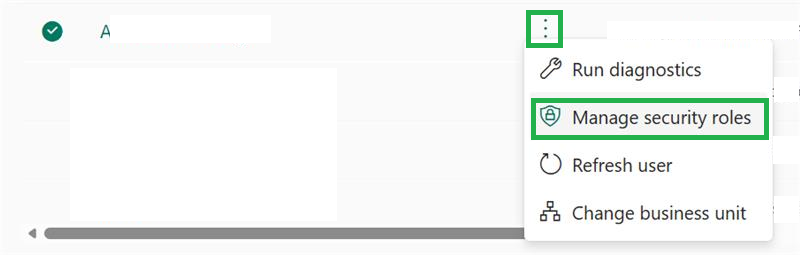
User's image

  1. Ensure System Administrator and Project User/Manager or any other roles you want are checked. Click Save. User's image
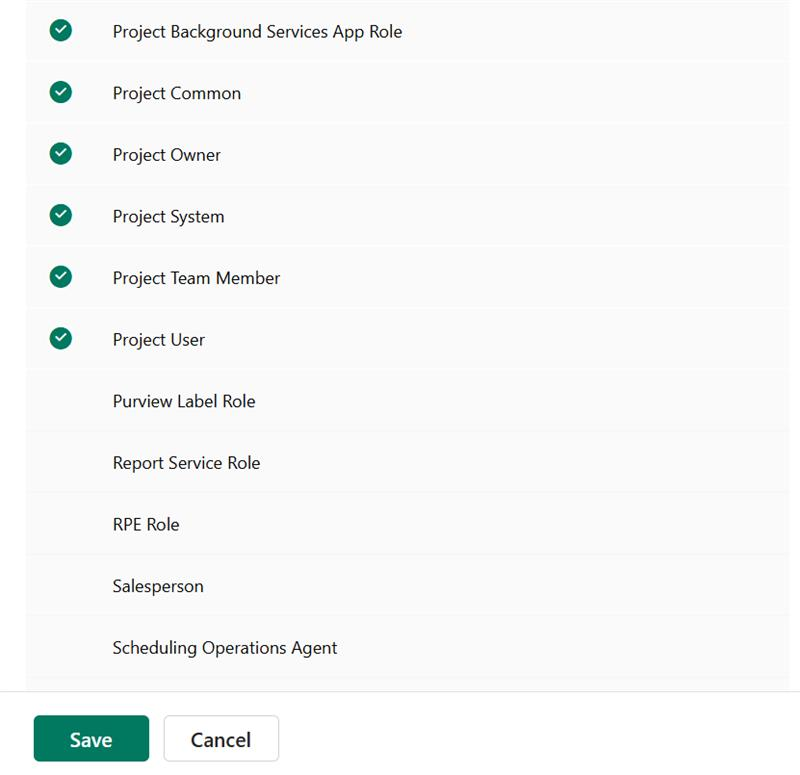
Note: It may take 5–10 minutes for these permissions to propagate.

Planner Premium does not have a "Weekend Toggle" in the main UI. You  can now build a new template in the PowerApps backend by following this guide: Resource Calendars in Project for the web | Microsoft Community Hub


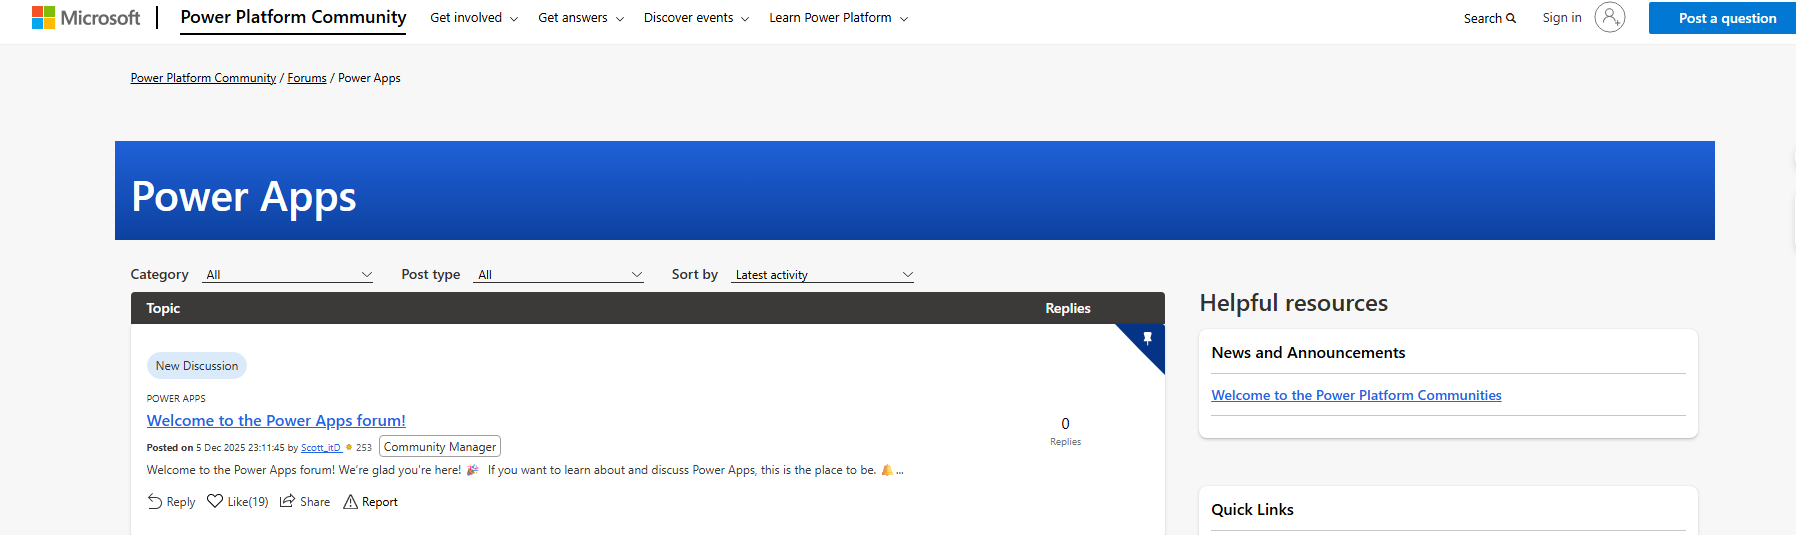
In case you require more in-depth guidance or support for these steps, I’d recommend posting your query in the Microsoft Power Automate Community. This is a dedicated channel for Power Apps discussions. The reason I suggest posting a new topic there is that in the general Q&A Forum, resources and expertise on Power Automate are limited. In the Microsoft Power Platform Community Forum Thread, you’ll find the most qualified group of respondents, and other partners who regularly read the forums can share their knowledge or learn from your interaction. 
 User's image

If you find my post helpful, kindly consider marking it as the accepted answer. Doing so can assist others in the community who may have similar questions in finding solutions more quickly.  

Thank you for your kindness and contributions to the forum.


Note: Follow the steps in our documentation to enable email notifications if you want to receive email notifications related to this topic.

Was this answer helpful?


2 additional answers

Sort by: Most helpful
  1. Allen Cook 40 Reputation points
    2026-03-11T16:52:42.8766667+00:00

    Your answer lacks detail about the most critical issue here. I have found the options for creating new calendar templates. You made the critical error point 5 in your list. nothing else matters if I lack permissions and your answer lacks detail on howe to solve the problem.

    I am a global admin with a Power Apps license. What else is required to manage calendars?

    Was this answer helpful?

    0 comments No comments

  2. AI answer

    2026-03-11T16:43:47.9066667+00:00

    Planner Premium (the new Planner experience backed by Project for the web) supports custom work calendars, including weekends, but the calendar must be created as a calendar template in the underlying Project for the web environment and then applied to the plan.

    Key points from the product behavior:

    1. Each plan uses a work template (calendar)
      • By default, plans use a standard Monday–Friday work week.
      • With premium capabilities, custom work week calendars can be created so that tasks can be scheduled on different days (including weekends). The Planner scheduling engine then uses those days when calculating task dates and dependencies.
    2. Custom calendars are created as work hour/calendar templates
      • Project for the web is built on Power Platform/Dynamics 365. Work hours templates (calendars) are defined there and then associated with projects.
      • A calendar template defines:
        • Working hours (start/end time)
        • Working days
        • Exceptions (non‑working days)
    3. Required steps to create a new work hours template (calendar) These steps are done in the Power Apps/Dynamics 365 Project environment, not directly in the Planner UI: a. Define working hours on a resource
      • Go to Resources > Resources in the Project/Power Apps environment.
      • Create or select a resource that will represent the desired working pattern.
      • On that resource, configure Work Hours (for example, include Saturday and Sunday as working days, set working times) following the “Set work hours for a resource” guidance referenced in the docs.
      b. Create a calendar template from that resource
      • On the Resources page, select the resource whose work hours were configured.
      • Select Save Calendar As, give the work hours template a name, and save.
      • Alternatively, from Project Settings > Calendar Templates:
        • Go to Projects (bottom of left pane) > Settings.
        • Open Calendar Templates.
        • On Active Work Hour Templates, select New.
        • Name the template and set Template Resource to the resource configured above.
        • Save and close. The new template appears in Active Work Hour Templates.
    4. Apply the calendar template
      • To resources: On Resources, select one or more resources, choose Set Calendar, pick the work hours template, and apply.
      • To a project (plan): In the project in Project for the web/Planner premium experience:
        • Open project details (select the project name).
        • Under Calendar Settings, use Choose from template and select the new calendar.
        • Apply the calendar. The project will then schedule work only on the working days defined in that template (including weekends if configured).
    5. About the “insufficient permissions” error
      • Work hours templates and calendar templates are managed in the underlying Project/Power Apps environment. The account must have sufficient permissions in that environment (not just be a Microsoft 365 admin) to access Resources and Project Settings > Calendar Templates.
      • If the account is a tenant admin but lacks app‑level security roles in the Project/Power Apps environment, an environment admin or someone with appropriate Dynamics/Power Apps security must grant the necessary role so that calendar templates can be created and edited.
    6. Weekend work support
      • Planner with premium capabilities does not restrict work to Monday–Friday only. Using custom calendars, any combination of days (including weekends) can be configured as working days, and the scheduling engine will respect those days when calculating task dates and dependencies.

    References:

    AI-generated content may be incorrect. Read our transparency notes for more information.

    Was this answer helpful?

Your answer

Answers can be marked as 'Accepted' by the question author and 'Recommended' by moderators, which helps users know the answer solved the author's problem.