OpenGL Again

Sid Kraft 46 Reputation points
2026-07-05T13:44:38.6266667+00:00

Downloaded what I thought were the files with the headers for the C++ program in Visual Studio, C++.

Files were from glut-3.7, contains sub files: Include, LIB, other files, fgl.h, fglut.h, glut.h, tube.h

Changed the library paths in C/C++ General--> Additional Include Directories

Changed the library paths in Linker General--> Additional Include Directories

Changed the library paths in Linker> Input> Additional Dependencies all pointing to the glut files above

Added #include <fgl.h>

        #include <fglut.h>

        #include <glut.h>

        #include<tube.h>

After issuing the rebuild command, got the error:

>LINK : fatal error LNK1104: cannot open file 'c:\glut37\glut-3.7\Include\GL\\.obj'
Developer technologies | C++

A high-level, general-purpose programming language, created as an extension of the C programming language, that has object-oriented, generic, and functional features in addition to facilities for low-level memory manipulation.

0 comments No comments

3 answers

Sort by: Most helpful
  1. AI answer

    2026-07-05T13:44:53.6033333+00:00

    The linker error shows it is trying to open a file named GL\.obj, which is wrong. That means the project is treating a path or header name as an object or library dependency.

    Key points:

    1. Headers vs. libraries
      • Header files (.h) go in include directories and are referenced with #include.
      • The linker only works with .lib (and .obj) files, not .h files.
    2. Fix the include paths
      • In Configuration Properties → C/C++ → General → Additional Include Directories, add the directory that contains the header files, for example:
        c:\glut37\glut-3.7\Include
      • Then include them normally, e.g.:
             #include "fgl.h"
             #include "fglut.h"
             #include "glut.h"
             #include "tube.h"
        
      • Do not add header paths to linker library directories or dependencies.
    3. Fix the linker settings
      • In Configuration Properties → Linker → General → Additional Library Directories, specify the directory that contains the GLUT .lib files, e.g.:
        c:\glut37\glut-3.7\LIB
      • In Configuration Properties → Linker → Input → Additional Dependencies, list only library filenames (like glut32.lib or whatever the package provides).
      • Remove any entries that look like paths or header names (such as c:\glut37\glut-3.7\Include\GL\...), because the linker will treat them as library/object names and produce LNK1104.
    4. Check for path/filename issues
      • LNK1104 is commonly caused by incorrect paths or filenames passed to the linker. Review all entries in Additional Dependencies and ensure they are valid library names that exist in the directories specified in Library Directories.
    5. Verify architecture and library type
      • Ensure the GLUT libraries match the project’s target (x86 vs x64). A mismatch can also cause LNK1104 if the wrong directory is referenced.

    After these changes, rebuild the project. The compiler will find the headers via the include path, and the linker will only try to open valid .lib files from the library directories, eliminating the GL\.obj error.


    References:

    AI-generated content may be incorrect. Read our transparency notes for more information.

    Was this answer helpful?

    1 person found this answer helpful.
  2. Nancy Vo (WICLOUD CORPORATION) 7,250 Reputation points Microsoft External Staff Moderator
    2026-07-06T04:03:52.8033333+00:00

    Hello @Sid Kraft ,

    Thanks for your question.

    The Additional Dependencies box is very strict and only accepts specific file names (like glut32.lib). Because you pasted an entire folder path in that box, Visual Studio got confused, added a .obj extension to the end of your folder path, and tried to open your folder as if it were a file.

    Additionally, the Linker needs to look in your LIB folder, not your Include folder.

    You can refer to these following steps:

    1. Point the Linker to the correct folder
    • Open your Project Properties.
    • On the left, expand Linker and click on General.
    • On the right, find Additional Library Directories.
    • Change this path so it points to your library folder (for example: c:\glut37\glut-3.7\LIB). Make sure it does not say Include here.
    1. Give the Linker the exact file name
    • Still under the Linker menu on the left, click on Input.
    • On the right, find Additional Dependencies.
    • Remove the folder path that is currently there.
    • Type in the exact name of your library file. For GLUT, this is usually glut32.lib (check your LIB folder to confirm the exact name).

    Once you fix those two boxes, please rebuild your project and run again.

    I hope this addresses your question. If this response was helpful, please consider following the guidance to provide feedback.

    Was this answer helpful?


  3. Darran Rowe 2,616 Reputation points
    2026-07-05T15:10:12.54+00:00

    Without giving any indicator as to how you changed these paths then it is difficult to help. In the end, the easiest method for doing any of this is still vcpkg. Using vcpkg in manifest mode means that you don't have to care about any of this.

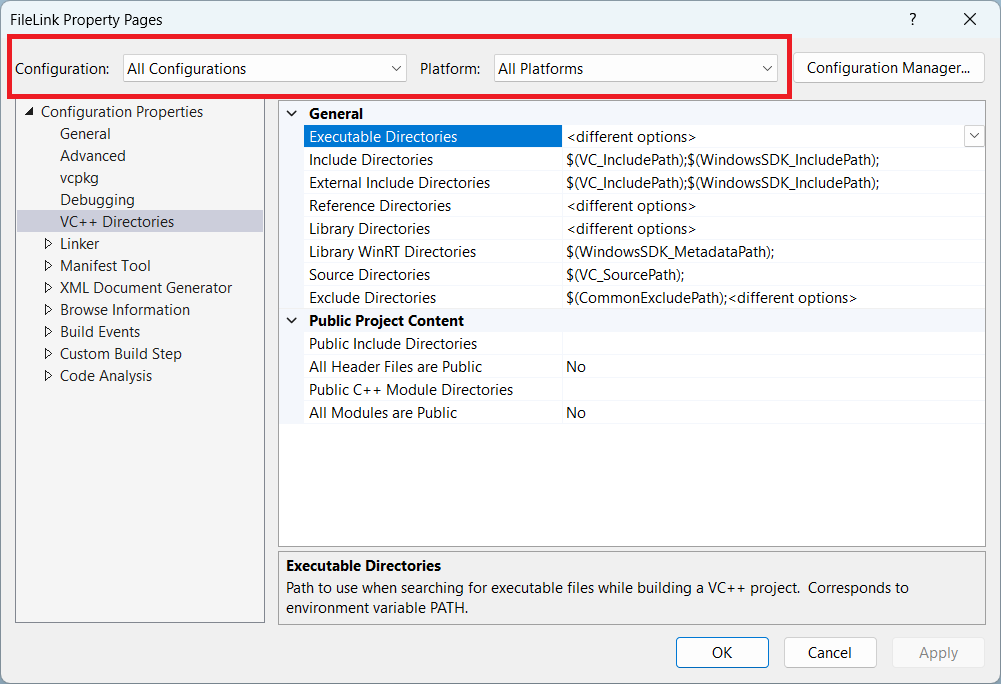
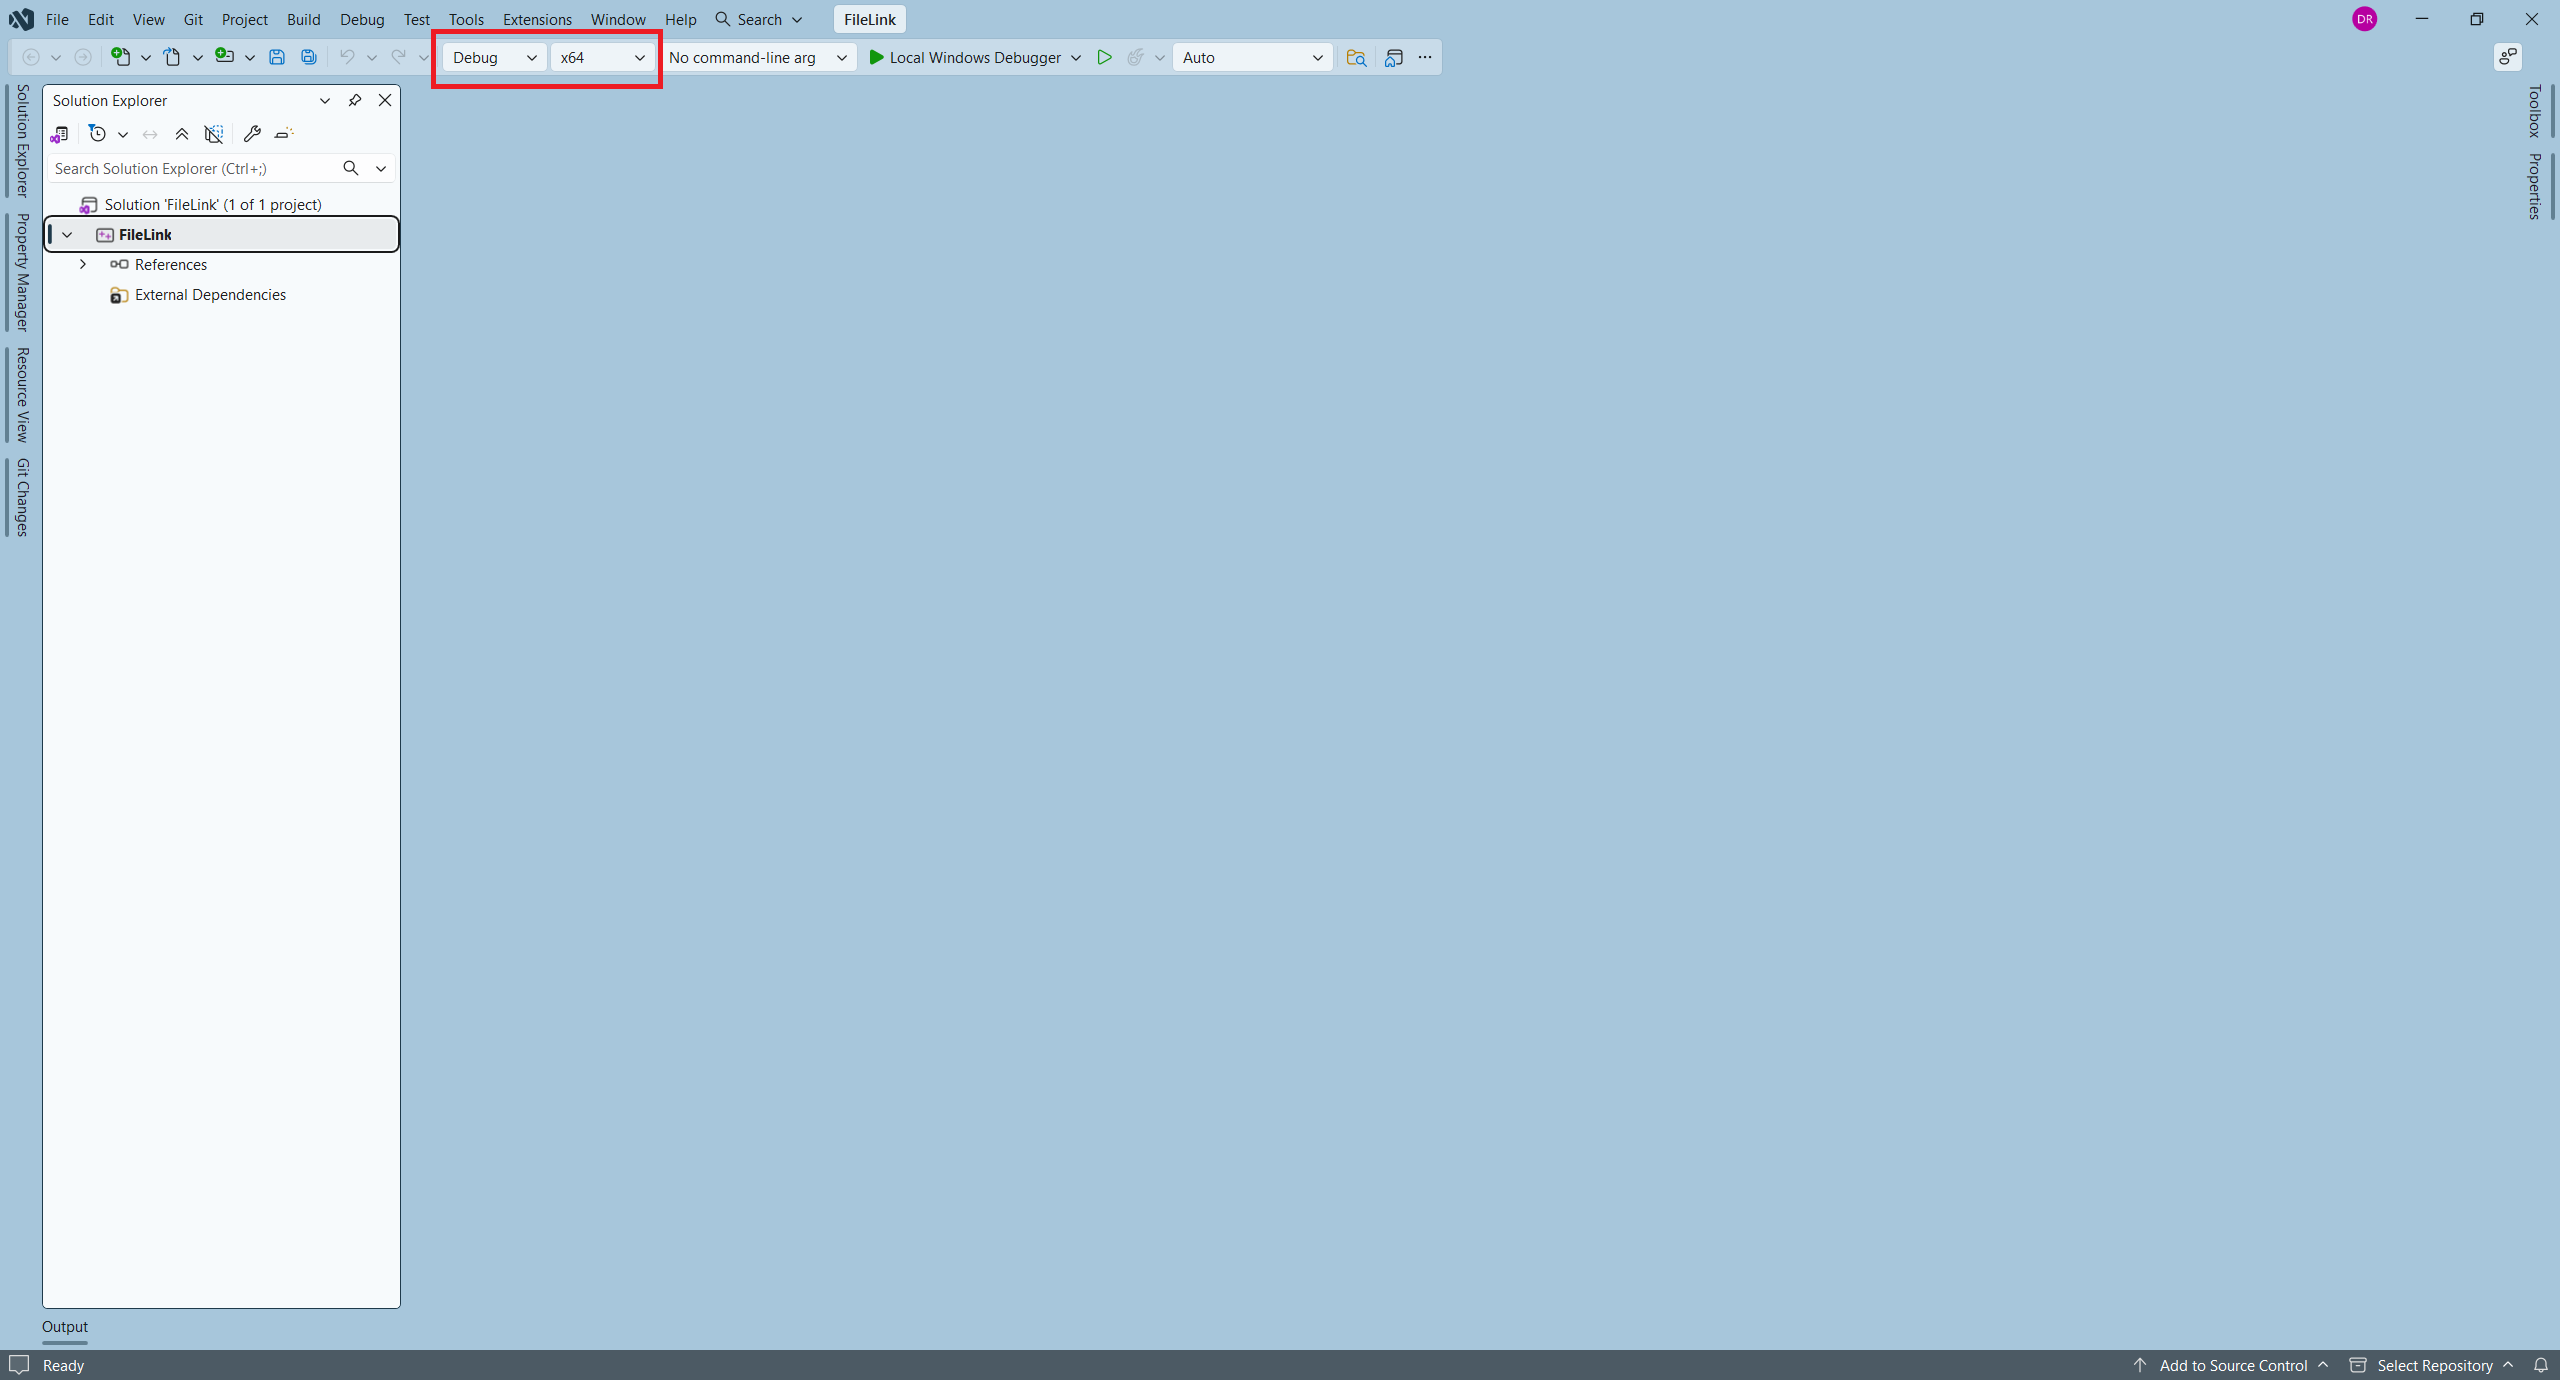
    But first and foremost, modifying the project properties requires that you keep track of the platform and configuration that you are changing the properties for, and what you are building.
    Screenshot 2026-07-05 153132

    Screenshot 2026-07-05 153307

    If you don't modify the properties in a way that works with the currently set platform or configuration, then it is all for nothing. That is why, keeping the project properties set to All Configurations and All Platforms by default is a good idea. Until you are used to how things work, only change the project properties from this when you modify a setting that is only needed for one platform or one configuration.

    There are two major locations to modify the paths. It works the same with both, so I'm only going to cover one.
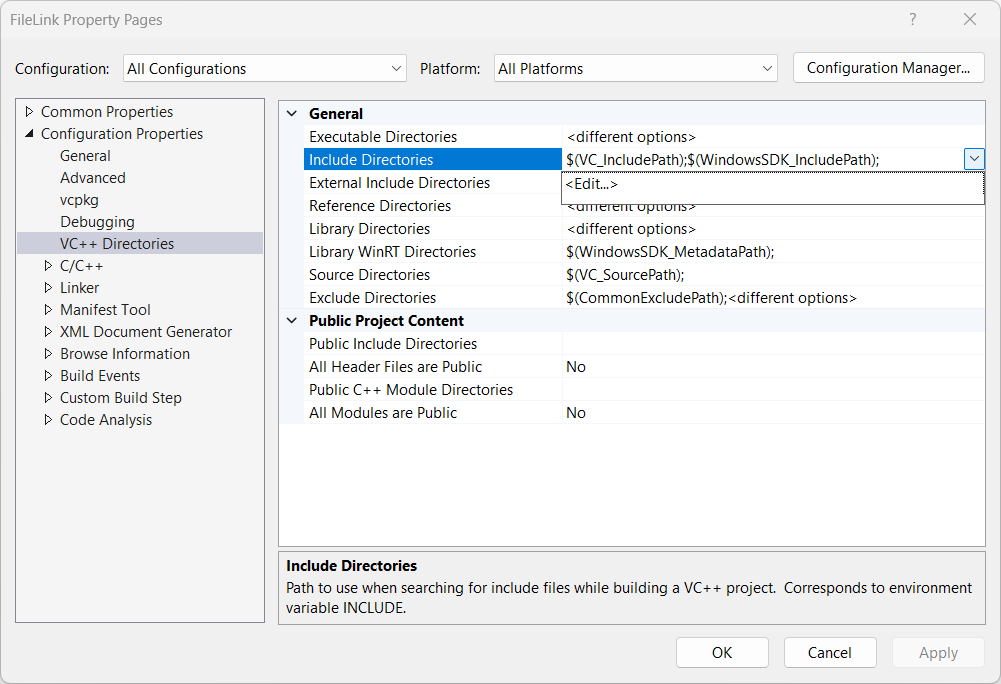
    Screenshot 2026-06-27 211641

    On the right hand side of the property is the little down arrow. If you click this then you can bring up the edit dialog. This is preferable if you don't know how to separate things. It is also useful since it allows you to make sure that property inheritance is on. You want to keep this on unless you really know what you are doing. This menu also allows you to reset settings back to default too. This works if the property text is bold.
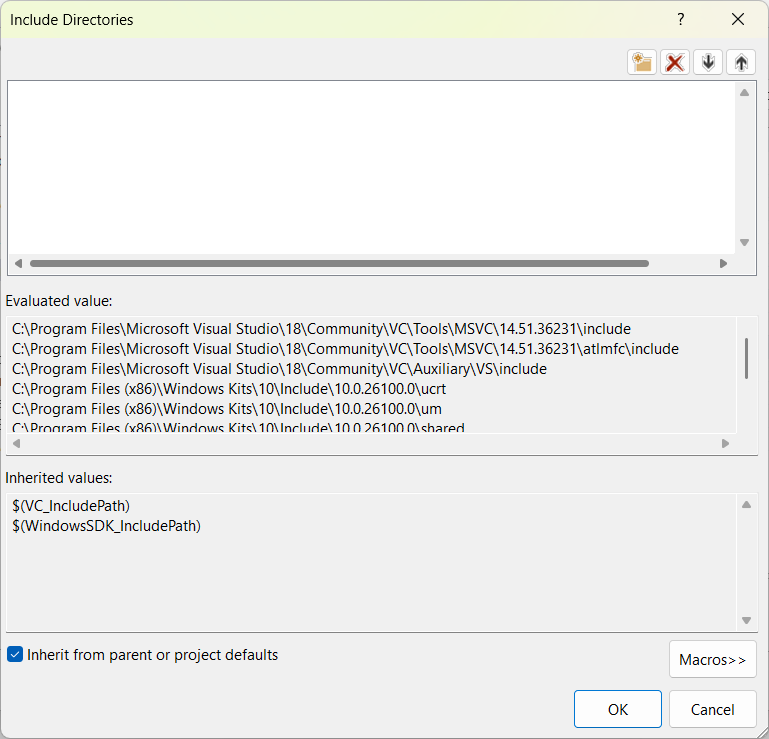
    Screenshot 2026-06-27 211651

    Anyway, if you open the dialog, then you can add an include directory per line. But this has to correspond with the directory layout. So as an example, if you have:Screenshot 2026-07-05 154754
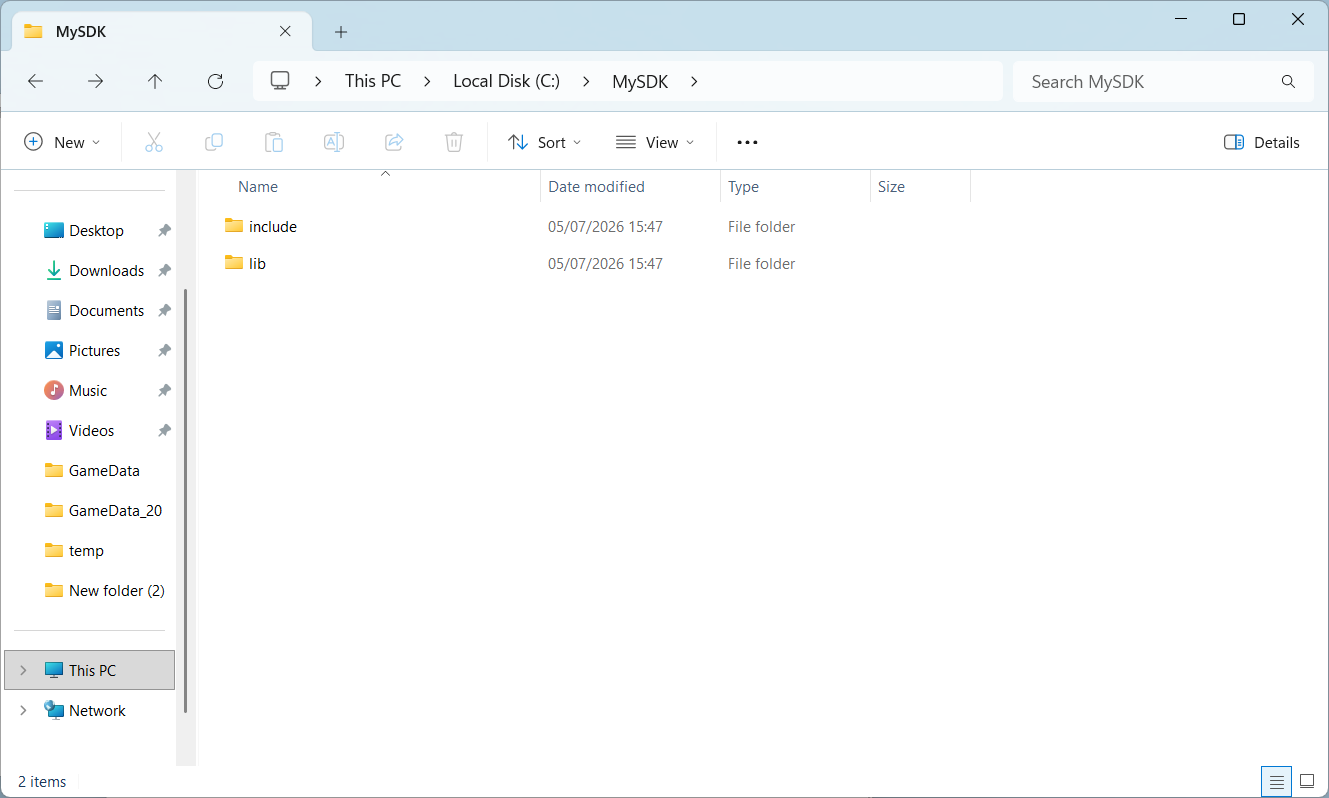
    Where all of the include files are in include, then what you add to the dialog is:
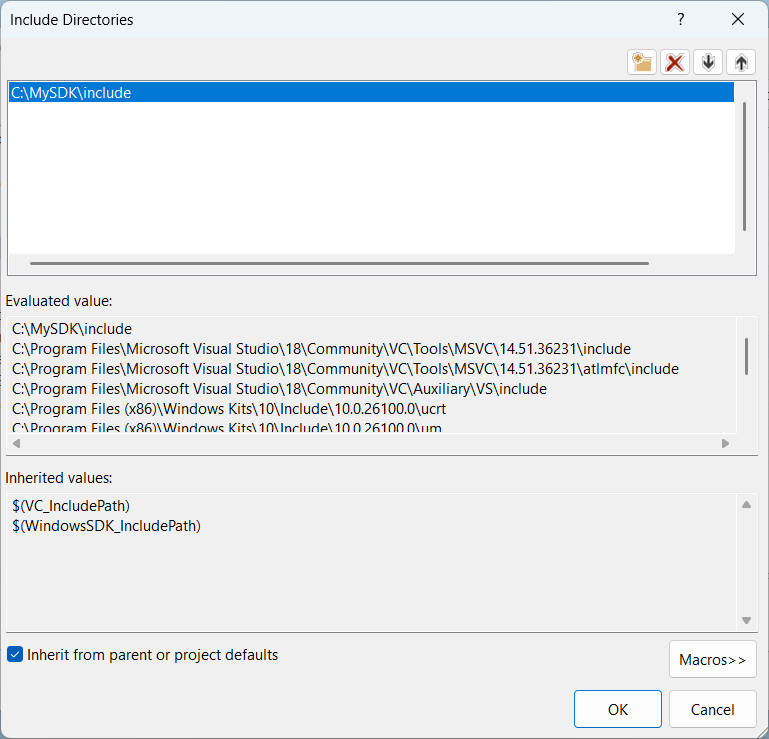
    Screenshot 2026-07-05 154800

    The important points here are that you can see that the include directory is right at the top, and "Inherit from parent or project defaults" is checked. If the directory structure has a sub directory, then just add the outer include directory to the path.

    For the library directory, things can get more complex. Libraries, including import libraries, are specific to an architecture. Often, you will see sub directories:
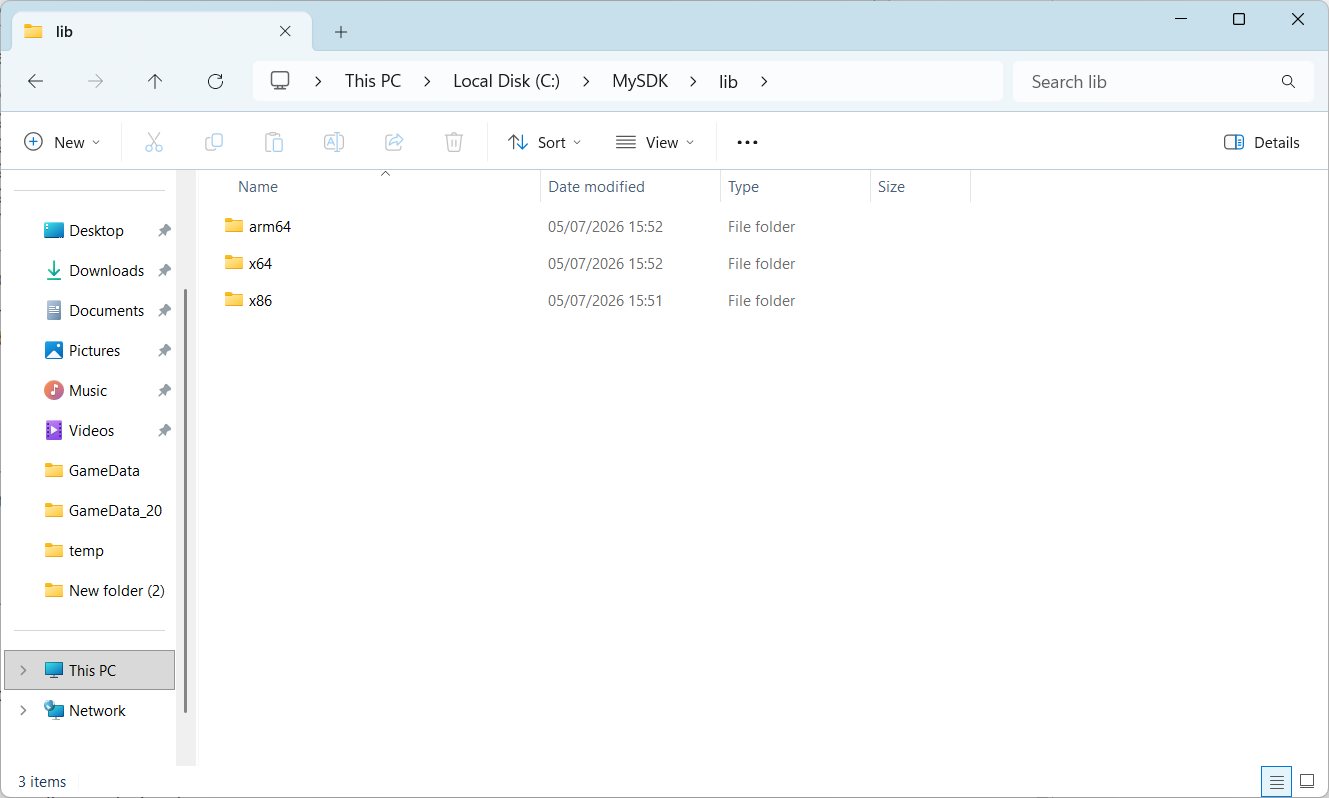
    Screenshot 2026-07-05 155400

    These contain platform specific libraries. These contain separate libraries so that the linker can successfully link against them for the given platforms. It makes a difference too, since calling conventions and name mangling can change. If you only have a single library, then it is vital to know what platform it is built for. If you try to use it to link against the wrong platform then you will get build errors. The web site that you downloaded the library and includes from will tell you what platform the library is for.

    You can use something similar to the following to add the library path in a generic way:
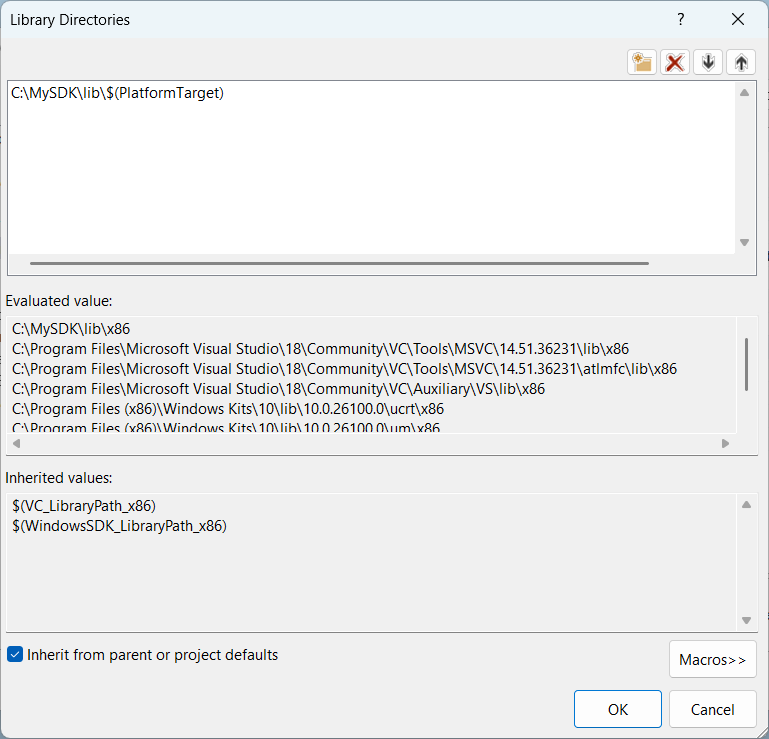
    Screenshot 2026-07-05 160510

    The thing including the $ is a macro, and you can see a list of them by clicking on the macro button. This macro, in this case, will substitute a value based upon the platform. But most importantly, you want the path that you see in both the includes and the library paths to match the filesystem.

    This will work for the compiler's "Additional Include Directories" and the linker's "Additional Library Directories" properties too.

    Was this answer helpful?


Your answer

Answers can be marked as 'Accepted' by the question author and 'Recommended' by moderators, which helps users know the answer solved the author's problem.