Migrate an Azure Cosmos DB account from periodic to continuous backup mode
APPLIES TO:
![]() NoSQL
NoSQL
![]() MongoDB
MongoDB
![]() Gremlin
Gremlin
![]() Table
Table
Azure Cosmos DB accounts with periodic mode backup policy can be migrated to continuous mode using the Azure portal, CLI, PowerShell, or Resource Manager templates. Migration from periodic to continuous mode is a one-way migration and it’s not reversible. After migrating from periodic to continuous mode, you can apply the benefits of continuous mode.
The following are the key reasons to migrate into continuous mode:
- The ability to do self-service restore using Azure portal, CLI, or PowerShell.
- The ability to restore at time granularity of a second within the last 30-day or 7-day window.
- The ability to make sure that the backup is consistent across shards or partition key ranges within a period.
- The ability to restore container, database, or the full account when it's deleted or modified.
- The ability to choose the events on the container, database, or account and decide when to initiate the restore.
Note
The migration capability is one-way only and it's an irreversible action. Which means once you migrate from periodic mode to continuous mode, you can’t switch back to periodic mode.
You can migrate an account to continuous backup mode only if the following conditions are true. Also checkout the point in time restore limitations before migrating your account:
- If the account is of type API for NoSQL,API for Table, Gremlin or API for MongoDB.
- If the account has a single write region.
- If the account never had Synapse Link disabled for a container.
If the account is using customer-managed keys, a managed identity (System-assigned or User-assigned) must be declared in the Key Vault access policy and must be set as the default identity on the account.
Permissions
To perform the migration, you need Microsoft.DocumentDB/databaseAccounts/write permission for the account that is being migrated.
Pricing after migration
After you migrate your account to continuous backup mode, the cost can change when compared to the periodic backup mode. The tier choice of 30 days versus seven days will also have an influence on the cost of the backup. To learn more, see continuous backup mode pricing.
Migrate using portal
Use the following steps to migrate your account from periodic backup to continuous backup mode:
Sign in to the Azure portal.
Navigate to your Azure Cosmos DB account and open the Backup & Restore pane. Select Backup Policies tab and select on change. Once you choose the target continuous mode, select on Save.
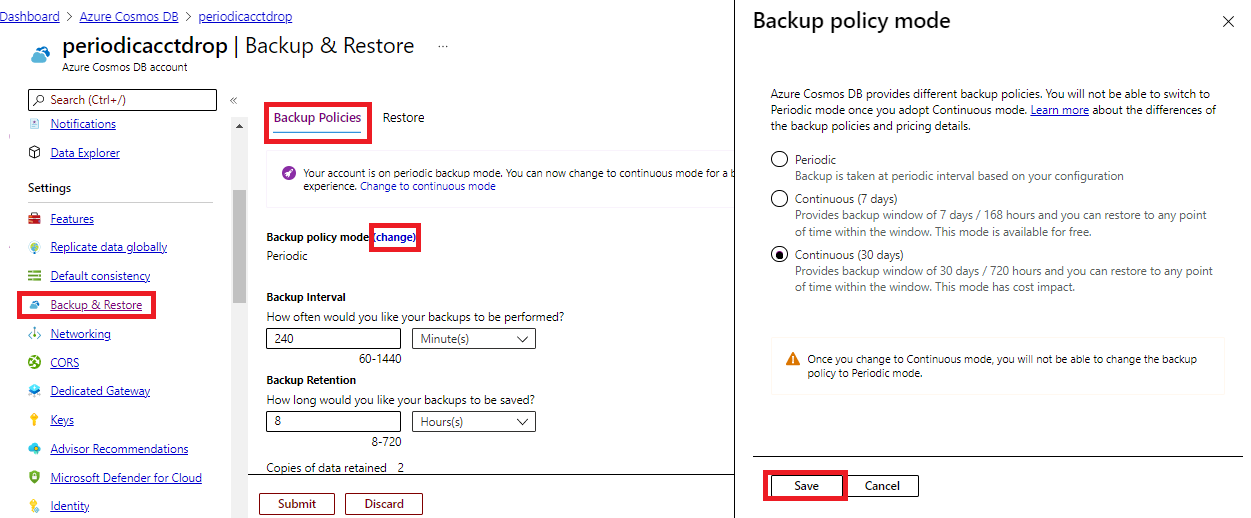
When the migration is in progress, the popup shows Updating Backup policy settings. If you select that notification, you might see Updating on the account level and Migrating for Backup policy on overview of the account. After it’s complete, the backup policy would have switched to chosen tier of Continuous mode. Migration time depends on the size of data in your account.


Migrate using PowerShell
Install the latest version of Azure PowerShell or any version higher than 6.2.0.
To use
Continous7Daysmode for provisioning or migrating, you'll have to use preview of thecosmosdbextension. UseInstall-Module -Name Az.CosmosDB -AllowPrereleaseNext, run the following steps:
Connect to your Azure account:
Connect-AzAccountMigrate your account from periodic to continuous backup mode with
continuous30daystier orcontinuous7daysdays. If a tier value isn't provided, it's assumed to becontinuous30days:Update-AzCosmosDBAccount ` -ResourceGroupName "myrg" ` -Name "myAccount" ` -BackupPolicyType "Continuous"Update-AzCosmosDBAccount ` -ResourceGroupName "myrg" ` -Name "myAccount" ` -BackupPolicyType "Continuous" ` -ContinuousTier "Continuous7Days"
Migrate using CLI
- Install the latest version of Azure CLI:
- If you don’t have the Azure CLI already installed, see install Azure CLI. Alternatively, you can also use the Azure Cloud Shell from the Azure portal.
Sign in to your Azure account and run the following command to migrate your account to continuous mode:
az loginMigrate the account to
continuous30daysorcontinuous7daystier. If tier value isn't provided, it's assumed to becontinuous30days:az cosmosdb update -n <myaccount> -g <myresourcegroup> --backup-policy-type continuousaz cosmosdb update -g "my-rg" -n "my-continuous-backup-account" --backup-policy-type "Continuous" --continuous-tier "Continuous7Days"After the migration completes successfully, the output shows the
backupPolicyobject, which includestypeproperty with a value ofContinuous.{ "apiProperties": null, "backupPolicy": { "continuousModeProperties": { "tier": "Continuous7Days" }, "migrationState": null, "type": "Continuous" }, … }
Check the migration status
Run the following command and check the status and targetType properties of the backupPolicy object. The status shows in-progress after the migration starts:
az cosmosdb show -n "myAccount" -g "myrg"

When the migration is complete, the backup type changes to Continuous and shows the chosen tier. If a tier wasn't provided, the tier would be set to Continuous30Days. Run the same command again to check the status:
az cosmosdb show -n "myAccount" -g "myrg"

Migrate from periodic mode to Continuous mode using Resource Manager template
To migrate to continuous backup mode using ARM template, find the backupPolicy section of your template and update the type property. For example, if your existing template has backup policy like the following JSON object:
"backupPolicy": {
   "type": "Periodic",
   "periodicModeProperties": {
   "backupIntervalInMinutes": 240,
   "backupRetentionIntervalInHours": 8
   }
}
Replace it with the following JSON object:
"backupPolicy": {
   "type": "Continuous",
   "continuousModeProperties": {
      "tier": "Continuous7Days"
    }
}
Next deploy the template by using Azure PowerShell or CLI. The following example shows how to deploy the template with a CLI command:
az deployment group create -g <ResourceGroup> --template-file <ProvisionTemplateFilePath>
Change Continuous Mode tiers
You can switch between Continuous30Days and Continous7Days in Azure PowerShell, Azure CLI or the Azure portal.
In the portal for the given Azure Cosmos DB account, choose Point in Time Restore pane, select on change link next to Backup policy mode to show you the option of Continuous (30 days) or Continuous (7 days). Choose the required target and select on Save.

The Following Azure CLI command illustrates switching an existing account to Continous7Days:
az cosmosdb update \
    --resource-group "my-rg" \
    --name "my-continuous-backup-account" \
    --backup-policy-type "Continuous" \
    --continuous-tier "Continuous7Days"
The following Azure PowerShell command illustrates switching an existing account to Continous7Days:
Update-AzCosmosDBAccount `
    -ResourceGroupName "myrg" `
    -Name "myAccount" `
    -BackupPolicyType Continuous `
    -ContinuousTier Continuous7Days
You can also use an ARM template in a method similar to using the Azure CLI and Azure PowerShell.
Note
When changing from the 30 to 7 days tier, the ability to restore more than 7 days in history is immediately unavaiailable. When changing from 7 to 30 days tier, you will not be able to restore more than 7 days immediately. The earliest time to restore can be extracted from the account metadata available via Azure Powershell or Azure CLI. The price impact of switching between the 7 and 30 days tiers would also be immediately visible.
What to expect during and after migration?
When migrating from periodic mode to continuous mode, you can't run any control plane operations that performs account level updates or deletes. For example, operations such as adding or removing regions, account failover, updating backup policy etc. can't be run while the migration is in progress. The time for migration depends on the size of data and the number of regions in your account. Restore action on the migrated accounts only succeeds from the time when migration successfully completes.
You can restore your account after the migration completes. If the migration completes at 1:00 PM PST, you can do point in time restore starting from 1:00 PM PST.
Frequently asked questions
Does the migration only happen at the account level?
Yes.
Which accounts can be targeted for backup migration?
Currently, API for NoSQL, API for Table, Gremlin API and API for MongoDB accounts with single write region that have shared, provisioned, or autoscale provisioned throughput support migration.
Accounts enabled with multiple-write regions aren't supported for migration.
Currently, accounts with Synapse Link enabled, that had Synapse Link disabled for one or more collections, can't migrate to continuous backup.
Does the migration take time? What is the typical time?
Migration takes a varying amount of time that largely depends on the size of data and the number of regions in your account. You can get the migration status using Azure CLI or PowerShell commands. For large accounts with tens of terabytes of data, the migration can take up to few days to complete.
Does the migration cause any availability impact/downtime?
No, the migration operation takes place in the background. So, client requests aren't impacted. However, we need to perform some backend operations during the migration, and it may take extra time if the account is under heavy load.
What happens if the migration fails? Will I still get the periodic backups or get the continuous backups?
Once the migration process is started, the account will be enabled in continuous mode. If the migration fails, you must initiate migration again until it succeeds.
How do I perform a restore to a timestamp before/during/after the migration?
Assume that you started migration at t1 and finished at t5, you can’t use a restore timestamp between t1 and t5.
Also assume that your account is now in continuous mode. To restore to a time after t5, perform the restore using Azure portal, CLI, or PowerShell like normally with a continuous account. This self-service restore request can only be done after the migration is complete.
To restore to a time before t1, you can open a support ticket like you normally would with a periodic backup account. After the migration, you have up to 30 days to perform the periodic restore. During these 30 days, you can restore based on the backup retention/interval of your account before the migration. For example, if the backup was configured to retain 24 copies at 1 hour intervals, then you can restore to anytime between (t1 – 24 hours) and t1.
Which account level control plane operations are blocked during migration?
Operations such as add/remove region, failover, changing backup policy, and any throughput changes resulting in data movement are blocked during migration.
If the migration fails for some underlying issue, would it still block the control plane operation until it's retried and completed successfully?
Failed migration won't block any control plane operations. If migration fails, it’s recommended to retry until it succeeds before performing any other control plane operations.
Is it possible to cancel the migration?
It isn't possible to cancel the migration because migrations aren't a reversible operation.
Is there a tool that can help estimate migration time based on the data usage and number of regions?
There isn't a tool to estimate time. Our testings and scale runs indicate that a single region account with 1 TB of data takes roughly 90 minutes.
For multi-region accounts, calculate the total data size as Number_of_regions * Data_in_single_region.
Since the continuous backup mode is now GA, do you still recommend restoring a copy of your account? Would you recommend trying migration on the copy before deciding to migrate the production account?
It’s recommended to test the continuous backup mode feature to see it works as expected before migrating production accounts. Migration is a one-way operation and it’s not reversible.
Next steps
To learn more about continuous backup mode, see the following articles:
Introduction to continuous backup mode with point-in-time restore.
Restore an account using the Azure portal, PowerShell, CLI, or Azure Resource Manager.