Note
Access to this page requires authorization. You can try signing in or changing directories.
Access to this page requires authorization. You can try changing directories.
Important
You need to complete the steps to deploy the Employee Self-Service agent before you can configure this supplemental extension pack.
The Employee Self-Service agent is built on Copilot and uses AI to provide relevant information to employees and take actions on their HR data. If your organization uses a human resource management system, the Employee Self-Service agent requires access to that system to function most effectively.
Functional synopsis
The Employee Self-Service agent acts as a front-end for consuming information from ServiceNow Knowledge using the Microsoft 365 Copilot Connector. The capabilities enabled for this integration are:
- Employees can ask questions related to IT/HR workflows.
- How do I request a new device?
- How to create a new VPN connection?
- How do I apply for leave?
- Use Semantic search in the Employee Self-Service agent to enable employees to find relevant content based on keywords, personal preferences, and social connections.
- Employees can search for knowledge base articles in the Employee Self-Service agent after it indexes and is visible to all users or restricted with user criteria permissions.
Technical synopsis
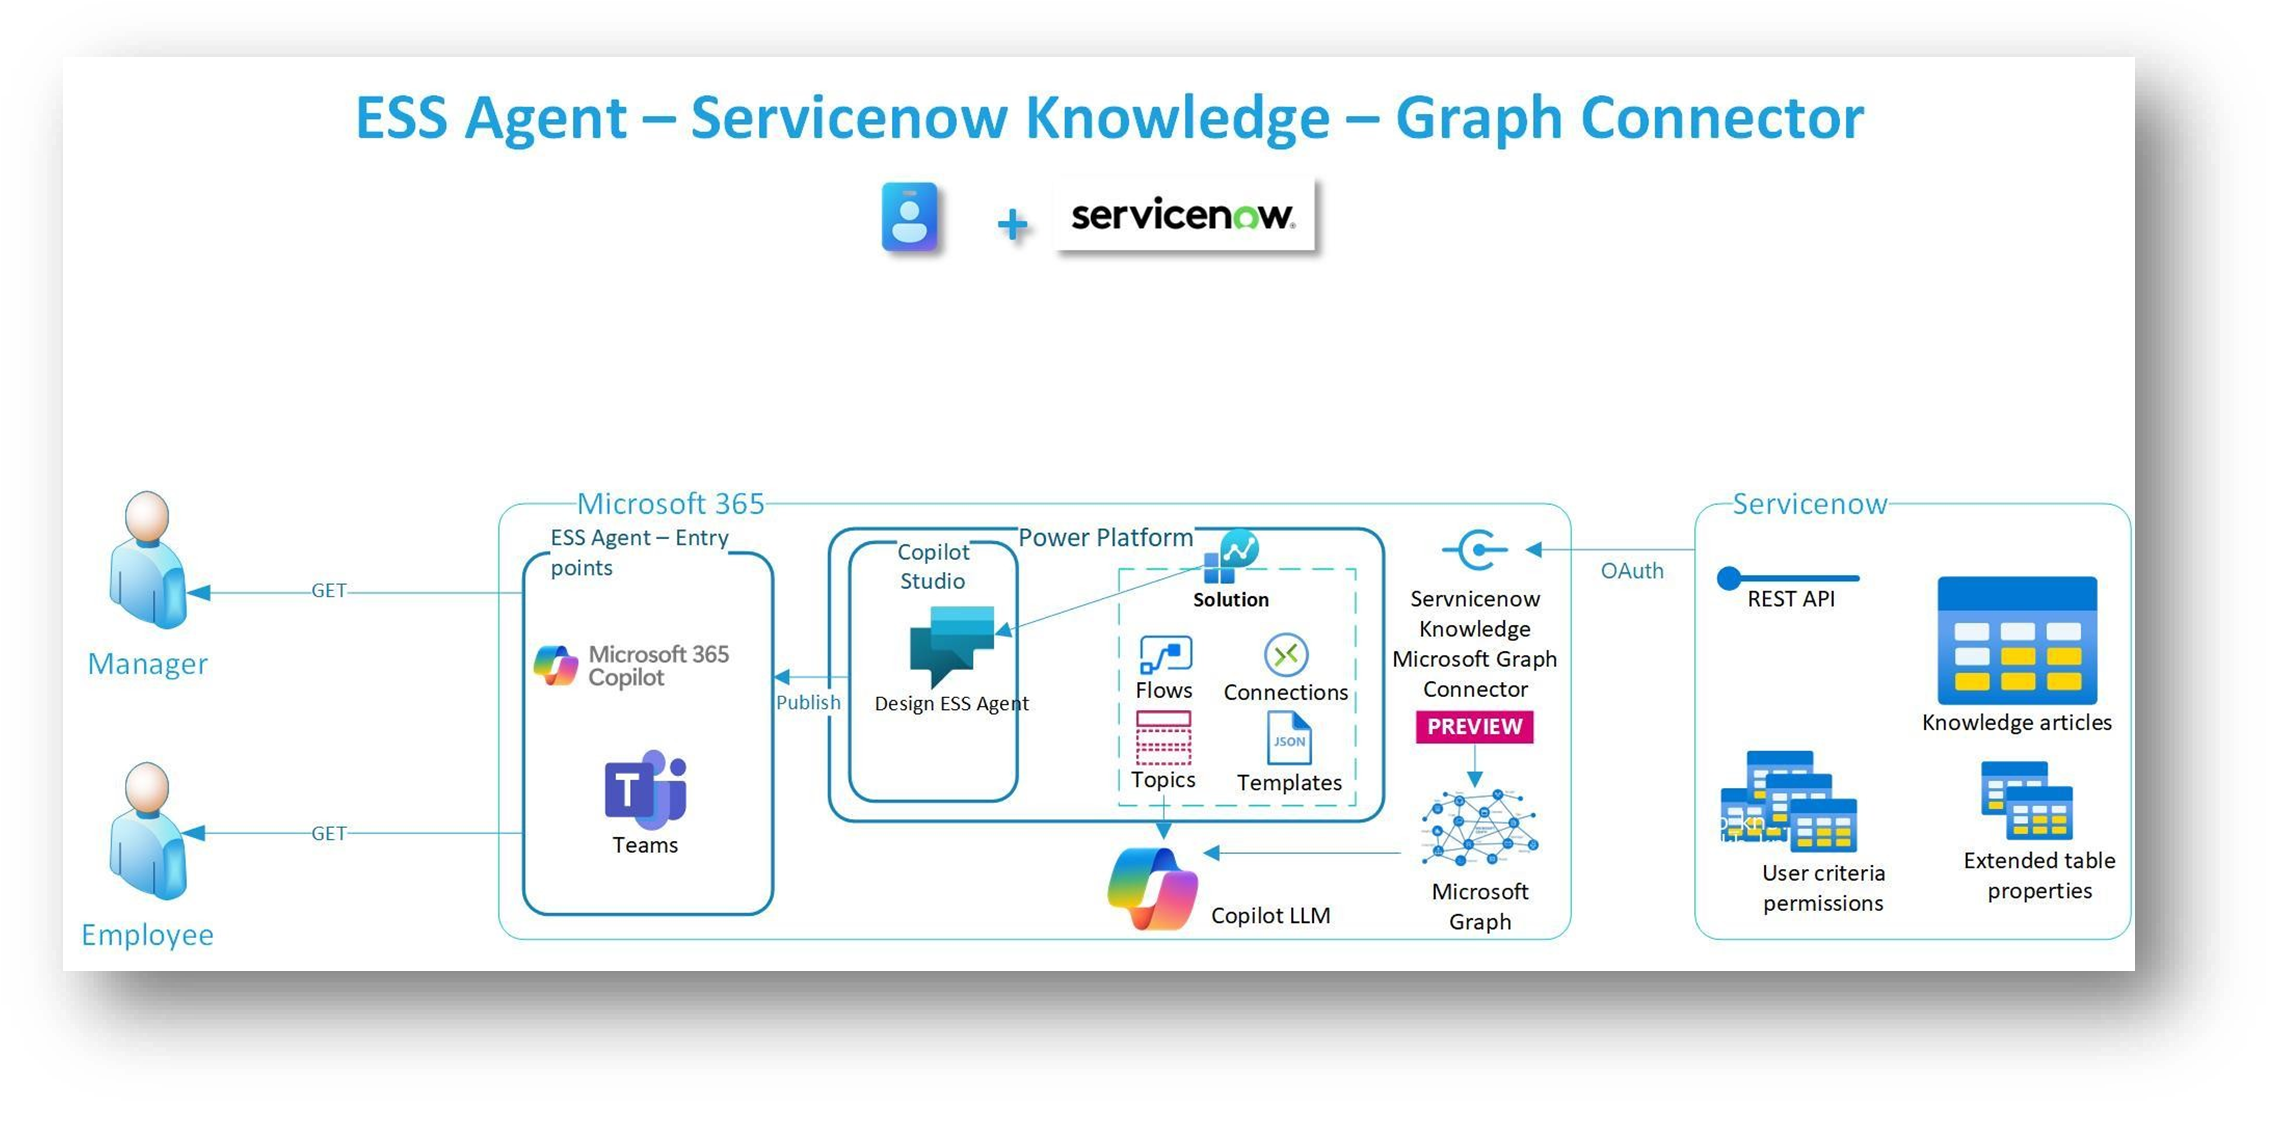
The preceding diagram outlines the high-level components comprising overall solution for the Employee Self-Service agent and ServiceNow Knowledge integration using Microsoft 365 Copilot Connector. There are different activities to be performed as part of initial deployment and for an ongoing operation. As the solution involves multiple technologies, it's better to spend some time initially in understanding the various components. This understanding helps you bring in the right stakeholders to set up an environment to deploy and test the Employee Self-Service agent.
Note
ServiceNow Knowledge Microsoft 365 Copilot Connector is still a preview version, which means the current implementation documented here may have few limitations and known issues. It may change in the future release targeted for General Availability (GA).
Prerequisites
- ServiceNow Knowledge instance
- Microsoft 365 Tenant
Important
ServiceNow permissions for User Criteria (required for Employee Self-Service)
If your ServiceNow knowledge articles use User Criteria (common for HR and Employee Self-Service scenarios), the ServiceNow account configured for the Microsoft 365 Copilot connector must have read access to the user_criteria table.
Without this access, permission evaluation may be incomplete and articles may not appear in Employee Self-Service even though they're visible in ServiceNow.
For information on subscription requirements required for the Employee Self-Service agent itself, see the Employee Self-Service agent deployment guide.
Limitations
The current version of ServiceNow Knowledge Microsoft 365 Copilot Connector is a prerelease version and have the following limitations:
- Attachments aren't indexed.
Hierarchical permissions
The ServiceNow Knowledge Microsoft 365 Copilot connector supports hierarchical permissions. To configure hierarchical permissions, follow the steps in Set up hierarchical permissions (preview) in the ServiceNow Knowledge Microsoft 365 Copilot connector setup guide.
Deployment role requirements
| Roles/Persona | Description | Activities performed | Configuration areas |
|---|---|---|---|
| ServiceNow Administrator | User who can perform administrative tasks. | Create a service account and assign a role to provide read access to specific table records. | ServiceNow. |
| ServiceNow | User who can configure access control. | 1. Create OAuth Application Registry The following steps are required only if "Advanced Scripts" are in place: 2. Configure Access Control (ACL) for REST endpoint. 3. Create scripted REST API. 4. Define the API Resource |
ServiceNow |
| Global Administrator or Search Administrator | User who can configure the Microsoft 365 Copilot Connector for ServiceNow Knowledge. | 1. Establish a Microsoft Enterprise Application. 2. Configure SAML settings within the Enterprise Application. 3. Obtain the Enterprise Application's SAML certificate. 4. Establish trust. |
Microsoft 365 Admin Center |
| Global Administrator or Cloud App Administrator | User who can configure OAuth in Microsoft Entra | 1. Create App registration. | Microsoft Entra admin center |
| Environment Maker | User who can customize the Employee Self-Service agent. | Configure knowledge source using ServiceNow Knowledge Microsoft 365 Copilot Connector. | Microsoft Copilot Studio |
Connector identity permissions
Ensure the ServiceNow account used by the Microsoft 365 Copilot connector can:
- Read knowledge articles
- Read User Criteria records (
user_criteria) - Read groups or roles referenced by those criteria
If the connector can't read User Criteria, permission evaluation may silently fail and restricted articles may not appear in Employee Self-Service even though they're visible in ServiceNow.
Note
The following tables are not required and shouldn't be granted access:
user_criteria_mtom_useruser_criteria_mtom_groupuser_criteria_mtom_role
Tip
Microsoft recommends you sign in with the least privileged role that you need to complete your task. Typically, the Global Administrator role is too powerful for most tasks.
ServiceNow configuration
This section outlines the tasks required to be configured in ServiceNow integration by an administrator. ServiceNow integration supports three types of authentications as follows:
The following sections cover configuration for different authentication methods. Use the authentication method most appropriate for your deployment.
Basic authentication
This method of authentication involves a ServiceNow username and password to authenticate API requests. This method is simple to use and is primarily suggested for testing purposes, as it offers lower security compared with other authentication methods.
ServiceNow OAuth configuration
Note
For all security related tasks in ServiceNow, the signed-in user with admin or security_admin role must elevate their access using "Elevate role" option from the profile menu in the top-right of navigation bar. Without elevating access, the new security objects can't be created. If New button in the top right of configuration pane is missing, then the role isn't elevated to "security_admin".
Task 1: Create an OAuth Application Registry
Sign in to the ServiceNow instance that needs to be integrated with the Employee Self-Service agent.
Elevate access permissions using Elevate role.
Select All in the top navigation bar.
Search for OAuth in the search box within dropdown navigation menu.
Select "System OAuth → Application Registry" from the search results (if you don't see this option, then you don't have sufficient privileges).
Select New in the top right-corner of the configuration section pane.
Select Create an OAuth API endpoint for external clients.
Fill in the following information for the new application registry:
Configuration Description Name A meaningful name to identify that this application registry is created for the Employee Self-Service agent. Client ID Autogenerated code.
Note: This value is used in Microsoft 365 Copilot Connector configuration if no Advanced Scripting is used.Client Secret Leave it blank for a string to be automatically generated.
Note: This value is used in Microsoft 365 Copilot Connector configuration if no Advanced Scripting is used.Row4Redirect URL A required callback URL that the authorization server redirects to:
For M365 Enterprise:https://gcs.office.com/v1.0/admin/oauth/callback
For M365 Government:https://gcsgcc.office.com v1.0/admin/oauth/callbackIt's important to use the actual callback URL from the sign-in popup window during connection configuration. Follow these steps when the URL redirection fails with the error "Invalid redirect_url".
1. Copy/paste the complete URL from the authorization popup window.
2. Extract the redirect_url parameter. (example:redirect_uri=https%3a%2f%2ftip1-shared.consent.azure-apim.net%2fredirect).
3. Decode the URL, replacing %3a with: and %2f with /
4. Update the Redirect URL field.Logo URL A URL that contains the image for the application logo. Active Set to active. Refresh token lifespan The number of seconds that a refresh token is valid. By default, refresh tokens expire in 100 days (8,640,000 seconds). The recommended value is 31,536,000 (one year). Access token lifespan The number of seconds that an access token is valid. Recommended value is 43,200 (12 hours). Application Global. Accessible from All application scopes. Client Type Integration as a Service. Select Submit or Update button to save the changes.
These steps are the only configuration needed on ServiceNow for integrating with Microsoft 365 Copilot Connector without Advanced Scripts.
The following tasks are required only if Advanced Scripts are used in ServiceNow for controlling access to knowledge bases and articles using user criteria:
Task 2: Configure Access Control for REST endpoint
This task is required to ensure only the crawling account can access the REST API.
Sign in to the ServiceNow instance that needs to be integrated with the Employee Self-Service agent.
Elevate access permissions using Elevate role.
Select All in the top navigation bar.
Search for Access Control in the search box within dropdown navigation menu.
Select System Security → Access Control (ACL) from the search results.
Select New in the top-right corner of configuration section pane
In the new form, fill in the following information.
Configuration Description/Value Type Type of object to be secured with this ACL; select REST_Endpoint. Application Global. Operation Execute. Decision Type Allow If. Admin overrides Checked. Name Provide a meaningful name to identify the purpose of this ACL, for example, "Microsoft Copilot". Description Provide a relevant description. Active Checked. Role An account used to crawl the content.
Note: This account is the account that should be used for Microsoft 365 Copilot Connector configuration with Basic authentication.Select Submit to save changes.
Task 3: Create scripted REST API
This task is required to define a custom script processing for user criteria.
Sign in to the ServiceNow instance that needs to be integrated with the Employee Self-Service agent.
Elevate access permissions using Elevate role.
Select All in the top navigation bar.
Search for Scripted REST in the search box within dropdown navigation menu.
Select System Web Services → Scripted Web Services → Scripted REST APIs from the search results.
Fill in the following configuration information.
Configuration Description/Value Name Provide a name that identifies the purpose. API ID Auto generated. API namespace Auto generated
This value is used in Microsoft 365 Copilot Connector configuration.Select Submit to save changes.
Click on the newly created Scripted REST API from the list.
Under the Security tab, select Default ACLs.
Remove the default value and add/look up the ACL created in Task 2: Configure Access Control for REST endpoint.
Add the ACL and update the changes.
Task 4: Define the API resource
This task is required to define the custom script as a resource for the REST API created in the previous task.
From the Scripted REST API list, select the one created in Task 3.
At the bottom of the page, select the Resources tab and select New.
Fill in the following configuration.
Configuration Description/Value Name GetAllUserCriteria Relative path /user_criteria Script Copy and paste Script to copy exactly as-is. Requires authentication Checked Requires ACL authorization Checked
Ensure that the ACL created in Task 2 is set correctly and remove any other default values.Script to copy
(function execute (/*RESTAPIRequest*/ request,
/*RESTAPIResponse*/ response )
{
    var queryParams = request.queryParams;
    var user = new String(queryParams.user);
    return (new
    sn_uc.UserCriteriaLoader()).getAllUserCriteria(user);
}
) (request, response);
Select Submit to save changes.
This task wraps up the configuration required on the ServiceNow side. The next set of tasks are on the Microsoft 365 side.
Microsoft Entra Open ID Connect
To learn about Microsoft Entra Open ID Connect, refer to the ServiceNow Copilot Connector configurations documentation.
Microsoft 365 Copilot Connector configuration
This section covers the tasks required for configuring Microsoft 365 Copilot Connector in Microsoft Admin Center (MAC). These tasks require a Global Administrator role or a Security Administrator role in the Microsoft 365 tenant.
Sign in to the Microsoft Admin Center.
Select Settings → Search & intelligence in the left navigation pane.
In the Search & intelligence page, select Data sources.
Click + Add Connection to add a new Copilot connection.
In the Connect to data source page, from the list of connectors, search for ServiceNow Knowledge.
Select ServiceNow Knowledge connector and select Next.
Fill in the following configuration information:
Configuration Description/Value Display Name Provide a display name that helps to identify this connector within Copilot Studio by the Environment Makers for the Employee Self-Service agent. User criteria setup in ServiceNow Select Simple if no hierarchical permissions or user criteria are used; otherwise select Advanced. ServiceNow instance Provide the ServiceNow instance name, which typically is https://organization name.service-now.com. Authentication type Select Basic authentication for Advanced Scripting mode to use the service account configured in Task 2: Configure Access Control for REST endpoint. Select OAuth 2.0 authentication if no Advanced Scripting is used in ServiceNow (Simple), and use the Client ID and Client secret created in Task 1: Create an OAuth Application Registry (recommended). API namespace Enter the API namespace for Scripted REST API created in Task 3: Create scripted REST API.
Important
Advanced flow is required for Employee Self-Service scenarios
For Employee Self-Service (including HR and IT help content), Advanced flow is required when knowledge articles use:
- User Criteria
- Scripted conditions
- HR profile-based access rules
Using Simple flow in these scenarios can result in articles being indexed but not visible to users in Copilot Employee Self-Service.
- Select Authorize once a desired authentication type is chosen based on the guidance provided in the table in Deployment role requirements and the respective values are given.
- Microsoft 365 Copilot Connector connects to the ServiceNow REST API to get authorized and ask for consent to allow the authorization; select Allow for it. When the authorization is successfully completed, the authorization field has a green check.
- Choose to enable or disable rollout to limited audience for staged rollout of this connector so that it can be tested with limited set of users before rolling it out to the whole organization.
- Check Notice checkbox to authorize Microsoft to create an index of third-party data in Microsoft 365 tenant subject to the configurations.
- Select Create to create the connector.
- In the status page, it shows the connection status as either a Success or Failure message. A sync is triggered in the background and its status is also indicated.
- Provide a description for the Connector, which serves as an instruction to Copilot and select Save.
- Select Done and wait for the connection state to be Ready after the sync is completed.
Employee Self-Service agent configuration
This section outlines the steps to configure the newly created Microsoft 365 Copilot Connector within the Employee Self-Service agent as a knowledge source.
- Sign in to Copilot Studio as an Environment Maker (https://copilotstudio.microsoft.com).
- Open the Employee Self-Service agent.
- Select Knowledge from the top-navigation pane and select + Add Knowledge.
- Select ServiceNow from the list of connector options shown in the Add knowledge dialog box.
- In the Select ServiceNow connection dialog box, it lists all the ServiceNow connections available within the current Copilot Studio environment, including the ones created by the tenant admins, which should show the Microsoft 365 Copilot Connection created in the previous section, under Created by your admin section.
- Select the connector created in the previous section.
- Select Add to complete the configuration.
- Confirm the newly created connector is in Ready state in the Microsoft Admin Center before the connector is being used in the agent.
- Once the connector is ready, validate the connection by asking relevant queries in the Copilot Studio maker experience in the Test panel.
- See the Troubleshooting section for any issues encountered.
Troubleshooting
Articles are visible in ServiceNow but not in Employee Self-Service
Symptom
Knowledge articles appear correctly in ServiceNow but don't appear in Microsoft 365 Copilot Employee Self-Service.
Cause
The ServiceNow account configured for the connector doesn't have Read access to User Criteria (user_criteria). When User Criteria are used to restrict access, the connector must be able to evaluate them.
Resolution
- Grant the connector service account read access to the
user_criteriatable. - Trigger a re-crawl of the ServiceNow connector.
ServiceNow Knowledge Microsoft 365 Copilot connector - Troubleshooting section.
References
For Custom Setup and complete configuration documentation, see:
- ServiceNow Knowledge Microsoft 365 Copilot connector
- Semantic indexing for Microsoft 365 Copilot
- Staged rollout for Microsoft 365 Copilot connectors
- Map your non-Azure AD Identities
- Guidelines for Sync settings
For ServiceNow Knowledge documentation, see the following resources, which require ServiceNow sign ins: