Exercise - Create the deployment pipeline
With the Helm charts created, you now have all the tools you need to deploy the application to AKS by using GitHub Actions. In this unit, you finish the CI/CD pipeline by completing the final deployment steps.
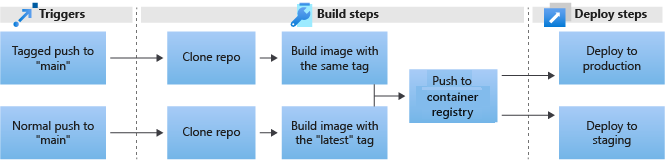
The deployment steps include:
- Create the deploy job.
- Set up Open ID Connect (OIDC).
- Deploy the application with Helm.
- Run the deployment on production.
Add the deploy job
In GitHub, go to your fork of the repository.
Expand the .github/workflows directory and open the build-staging.yml file for editing.
Add a new
deployjob at the end of the file, after thebuild_push_imagejob, as follows. Be sure to match the indentation.The job has three keys:
runs-on,needs, andpermissions.- For
runs-on, useubuntu-20.04to be consistent with the other job. - For
needs, use the name of the first job,build_push_image, so the application only deploys after the image is built - For
permissions, add two arguments calledid-tokenandcontents. Setid-tokentowriteandcontentstoread, to grant GitHub Actions access to send requests and read the repo contents.
- For
Add
- uses: actions/checkout@v2as the first step of the job.The added
deployjob should look like the following code:deploy: runs-on: ubuntu-20.04 needs: build_push_image permissions: id-token: write contents: read steps: - uses: actions/checkout@v2
Add the Install Helm step
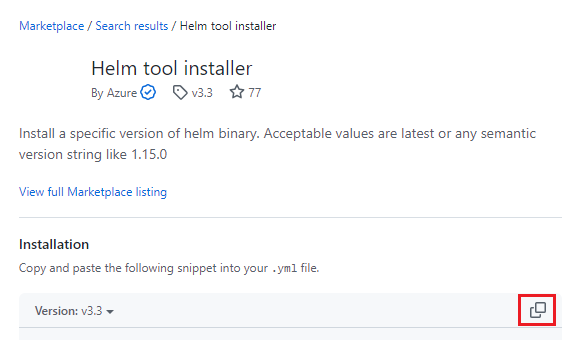
Use a GitHub action to download and install Helm version v3.3.1.
In the right panel of the editing page, search for helm tool installer. Select the first result published by Azure.

Select the copy icon to copy the usage YAML.
Copy and paste the YAML below the
useskey in build-staging.yml.Rename the step from
Helm tool installertoInstall Helm, and pin theversionkey tov3.3.1.steps: - uses: actions/checkout@v2 - name: Install Helm uses: Azure/setup-helm@v1 with: version: v3.3.1
Add the Azure Login authentication step
Use OIDC to authenticate GitHub Actions to access AKS.
In the right panel, search for Azure login, and select Azure Login published by Azure.

Select the copy icon to copy the usage YAML, and paste it below the
Install Helmstep in build-staging.yml.Change the step name from
Azure LogintoSign in to Azure with OIDC.Azure Loginrequires three parameters to authenticate:client-id,tenant-id, andsubscription-id. Fill these parameters with placeholders for secrets you set later.- name: Sign in to Azure with OIDC uses: Azure/login@v1.5.1 with: client-id: ${{ secrets.AZURE_CLIENT_ID }} tenant-id: ${{ secrets.AZURE_TENANT_ID }} subscription-id: ${{ secrets.AZURE_SUBSCRIPTION_ID }}In the right panel, search for set context, and select Azure Kubernetes set context published by Azure.

Select the copy icon to copy the usage YAML, and paste it below the
Sign in to Azure with OIDCstep in build-staging.yml. Fill theresource-groupandcluster-nameparameters with placeholders for the secrets you set in an earlier unit.- name: Azure Kubernetes set context uses: Azure/aks-set-context@v3 with: resource-group: ${{ secrets.RESOURCE_GROUP }} cluster-name: ${{ secrets.CLUSTER_NAME }}Your build-staging.yml file should look like the following example:
name: Build and push the latest build to staging

    on:
      push:
        branches: [ main ]

    jobs:
      build_push_image:
        runs-on: ubuntu-20.04

        steps:
          - uses: actions/checkout@v2

          - name: Set up Buildx
            uses: docker/setup-buildx-action@v3.0.0

          - name: Docker Login
            uses: docker/login-action@v3.0.0
            with:
              registry: ${{ secrets.ACR_NAME }}
              username: ${{ secrets.ACR_LOGIN }}
              password: ${{ secrets.ACR_PASSWORD }}

          - name: Build and push staging images
            uses: docker/build-push-action@v5.0.0
            with:
              context: .
              push: true
              tags: ${{secrets.ACR_NAME}}/contoso-website:latest

      deploy:
        runs-on: ubuntu-20.04
        needs: build_push_image # Will wait for the execution of the previous job
        permissions:
          id-token: write # This is required for requesting the JWT
          contents: read  # This is required for actions/checkout

        steps:
          - uses: actions/checkout@v2

          - name: Install Helm
            uses: Azure/setup-helm@v1
            with:
              version: v3.3.1

          - name: Sign in to Azure with OIDC
            uses: Azure/login@v1.5.1
            with:
              client-id: ${{ secrets.AZURE_CLIENT_ID }}
              tenant-id: ${{ secrets.AZURE_TENANT_ID }}
              subscription-id: ${{ secrets.AZURE_SUBSCRIPTION_ID }}

          - name: Azure Kubernetes set context
            uses: Azure/aks-set-context@v3
            with:
              resource-group: ${{ secrets.RESOURCE_GROUP }}
              cluster-name: ${{ secrets.CLUSTER_NAME }}
Set up Open ID Connect (OIDC)
Assign values to your secrets by creating a service principal and certificates to log in with OIDC.
Create the service principal
In Azure Cloud Shell, run
az account show, and save theidvalue from the output.Create a service principal by running the following command, substituting the
idvalue from the previous command for$SUBSCRIPTION_ID:az ad sp create-for-rbac --scopes /subscriptions/$SUBSCRIPTION_ID --role ContributorCopy the JSON output and save it for the next step.
Set the secrets
On your GitHub repository page, select the Settings tab, and then select Secrets and variables > Actions from the left menu. Define the following three new secrets that use the output from the preceding steps.
AZURE_CLIENT_ID: The"appId"value fromaz ad sp create-for-rbacoutputAZURE_TENANT_ID: The"tenant"value fromaz ad sp create-for-rbacoutputAZURE_SUBSCRIPTION_ID: Theidvalue fromaz account showoutput
For each secret:
- Select New repository secret.
- For Name, enter the secret name.
- For Secret, enter the value.
- Select Add secret.
Add federated credentials
Create federated certificates to authorize GitHub Actions to access the application.
In the Azure portal, go to App registrations.
Search for and select the application that matches the
displayNamevalue returned in the previousaz ad sp create-for-rbacstep. By default, the application name uses the timestamp of the service principal creation.Verify that the values of the appID (Client ID), Object ID (Application Object ID), and Directory ID (Tenant ID) match the previous JSON output.
In the left navigation, select Certificates & secrets.
On the Certificates & secrets screen, select the Federated credentials tab.
Select Add credential.
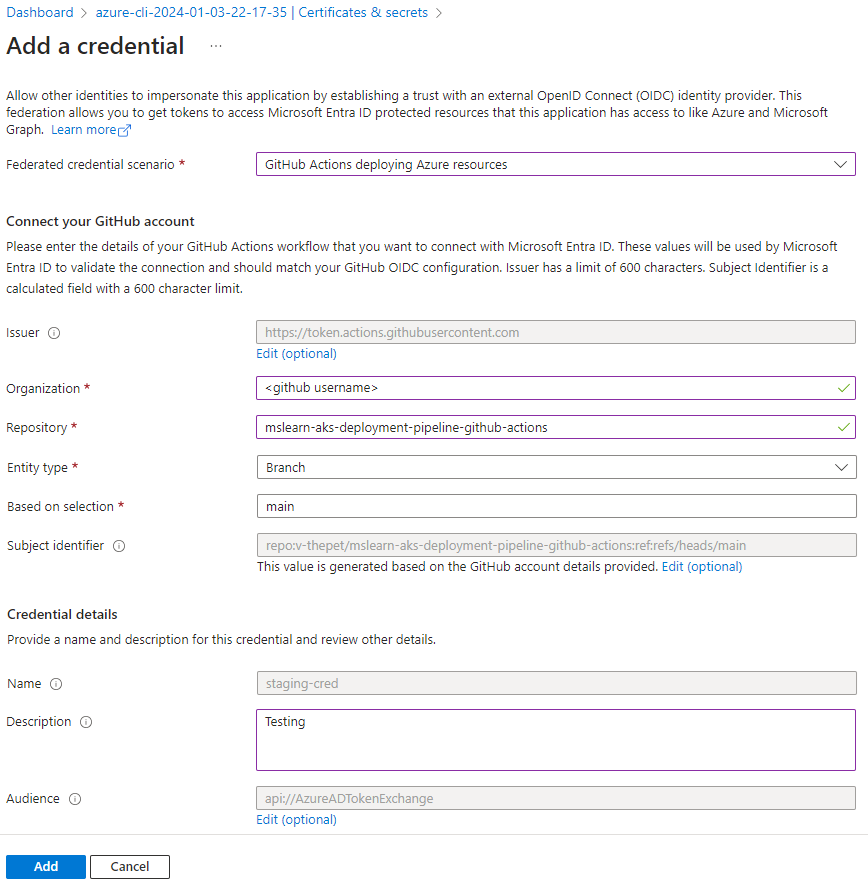
To add the staging credential, on the Add a credential screen, select or enter the following information:
- Federated credential scenario: Select GitHub Actions deploying Azure resources.
- Organization: Enter your GitHub user name.
- Repository: Enter mslearn-aks-deployment-pipeline-github-actions.
- Entity type: Select Branch.
- GitHub branch name: Enter main.
- Name: Enter staging-cred.
- Description Enter Testing.
Select Add.
To add the production credential, select Add credential again, and on the Add a credential screen, enter all the same values as for the previous credential except:
- Entity type: Select Tag.
- GitHub tag name: Enter v2.0.0, because in the next step you deploy version 2.
- Name: Enter prod-cred.
Select Add.
Deploy the application with Helm
Now that you configured Helm and granted access to your cluster, you're ready to deploy the application.
Add the Run Helm Deploy step
Back in the build-staging.yml file in GitHub, after the latest step in the
deployjob, create a new step namedRun Helm Deploy. Below it, add another key calledrun.- name: Run Helm Deploy run:You can use the
runkey to execute any shell command inside the container. This pipeline uses therunkey to execute the following Helm command:helm upgrade --install --create-namespace --atomic --wait --namespace staging contoso-website \ ./kubernetes/contoso-website \ --set image.repository=${{ secrets.ACR_NAME }} \ --set dns.name=${{ secrets.DNS_NAME }}Understand what each parameter does:
Parameter Action or value helm upgradeUpgrades an installed release. --installIf the release doesn't exist, installs it. --create-namespaceIf the namespace in the --namespaceflag doesn't exist, creates it.--atomicIf the release fails, removes all workloads that have been installed. --waitWaits for the release to finish and returns OKstatus.--namespace staging contoso-websiteDeploys the contoso-websiterelease to thestagingnamespace../kubernetes/contoso-websiteChart directory location. --set image.repositoryUpdates the value of image.repositoryin the values.yaml file for this release only.--set dns.nameUpdates the dns.namekey in the values.yaml file for this release only.Add the command to the file and set it to run, starting with the
|character. TheRun Helm deploystep should match this example:... - name: Run Helm Deploy run: | helm upgrade \ --install \ --create-namespace \ --atomic \ --wait \ --namespace staging \ contoso-website \ ./kubernetes/contoso-website \ --set image.repository=${{ secrets.ACR_NAME }} \ --set dns.name=${{ secrets.DNS_NAME }}Your completed build-staging.yml file should look like the following example:
name: Build and push the latest build to staging

    on:
      push:
        branches: [ main ]

    jobs:
      build_push_image:
        runs-on: ubuntu-20.04

        steps:
          - uses: actions/checkout@v2

          - name: Set up Buildx
            uses: docker/setup-buildx-action@v3.0.0

          - name: Docker Login
            uses: docker/login-action@v3.0.0
            with:
              registry: ${{ secrets.ACR_NAME }}
              username: ${{ secrets.ACR_LOGIN }}
              password: ${{ secrets.ACR_PASSWORD }}

          - name: Build and push staging images
            uses: docker/build-push-action@v5.0.0
            with:
              context: .
              push: true
              tags: ${{secrets.ACR_NAME}}/contoso-website:latest

      deploy:
        runs-on: ubuntu-20.04
        needs: build_push_image # Waits for the execution of the previous job
        permissions:
          id-token: write # Required for requesting the JWT
          contents: read  # Required for actions/checkout

        steps:
          - uses: actions/checkout@v2

          - name: Install Helm
            uses: Azure/setup-helm@v1
            with:
              version: v3.3.1

          - name: Sign in to Azure with OIDC
            uses: Azure/login@v1.5.1
            with:
              client-id: ${{ secrets.AZURE_CLIENT_ID }}
              tenant-id: ${{ secrets.AZURE_TENANT_ID }}
              subscription-id: ${{ secrets.AZURE_SUBSCRIPTION_ID }}

          - name: Azure Kubernetes set context
            uses: Azure/aks-set-context@v3
            with:
              resource-group: ${{ secrets.RESOURCE_GROUP }}
              cluster-name: ${{ secrets.CLUSTER_NAME }}

          - name: Run Helm Deploy
            run: |
              helm upgrade \
                --install \
                --create-namespace \
                --atomic \
                --wait \
                --namespace staging \
                contoso-website \
                ./kubernetes/contoso-website \
                --set image.repository=${{ secrets.ACR_NAME }} \
                --set dns.name=${{ secrets.DNS_NAME }}
Set the DNS_NAME secret
In a new browser tab, go to your fork of the repository, select the Settings tab, and then select Secrets and variables > Actions from the left menu.
Select New repository secret.
For Name, enter
DNS_NAME.For Secret, enter the AKS DNS Zone Name value from your original setup script output.
If you don't have this value, run the following command in Cloud Shell, substituting your values for
<resource-group-name>and<aks-cluster-name>:az aks show -g <resource-group-name> -n <aks-cluster-name> -o tsv --query addonProfiles.httpApplicationRouting.config.HTTPApplicationRoutingZoneNameSelect Add secret.
Commit the changes and test the staging deployment
To commit your changes, select Commit changes. Enter a description for the commit, and then select Commit changes.
Select the Actions tab to see the build running.
After the build succeeds, in your browser go to
contoso-staging.<aks-dns-zone-name>to confirm that the website appears.
Run the deployment on production
The next step is to create the production workflow.
In the .github/workflows directory in your repository, open the build-production.yml file for editing.
Copy the
deployjob from the staging pipeline and paste it below the last line in the build-production.yml file.Change the
Run Helm Deploystep to deploy to the production namespace by changing the--namespaceflag fromstagingtoproduction.At the end of the Helm command, add a new parameter,
--set image.tag=${GITHUB_REF##*/}.Here, you use a Bash feature called parameter expansion. The expansion
${ENV##<wildcard><character>}returns the last occurrence of the string aftercharacter.In this case, you want to get only the tag name, which is represented as the GitHub Actions runtime,
GITHUB_REF. Branches arerefs/heads/<branch>, while tags arerefs/tags/<tag>.You want to remove
refs/tags/to get only the tag name, so you pass${GITHUB_REF##*/}to return everything after the last/in theGITHUB_REFenvironment variable.Your final build-production.yml file should look like the following example:
name: Build and push the tagged build to production

permissions:
  id-token: write # This is required for requesting the JWT
  contents: read  # This is required for actions/checkout

on:
  push:
    tags:
      - 'v*'

jobs:
  build_push_image:
    runs-on: ubuntu-20.04

    steps:
      - uses: actions/checkout@v2

      - name: Fetch latest version
        id: fetch_version
        run: echo ::set-output name=TAG::${GITHUB_REF#refs/tags/}

      - name: Set up Buildx
        uses: docker/setup-buildx-action@v3.0.0

      - name: Docker Login
        uses: docker/login-action@v3.0.0
        with:
          registry: ${{ secrets.ACR_NAME }}
          username: ${{ secrets.ACR_LOGIN }}
          password: ${{ secrets.ACR_PASSWORD }}

      - name: Build and push production images
        uses: docker/build-push-action@v2
        with:
          context: .
          push: true
          tags: ${{secrets.ACR_NAME}}/contoso-website:latest,${{secrets.ACR_NAME}}/contoso-website:${{ steps.fetch_version.outputs.TAG }}

  deploy:
    runs-on: ubuntu-20.04
    needs: build_push_image

    steps:
      - uses: actions/checkout@v2

      - name: Install Helm
        uses: Azure/setup-helm@v1
        with:
          version: v3.3.1

      - name: Login to Azure with OIDC
        uses: azure/login@v1
        with:
          client-id: ${{ secrets.AZURE_CLIENT_ID }}
          tenant-id: ${{ secrets.AZURE_TENANT_ID }}
          subscription-id: ${{ secrets.AZURE_SUBSCRIPTION_ID }}

      - name: Azure Kubernetes set context
        uses: Azure/aks-set-context@v3
        with:
          resource-group: ${{ secrets.RESOURCE_GROUP }}
          cluster-name: ${{ secrets.CLUSTER_NAME }}

      - name: Run Helm Deploy
        run: |
          helm upgrade \
            --install \
            --create-namespace \
            --atomic \
            --wait \
            --namespace production \
            contoso-website \
            ./kubernetes/contoso-website \
            --set image.repository=${{ secrets.ACR_NAME }} \
            --set dns.name=${{ secrets.DNS_NAME }} \
            --set image.tag=${GITHUB_REF##*/}
To commit your changes, select Commit changes. Enter a description for the commit, and then select Commit changes.
Production changes
Every time you run the production workflow, you need to update the federated certificate with the corresponding tag version, as follows:
In the Azure portal, go to your application page and select Certificates & secrets in the left navigation.
Select the Federated credentials tab.
Select the prod-cred credential.
On the Edit a credential screen, next to Based on selection, increment the tag number to a new v.x.x.x such as v.2.0.1.
Select Update.
In Cloud Shell, run
git pullto fetch the latest changes. Then, run the following command to tag and push the changes, substituting your new version tag for the placeholder:git tag -a v<new version tag> -m 'Create new production deployment' && git push --tagsWhen prompted, provide the PAT from previous exercises as the password.
In GitHub, open the Actions tab and see the running process.
After the workflow succeeds, to test the production deployment, go to
contoso-production.<aks-dns-zone-name>in your browser and confirm that the website appears.
Continue to the next unit to delete your resources so they don't continue to incur charges.