Deploy with Helm
You successfully built and pushed both your staging and production images to your Azure Container Registry instance. It's time to automate all the steps and make the pipeline work for you.
Currently, you must manually change files every time you run the pipeline, so you can't deploy automatically. To solve this issue, you can use a Helm chart to manage your deployments. In this unit, you learn about Helm charts and templates.
Helm charts
Helm is an open-source packaging tool similar to Linux package managers like APT and Yum. Helm can help you install and manage the lifecycle of Kubernetes applications.
You use Helm to manage Kubernetes charts, which are groups of one or more workloads packaged with configuration files and a chart description file. When packaged in a chart, the files can easily be deployed as a unit to a Kubernetes cluster.
One of the advantages of using Helm is to not have to deploy files individually. You can issue a single command to deploy the chart. You can even deploy multiple dependent charts, with an automatic dependency resolution.
Here's the structure of a typical Helm chart directory:
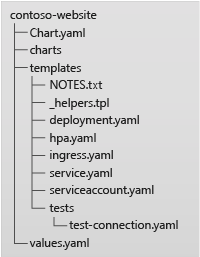
- The Chart.yaml file contains the name, description, and version of the chart.
- The charts directory includes dependent charts.
- The templates directory contains all manifest files.
- The values.yaml file contains the default values for the Helm templates.
Helm templates
A distinguishing feature of the Helm tool is its ability to create and manage templates to perform automated deployments. Templates make it possible for manifest files to be automated and added to a CI/CD pipeline. A template file is a manifest file that contains placeholders for variable values.
Look at the following example of the deployment.yaml file in the kubernetes directory of your website fork:
apiVersion: apps/v1
kind: Deployment
metadata:
  name: contoso-website
spec:
  selector:
    matchLabels:
      app: contoso-website
  template:
    metadata:
      labels:
        app: contoso-website
    spec:
      containers:
        - image: !IMAGE!
          name: contoso-website
          resources:
            requests:
              cpu: 100m
              memory: 128Mi
            limits:
              cpu: 250m
              memory: 256Mi
          ports:
            - containerPort: 80
              name: http
Your workflow replaces the !IMAGE! placeholder with your Container Registry instance and image name. In a manual workflow, you can run the following command to replace the !IMAGE! placeholder and then print the result. To run the code manually, you can pipe the command to kubectl apply -f - to create the workloads:
$ sed 's+!IMAGE!+'"$ACR_NAME"'/contoso-website+g' kubernetes/deployment.yaml
However, this manual solution isn't elegant or efficient. With Helm native templating, you can replace !IMAGE! by using the {{.Values.containerImage}} variable instead.
...
  template:
...
    spec:
      containers:
        - image: {{.Values.containerImage}}
...
Then, you run helm install to point to your image and pass your charts folder:
$ helm install contoso-website ./chart-location --set containerImage="$ACR_NAME/contoso-website"
Helm also offers template functions for more complex logic, for example to include default and required values in your environment. Proceed to the next unit to build a Helm chart to make your CI/CD pipeline more efficient.