Exercise - Create a news tracker with Azure Logic Apps
In this exercise, create your news monitoring logic app and workflow using the Azure portal. You add a Bing Search trigger using the workflow designer. The following diagram shows a conceptual view of the workflow and highlights the part that you work on:

Get API key and endpoint for Bing Search
To use the Bing Search trigger in your workflow, you need an API key and API endpoint for the Bing Search API. To get this key and endpoint, you have to create a Bing resource in Azure.
In the Azure portal, sign in with your Azure account.
In the Azure search box, enter bing, and select Bing Resources.
On the Bing Resources page toolbar, select Add > Bing Search.
Property Value Description Subscription <Azure-subscription> Select your Azure subscription. Resource group <resource-group> Select Create New, and then create a resource group with a unique name to use across this module. Name <Bing-resource> Enter unique name for your Bing resource. This example uses MyBingSearch. Region Global Your resource works across multiple Azure regions. Pricing tier F1 This tier provides 3 calls per second with a limit of 1,000 calls per month. For pricing information, see Bing Search API pricing. When you finish, select I confirm I have read and understood the notice above. > Review + create.
After deployment completes, select Go to resource.
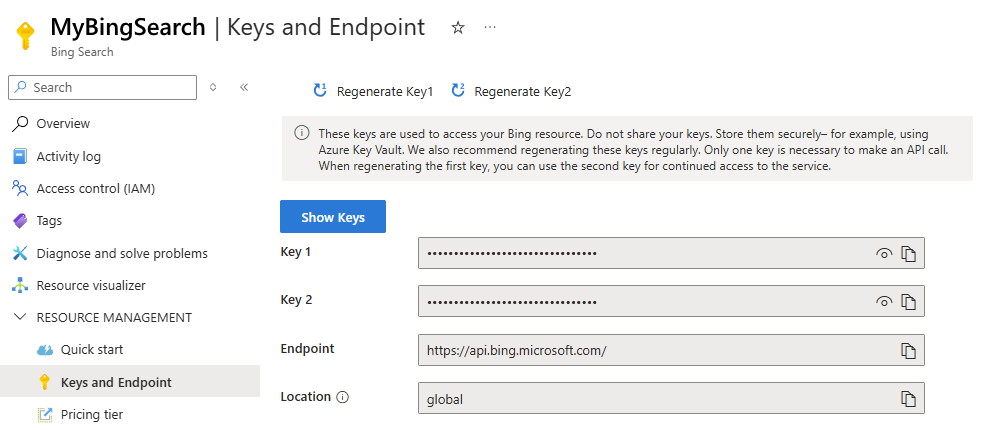
On the resource menu, under Resource management, select Keys and Endpoint.
Copy and save the following values somewhere safe:
- Key 1 or Key 2
- Endpoint
Create the logic app resource
Now, create the logic app resource in Azure.
In the Azure portal search box, find and select Logic apps.
On the Logic apps page toolbar, select Add.
The Create Logic App page appears with the available logic app types and hosting plans.
Select the Consumption (Multitenant) hosting plan, and then continue with Select.
The Consumption plan specifies that your logic app workflow runs in the multitenant, global Azure environment and uses the Consumption billing and pricing model, which is pay per operation execution. For more information, see Consumption Plan (Multitenant). Other hosting plans are also available for different hosting environments.
On the Basics tab, provide the following information about your logic app resource and leave all other options to their defaults:
Property Value Subscription Select your Azure subscription. Resource Group Select Create New, and then create a resource group with a unique name. Logic app name Enter a unique name for your logic app. This example uses ShoeNewsTracker<random-string>, replacing the <random-string> placeholder with numbers or letters. Region Select an Azure region nearest you. Select Review + create, and then select Create.
The Azure portal shows the deployment pane with the deployment progress and the resources that Azure creates.
After Azure completes the deployment, select Go to resource.
The Overview page for your logic app appears.
To open the workflow designer, on the logic app menu, under Development Tools, selects Logic app designer.
Add a Bing Search trigger named On new news article
Typically, when you start with an empty workflow, you find a connector that has a trigger for the condition to meet for starting the workflow. In this example, you start with the Bing Search connector because the condition is when a new news article is available. You add the Bing Search trigger and provide values for all the required parameters.
For this step, you need to get the API key and API endpoint for the Bing News Search service.
If you don't want to use Bing Search, you can follow the steps, but substitute the RSS trigger instead, which doesn't require any keys or secrets. You only have to provide the URL for the RSS feed plus the frequency and interval. The downside to the RSS trigger is that new articles appear infrequently in RSS feeds, so you might have to wait a while before this trigger activates or returns results.
On the workflow designer, select Add a trigger.
The Add a trigger pane opens and shows the connector gallery for available triggers.
In the Add a trigger search box, find and select the Bing Search trigger named On a new news article.
Substitution: In the search box, find and select the RSS trigger named When a feed item is published.
To access the Bing Search service, you need to create a connection by providing the following information:
Substitution: The RSS trigger doesn't have this step.
Property Required Value Description Connection Name Yes ShoeNewsBingConnection The name to give your connection API Key Yes <api-key> The API key that you previously copied for the Bing Search API. API Endpoint Yes <api-endpoint> Select the API endpoint with the same domain name as the one you copied for the Bing Search API. This example uses https://api.bing.microsoft.com/v7.0.Important
For optimal security, Microsoft recommends that you use Microsoft Entra ID with managed identities for authentication when possible. This option provides superior security without having to provide credentials. Azure manages this identity and helps keep authentication information secure so that you don't have to manage this sensitive information. To set up a managed identity for Azure Logic Apps, see Authenticate access and connections to Azure resources with managed identities in Azure Logic Apps.
When you finish, select Create new.
Substitution: The RSS trigger doesn't have this step.
If you successfully create the connection, the information box appears for the Bing Search trigger named On new news article.
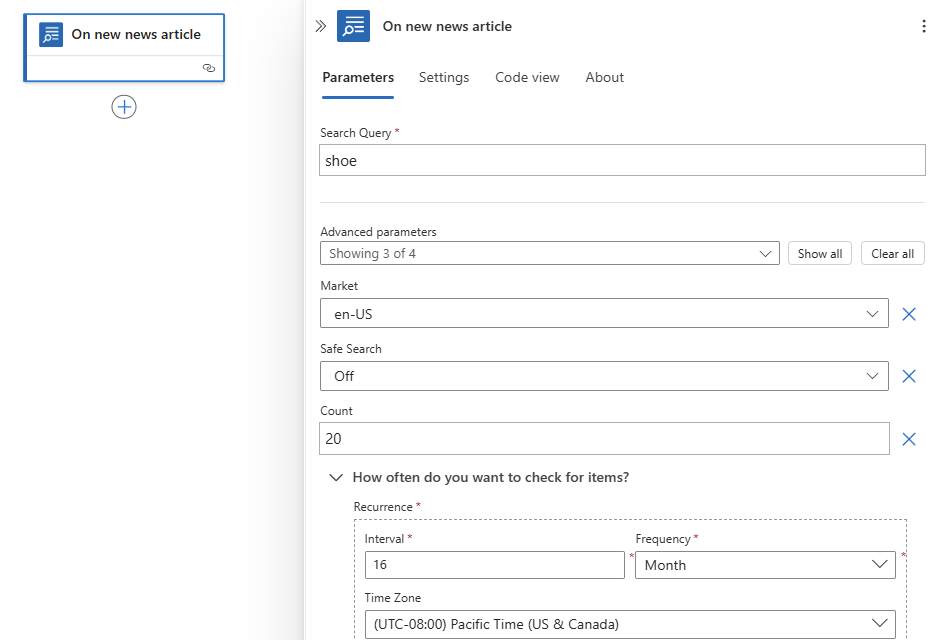
In the Bing Search trigger, provide the following information:
Parameter Required Value Description Search Query Yes shoe The text to find in the news article. Under How often do you want to check for items, provide the following values:
Parameter Required Value Description Interval Yes 16 The number of time units to wait until the next check. For example, an interval of 3 and a frequency of Hour checks for new articles every 3 hours.
For this exercise, we want to only manually activate the trigger, not on a schedule, so set the interval to the largest value possible for the Month frequency, which is 16 in this example.Frequency Yes Month The time unit to use for the polling interval, for example, Second, Minute, Hour, Day, Week, or Month. Advanced parameters No None Any parameters to add to the trigger. For example, the trigger now looks like the following example:
If you're using the RSS trigger, provide the following information:
Parameter Required Value Description RSS feed URL Yes https://feeds.a.dj.com/rss/RSSWorldNews.xmlThe RSS feed URL to check.
You can use any RSS feed that doesn't require HTTP authorization, but choose an RSS feed that publishes frequently, so you can easily test your workflow.Advanced parameters No None Any parameters to add to the trigger. Chosen property used to determine which items are new No UpdatedOn The property to use for determining which articles to return. The default is PublishDate. Under How often do you want to check for items, provide the following values:
Parameter Required Value Description Interval Yes 16 The number of time units to wait until the next check. For example, an interval of 3 and a frequency of Hour checks for new articles every three hours.
For this exercise, we want to only manually activate the trigger, not on a schedule, so set the interval to the largest value possible for the Month frequency, which is 16 in this example. For the minimum interval, see RSS connector reference.Frequency Yes Month The time unit to use for the polling interval, for example, Second, Minute, Hour, Day, Week, or Month. 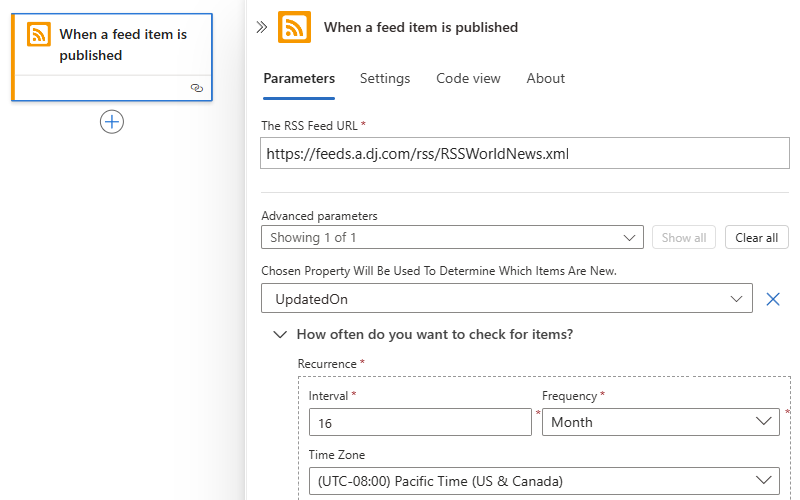
When you finish, on the designer toolbar, select Save.
When you save your workflow, Azure automatically pushes your saved changes to your deployed logic app resource, which is already live. If any errors exist in your trigger setup, Azure shows those errors.
Test the trigger. To manually activate the trigger, on the designer toolbar, select Run > Run.
The trigger checks the Bing Search service for any news articles that contain your search text and are available at the current time.
Important
If you use an Azure subscription that incurs charges, your subscription might incur a small charge when you run the Bing Search trigger and other "managed" operations The Consumption plan specifies that metering and billing apply as described:
- Built-in (in-app) operations: The first X number of executions are free. Afterwards, pay-per-execution pricing applies.
- Managed (shared) operations: Pay-per-execution pricing applies.
To minimize charges, make sure to clean up your resources after you finish this module.
For more information, see the following resources:
- Trigger and action operations in the Consumption model
- Azure Logic Apps pricing. Select your region, currency, and then the Consumption Plan (Mutlitenant) tab.
Let's review the trigger history.
Review trigger history
The Trigger history tab only shows information about your workflow's trigger, for example, whether trigger fired or was skipped.
On the logic app menu, select Overview.
On the Overview page, select the Trigger history tab.
The trigger history shows two entries for a single event. One entry shows the trigger checking the associated service or system. The other entry shows that the trigger fired if the trigger condition was met. Each entry shows an ID number, status, start time, and whether the trigger fired.
Tip
If no recent results appear, on the Overview page toolbar, select Refresh.
Based on the trigger result, the Status and Fired columns can show the following values:
Trigger result Status column Fired column Description No result found Skipped <empty> The trigger checked the service, but the condition wasn't met. No other workflow steps are run.
Note: If no news articles match your search at the current time, the trigger doesn't return any results. You might have to wait and periodically retry running the trigger more than once.Result found Succeeded Fired The trigger checked the service, and the condition was met. The trigger fired and starts to run any subsequent steps. If multiple matches exist, the trigger fires for each match.
For this example, we're only testing, so no other steps are available to run.
If the trigger successfully fires, and all existing steps successfully complete, the run details page opens. This page looks similar to the designer, but shows the status and time taken for each operation to run. We'll review this page in more detail later.If the trigger succeeded and shows the Fired label, you can view the trigger outputs. Continue to the next step.
Otherwise, if the trigger was skipped, try periodically rerunning the trigger. On the Overview page toolbar, select Run > Run.
Review trigger outputs
After the trigger successfully fires, you can view information about the found news article.
View from trigger history
On the Trigger history tab, select the row for either trigger entry.
On the History page, under Outputs link, select the link.
On the Outputs page, in the body JSON object, information about the matching news article appears.
View from run history
The Runs history tab only shows information about workflow runs, for example, whether they succeeded or failed. If a trigger is skipped, the Runs history tab doesn't show any run information for that specific trigger event.
For a fired trigger, you can still view the trigger outputs on this tab by following these steps:
On the Overview page, select the Runs history tab.
Each run has an ID number, status, start time, duration, and whether the run used static results, which aren't in scope for this module. A trigger can successfully fire, but the workflow can succeed or fail.
Tip
If no recent results appear, on the Overview page toolbar, select Refresh.
Select the row for a workflow run.
The workflow's run details page opens and shows the status and time taken for each operation to run. From this view, you can also review the data that flowed through each operation.
To view the trigger's inputs and outputs, on the run details page, select the trigger.
A pane opens to show the trigger's INPUTS and OUTPUTS sections.
In the OUTPUTS section, in the body field, find the description and other information for the matching article. To review the complete response in JSON format, next to the OUTPUTS label, select Show raw outputs.
The next unit introduces actions, which perform various tasks in a workflow.