Note
Access to this page requires authorization. You can try signing in or changing directories.
Access to this page requires authorization. You can try changing directories.
This article focuses on enabling FIDO2 security key-based passwordless authentication with Windows 10 and 11 devices. After completing the steps in this article, you can sign in to both your Microsoft Entra ID and Microsoft Entra hybrid joined Windows devices with your Microsoft Entra account using a FIDO2 security key.
Prerequisites for FIDO2 security keys
An account with at least Authentication Policy Administrator permissions to configure authentication methods.
You need to enable passkey sign-in in the Passkey (FIDO2) policy in Authentication methods in the Microsoft Entra admin center.
Devices need to meet the following requirements:
Device Type Microsoft Entra joined Microsoft Entra hybrid joined Compatible FIDO2 security keys X X WebAuthN requires Windows 10 version 1903 or higher X X Microsoft Entra joined devices require Windows 10 version 1909 or higher X Microsoft Entra hybrid joined devices require Windows 10 version 2004 or higher X Fully patched domain controllers that run Windows Server 2016 or later X Microsoft Entra Hybrid Authentication Management module X Microsoft Intune (Optional) X X Provisioning package (Optional) X X Group Policy (Optional) X
Unsupported scenarios
The following scenarios aren't supported:
- Windows Server Active Directory Domain Services (AD DS) domain-joined (on-premises only devices) deployment.
- Scenarios such as RDP, VDI, and Citrix, that use a security key other than webauthn redirection.
- S/MIME using a security key.
- Run as using a security key.
- Signing in to a server using a security key.
Device sign-in and unlock
- OOBE sign-in with a FIDO2 security key is supported. You can use Web sign-in to unlock a Windows device. For more information, see Use Web Sign-In To Enable Passwordless Sign-In In Windows.
- When signing in or unlocking a Windows device using a security key that contains multiple Microsoft Entra accounts, the device defaults to the last account added to the key. However, WebAuthn allows users to select the specific account they wish to use for authentication.
- Unlocking a device requires Windows 10 version 1809. For the best experience, use Windows 10 version 1903 or higher.
Prepare devices
Microsoft Entra joined devices must run Windows 10 version 1909 or higher.
Microsoft Entra hybrid joined devices must run Windows 10 version 2004 or newer.
Configure a device-bound passkeys profile for FIDO2 security keys
A device-bound key profile allows you to define attestation and key restriction settings for device-bound passkeys stored on physical security keys.
Sign in to the Microsoft Entra admin center as at least an Authentication Policy Administrator.
Browse to Entra ID > Authentication methods.
On the Authentication methods | Policies page, select Passkey (FIDO2) > Configure.
Select + Add profile.
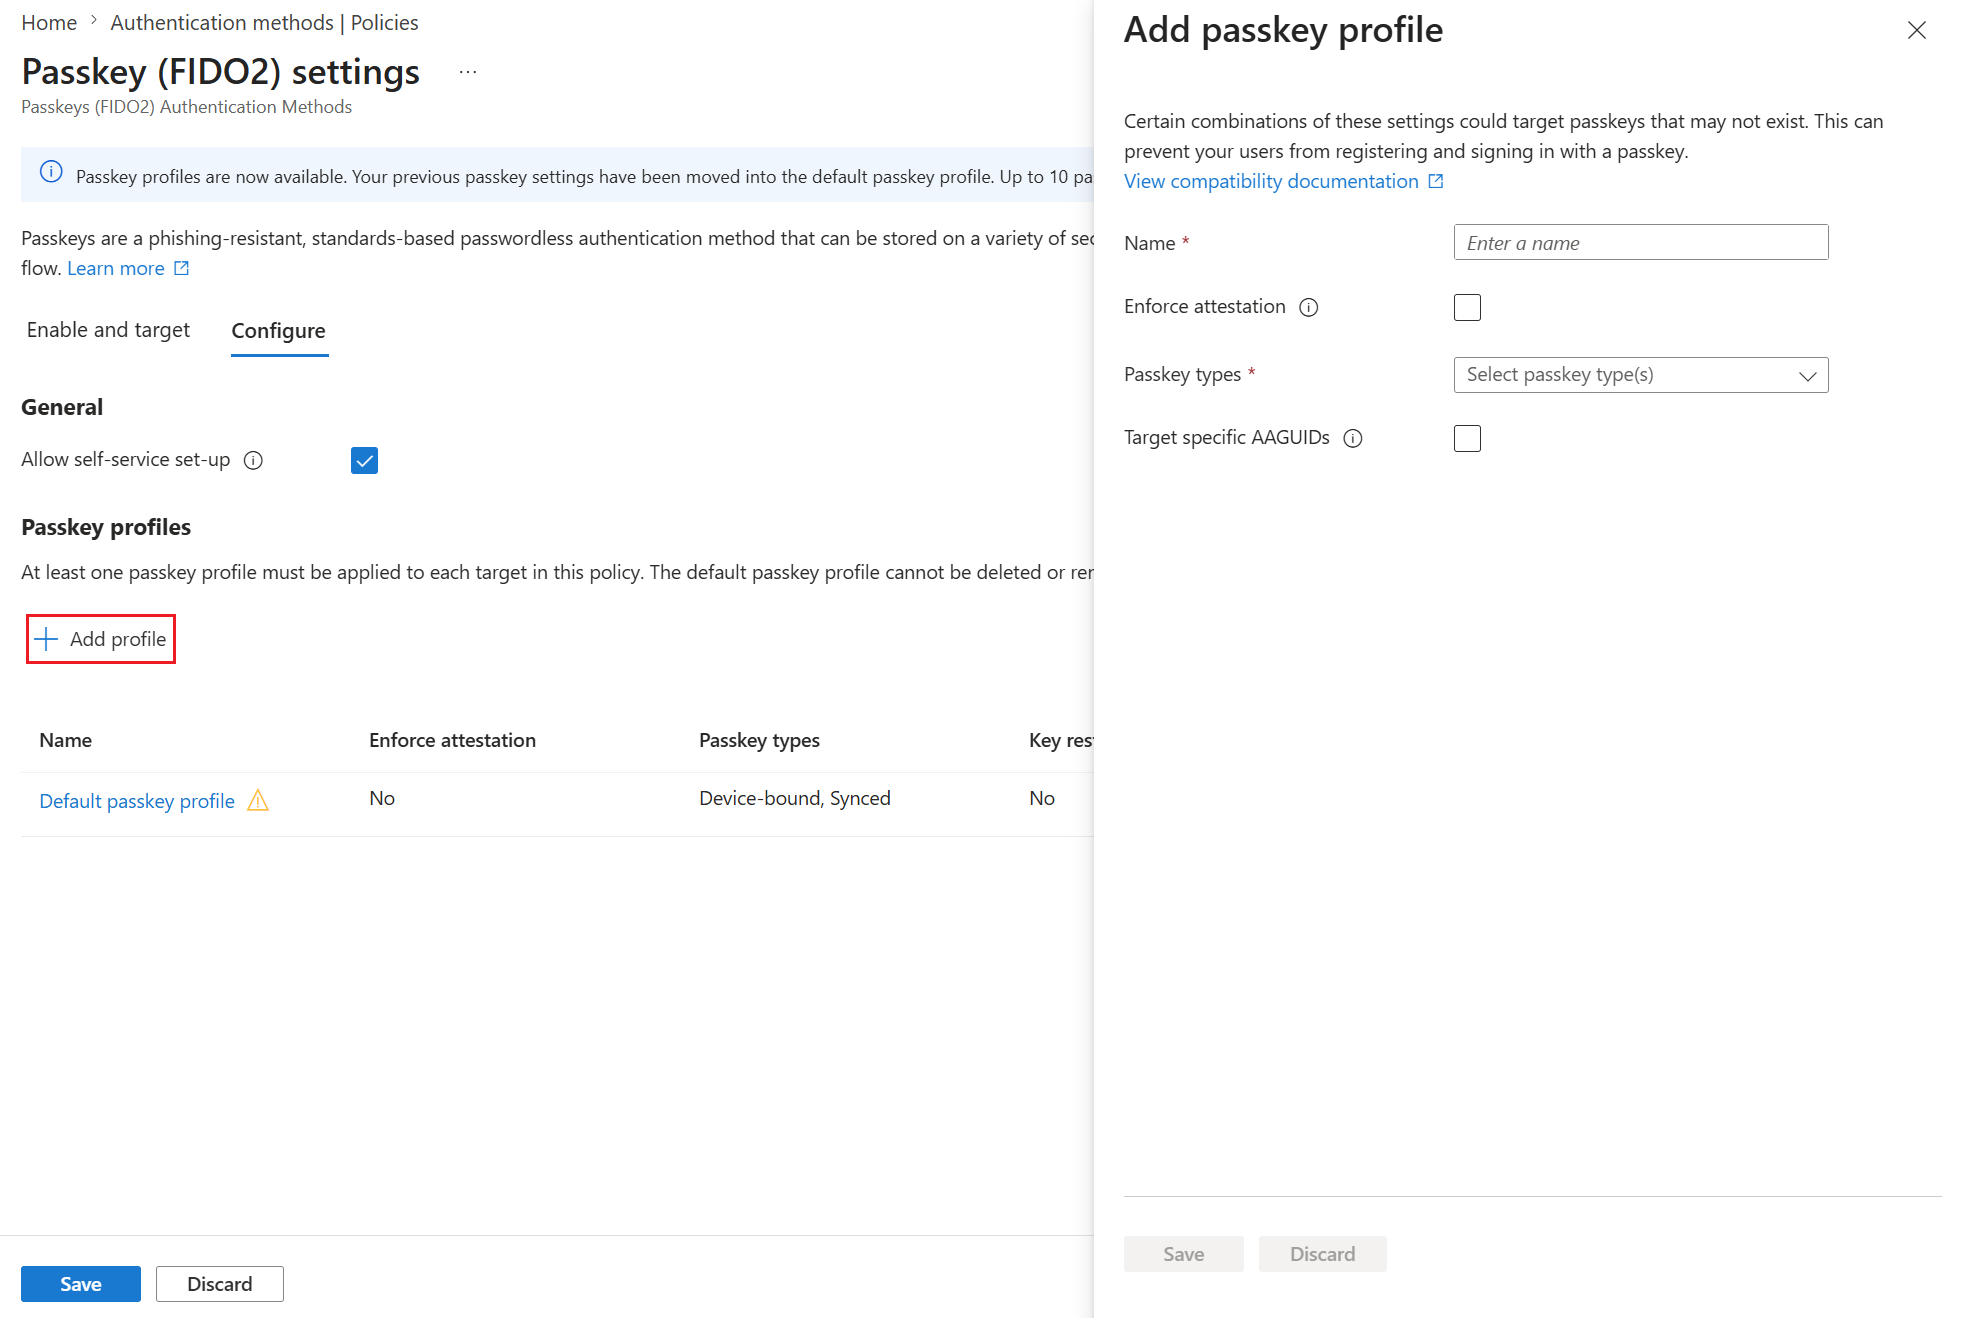
Enter a Name for the profile, such as FIDO2 security keys.
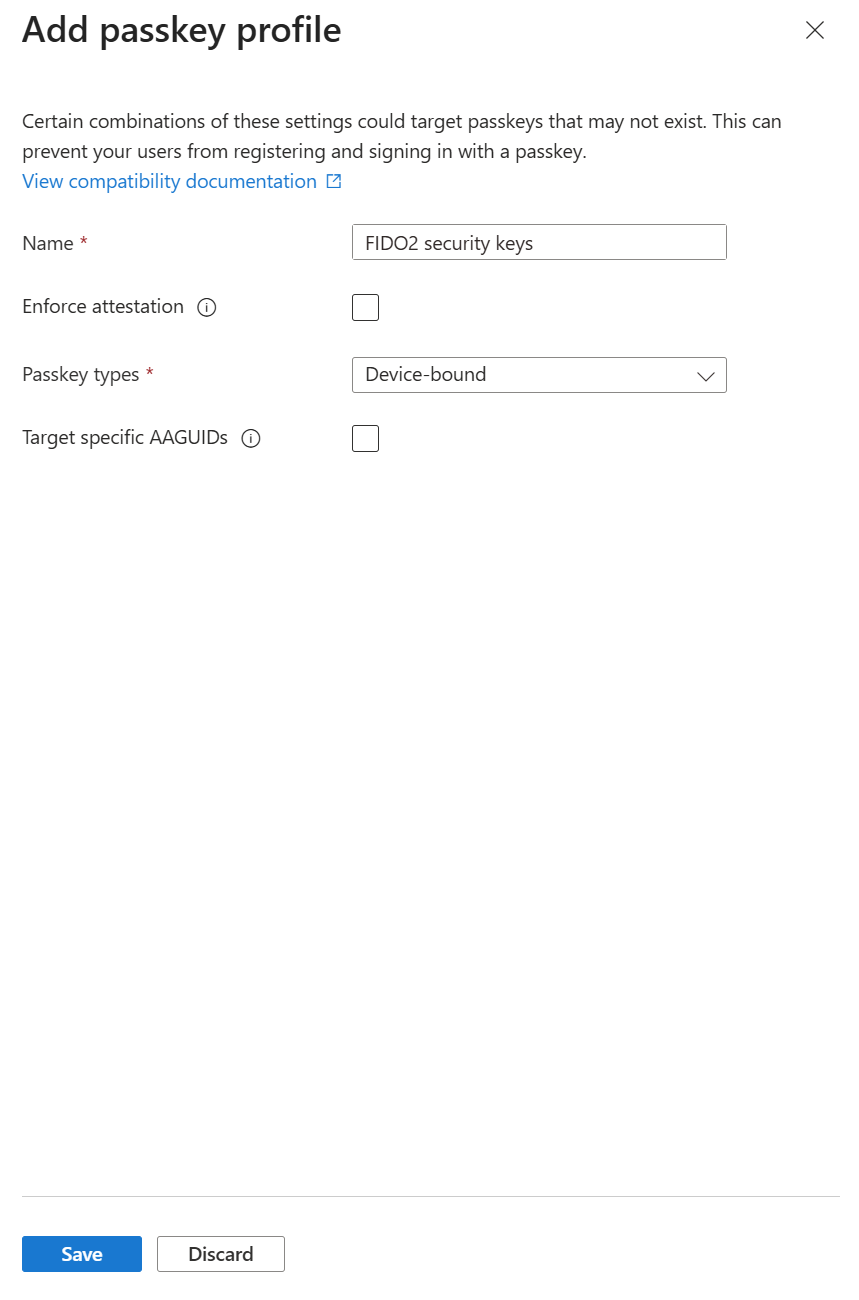
For Passkey types, select Device-bound and Save.
Note
If you disable device-bound passkeys for a given passkey profile, targeted users can't sign in with a device-bound passkey even if they already registered one.
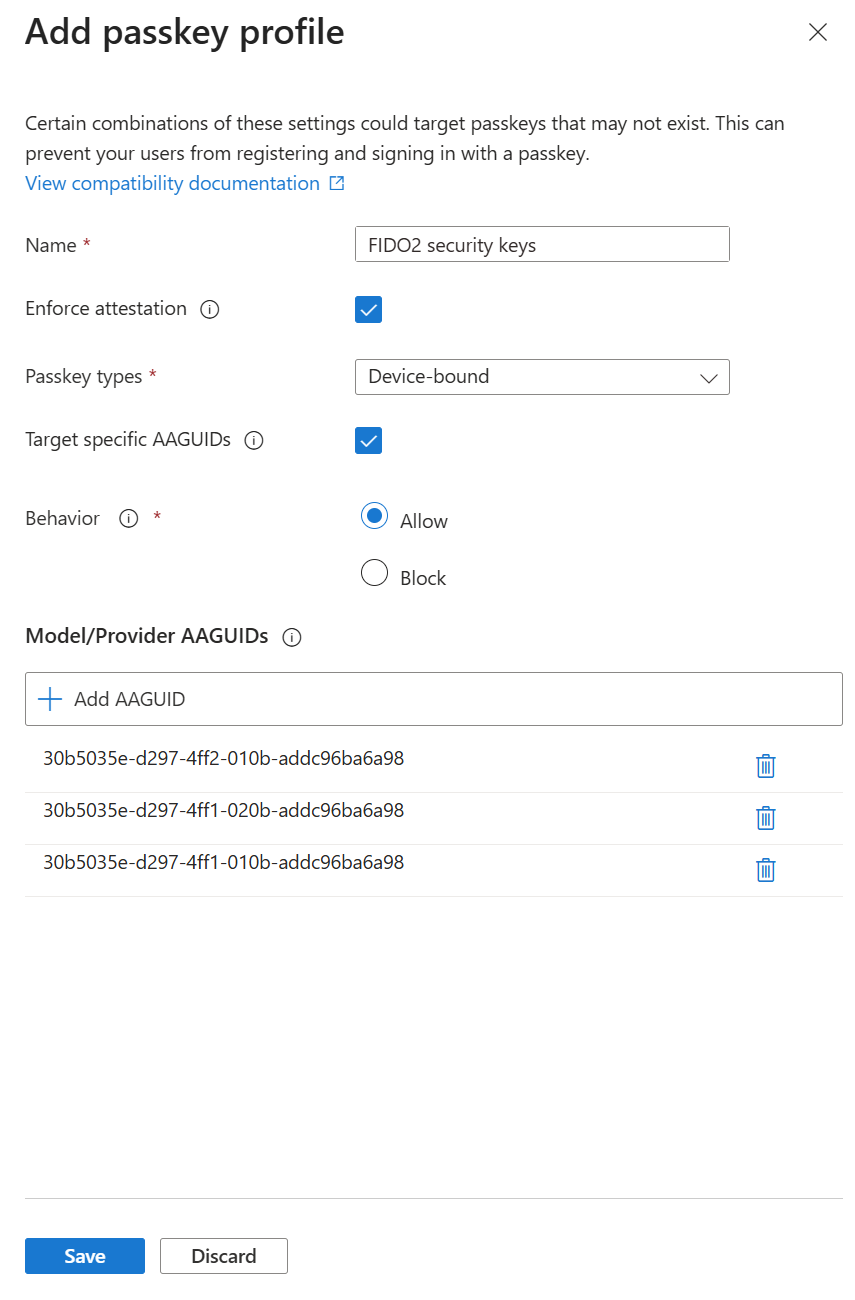
Example: Target specific AAGUIDs
You can target specific AAGUIDs to control which authenticators users can register. In this example, the passkey profile allows only AAGUIDs for specific models of FIDO2 security keys.
To configure this profile:
Select Target specific AAGUIDs.
Set Behavior to Allow.
Under Model/Provider AAGUIDs, add the AAGUIDs for the FIDO2 security key models that you want to allow for sign-in, and select Save.
Warning
If you select Enforce attestation, attestation is required at registration time. Microsoft Entra ID can verify the authenticator's make and model against trusted metadata. Attestation assures your organization that the passkey is genuine and comes from the stated vendor. If you don't select Enforce attestation, Microsoft Entra ID can't guarantee any attribute about a passkey, including if it's synced or device-bound.
Attestation enforcement governs whether a passkey (FIDO2) is allowed only during registration. Users who register a passkey (FIDO2) without attestation aren't blocked from sign-in if Enforce attestation is selected later.
Enable and target groups for a device-bound passkey profile
Organizations can choose to use one or more of the following methods to enable the use of security keys for Windows sign-in based on their organization's requirements:
- Enable with Microsoft Entra admin center
- Enable with Microsoft Intune
- Targeted Microsoft Intune deployment
- Enable with a provisioning package
- Enable with Group Policy (Microsoft Entra hybrid joined devices only)
Important
Organizations with Microsoft Entra hybrid joined devices must also complete the steps in the article, Enable FIDO2 authentication to on-premises resources before Windows 10 FIDO2 security key authentication works.
Organizations with Microsoft Entra joined devices must do this before their devices can authenticate to on-premises resources with FIDO2 security keys.
Enable with Microsoft Entra admin center
Sign in to the Microsoft Entra admin center as at least an Authentication Policy Administrator.
Browse to Entra ID > Authentication methods.
On the Authentication methods | Policies page, select Passkey (FIDO2) > Enable and target.
On the Enable and Target tab, make sure Enable is On.
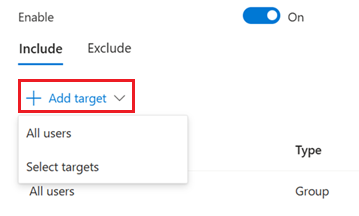
Select Add target, and choose All users or Select targets to choose specific groups.
Select the profile for device-bound passkeys.
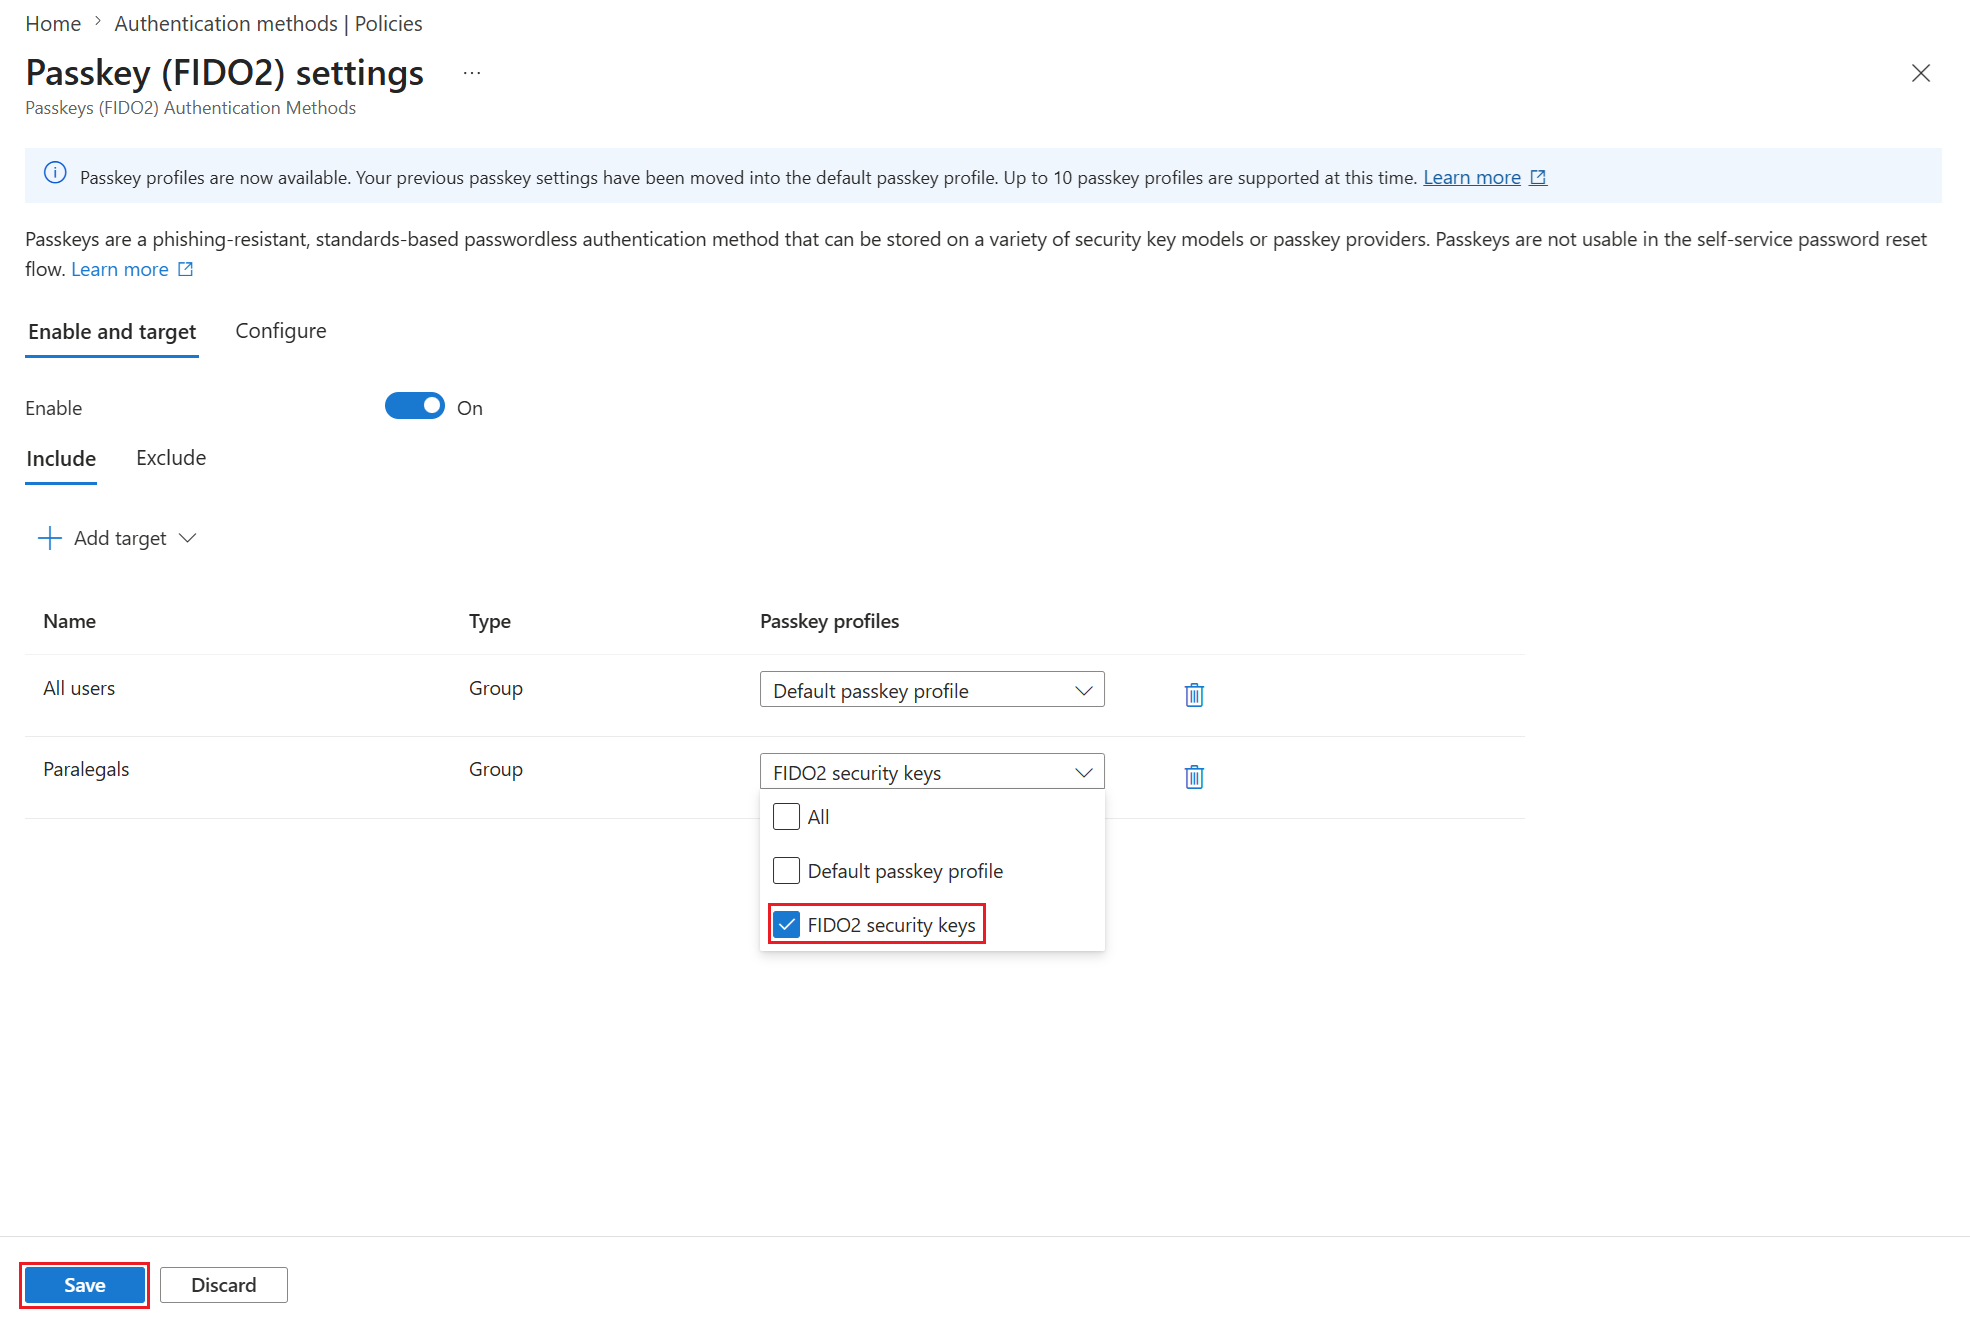
Select Save to enable device-bound passkeys for the selected users.
Enable with Microsoft Intune
To enable the use of security keys using Intune, complete the following steps:
- Sign in to the Microsoft Intune admin center.
- Browse to Devices > Enroll Devices > Windows enrollment > Windows Hello for Business.
- Set Use security keys for sign-in to Enabled.
Configuration of security keys for sign-in isn't dependent on configuring Windows Hello for Business.
Note
This doesn't enable security keys on already provisioned devices. In that case, use the next method (Targeted Intune deployment).
Targeted Intune deployment
To target specific device groups to enable the credential provider, use the following custom settings via Intune:
- Sign in to the Microsoft Intune admin center.
- Browse to Devices > Windows > Configuration profiles > Create profile.
- Configure the new profile with the following settings:
- Platform: Windows 10 and later
- Profile type: Templates > Custom
- Name: Security Keys for Windows Sign-In
- Description: Enables FIDO Security Keys to be used during Windows Sign In
- Select Next > Add and in Add Row, add the following Custom OMA-URI settings:
- Name: Turn on FIDO Security Keys for Windows Sign-In
- Description: (Optional)
- OMA-URI: ./Device/Vendor/MSFT/PassportForWork/SecurityKey/UseSecurityKeyForSignin
- Data Type: Integer
- Value: 1
- Assign the remainder of the policy settings, including specific users, devices, or groups. For more information, see Assign user and device profiles in Microsoft Intune.
Enable with a provisioning package
For devices not managed by Microsoft Intune, a provisioning package can be installed to enable the functionality. The Windows Configuration Designer app can be installed from the Microsoft Store. Complete the following steps to create a provisioning package:
- Launch the Windows Configuration Designer.
- Select File > New project.
- Give your project a name and take note of the path where your project is created, then select Next.
- Leave Provisioning package selected as the Selected project workflow and select Next.
- Select All Windows desktop editions under Choose which settings to view and configure, then select Next.
- Select Finish.
- In your newly created project, browse to Runtime settings > WindowsHelloForBusiness > SecurityKeys > UseSecurityKeyForSignIn.
- Set UseSecurityKeyForSignIn to Enabled.
- Select Export > Provisioning package
- Leave the defaults in the Build window under Describe the provisioning package, then select Next.
- Leave the defaults in the Build window under Select security details for the provisioning package and select Next.
- Take note of or change the path in the Build windows under Select where to save the provisioning package and select Next.
- Select Build on the Build the provisioning package page.
- Save the two files created (ppkg and cat) to a location where you can apply them to machines later.
- To apply the provisioning package you created, see Apply a provisioning package.
Note
Devices running Windows 10 Version 1903 must also enable shared PC mode (EnableSharedPCMode). For more information about enabling this functionality, see Set up a shared or guest PC with Windows 10.
Enable with Group Policy
For Microsoft Entra hybrid joined devices, organizations can configure the following Group Policy setting to enable FIDO security key sign-in. The setting can be found under Computer Configuration > Administrative Templates > System > Logon > Turn on security key sign-in:
- Setting this policy to Enabled allows users to sign in with security keys.
- Setting this policy to Disabled or Not Configured stops users from signing in with security keys.
This Group Policy setting requires an updated version of the CredentialProviders.admx Group Policy template. This new template is available with the next version of Windows Server and with Windows 10 20H1. This setting can be managed with a device running one of these newer versions of Windows or centrally by following the guidance here: How to create and manage the Central Store for Group Policy Administrative Templates in Windows.
Provision FIDO2 security keys using Microsoft Graph API (preview)
Currently in preview, administrators can use Microsoft Graph and custom clients to provision FIDO2 security keys on behalf of users. Provisioning requires the Authentication Administrator role or a client application with UserAuthenticationMethod.ReadWrite.All permission. The provisioning improvements include:
- The ability to request WebAuthn creation Options from Microsoft Entra ID
- The ability to register the provisioned security key directly with Microsoft Entra ID
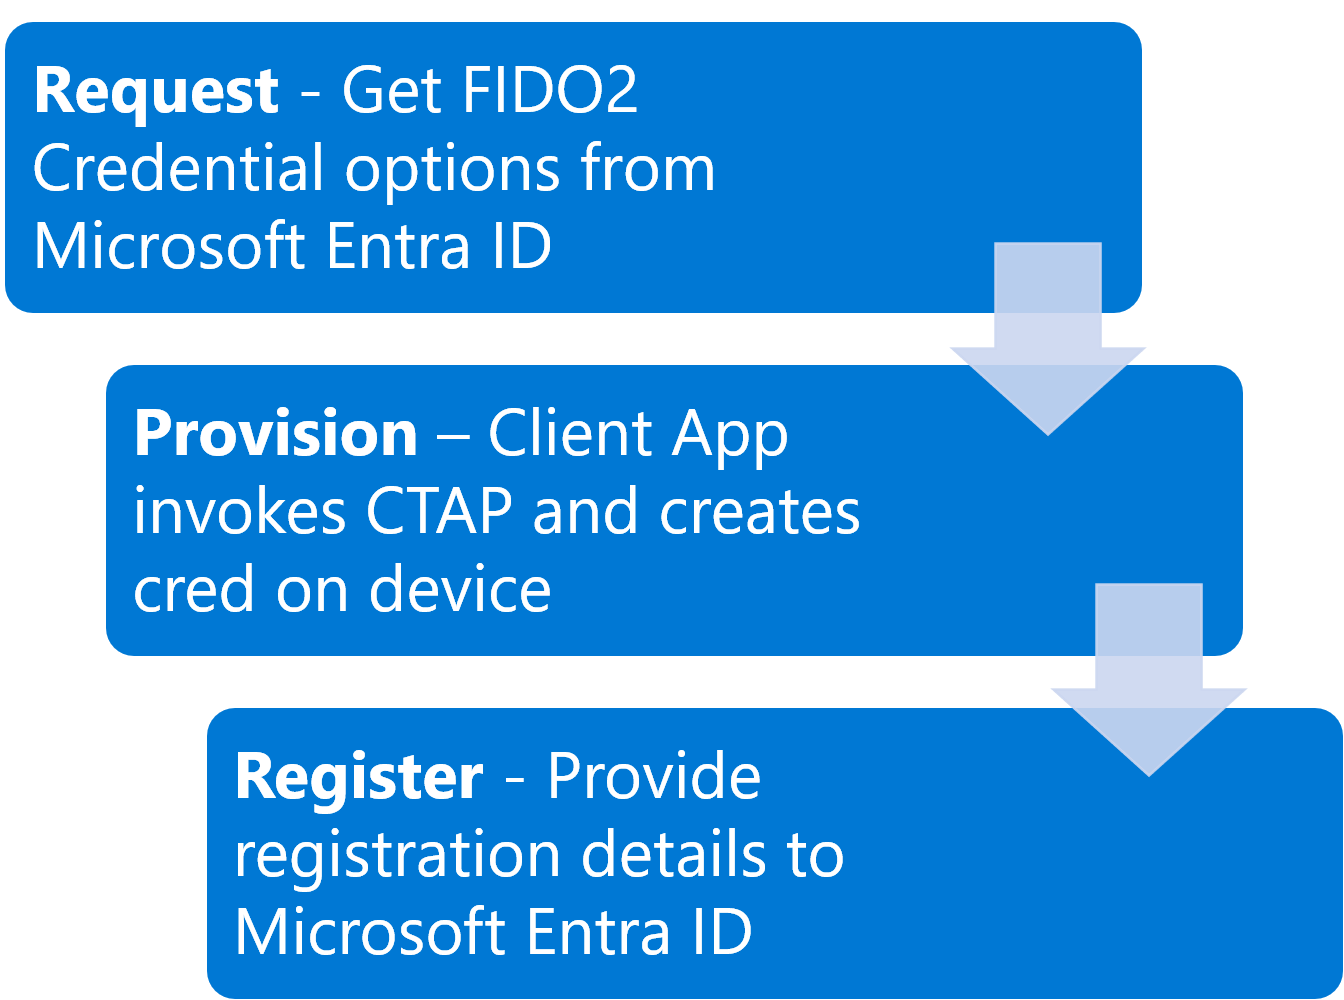
With these new APIs, organizations can build their own clients to provision passkey (FIDO2) credentials on security keys on behalf of a user. To simplify this process, three main steps are required.
- Request creationOptions for a user: Microsoft Entra ID returns the necessary data for your client to provision a passkey (FIDO2) credential. This includes information such as user information, relying party ID, credential policy requirements, algorithms, registration challenge and more.
- Provision the passkey (FIDO2) credential with the creation Options: Use the
creationOptionsand a client that supports the Client to Authenticator Protocol (CTAP) to provision the credential. During this step, you need to insert the security key and set a PIN. - Register the provisioned credential with Microsoft Entra ID: Use the formatted output from the provisioning process to provide Microsoft Entra ID the necessary data to register the passkey (FIDO2) credential for the targeted user.
Troubleshooting and feedback
If you'd like to share feedback or encounter issues about this feature, share via the Windows Feedback Hub app using the following steps:
- Launch Feedback Hub and make sure you're signed in.
- Submit feedback under the following categorization:
- Category: Security and Privacy
- Subcategory: FIDO
- To capture logs, use the option to Recreate my Problem.
Register a FIDO2 security key
After an admin creates the device-bound passkey profile, users can register a FIDO2 security key on their device.
For registration steps, see Register a passkey with a FIDO2 security key.
Sign in with a FIDO2 security key
After registration, users can sign in to Microsoft Entra ID by using the FIDO2 security key on their device.
For sign-in steps, see Sign in with a FIDO2 security key.