Note
Access to this page requires authorization. You can try signing in or changing directories.
Access to this page requires authorization. You can try changing directories.
APPLIES TO: All API Management tiers
You can import AI model endpoints deployed in Azure OpenAI in Foundry Models to your API Management instance as a REST API. Use AI gateway policies and other capabilities in API Management to simplify integration, improve observability, and enhance control over the model endpoints.
This article shows two options to import an Azure OpenAI API into an Azure API Management instance as a REST API:
Import an Azure OpenAI API directly from Azure OpenAI (recommended)
Download and add the OpenAPI specification for Azure OpenAI and add it to API Management as an OpenAPI API.
Learn more about managing AI APIs in API Management:
Prerequisites
An existing API Management instance. Create one if you haven't already.
An Azure OpenAI resource with a model deployed. For more information about model deployment in Azure OpenAI, see the resource deployment guide.
Make a note of the ID (name) of the deployment. You'll need it when you test the imported API in API Management.
Note
API Management policies such as azure-openai-token-limit and azure-openai-emit-token-metric are supported for certain API endpoints exposed through specific Azure OpenAI models. For more information, see Supported Azure OpenAI models.
Permissions to grant access to the Azure OpenAI resource from the API Management instance.
Option 1. Import API from Azure OpenAI
You can import an Azure OpenAI API directly from Azure OpenAI to API Management.
Note
Currently, this feature isn't available in workspaces.
When you import the API, API Management automatically configures:
- Operations for each of the Azure OpenAI REST API endpoints
- A system-assigned identity with the necessary permissions to access the Azure OpenAI resource.
- A backend resource and a set-backend-service policy that direct API requests to the Azure OpenAI endpoint.
- Authentication to the Azure OpenAI backend using the instance's system-assigned managed identity.
- (optionally) Policies to help you monitor and manage the Azure OpenAI API.
To import an Azure OpenAI API to API Management:
In the Azure portal, navigate to your API Management instance.
In the left menu, under APIs, select APIs > + Add API.
Under Create from Azure resource, select Azure OpenAI.
On the Basics tab:
Select the Azure OpenAI resource that you want to import.
Optionally select an Azure OpenAI API version. If you don't select one, the latest production-ready REST API version is used by default. Make a note of the version you selected. You'll need it to test the API.
Enter a Display name and optional Description for the API.
In Base URL, append a path that your API Management instance uses to access the Azure OpenAI API endpoints. If you enable Ensure OpenAI SDK compatibility (recommended),
/openaiis automatically appended to the base URL.For example, if your API Management gateway endpoint is
https://contoso.azure-api.net, set a Base URL similar tohttps://contoso.azure-api.net/my-openai-api/openai.Optionally select one or more products to associate with the API. Select Next.
On the Policies tab, optionally enable policies to help monitor and manage the API. You can also set or edit policies later.
If selected, enter settings or accept defaults that define the following policies (see linked articles for prerequisites and configuration details):
- Manage token consumption
- Track token usage
- Enable semantic caching of responses
- Configure AI Content Safety for the API.
Select Review + Create.
After settings are validated, select Create.
Option 2. Add an OpenAPI specification to API Management
Alternatively, manually download the OpenAPI specification for the Azure OpenAI REST API and add it to API Management as an OpenAPI API.
Download the OpenAPI specification
Download the OpenAPI specification for the Azure OpenAI REST API, such as the 2024-10-21 GA version.
In a text editor, open the specification file that you downloaded.
In the
serverselement in the specification, substitute the name of your Azure OpenAI endpoint in the placeholder values ofurlanddefaultendpoint in the specification. For example, if your Azure OpenAI endpoint iscontoso.openai.azure.com, update theserverselement with the following values:- url:
https://contoso.openai.azure.com/openai - default endpoint:
contoso.openai.azure.com
[...] "servers": [ { "url": "https://contoso.openai.azure.com/openai", "variables": { "endpoint": { "default": "contoso.openai.azure.com" } } } ], [...]- url:
Make a note of the value of the API
versionin the specification. You'll need it to test the API. Example:2024-10-21.
Add OpenAPI specification to API Management
- In the Azure portal, navigate to your API Management instance.
- In the left menu, select APIs > + Add API.
- Under Define a new API, select OpenAPI. Enter a Display name and Name for the API.
- Enter an API URL suffix ending in
/openaito access the Azure OpenAI API endpoints in your API Management instance. Example:my-openai-api/openai. - Select Create.
The API is imported and displays operations from the OpenAPI specification.
Configure authentication to Azure OpenAI API
To authenticate to the Azure OpenAI API, you supply an API key or a managed identity. If you imported the Azure OpenAI API directly to your API Management instance, authentication using the API Management instance's managed identity is automatically configured.
If you added the Azure OpenAI API from its OpenAPI specification, you need to configure authentication. For more information about configuring authentication using API Management policies, see Authenticate and authorize to Azure OpenAI API.
Test the Azure OpenAI API
To ensure that your Azure OpenAI API is working as expected, test it in the API Management test console. You need to supply a model deployment ID (name) configured in the Azure OpenAI resource and the API version to test the API.
Select the API you created in the previous step.
Select the Test tab.
Select an operation that's compatible with the model you deployed in the Azure OpenAI resource. The page displays fields for parameters and headers.
In Template parameters, enter the following values:
deployment-id- the ID of a deployment in Azure OpenAIapi-version- a valid Azure OpenAI API version, such as the API version you selected when you imported the API.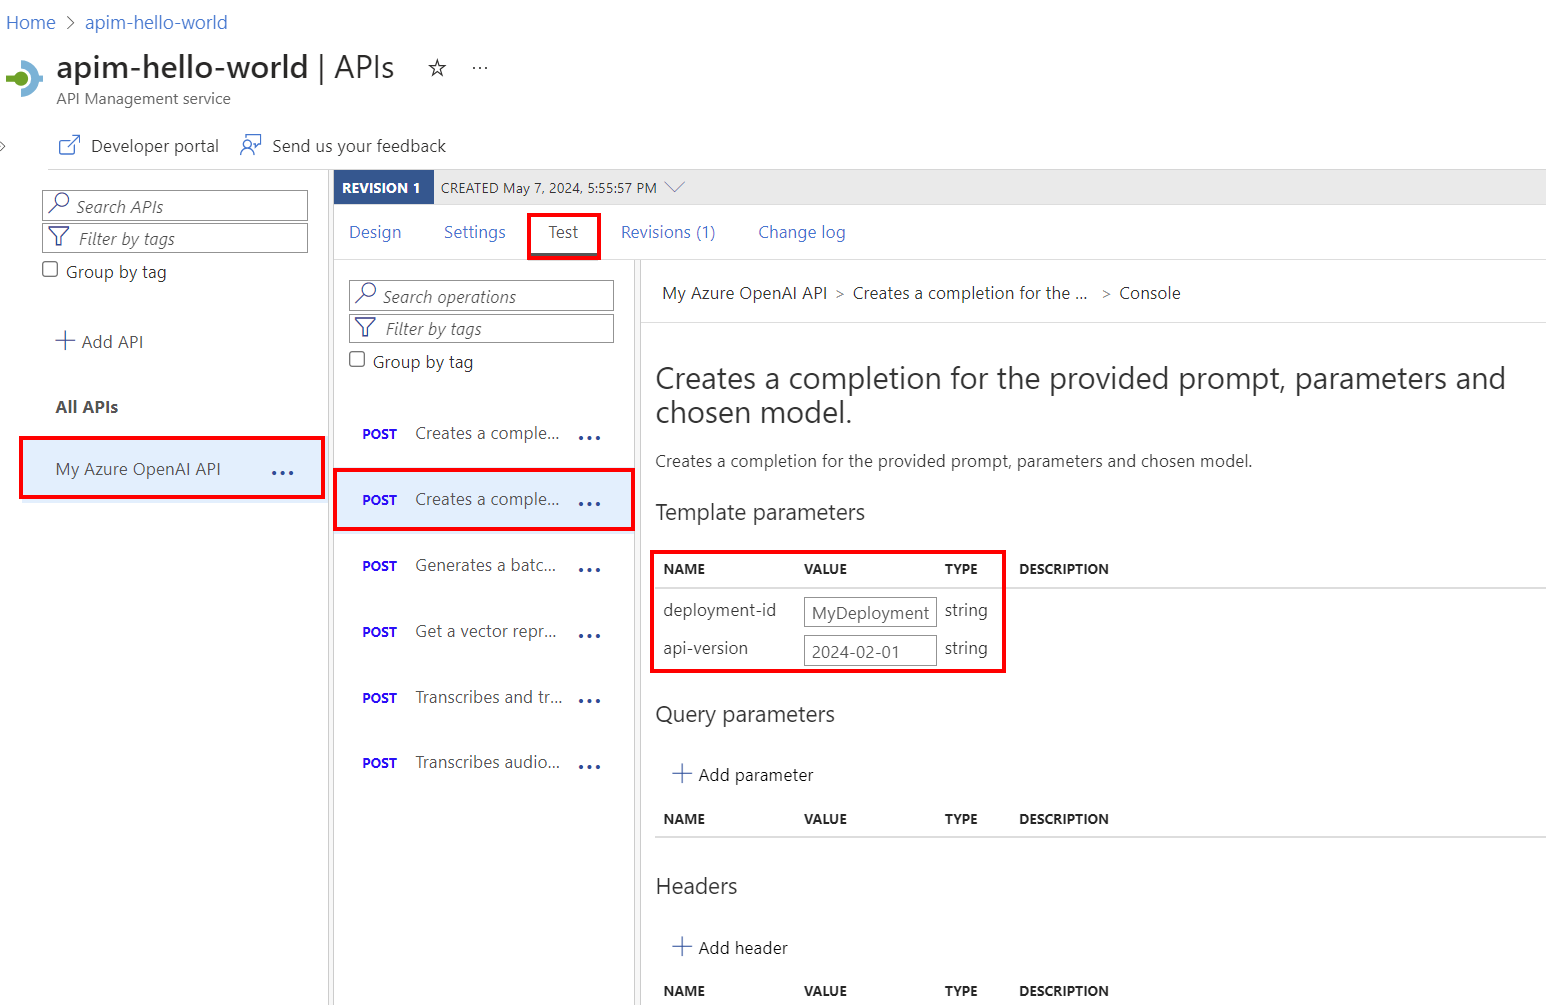
Enter other parameters and headers as needed. Depending on the operation, you might need to configure or update a Request body.
Note
In the test console, API Management automatically populates an Ocp-Apim-Subscription-Key header, and configures the subscription key of the built-in all-access subscription. This key enables access to every API in the API Management instance. Optionally display the Ocp-Apim-Subscription-Key header by selecting the "eye" icon next to the HTTP Request.
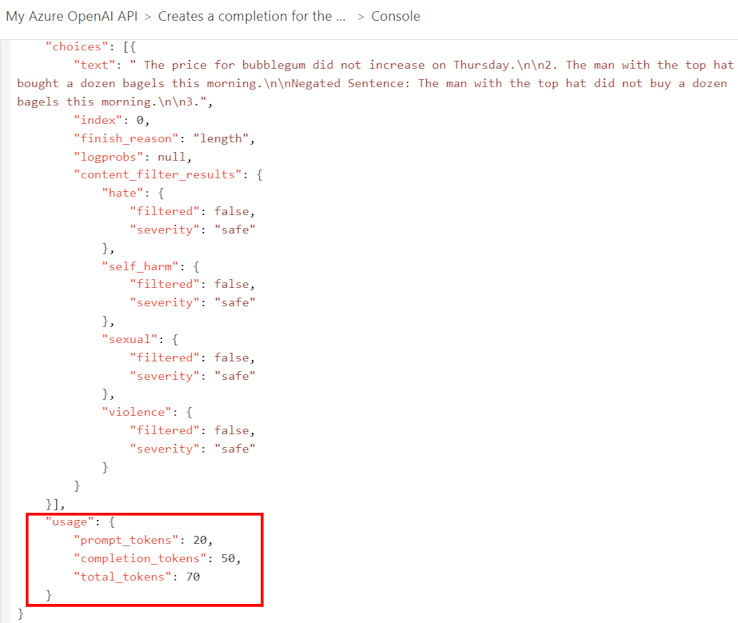
Select Send.
When the test is successful, the backend responds with a successful HTTP response code and some data. Appended to the response is token usage data to help you monitor and manage your Azure OpenAI API token consumption.

Related content
- API import limitations
- Import an OpenAPI specification
- Import a SOAP API
- Import a SOAP API and convert it to REST
- Import an App Service API
- Import a container app API
- Import a WebSocket API
- Import a GraphQL API
- Import a GraphQL schema and set up field resolvers
- Import a function app API
- Import a logic app API
- Import a Service Fabric service
- Import an Azure AI Foundry API
- Import an Azure OpenAI API
- Import an LLM API
- Import an OData API
- Export a REST API as an MCP server
- Expose an existing MCP server
- Import an A2A agent API
- Import SAP OData metadata
- Import a gRPC API
- Edit an API