Data collection transformations in Azure Monitor
With transformations in Azure Monitor, you can filter or modify incoming data before it's sent to a Log Analytics workspace. This article provides a basic description of transformations and how they're implemented. It provides links to other content for creating a transformation.
Why to use transformations
The following table describes the different goals that you can achieve by using transformations.
Category | Details |
---|---|
Remove sensitive data | You might have a data source that sends information you don't want stored for privacy or compliancy reasons. Filter sensitive information. Filter out entire rows or particular columns that contain sensitive information. Obfuscate sensitive information. Replace information such as digits in an IP address or telephone number with a common character. Send to an alternate table. Send sensitive records to an alternate table with different role-based access control configuration. |
Enrich data with more or calculated information | Use a transformation to add information to data that provides business context or simplifies querying the data later. Add a column with more information. For example, you might add a column identifying whether an IP address in another column is internal or external. Add business-specific information. For example, you might add a column indicating a company division based on location information in other columns. |
Reduce data costs | Because you're charged ingestion cost for any data sent to a Log Analytics workspace, you want to filter out any data that you don't require to reduce your costs. Remove entire rows. For example, you might have a diagnostic setting to collect resource logs from a particular resource but not require all the log entries that it generates. Create a transformation that filters out records that match a certain criteria. Remove a column from each row. For example, your data might include columns with data that's redundant or has minimal value. Create a transformation that filters out columns that aren't required. Parse important data from a column. You might have a table with valuable data buried in a particular column. Use a transformation to parse the valuable data into a new column and remove the original. Send certain rows to basic logs. Send rows in your data that require basic query capabilities to basic logs tables for a lower ingestion cost. |
Supported tables
You can apply transformations to the following tables in a Log Analytics workspace:
- Any Azure table listed in Tables that support transformations in Azure Monitor Logs
- Any custom table
How transformations work
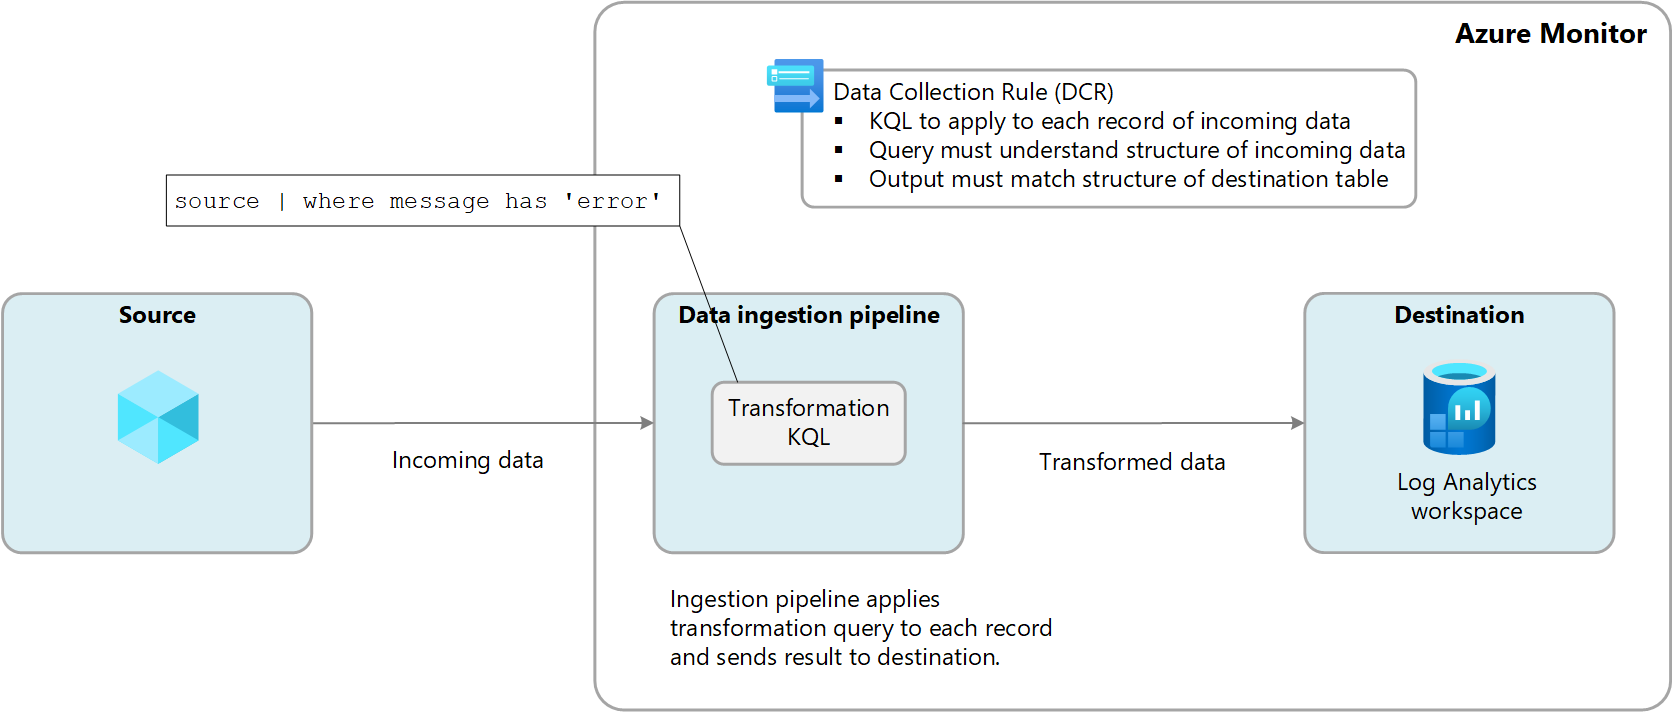
Transformations are performed in Azure Monitor in the data ingestion pipeline after the data source delivers the data and before it's sent to the destination. The data source might perform its own filtering before sending data but then rely on the transformation for further manipulation before it's sent to the destination.
Transformations are defined in a data collection rule (DCR) and use a Kusto Query Language (KQL) statement that's applied individually to each entry in the incoming data. It must understand the format of the incoming data and create output in the structure expected by the destination.
For example, a DCR that collects data from a virtual machine by using Azure Monitor Agent would specify particular data to collect from the client operating system. It could also include a transformation that would get applied to that data after it's sent to the data ingestion pipeline that further filters the data or adds a calculated column. See Creating Agent Transforms. The following diagram shows this workflow.
Another example is data sent from a custom application by using the logs ingestion API. In this case, the application sends the data to a data collection endpoint and specifies a DCR in the REST API call. The DCR includes the transformation and the destination workspace and table.
Workspace transformation DCR
The workspace transformation DCR is a special DCR that's applied directly to a Log Analytics workspace. It includes default transformations for one or more supported tables. These transformations are applied to any data sent to these tables unless that data came from another DCR.
For example, if you create a transformation in the workspace transformation DCR for the Event
table, it would be applied to events collected by virtual machines running the Log Analytics agent because this agent doesn't use a DCR. The transformation would be ignored by any data sent from Azure Monitor Agent because it uses a DCR and would be expected to provide its own transformation.
A common use of the workspace transformation DCR is collection of resource logs that are configured with a diagnostic setting. The following example shows this process.
Multiple destinations
With transformations, you can send data to multiple destinations in a Log Analytics workspace by using a single DCR. You provide a KQL query for each destination, and the results of each query are sent to their corresponding location. You can send different sets of data to different tables or use multiple queries to send different sets of data to the same table.
For example, you might send event data into Azure Monitor by using the Logs Ingestion API. Most of the events should be sent an analytics table where it could be queried regularly, while audit events should be sent to a custom table configured for basic logs to reduce your cost.
To use multiple destinations, you must currently either manually create a new DCR or edit an existing one. See the Samples section for examples of DCRs that use multiple destinations.
Important
Currently, the tables in the DCR must be in the same Log Analytics workspace. To send to multiple workspaces from a single data source, use multiple DCRs and configure your application to send the data to each.
Create a transformation
There are multiple methods to create transformations depending on the data collection method. The following table lists guidance for different methods for creating transformations.
Type | Reference |
---|---|
Logs ingestion API with transformation | Send data to Azure Monitor Logs by using REST API (Azure portal) Send data to Azure Monitor Logs by using REST API (Azure Resource Manager templates) |
Transformation in workspace DCR | Add workspace transformation to Azure Monitor Logs by using the Azure portal Add workspace transformation to Azure Monitor Logs by using Resource Manager templates |
Agent Transformations in a DCR | Add transformation to Azure Monitor Log |
Cost for transformations
While transformations themselves don't incur direct costs, the following scenarios can result in additional charges:
- If a transformation increases the size of the incoming data, such as by adding a calculated column, you'll be charged the standard ingestion rate for the extra data.
- If a transformation reduces the ingested data by more than 50%, you'll be charged for the amount of filtered data above 50%.
To calculate the data processing charge resulting from transformations, use the following formula:
[GB filtered out by transformations] - ([GB data ingested by pipeline] / 2). The following table shows examples.
Data ingested by pipeline | Data dropped by transformation | Data ingested by Log Analytics workspace | Data processing charge | Ingestion charge |
---|---|---|---|---|
20 GB | 12 GB | 8 GB | 2 GB 1 | 8 GB |
20 GB | 8 GB | 12 GB | 0 GB | 12 GB |
1 This charge excludes the charge for data ingested by Log Analytics workspace.
To avoid this charge, you should filter ingested data using alternative methods before applying transformations. By doing so, you can reduce the amount of data processed by transformations and, therefore, minimize any additional costs.
See Azure Monitor pricing for current charges for ingestion and retention of log data in Azure Monitor.
Important
If Azure Sentinel is enabled for the Log Analytics workspace, there's no filtering ingestion charge regardless of how much data the transformation filters.
Samples
The following Resource Manager templates show sample DCRs with different patterns. You can use these templates as a starting point to creating DCRs with transformations for your own scenarios.
Single destination
The following example is a DCR for Azure Monitor Agent that sends data to the Syslog
table. In this example, the transformation filters the data for records with error
in the message.
{
"$schema": "https://schema.management.azure.com/schemas/2019-04-01/deploymentTemplate.json#",
"contentVersion": "1.0.0.0",
"resources" : [
{
"type": "Microsoft.Insights/dataCollectionRules",
"name": "singleDestinationDCR",
"apiVersion": "2021-09-01-preview",
"location": "eastus",
"properties": {
"dataSources": {
"syslog": [
{
"name": "sysLogsDataSource",
"streams": [
"Microsoft-Syslog"
],
"facilityNames": [
"auth",
"authpriv",
"cron",
"daemon",
"mark",
"kern",
"mail",
"news",
"syslog",
"user",
"uucp"
],
"logLevels": [
"Debug",
"Critical",
"Emergency"
]
}
]
},
"destinations": {
"logAnalytics": [
{
"workspaceResourceId": "/subscriptions/xxxxxxxx-xxxx-xxxx-xxxx-xxxxxxxxxxxx/resourceGroups/my-resource-group/providers/Microsoft.OperationalInsights/workspaces/my-workspace",
"name": "centralWorkspace"
}
]
},
"dataFlows": [
{
"streams": [
"Microsoft-Syslog"
],
"transformKql": "source | where message has 'error'",
"destinations": [
"centralWorkspace"
]
}
]
}
}
]
}
Multiple Azure tables
The following example is a DCR for data from the Logs Ingestion API that sends data to both the Syslog
and SecurityEvent
tables. This DCR requires a separate dataFlow
for each with a different transformKql
and OutputStream
for each. In this example, all incoming data is sent to the Syslog
table while malicious data is also sent to the SecurityEvent
table. If you didn't want to replicate the malicious data in both tables, you could add a where
statement to first query to remove those records.
{
"$schema": "https://schema.management.azure.com/schemas/2019-04-01/deploymentTemplate.json#",
"contentVersion": "1.0.0.0",
"resources" : [
{
"type": "Microsoft.Insights/dataCollectionRules",
"name": "multiDestinationDCR",
"location": "eastus",
"apiVersion": "2021-09-01-preview",
"properties": {
"dataCollectionEndpointId": "/subscriptions/xxxxxxxx-xxxx-xxxx-xxxx-xxxxxxxxxxxx/resourceGroups/my-resource-group/providers//Microsoft.Insights/dataCollectionEndpoints/my-dce",
"streamDeclarations": {
"Custom-MyTableRawData": {
"columns": [
{
"name": "Time",
"type": "datetime"
},
{
"name": "Computer",
"type": "string"
},
{
"name": "AdditionalContext",
"type": "string"
}
]
}
},
"destinations": {
"logAnalytics": [
{
"workspaceResourceId": "/subscriptions/xxxxxxxx-xxxx-xxxx-xxxx-xxxxxxxxxxxx/resourceGroups/my-resource-group/providers/Microsoft.OperationalInsights/workspaces/my-workspace",
"name": "clv2ws1"
},
]
},
"dataFlows": [
{
"streams": [
"Custom-MyTableRawData"
],
"destinations": [
"clv2ws1"
],
"transformKql": "source | project TimeGenerated = Time, Computer, Message = AdditionalContext",
"outputStream": "Microsoft-Syslog"
},
{
"streams": [
"Custom-MyTableRawData"
],
"destinations": [
"clv2ws1"
],
"transformKql": "source | where (AdditionalContext has 'malicious traffic!' | project TimeGenerated = Time, Computer, Subject = AdditionalContext",
"outputStream": "Microsoft-SecurityEvent"
}
]
}
}
]
}
Combination of Azure and custom tables
The following example is a DCR for data from the Logs Ingestion API that sends data to both the Syslog
table and a custom table with the data in a different format. This DCR requires a separate dataFlow
for each with a different transformKql
and OutputStream
for each.
{
"$schema": "https://schema.management.azure.com/schemas/2019-04-01/deploymentTemplate.json#",
"contentVersion": "1.0.0.0",
"resources" : [
{
"type": "Microsoft.Insights/dataCollectionRules",
"name": "multiDestinationDCR",
"location": "eastus",
"apiVersion": "2021-09-01-preview",
"properties": {
"dataCollectionEndpointId": "/subscriptions/xxxxxxxx-xxxx-xxxx-xxxx-xxxxxxxxxxxx/resourceGroups/my-resource-group/providers//Microsoft.Insights/dataCollectionEndpoints/my-dce",
"streamDeclarations": {
"Custom-MyTableRawData": {
"columns": [
{
"name": "Time",
"type": "datetime"
},
{
"name": "Computer",
"type": "string"
},
{
"name": "AdditionalContext",
"type": "string"
}
]
}
},
"destinations": {
"logAnalytics": [
{
"workspaceResourceId": "/subscriptions/xxxxxxxx-xxxx-xxxx-xxxx-xxxxxxxxxxxx/resourceGroups/my-resource-group/providers/Microsoft.OperationalInsights/workspaces/my-workspace",
"name": "clv2ws1"
},
]
},
"dataFlows": [
{
"streams": [
"Custom-MyTableRawData"
],
"destinations": [
"clv2ws1"
],
"transformKql": "source | project TimeGenerated = Time, Computer, SyslogMessage = AdditionalContext",
"outputStream": "Microsoft-Syslog"
},
{
"streams": [
"Custom-MyTableRawData"
],
"destinations": [
"clv2ws1"
],
"transformKql": "source | extend jsonContext = parse_json(AdditionalContext) | project TimeGenerated = Time, Computer, AdditionalContext = jsonContext, ExtendedColumn=tostring(jsonContext.CounterName)",
"outputStream": "Custom-MyTable_CL"
}
]
}
}
]
}
Next steps
Create a data collection rule and an association to it from a virtual machine by using Azure Monitor Agent.
Feedback
Submit and view feedback for