Organize your Azure resources effectively
Organize your cloud-based resources to secure, manage, and track costs that are related to your workloads. To organize your resources, define a management group hierarchy, consider and follow a naming convention, and apply resource tagging.
Management levels and hierarchy
Azure provides four levels of management: management groups, subscriptions, resource groups, and resources. The following diagram shows the relationship between these levels.
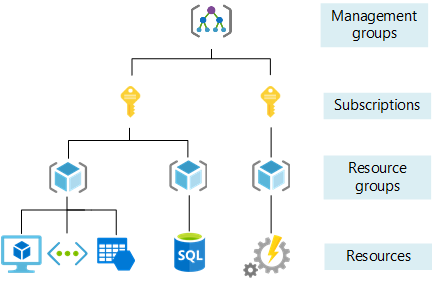
Management groups help you manage access, policy, and compliance for multiple subscriptions. All subscriptions in a management group automatically inherit the conditions that are applied to the management group.
Subscriptions logically associate user accounts with the resources that they create. Each subscription has limits or quotas on the amount of resources that it can create and use. Organizations can use subscriptions to manage costs and the resources that are created by users, teams, and projects.
Resource groups are logical containers where you can deploy and manage Azure resources like virtual machines, web apps, databases, and storage accounts.
Resources are instances of services that you can create in a resource group, such as virtual machines, storage, and SQL databases.
Note
To minimize the effect of regional outages, we recommend that you place resources in the same region as the resource group. For more information, see Resource group location alignment.
Management settings scope
You can apply management settings, such as policies and role-based access control, at any management level. The level determines how widely the setting is applied. Lower levels inherit settings from higher levels. For example, when you apply a policy to a subscription, that policy applies to all resource groups and resources in that subscription.
Usually, it makes sense to apply critical settings at higher levels and project-specific requirements at lower levels. For example, to make sure that all resources for your organization deploy to certain regions, apply a policy to the subscription that specifies the allowed regions. The allowed locations are automatically enforced when users in your organization add new resource groups and resources.
Managing a few subscriptions independently is easy. However, for a larger number of subscriptions, consider creating a management group hierarchy to simplify management of subscriptions and resources. For more information, see Organize and manage multiple Azure subscriptions.
Work with people in the following roles as you plan your organizational compliance strategy:
- Security and compliance
- IT administration
- Enterprise architecture
- Networking
- Finance
- Procurement
Create a management structure
To create a management group, subscription, or resource group, sign in to the Azure portal.
To create a management group to help you manage multiple subscriptions, go to Management groups and select Create.
To create a subscription to associate users with resources, go to Subscriptions and select Add.
Note
You can also create subscriptions programmatically. For more information, see Programmatically create Azure subscriptions.
To create a resource group to hold resources that share the same permissions and policies:
- Go to Create a resource group.
- In the Create a resource group form:
- For Subscription, select the subscription in which to create the resource group.
- For Resource group, enter a name for the new resource group.
- For Region, select a region in which to locate the resource group.
- Select Review + create, and after the review passes, select Create.
Actions
To create a management group, subscription, or resource group, sign in to the Azure portal.
To create a management group to help you manage multiple subscriptions, go to Management groups and select Create.
To create a subscription to associate users with resources, go to Subscriptions and select Add.
Note
You can also create subscriptions programmatically. For more information, see Programmatically create Azure subscriptions.
To create a resource group to hold resources that share the same permissions and policies:
- Go to Create a resource group.
- In the Create a resource group form:
- For Subscription, select the subscription in which to create the resource group.
- For Resource group, enter a name for the new resource group.
- For Region, select a region in which to locate the resource group.
- Select Review + create, and after the review passes, select Create.
Naming standards
A good naming standard helps to identify resources in the Azure portal, on a billing statement, and in automation scripts. Your naming strategy should include business and operational details in resource names.
Business details should include the organizational information that's required to identify teams. Use the resource's short name, along with the names of the business owners who are responsible for the resource costs.
Operational details in resource names should include information that IT teams need. Include details that identify the workload, application, environment, criticality, and other information that's useful for managing resources.
Naming rules and restrictions vary by the type of resource. For more information and for recommendations that support cloud adoption by enterprises, see Develop your naming and tagging strategy for Azure resources.
Note
- Avoid using special characters, such as hyphen and underscore (
-and_), as the first or last characters in a name. Doing so can cause validation rules to fail. - Names of tags are case-insensitive.
Resource tags
Tags can quickly identify your resources and resource groups. You apply tags to your Azure resources to logically organize them by categories. Tags can include context about the resource's associated workload or application, operational requirements, and ownership information.
Each tag consists of a name and a value. For example, you can apply the name environment and the value production to all the resources in production.
After you apply tags, you can easily retrieve all the resources in your subscription that have that tag name and value. When you organize resources for billing or management, tags can help you retrieve related resources from different resource groups.
Other common uses for tags include:
- Metadata and documentation: Administrators can easily see detail about the resources they're working on by applying a tag like ProjectOwner.
- Automation: Regularly running scripts can take action based on a tag value like ShutdownTime or DeprovisionDate.
- Cost optimization: You can allocate resources to the teams and resources who are responsible for the costs. In Microsoft Cost Management, you can apply your cost center tag as a filter to report charges based on usage by team or department.
Each resource or resource group can have a maximum of 50 pairs of tag names and values. This limitation is only for tags that directly apply to the resource group or resource.
For more tagging recommendations and examples, see Develop your naming and tagging strategy for Azure resources.
Apply a resource tag
To apply one or more tags to a resource group:
- In the Azure portal, go to Resource groups and select the resource group.
- Select Assign tags in the navigation at the top of the page.
- Enter the name and value for a tag under Name and Value.
- Enter more names and values or select Save.
Remove a resource tag
To remove one or more tags from a resource group:
- In the Azure portal, go to Resource groups and select the ellipses menu for the group, and then select Edit tags.
- Select the trash can icon for each tag that you want to remove.
- To save your changes, select Save.
Action
To apply one or more tags to a resource group:
- In the Azure portal, go to Resource groups and select the resource group.
- Select Assign tags in the navigation at the top of the page.
- Enter the name and value for a tag under Name and Value.
- Enter more names and values or select Save.
To remove one or more tags from a resource group:
- In the Azure portal, go to Resource groups and select the ellipses menu for the group, and then select Edit tags.
- Select the trash can icon for each tag that you want to remove.
- To save your changes, select Save.
Next steps
To learn more about management levels and organization, see:
- Azure fundamentals
- Create your initial Azure subscriptions
- Create additional subscriptions to scale your Azure environment
- Organize and manage multiple Azure subscriptions
- What are Azure management groups?
- Resource access management in Azure
- Azure subscription and service limits, quotas, and constraints
For more information about resource naming and tagging, see: