Note
Access to this page requires authorization. You can try signing in or changing directories.
Access to this page requires authorization. You can try changing directories.
Azure Key Vault provides a secure way to manage credentials, including keys, secrets, and certificates. By using Azure Pipelines, you can streamline the process of accessing and using key vaults to store and retrieve credentials.
In certain scenarios, organizations prioritize security by restricting access to key vaults exclusively to designated Azure virtual networks. This restriction ensures the highest level of security for critical applications. In this tutorial, you learn how to set up authentication and configure inbound access so your pipeline can query and retrieve data from a private Azure Key Vault.
Prerequisites
| Product | Requirements |
|---|---|
| Azure DevOps | - An Azure DevOps organization. - An Azure DevOps project. - Permissions: - To grant access to all pipelines in the project: You must be a member of the Project Administrators group. - To create service connections: You must have the Administrator or Creator role for service connections. |
| Azure | - An Azure subscription. - An Azure key vault. |
Access a private key vault
Developers can use Azure Pipelines to link an Azure key vault to a variable group and map selective vault secrets to it. A key vault that's used as a variable group can be accessed:
- From Azure DevOps during variable group configuration.
- From a self-hosted agent during pipeline job runtime.
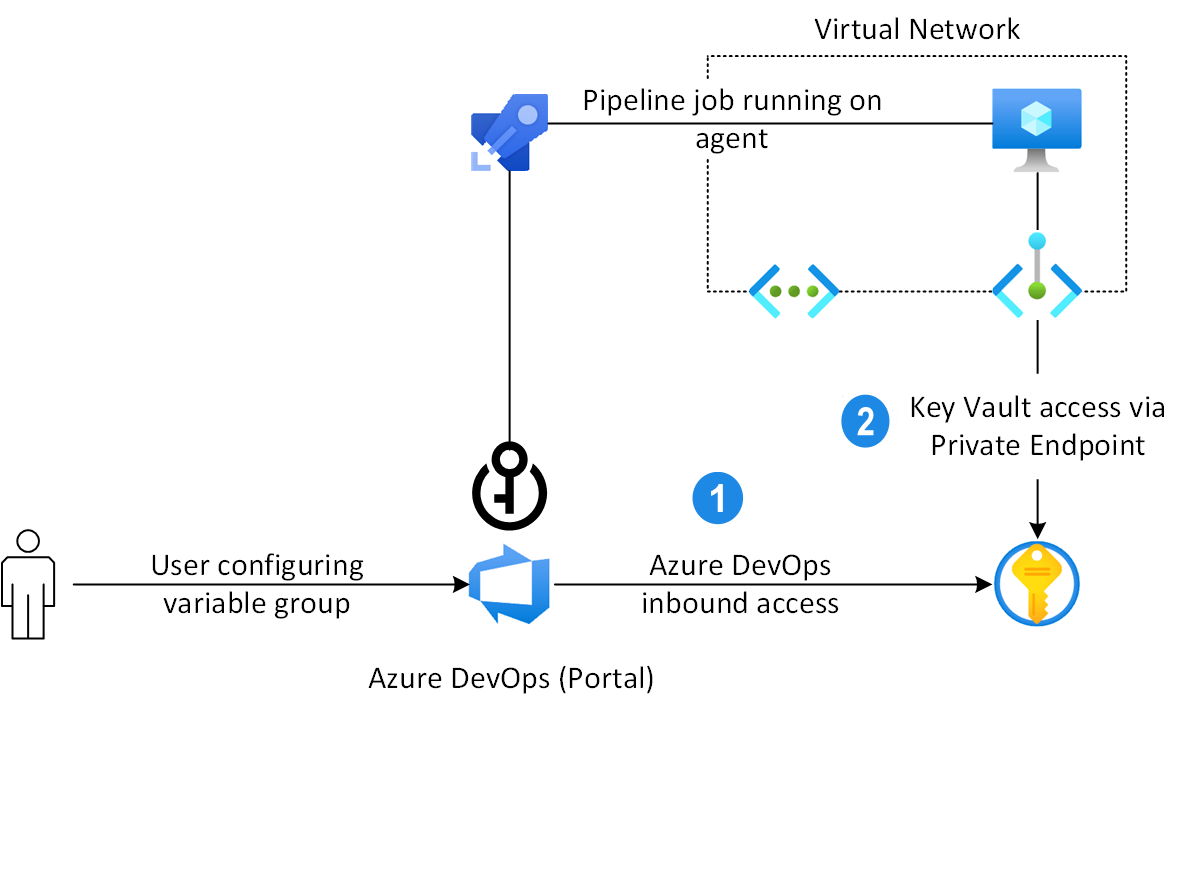
To set up access to your private key vault, complete the following steps in order:
- Create a service principal to authenticate with Azure resources.
- Create an Azure Resource Manager service connection in Azure DevOps using the service principal.
- Create a federated credential for your service principal in Azure.
Create a service principal
Create a service principal to authenticate with Azure resources:
Go to the Azure portal.
On the top menu, open Azure Cloud Shell, and then select Bash.
Run the following command to create a new service principal:
az ad sp create-for-rbac --name YOUR_SERVICE_PRINCIPAL_NAMECopy the command output. You need these values in the next step when you create the service connection.
Create a service connection
After creating your service principal, use its output values to create an Azure Resource Manager service connection in Azure DevOps.
Sign in to your Azure DevOps organization, and then go to your project.
Select Project settings > Service connections > New service connection.
Select Azure Resource Manager, and then select Next.
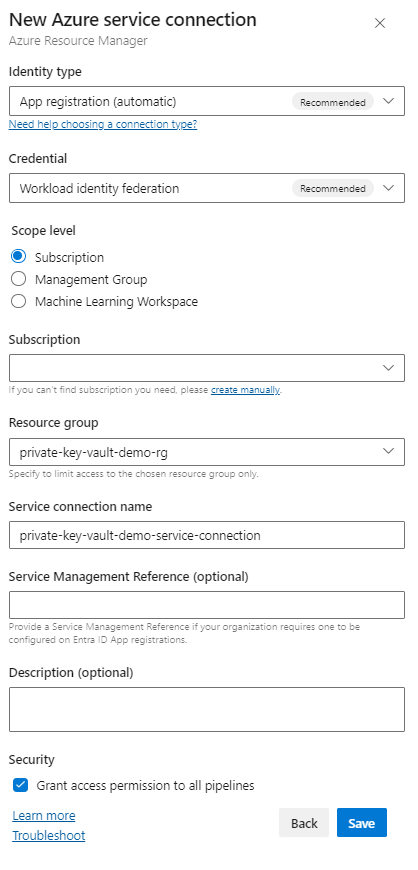
For Identity type, select App registration (automatic) from the dropdown menu.
For Credential, leave the default recommended value as Workload identity federation.
For Scope level, select Subscription, and then select your subscription from the dropdown menu.
Select a resource group if you want to limit access to the specified resource group only.
Enter a name for your service connection, and then select the Grant access permission to all pipelines checkbox to allow all pipelines to use this service connection.
Select Save.
Create a federated credential
After you save your service connection, configure a federated credential in Azure to establish trust between your service principal and Azure DevOps.
Go to the Azure portal, enter your service principal's client ID in the search bar, and then select your application.
Under Manage, select Certificates & secrets > Federated credentials.
Select Add credential, and then for Federated credential scenario, select Other issuer.
For Issuer, paste the following URL to replace the placeholder with your organization GUID. You can find your organization ID by going to Organization settings > Microsoft Entra. Download the list of Azure DevOps organizations that are connected to your directory.
https://login.microsoftonline.com/<TENANT_ID>/v2.0For Subject identifier, paste the following URL. Replace the placeholders with your organization name, project name, and service connection name.
ENTRA_PREFIX/sc/ORGANIZATION_NAME/PROJECT_NAME/SERVICE_CONNECTION_NAMEEnter a name for your federated credential, and then select Add.
Create a service connection
After creating your service principal, use its output values to create an Azure Resource Manager service connection in Azure DevOps.
Sign in to your Azure DevOps organization, and then go to your project.
Select Project settings > Service connections > New service connection.
Select Azure Resource Manager > Next, and then select Service principal (manual) > Next.
For Environment, select Azure Cloud, and for Scope level, select Subscription. Then enter your subscription ID and your subscription name.
Enter your service principal information, and then select Verify.
After successful verification, name your service connection, add a description, and then select the Grant access permission to all pipelines checkbox. Select Verify and save.
Tip
If you can't verify your service principal connection, grant the service principal Reader access to your subscription.
Access a private key vault from Azure DevOps
This section covers two methods for accessing a private key vault from Azure DevOps.
The first method uses variable groups to link and map secrets from your key vault, followed by setting up inbound access by allowing static IP ranges. Azure Pipelines uses the Azure DevOps public IP when querying a key vault from a variable group, so you need to allow those IP ranges in the key vault firewall.
The second method dynamically adds the Microsoft-hosted agent IP address to the key vault firewall allow list at the start of the pipeline, queries the key vault, and then finally removes the IP. This method is for demonstration purposes only and is not recommended for production use.
Step 1: Map key vault secrets with a variable group
Sign in to your Azure DevOps organization, and then go to your project.
Select Pipelines > Library, and then select + Variable group.
Name your variable group, and then turn on Link secrets from an Azure Key Vault as variable.
Select the service connection that you created earlier, select your key vault, and then select Authorize.
Under Variables, select Add to add your secret, and then select Save.
Note
Make sure that your service connection has the Get and List permissions, and that your service principal is assigned the Key Vault Secrets User role in your private key vault.
Step 1.1: Set up the service connection permissions
Go to your Azure key vault, and then select Access policies.
Select Create, and under Secret permissions, add the Get and List permissions, and then select Next.
Add your service connection in the search bar, select it, and then select Next.
Select Next once more, review your settings, and then select Review + create.
Step 1.2: Set up the service principal permissions
Go to your Azure key vault, and then select Access control (IAM).
Select Add > Add role assignment, and then select the Role tab.
Select the Key Vault Secrets User role, and then select Next.
Choose Select members, add your service principal, and choose Select.
Select Review + assign.
Sign in to your Azure DevOps organization, and then go to your project.
Select Pipelines > Library, and then select + Variable group.
Name your variable group, and then turn on Link secrets from an Azure Key Vault as variable.
Select the Azure service connection that you created earlier from the dropdown menu, and then select your key vault.
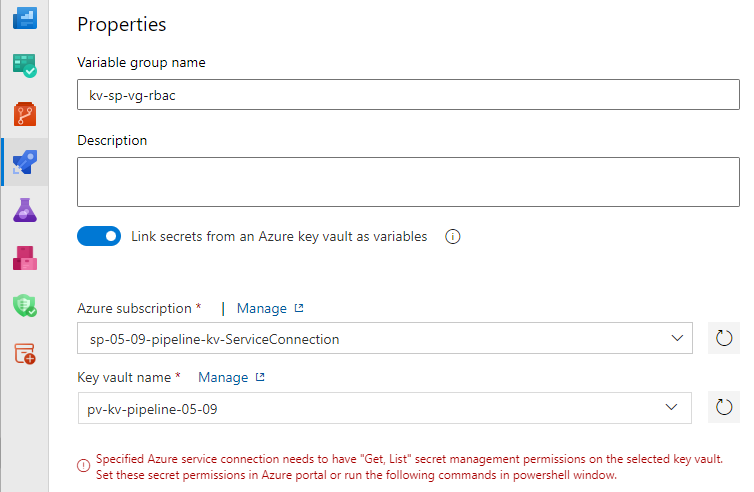
You might encounter the error message "Specified Azure service connection needs to have "Get, List" secret management permissions on the selected key vault." Go to your key vault in the Azure portal and select Access control (IAM) > Add role assignment > key vault secrets user > Next. Add your service principal, and then select Review + assign.
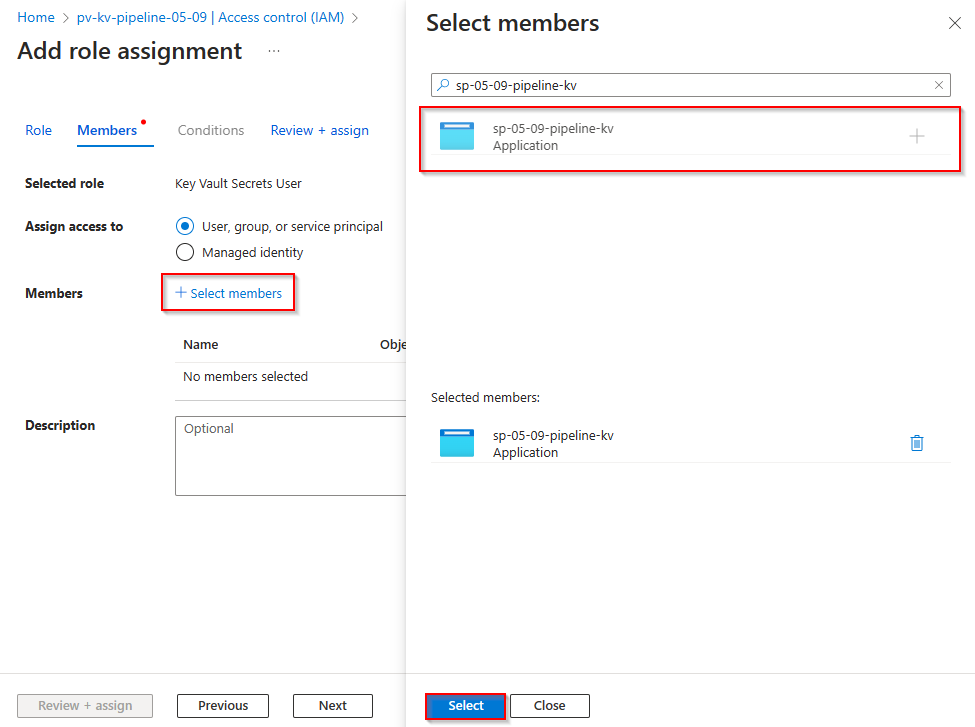
Add your secrets, and then select Save.
Step 2: Configure inbound access from Azure DevOps
After you configure your variable group, allow inbound access from Azure DevOps to your key vault by adding the static IP ranges for your organization's geographical region.
Sign in to your Azure DevOps organization.
Select Organization settings.
Go to Overview to find the geographical location.
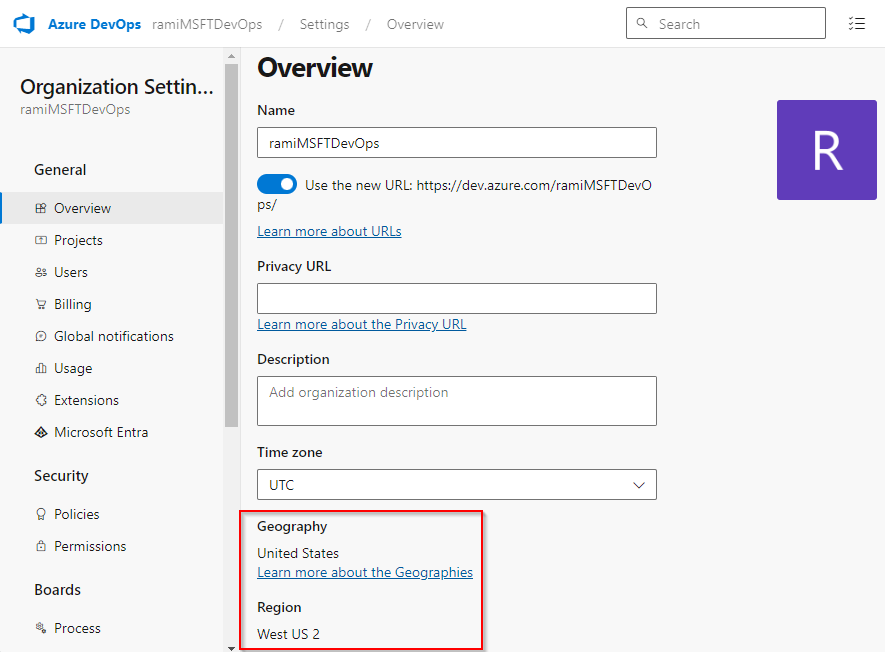
Find your geography IP V4 ranges.
Important
For United States inbound connections, make sure to add the IP ranges for all US regions.
Configure your key vault to allow access from static IP ranges.
Step 3: Query a private key vault with a variable group
With your variable group linked and inbound access configured, use the following pipeline to query your private key vault and copy the retrieved secret. Azure Pipelines uses its public IP to query the key vault from a variable group, so make sure you configured inbound access before running the pipeline.
variables:
-  group: mySecret-VG

steps:
- task: CmdLine@2
  inputs:
    script: 'echo $(mySecret) > secret.txt'

- task: CopyFiles@2
  inputs:
    Contents: secret.txt
    targetFolder: '$(Build.ArtifactStagingDirectory)'

- task: PublishBuildArtifacts@1
  inputs:
    PathtoPublish: '$(Build.ArtifactStagingDirectory)'
    ArtifactName: 'drop'
    publishLocation: 'Container'
Alternative method: Dynamically allow Microsoft-hosted agent IP
In this approach, the pipeline queries the Microsoft-hosted agent IP at startup, adds it to the key vault firewall allow list, runs the key vault tasks, and then removes the IP before the pipeline finishes.
Note
This approach is for demonstration purposes only. We don't recommend this approach for Azure Pipelines.
- task: AzurePowerShell@5
  displayName: 'Allow agent IP'
  inputs:
    azureSubscription: 'YOUR_SERVICE_CONNECTION_NAME'
    azurePowerShellVersion: LatestVersion
    ScriptType: InlineScript
    Inline: |
     $ip = (Invoke-WebRequest -uri "http://ifconfig.me/ip").Content
     Add-AzKeyVaultNetworkRule -VaultName "YOUR_KEY_VAULT_NAME" -ResourceGroupName "YOUR_RESOURCE_GROUP_NAME" -IpAddressRange $ip
     echo "##vso[task.setvariable variable=agentIP]ip"

- task: AzureKeyVault@2
  inputs:
    azureSubscription: 'YOUR_SERVICE_CONNECTION_NAME'
    KeyVaultName: 'YOUR_KEY_VAULT_NAME'
    SecretsFilter: '*'
    RunAsPreJob: false

- task: AzurePowerShell@5
  displayName: 'Remove agent IP'
  inputs:
    azureSubscription: 'YOUR_SERVICE_CONNECTION_NAME'
    azurePowerShellVersion: LatestVersion
    ScriptType: InlineScript
    Inline: |
     $ipRange = $env:agentIP + "/32"
     Remove-AzKeyVaultNetworkRule -VaultName "YOUR_KEY_VAULT_NAME" -IpAddressRange $ipRange
  condition: succeededOrFailed()
Important
Ensure that the service principal that you use to access your key vault from your pipeline holds the Key Vault Contributor role within your key vault's access control (IAM).
Access a private key vault from a self-hosted agent
To access a private key vault from an Azure Pipelines agent, use either a self-hosted agent (Windows, Linux, or Mac) or Virtual Machine Scale Sets agents. Microsoft-hosted agents, like other generic compute services, aren't included in the key vault list of trusted services.
To establish connectivity to your private key vault, configure a private endpoint for line-of-sight access. This endpoint must be routable, and its private DNS name must be resolvable from the self-hosted pipeline agent.
Step 1: Configure inbound access from a self-hosted agent
Follow the instructions to create a virtual network.
In the Azure portal, use the search bar at the top of the page to find your Azure key vault.
Select your key vault, and then go to Settings > Networking.
Select Private endpoint connections, and then select Create to create a new private endpoint.
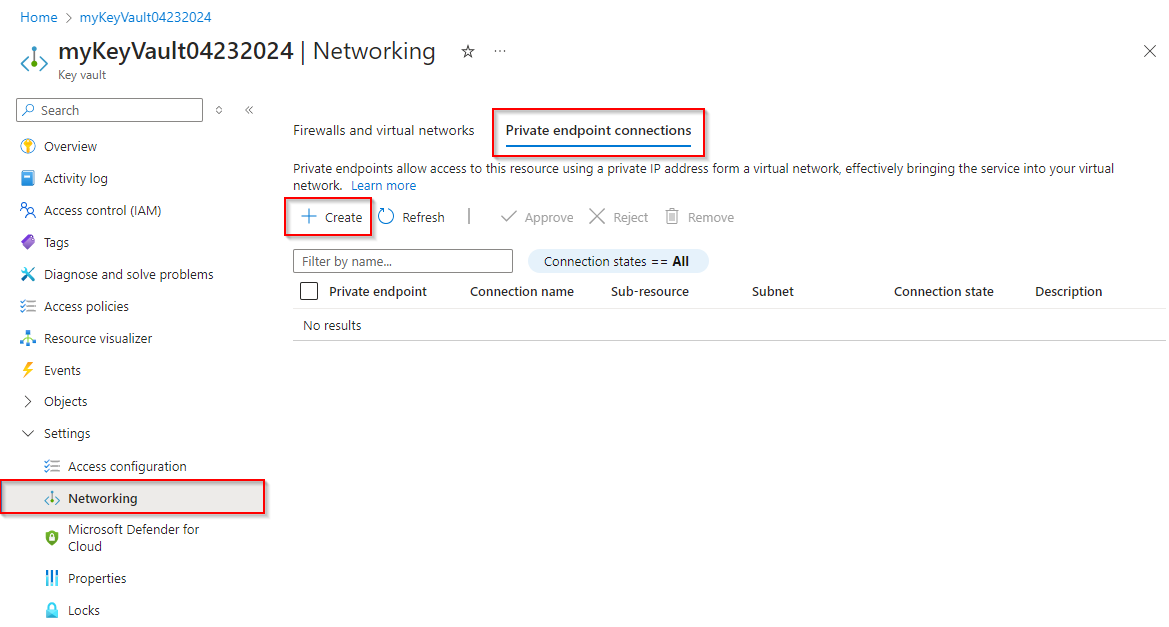
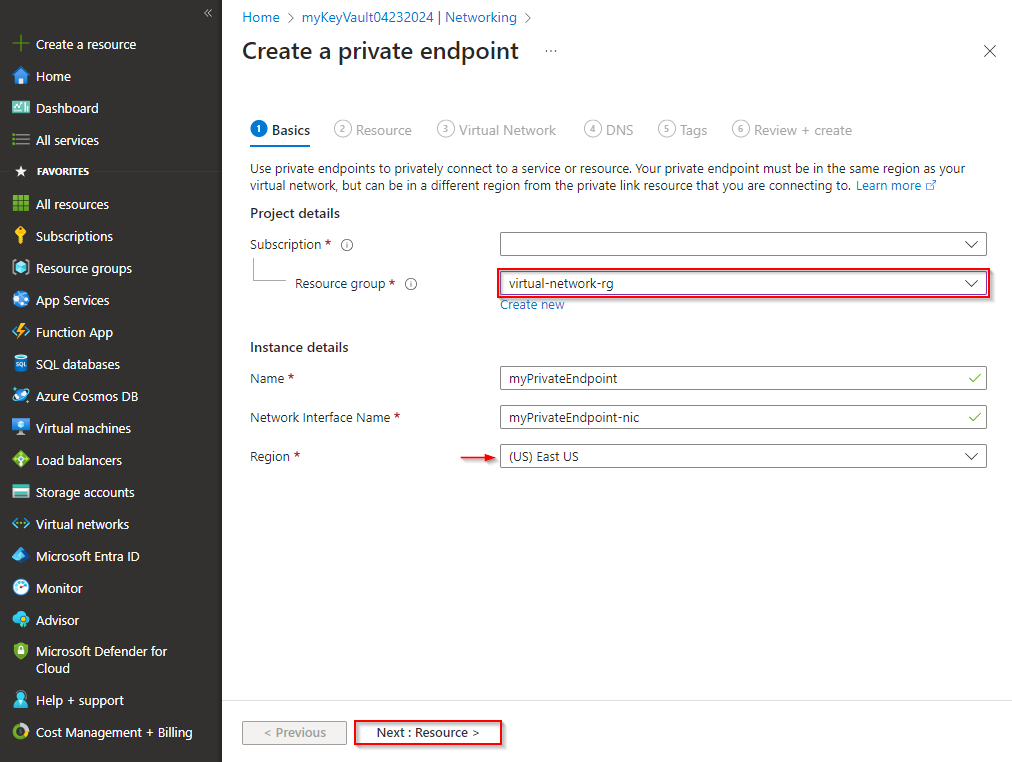
Select the resource group that hosts the virtual network that you created earlier. Enter a name and a network interface name for your instance, and make sure that you select the same region as the virtual network that you created earlier. Select Next.
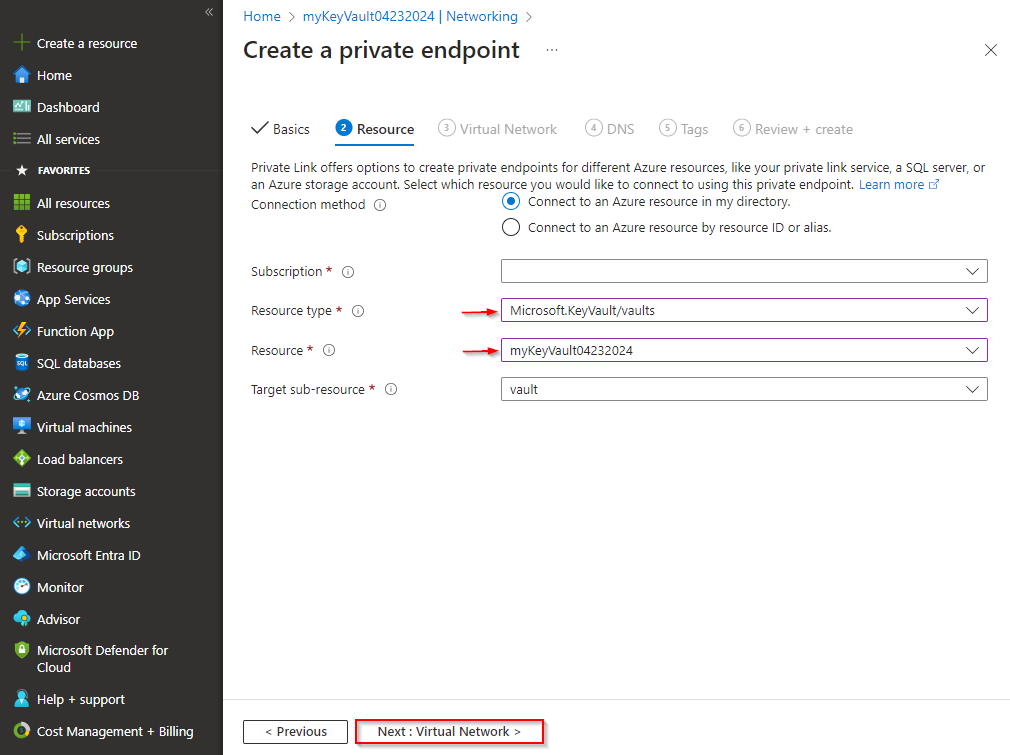
For Connection method, select Connect to an Azure resource in my directory. For Resource type, choose Microsoft.KeyVault/vaults from the dropdown menu. Select your resource from the dropdown menu. Target sub-resource is autopopulated with the value vault. Select Next.
On the Virtual Network tab, select the virtual network and subnet that you created earlier, and leave the rest of the fields as default. Select Next.
Accept the default settings on the DNS and Tags tabs. On the Review + Create tab, select Create.
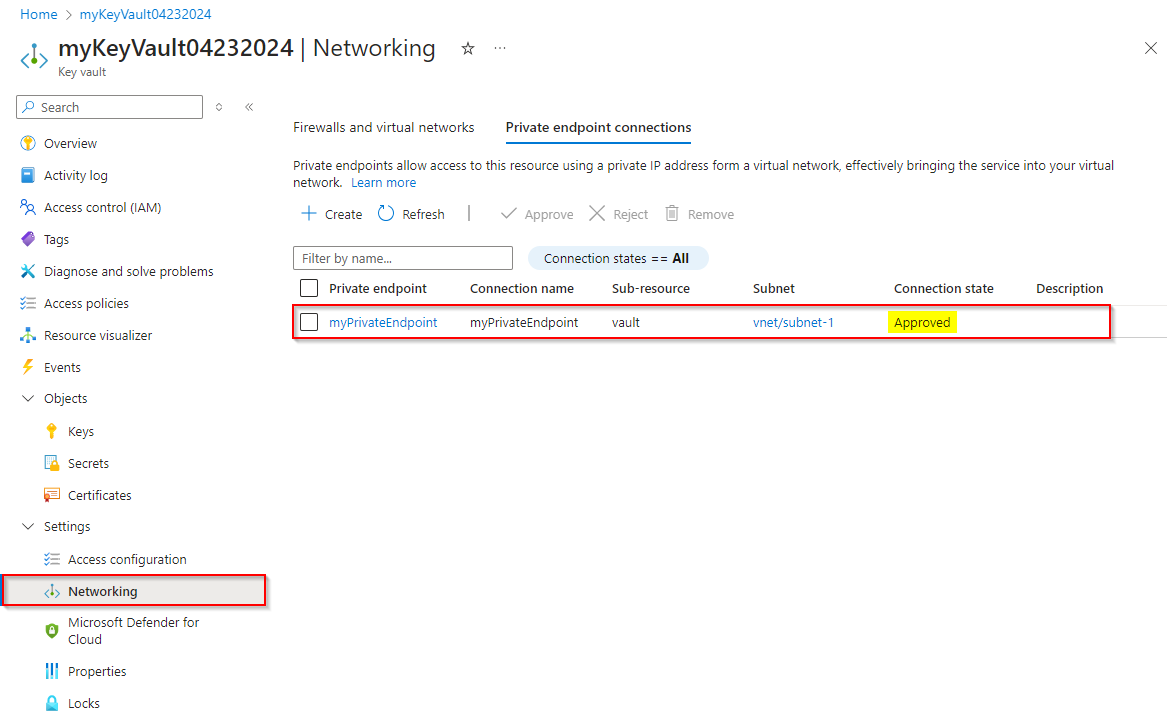
After your resource is deployed, go to your key vault and select Settings > Networking > Private endpoint connections. Your private endpoint should be listed with Connection state as Approved. If you link to an Azure resource in a different directory, you need to wait for the resource owner to approve your connection request.
Step 2: Allow your virtual network
With the private endpoint configured, allow the virtual network that hosts your self-hosted agent in the key vault firewall settings.
Go to the Azure portal, and then find your Azure key vault.
Select Settings > Networking, and make sure that you're on the Firewalls and virtual networks tab.
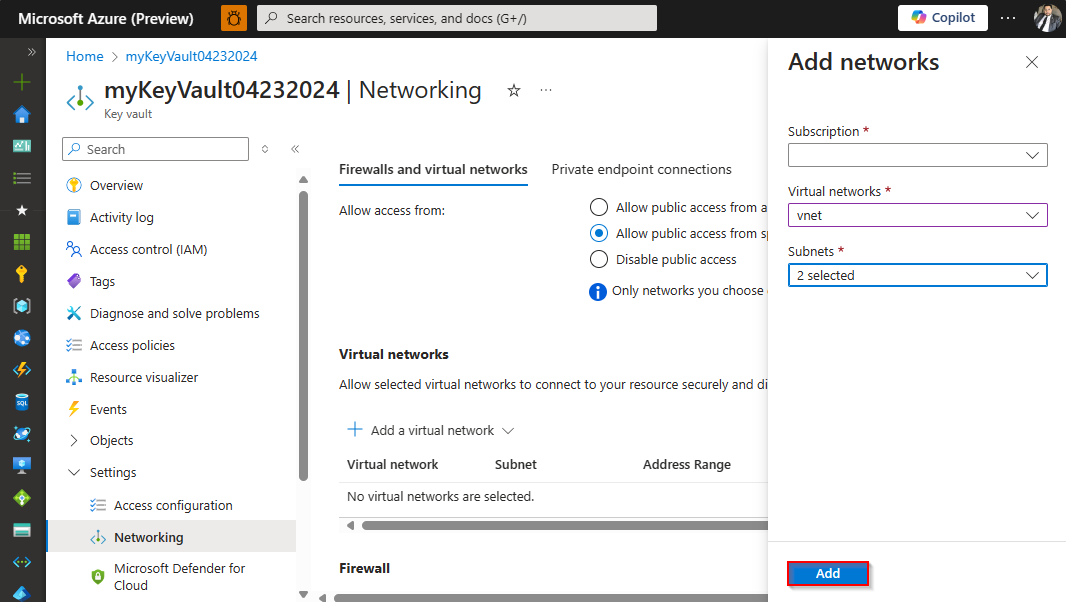
Select Add a virtual network > Add existing virtual networks.
Select your subscription from the dropdown menu, select the virtual network that you created earlier, and then select your subnets.
Select Add, and then scroll to the bottom of the page and select Apply to save your changes.
Step 3: Query a private key vault from a self-hosted agent
With the virtual network allowed, use the following pipeline to query the private key vault through the linked variable group from a self-hosted agent:
pool: Self-hosted-pool

variables:
  group: mySecret-VG

steps:
- task: CmdLine@2
  inputs:
    script: 'echo $(mySecret) > secret.txt'

- task: CopyFiles@2
  inputs:
    Contents: secret.txt
    targetFolder: '$(Build.ArtifactStagingDirectory)'

- task: PublishBuildArtifacts@1
  inputs:
    PathtoPublish: '$(Build.ArtifactStagingDirectory)'
    ArtifactName: 'drop'
    publishLocation: 'Container'
If you don't want to grant Azure DevOps inbound access to your private key vault, use the AzureKeyVault task to query the key vault directly. In this case, make sure the virtual network that hosts your self-hosted agent is allowed in the key vault firewall settings.
pool: Self-hosted-pool

steps:
- task: AzureKeyVault@2
  inputs:
    azureSubscription: '$(SERVICE_CONNECTION_NAME)'
    keyVaultName: $(KEY_VAULT_NAME)
    SecretsFilter: '*'

- task: CmdLine@2
  inputs:
    script: 'echo $(mySecret) > secret.txt'

- task: CopyFiles@2
  inputs:
    Contents: secret.txt
    targetFolder: '$(Build.ArtifactStagingDirectory)'

- task: PublishBuildArtifacts@1
  inputs:
    PathtoPublish: '$(Build.ArtifactStagingDirectory)'
    ArtifactName: 'drop'
    publishLocation: 'Container'
Troubleshoot
Use the following guidance to troubleshoot common key vault access errors:
Public network access is disabled and request is not from a trusted service nor via an approved private link.This error indicates that public access is disabled, but neither a private endpoint nor the required firewall exceptions are configured. Follow the steps under Configure inbound access from a self-hosted agent or Configure inbound access from Azure DevOps based on your scenario to set up access to your private key vault.
Request was not allowed by NSP rules and the client address is not authorized and caller was ignored because bypass is set to None Client address: <x.x.x.x>This error indicates that public access is disabled, Allow trusted Microsoft services to bypass this firewall isn't enabled, and the client IP isn't in the key vault firewall allow list. In the Azure portal, go to your key vault, select Settings > Networking, and add the client IP to the firewall allow list.
Error: Client address is not authorized and caller is not a trusted service.Make sure your geography's IPv4 ranges are added to the key vault allow list. For details, see Configure inbound access from Azure DevOps.
Alternatively, see Dynamically allow Microsoft-hosted agent IP to add the client IP to the key vault firewall at runtime.