Configure rules
Rules in IoT Central serve as a customizable response tool that trigger on actively monitored events from connected devices. The following sections describe how rules are evaluated. You can define one or more actions that happen when a rule triggers, this article describes email, webhook, and Azure Monitor action groups. To learn about other action types, see Use workflows to integrate your Azure IoT Central application with other cloud services.
Select target devices
Use the target devices section to select on what kind of devices this rule applies to. Filters allow you to further refine what devices should be included. The filters use properties on the device template to filter down the set of devices. Filters themselves don't trigger an action. In the following screenshot, the rule targets Refrigerator devices. The filter states that the rule should only include Refrigerators where the Manufactured State property equals Washington.

Use multiple conditions
Conditions determine which devices the rule triggers on. You can add multiple conditions to a rule and specify if the rule should trigger when all the conditions are true or any of the conditions are true.
In the following screenshot, the conditions check when the temperature is greater than 70° F and the humidity is less than 10%. When any of these statements are true, the rule evaluates to true and triggers an action.

Note
Currently only telemetry conditions are supported.
Use a cloud property in a value field
You can reference a cloud property from the device template in the Value field for a condition. The cloud property and telemetry value must have similar types. For example, if Temperature is a double, then only cloud properties of type double show as options in the Value drop-down.
If you choose an event type telemetry value, the Value drop-down includes the option Any. The Any option means the rule fires when your application receives an event of that type, whatever the payload.
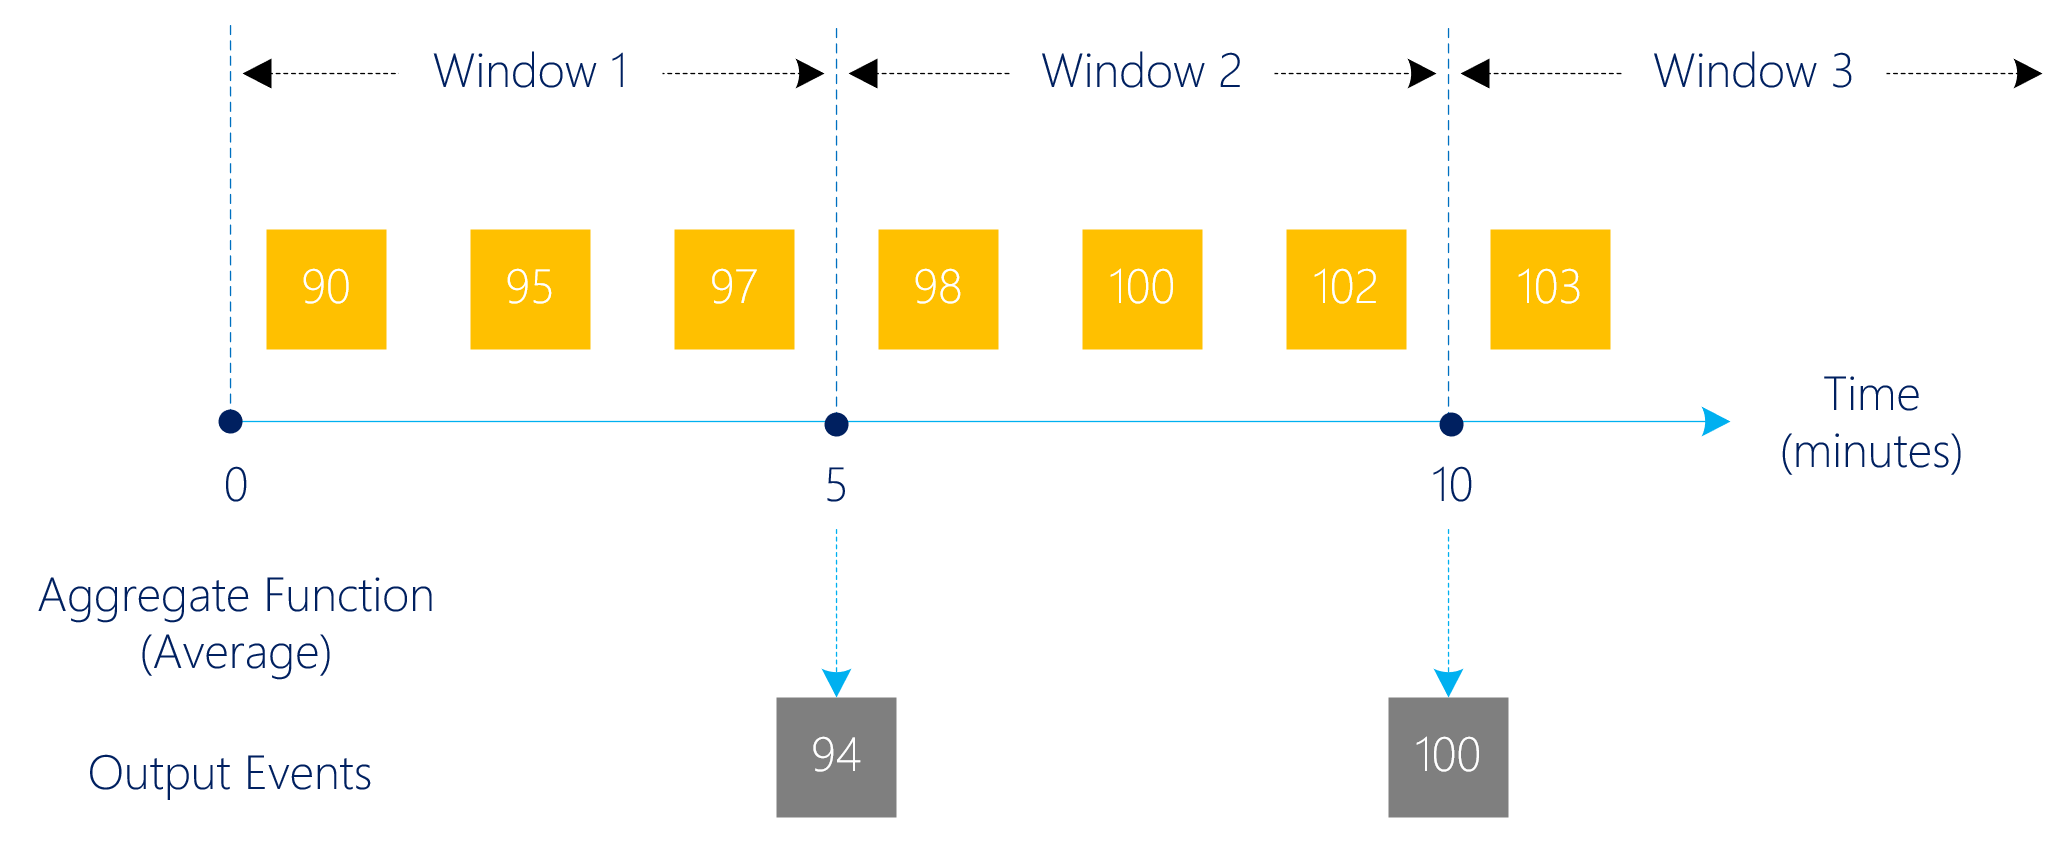
Use aggregate windowing
You can specify a time aggregation to trigger your rule based on a time window. Rule conditions evaluate aggregate time windows on telemetry data as tumbling windows. If there are any property filters in the rule, they're applied at the end of the time window. In the following screenshot, the time window is five minutes. Every five minutes, the rule evaluates on the last five minutes of telemetry data. The data is only evaluated once in the window to which it corresponds.
Create an email action
When you create an email action, the email address must be a user ID in the application, and the user must have signed in to the application at least once. You can also specify a note to include in the email. IoT Central shows an example of what the email looks like when the rule triggers:

Create a webhook action
Webhooks let you connect your IoT Central app to other applications and services for remote monitoring and notifications. Webhooks automatically notify other applications and services you connect whenever a rule is triggered in your IoT Central app. Your IoT Central app sends a POST request to the other application's HTTP endpoint whenever a rule triggers. The payload contains device details and rule trigger details.
In this example, you connect to RequestBin to test the notification:
Navigate to RequestBin.
Select Create a RequestBin.
Sign in with one of the available methods.
Copy the URL of your RequestBin endpoint.
Add an action to your rule:

Choose the webhook action, enter a display name, and paste the RequestBin URL as the Callback URL.
Save the rule.

Now when the rule triggers, you see a new request appear in RequestBin.
Payload
When a rule triggers, it makes an HTTP POST request to the callback URL. The request contains a JSON payload with the telemetry, device, rule, and application details. The payload looks like the following JSON snippet:
{
    "timestamp": "2020-04-06T00:20:15.06Z",
    "action": {
        "id": "<id>",
        "type": "WebhookAction",
        "rules": [
            "<rule_id>"
        ],
        "displayName": "Webhook 1",
        "url": "<callback_url>"
    },
    "application": {
        "id": "<application_id>",
        "displayName": "Contoso",
        "subdomain": "contoso",
        "host": "contoso.azureiotcentral.com"
    },
    "device": {
        "id": "<device_id>",
        "etag": "<etag>",
        "displayName": "Refrigerator Monitor - 1yl6vvhax6c",
        "instanceOf": "<device_template_id>",
        "simulated": true,
        "provisioned": true,
        "approved": true,
        "cloudProperties": {
            "City": {
                "value": "Seattle"
            }
        },
        "properties": {
            "deviceinfo": {
                "firmwareVersion": {
                    "value": "1.0.0"
                }
            }
        },
        "telemetry": {
            "<interface_instance_name>": {
                "humidity": {
                    "value": 47.33228889360127
                }
            }
        }
    },
    "rule": {
        "id": "<rule_id>",
        "displayName": "Humidity monitor"
    }
}
If the rule monitors aggregated telemetry over a period of time, the payload contains a telemetry section that looks like:
{
    "telemetry": {
        "<interface_instance_name>": {
            "Humidity": {
                "avg": 39.5
            }
        }
    }
}
Data format change notice
If you have one or more webhooks created and saved before 3 April 2020, delete the webhook and create a new one. Older webhooks use a deprecated payload format:
{
    "id": "<id>",
    "displayName": "Webhook 1",
    "timestamp": "2019-10-24T18:27:13.538Z",
    "rule": {
        "id": "<id>",
        "displayName": "High temp alert",
        "enabled": true
    },
    "device": {
        "id": "rm1",
        "displayName": "Refrigerator Monitor - rm1",
        "instanceOf": "<device-template-id>",
        "simulated": true,
        "provisioned": true,
        "approved": true
    },
    "data": [{
        "@id": "<id>",
        "@type": ["Telemetry"],
        "name": "temperature",
        "displayName": "Temperature",
        "value": 66.27310467496761,
        "interfaceInstanceName": "sensors"
    }],
    "application": {
        "id": "<id>",
        "displayName": "x - Store Analytics Checkout",
        "subdomain": "<subdomain>",
        "host": "<host>"
    }
}
Create an Azure Monitor group action
This section describes how to use Azure Monitor action groups to attach multiple actions to an IoT Central rule. You can attach an action group to multiple rules. An action group is a collection of notification preferences defined by the owner of an Azure subscription.
You can create and manage action groups in the Azure portal or with an Azure Resource Manager template.
An action group can:
- Send notifications such as an email, an SMS, or make a voice call.
- Run an action such as calling a webhook.
The following screenshot shows an action group that sends email and SMS notifications and calls a webhook:

To use an action group in an IoT Central rule, the action group must be in the same Azure subscription as the IoT Central application.
When you add an action to the rule in IoT Central, select Azure Monitor Action Groups.
Choose an action group from your Azure subscription:

Select Save. The action group now appears in the list of actions to run when the rule is triggered.
The following table summarizes the information sent to the supported action types:
| Action type | Output format |
|---|---|
| Standard IoT Central email template | |
| SMS | Azure IoT Central alert: ${applicationName} - "${ruleName}" triggered on "${deviceName}" at ${triggerDate} ${triggerTime} |
| Voice | Azure I.O.T Central alert: rule "${ruleName}" triggered on device "${deviceName}" at ${triggerDate} ${triggerTime}, in application ${applicationName} |
| Webhook | { "schemaId" : "AzureIoTCentralRuleWebhook", "data": {"regular webhook payload"}} |
The following text is an example SMS message from an action group:
iotcentral: Azure IoT Central alert: Contoso - "Low pressure alert" triggered on "Motion sensor 2" at March 20, 2019 10:12 UTC
Use rules with IoT Edge modules
A restriction applies to rules that are applied to IoT Edge modules. Rules on telemetry from different modules aren't evaluated as valid rules. Take the following example, the first condition of the rule is on a temperature telemetry from Module A. The second condition of the rule is on a humidity telemetry on Module B. Because the two conditions are from different modules, you have an invalid set of conditions. The rule isn't valid and throws an error when you try to save the rule.
Next steps
Now that you've learned how to configure a rule in your Azure IoT Central application, you can learn how to Configure advanced rules using Power Automate or Azure Logic Apps.