Note
Access to this page requires authorization. You can try signing in or changing directories.
Access to this page requires authorization. You can try changing directories.
When Azure Monitor data indicates that there might be a problem with your infrastructure or application, an alert is triggered. You can use an action group to send a notification such as a voice call, SMS, push, or email when the alert is triggered in addition to the alert itself. Action groups are a collection of notification preferences and actions. Azure Monitor, Azure Service Health, and Azure Advisor use action groups to notify users about the alert and take an action. This article shows you how to create and manage action groups.
Each action is made up of:
- Type: The sent notification or performed action. Examples include sending a voice call, SMS, or email. You can also trigger various types of automated actions.
- Name: A unique identifier within the action group.
- Details: The corresponding details that vary by type.
In general, an action group is a global service. Efforts to make them more available regionally are in development.
Global requests from clients can be processed by action group services in any region. If one region of the action group service is down, the traffic is automatically routed and processed in other regions. As a global service, an action group helps provide a disaster recovery solution. Regional requests rely on availability zone redundancy to meet privacy requirements and offer a similar disaster recovery solution.
- You can add up to five action groups to an alert rule.
- Action groups are executed concurrently, in no specific order.
- Multiple alert rules can use the same action group.
- Action Groups are defined by the unique set of actions and the users to be notified. For example, if you want to notify User1, User2 and User3 by email for two different alert rules, you only need to create one action group which you can apply to both alert rules.
Create an action group in the Azure portal
Go to the Azure portal.
Search for and select Monitor. The Monitor pane consolidates all your monitoring settings and data in one view.
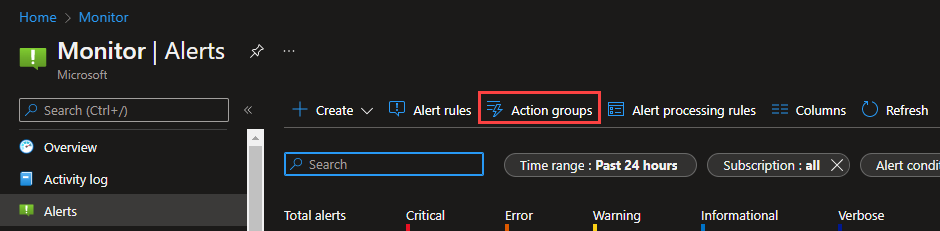
Select Alerts, and then select Action groups.
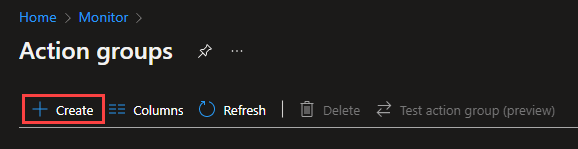
Select Create.
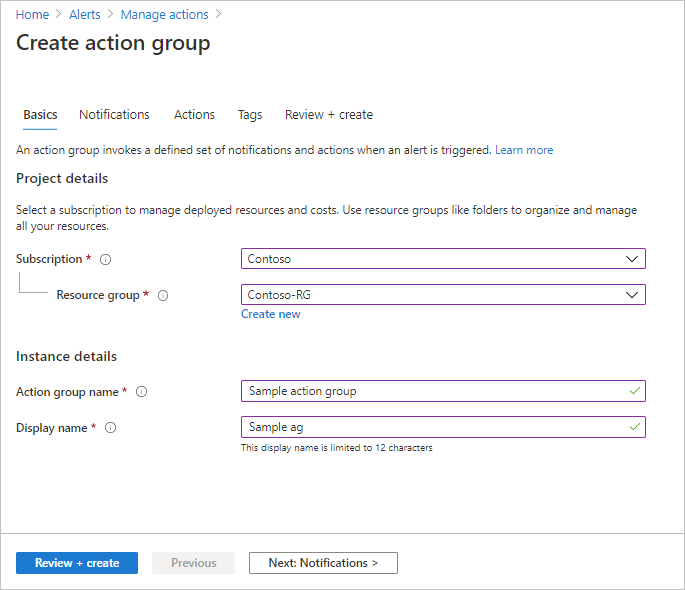
Configure basic action group settings. In the Project details section:
- Select values for Subscription and Resource group.
- Select the region.
Note
Service Health Alerts are only supported in public clouds within the global region. For Action Groups to properly function in response to a Service Health Alert, the region of the action group must be set as Global.
Option Behavior Global The action groups service decides where to store the action group. The action group is persisted in at least two regions to ensure regional resiliency. Processing of actions may be done in any geographic region.
Voice, SMS, and email actions performed as the result of service health alerts are resilient to Azure live-site incidents.Regional The action group is stored within the selected region. The action group is zone-redundant. Use this option if you want to ensure that the processing of your action group is performed within a specific geographic boundary.
You can select one of these regions for regional processing of action groups:
• East US
• West US
• East US2
• West US2
• South Central US
• North Central US
• Sweden Central
• Germany West Central
• India Central
• India South
We're continually adding more regions for regional data processing of action groups.The action group is saved in the subscription, region, and resource group that you select.
In the Instance details section, enter values for Action group name and Display name. The display name is used in place of a full action group name when the group is used to send notifications.
Configure notifications. Select Next: Notifications, or select the Notifications tab at the top of the page.
Define a list of notifications to send when an alert is triggered.
For each notification:
Select the Notification type, and then fill in the appropriate fields for that notification. The available options are:
Notification type Description Fields Email Azure Resource Manager role Send an email to the subscription members, based on their role.
See Email.Enter the primary email address configured for the Microsoft Entra user. See Email. Email Ensure that your email filtering and any malware/spam prevention services are configured appropriately.
Emails are sent from the following email addresses:
• azure-noreply@microsoft.com
• azureemail-noreply@microsoft.com
• alerts-noreply@mail.windowsazure.comEnter the email where the notification should be sent. SMS SMS notifications support bi-directional communication. The SMS contains the following information:
• Shortname of the action group this alert was sent to
• The title of the alert.
A user can respond to an SMS to:
• Unsubscribe from all SMS alerts for all action groups or a single action group.
• Resubscribe to alerts
• Request help.
For more information about supported SMS replies, see SMS replies.Enter the Country code and the Phone number for the SMS recipient. If you can't select your country/region code in the Azure portal, SMS isn't supported for your country/region. If your country/region code isn't available, you can vote to have your country/region added at Share your ideas. As a workaround until your country is supported, configure the action group to call a webhook to a third-party SMS provider that supports your country/region. Azure app push notifications Send notifications to the Azure mobile app. In the Azure account email field, enter the email address that you use as your account ID when you configure the Azure mobile app. Voice Voice notification. Enter the Country code and the Phone number for the recipient of the notification. If you can't select your country/region code in the Azure portal, voice notifications aren't supported for your country/region. If your country/region code isn't available, you can vote to have your country/region added at Share your ideas. As a workaround until your country is supported, configure the action group to call a webhook to a third-party voice call provider that supports your country/region. Select if you want to enable the Common alert schema. The common alert schema is a single extensible and unified alert payload that can be used across all the alert services in Azure Monitor. For more information about the common schema, see Common alert schema.
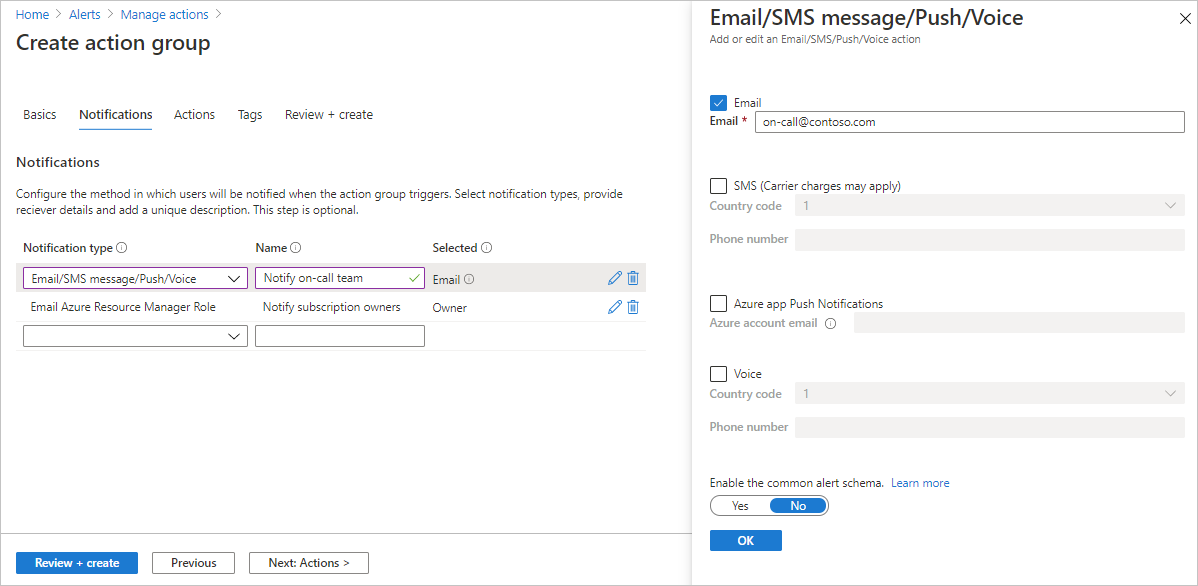
Select OK.
Configure actions. Select Next: Actions. or select the Actions tab at the top of the page.
Define a list of actions to trigger when an alert is triggered. Select an action type and enter a name for each action.
Action type Details Automation Runbook Use Automation Runbook to automate tasks based on metrics. For example, shut down resources when a certain threshold in the associated budget is met. For information about limits on Automation runbook payloads, see Automation limits. Event hubs An Event Hubs action publishes notifications to Event Hubs. It's the only action type that supports Azure Private Link and network security perimeter (NSP). For more information about Event Hubs, see Azure Event Hubs—A big data streaming platform and event ingestion service. You can subscribe to the alert notification stream from your event receiver. Functions Calls an existing HTTP trigger endpoint in functions. For more information, see Azure Functions.
When you define the function action, the function's HTTP trigger endpoint and access key are saved in the action definition, for example,https://azfunctionurl.azurewebsites.net/api/httptrigger?code=<access_key>. If you change the access key for the function, you must remove and re-create the function action in the action group.
Your endpoint must support the HTTP POST method.
The function must have access to the storage account. If it doesn't have access, keys aren't available and the function URI isn't accessible.
Learn about restoring access to the storage account.ITSM An ITSM action requires an ITSM connection. To learn how to create an ITSM connection, see ITSM integration. Logic apps You can use Azure Logic Apps to build and customize workflows for integration and to customize your alert notifications. Secure webhook When you use a secure webhook action, you must use Microsoft Entra ID to secure the connection between your action group and your endpoint, which is a protected web API. See Configure authentication for Secure webhook. Secure webhook doesn't support basic authentication. If you're using basic authentication, use the Webhook action. Webhook If you use the webhook action, your target webhook endpoint must be able to process the various JSON payloads that different alert sources emit.
You can't pass security certificates through a webhook action. To use basic authentication, you must pass your credentials through the URI.
If the webhook endpoint expects a specific schema, for example, the Microsoft Teams schema, use the Logic Apps action type to manipulate the alert schema to meet the target webhook's expectations.
For information about the rules used for retrying webhook actions, see Webhook.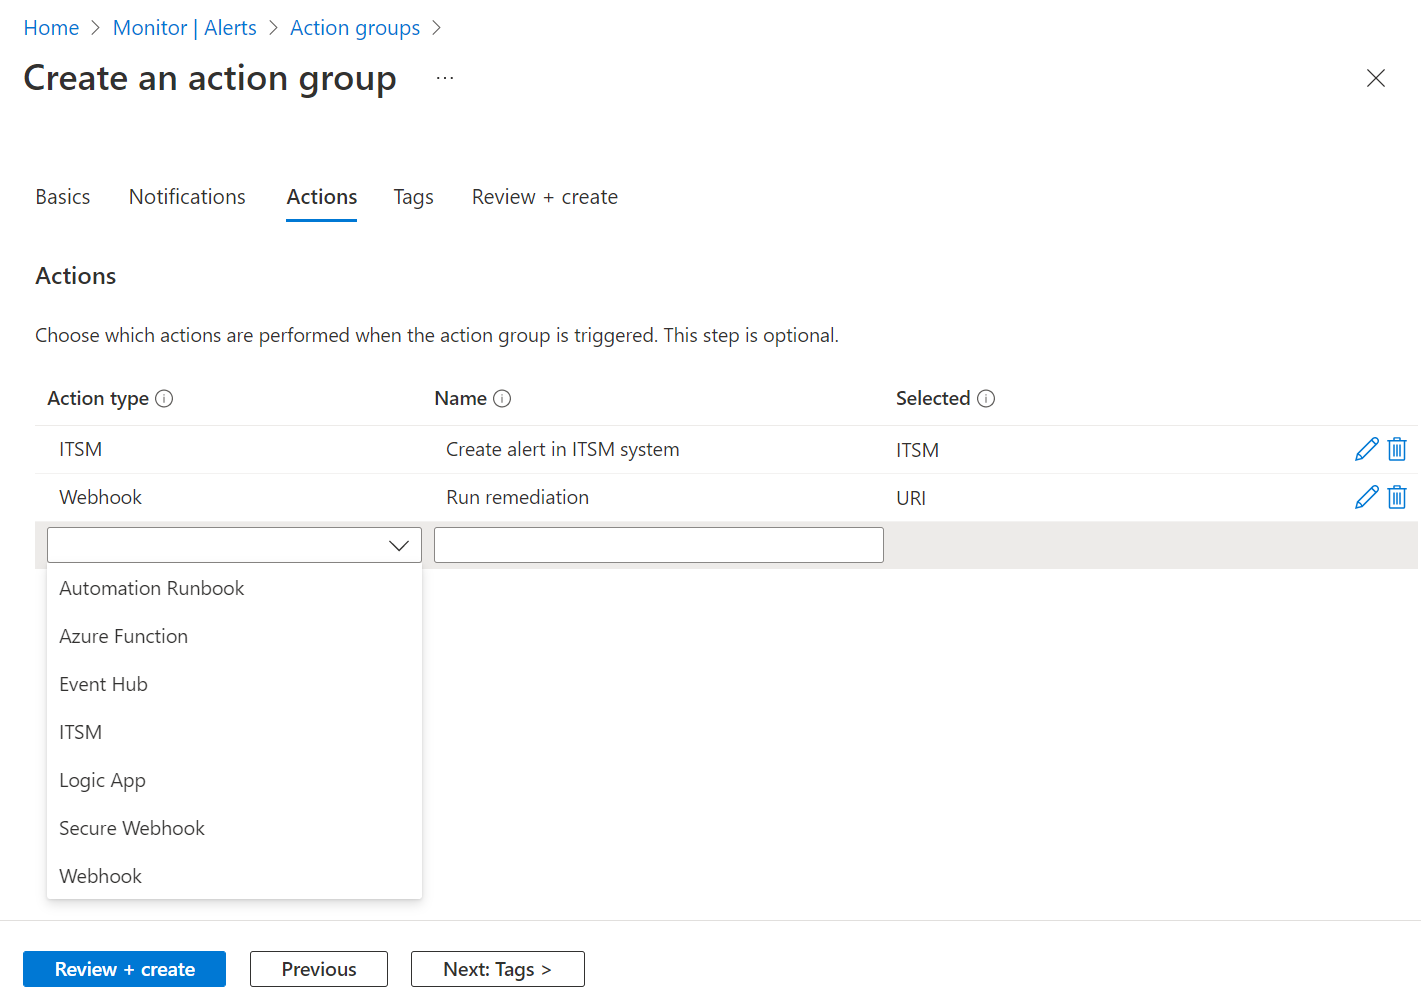
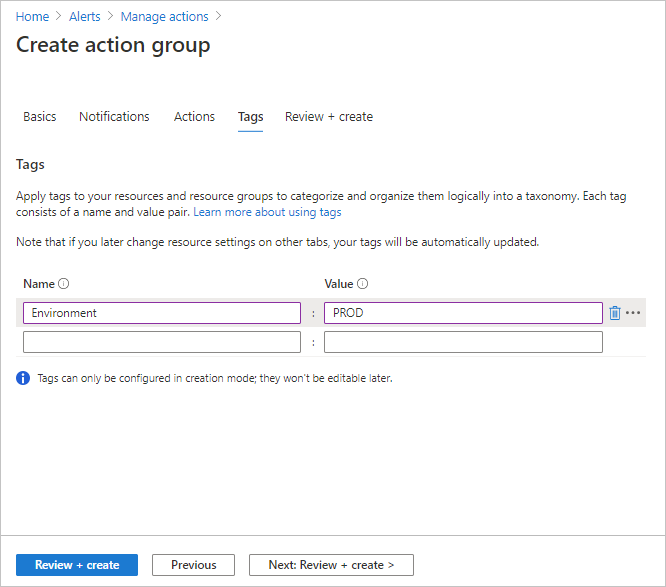
(Optional) If you'd like to assign a key-value pair to the action group to categorize your Azure resources, select Next: Tags or the Tags tab. Otherwise, skip this step.
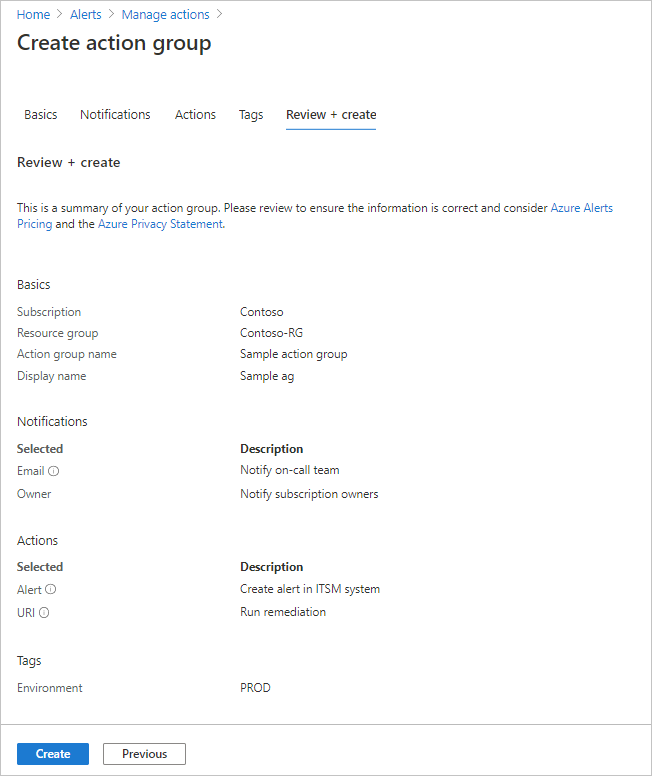
Select Review + create to review your settings. This step quickly checks your inputs to make sure you entered all required information. If there are issues, they're reported here. After reviewing the settings, select Create to create the action group.
Note
When you configure an action to notify a person by email or SMS, they receive a confirmation that indicates they were added to the action group.
Test an action group in the Azure portal
When you create or update an action group in the Azure portal, you can test the action group.
Create an action group in the Azure portal.
Note
The action group must be created and saved before testing. If you're editing an existing action group, save the changes to the action group before testing.
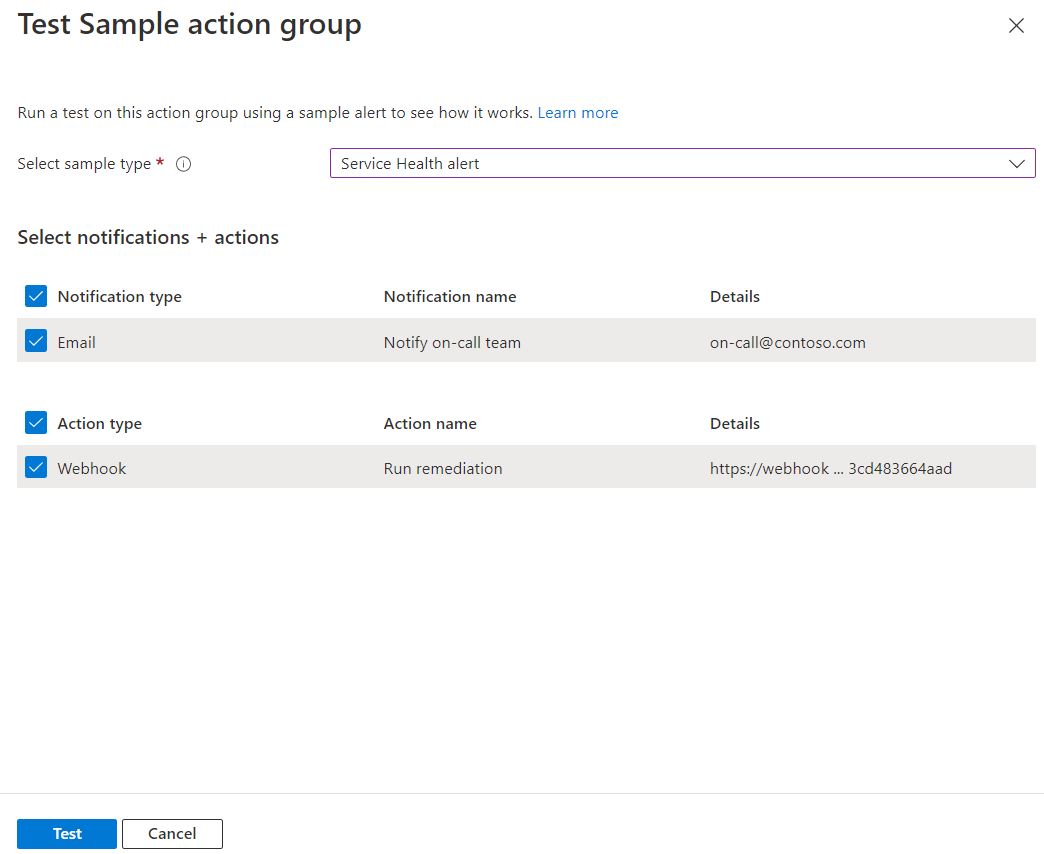
On the action group page, select Test.
Select a sample type and the notification and action types that you want to test. Then select Test.
If you close the window or select Back to test setup while the test is running, the test is stopped, and you don't get test results.
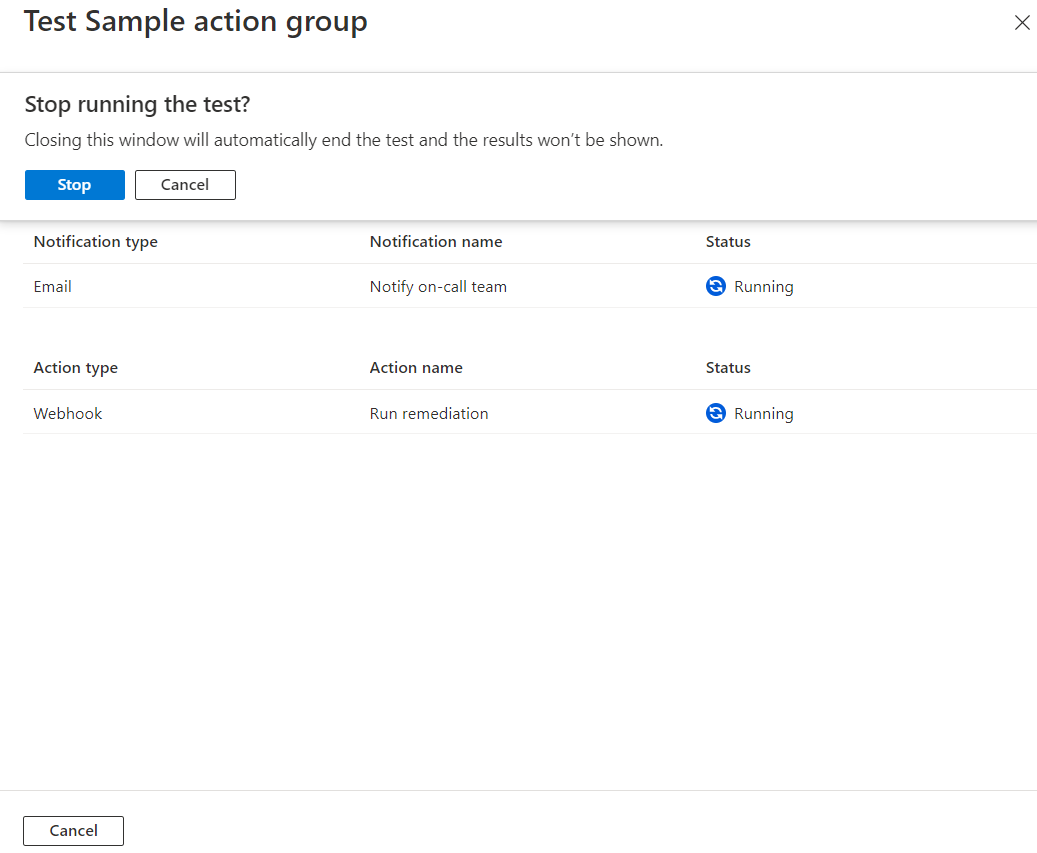
When the test is finished, a test status of either Success or Failed appears. If the test failed and you want to get more information, select View details.
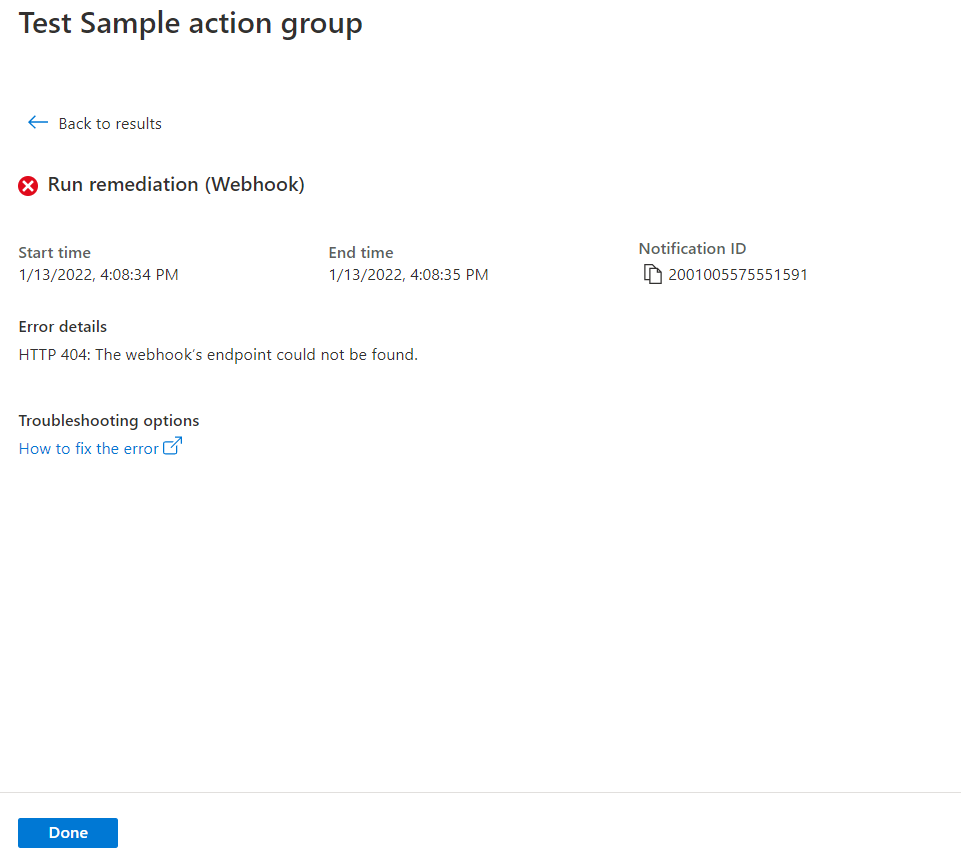
You can use the information in the Error details section to understand the issue. Then you can edit, save changes, and test the action group again.
When you run a test and select a notification type, you get a message with "Test" in the subject. The tests provide a way to check that your action group works as expected before you enable it in a production environment. All the details and links in test email notifications are from a sample reference set.
Role requirements for test action groups
The following table describes the role membership requirements that are needed for the test actions functionality:
| Role membership | Existing action group | Existing resource group and new action group | New resource group and new action group |
|---|---|---|---|
| Subscription contributor | Supported | Supported | Supported |
| Resource group contributor | Supported | Supported | Not applicable |
| Action group resource contributor | Supported | Not applicable | Not applicable |
| Azure Monitor contributor | Supported | Supported | Not applicable |
| Custom role 1 | Supported | Supported | Not applicable |
1 The custom role must have the Microsoft.Insights/ActionGroups/* permission added, which will also allow the user to update and delete the action group. To add restrictions so the user can only test the action group, add the following under the JSON tab for the custom role:
{
    "properties": {
        "roleName": "",
        "description": "",
        "assignableScopes": [
            "/subscriptions/{subscription-id}/resourceGroups/{resource-group-name}"
        ],
        "permissions": [
            {
                "actions": [
                    "Microsoft.Insights/ActionGroups/*"
                ],
                "notActions": [
                    "Microsoft.Insights/ActionGroups/write",
                    "Microsoft.Insights/ActionGroups/delete"
                ],
                "dataActions": [],
                "notDataActions": []
            }
        ]
    }
}
Note
You can run a limited number of tests per time period. To check which limits apply to your situation, see Azure Monitor service limits.
When you configure an action group in the portal, you can opt in or out of the common alert schema.
- To find common schema samples for all sample types, see Common alert schema definitions for Test Action Group.
- To find noncommon schema alert definitions, see Noncommon alert schema definitions for Test Action Group.
Create an action group with a Resource Manager template
You can use an Azure Resource Manager template to configure action groups. Using templates, you can automatically set up action groups that can be reused in certain types of alerts. These action groups ensure that all the correct parties are notified when an alert is triggered.
The basic steps are:
- Create a template as a JSON file that describes how to create the action group.
- Deploy the template by using any deployment method.
Action group Resource Manager templates
To create an action group by using a Resource Manager template, you create a resource of the type Microsoft.Insights/actionGroups. Then you fill in all related properties. Here are two sample templates that create an action group.
The first template describes how to create a Resource Manager template for an action group where the action definitions are hard-coded in the template. The second template describes how to create a template that takes the webhook configuration information as input parameters when the template is deployed.
{
  "$schema": "https://schema.management.azure.com/schemas/2019-04-01/deploymentTemplate.json#",
  "contentVersion": "1.0.0.0",
  "parameters": {
    "actionGroupName": {
      "type": "string",
      "metadata": {
        "description": "Unique name (within the Resource Group) for the Action group."
      }
    },
    "actionGroupShortName": {
      "type": "string",
      "metadata": {
        "description": "Short name (maximum 12 characters) for the Action group."
      }
    }
  },
  "resources": [
    {
      "type": "Microsoft.Insights/actionGroups",
      "apiVersion": "2021-09-01",
      "name": "[parameters('actionGroupName')]",
      "location": "Global",
      "properties": {
        "groupShortName": "[parameters('actionGroupShortName')]",
        "enabled": true,
        "smsReceivers": [
          {
            "name": "contosoSMS",
            "countryCode": "1",
            "phoneNumber": "5555551212"
          },
          {
            "name": "contosoSMS2",
            "countryCode": "1",
            "phoneNumber": "5555552121"
          }
        ],
        "emailReceivers": [
          {
            "name": "contosoEmail",
            "emailAddress": "devops@contoso.com",
            "useCommonAlertSchema": true

          },
          {
            "name": "contosoEmail2",
            "emailAddress": "devops2@contoso.com",
            "useCommonAlertSchema": true
          }
        ],
        "webhookReceivers": [
          {
            "name": "contosoHook",
            "serviceUri": "http://requestb.in/1bq62iu1",
            "useCommonAlertSchema": true
          },
          {
            "name": "contosoHook2",
            "serviceUri": "http://requestb.in/1bq62iu2",
            "useCommonAlertSchema": true
          }
        ],
         "SecurewebhookReceivers": [
          {
            "name": "contososecureHook",
            "serviceUri": "http://requestb.in/1bq63iu1",
            "useCommonAlertSchema": false
          },
          {
            "name": "contososecureHook2",
            "serviceUri": "http://requestb.in/1bq63iu2",
            "useCommonAlertSchema": false
          }
        ],
        "eventHubReceivers": [
          {
            "name": "contosoeventhub1",
            "subscriptionId": "replace with subscription id GUID",
            "eventHubNameSpace": "contosoeventHubNameSpace",
            "eventHubName": "contosoeventHub",
            "useCommonAlertSchema": true
          }
        ]
      }
    }
  ],
  "outputs":{
      "actionGroupId":{
          "type":"string",
          "value":"[resourceId('Microsoft.Insights/actionGroups',parameters('actionGroupName'))]"
      }
  }
}
{
  "$schema": "https://schema.management.azure.com/schemas/2019-04-01/deploymentTemplate.json#",
  "contentVersion": "1.0.0.0",
  "parameters": {
    "actionGroupName": {
      "type": "string",
      "metadata": {
        "description": "Unique name (within the Resource Group) for the Action group."
      }
    },
    "actionGroupShortName": {
      "type": "string",
      "metadata": {
        "description": "Short name (maximum 12 characters) for the Action group."
      }
    },
    "webhookReceiverName": {
      "type": "string",
      "metadata": {
        "description": "Webhook receiver service Name."
      }
    },
    "webhookServiceUri": {
      "type": "string",
      "metadata": {
        "description": "Webhook receiver service URI."
      }
    }
  },
  "resources": [
    {
      "type": "Microsoft.Insights/actionGroups",
      "apiVersion": "2021-09-01",
      "name": "[parameters('actionGroupName')]",
      "location": "Global",
      "properties": {
        "groupShortName": "[parameters('actionGroupShortName')]",
        "enabled": true,
        "smsReceivers": [
        ],
        "emailReceivers": [
        ],
        "webhookReceivers": [
          {
            "name": "[parameters('webhookReceiverName')]",
            "serviceUri": "[parameters('webhookServiceUri')]",
            "useCommonAlertSchema": true
          }
        ]
      }
    }
  ],
  "outputs":{
      "actionGroupResourceId":{
          "type":"string",
          "value":"[resourceId('Microsoft.Insights/actionGroups',parameters('actionGroupName'))]"
      }
  }
}
Manage action groups
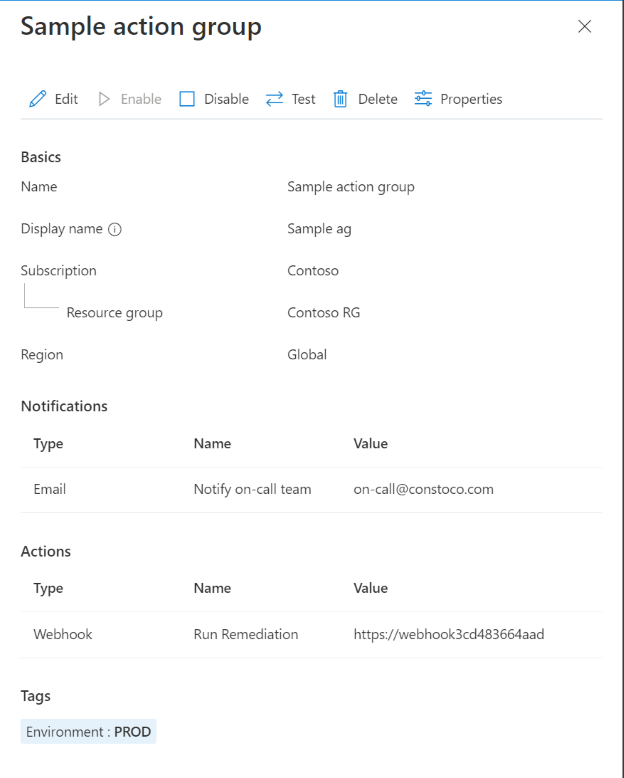
After you create an action group, you can view it in the portal:
Go to the Azure portal.
From the Monitor page, select Alerts.
Select Action groups.
Select the action group that you want to manage. You can:
- Add, edit, or remove actions.
- Delete the action group.
Service limits for notifications
A phone number or email can be included in action groups in many subscriptions. Azure Monitor uses rate limiting to suspend notifications when too many notifications are sent to a particular phone number, email address, or device. Rate limiting ensures that alerts are manageable and actionable.
Rate limiting applies to SMS, voice, push, and email notifications. All other notification actions aren't rate limited. Rate limiting applies across all subscriptions. Rate limiting is applied as soon as the threshold is reached, even if messages are sent from multiple subscriptions. When an email address is rate limited, a notification is sent to communicate that rate limiting was applied and when the rate limiting expires.
For information about rate limits, see Azure Monitor service limits.
Email Azure Resource Manager
When you use Azure Resource Manager for email notifications, you can send email to the members of a subscription's role. Email is sent to Microsoft Entra ID user or group members of the role. This includes support for roles assigned through Azure Lighthouse.
Note
Action Groups only support emailing the following roles: Owner, Contributor, Reader, Monitoring Contributor, Monitoring Reader.
If your primary email doesn't receive notifications, configure the email address for the Email Azure Resource Manager role:
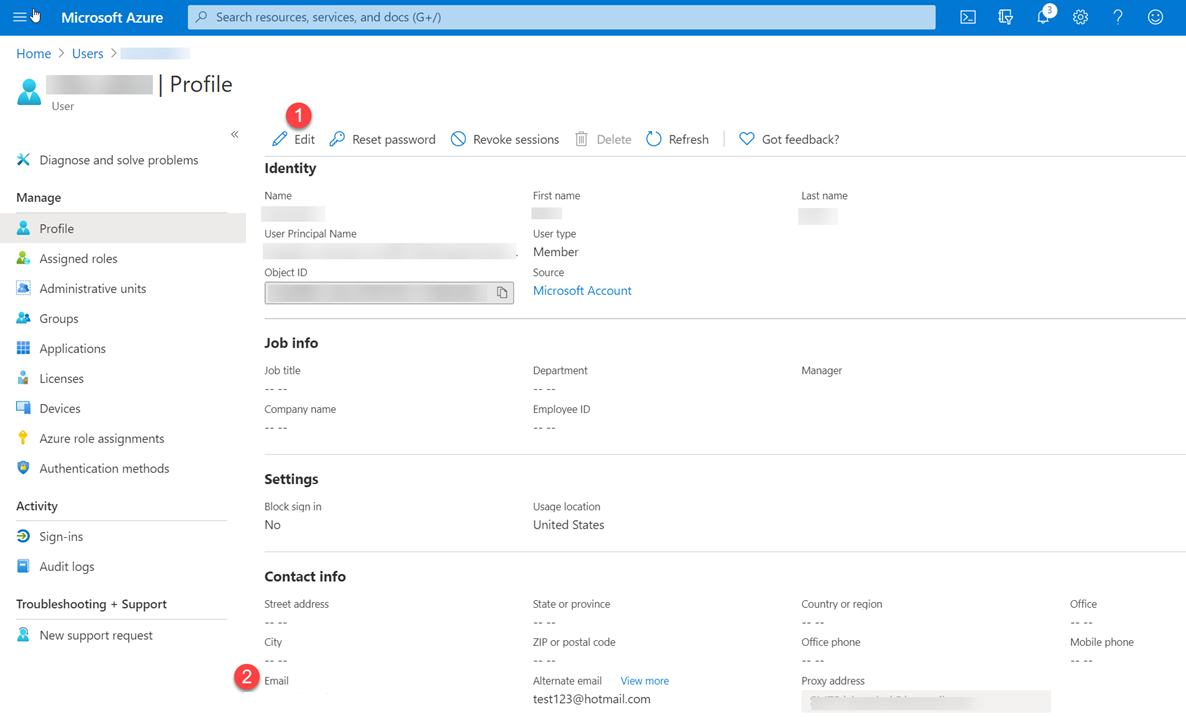
In the Azure portal, go to Microsoft Entra ID.
Select Users in the left-hand menu to show a list of all users.
Select the user whose primary email you want to review.
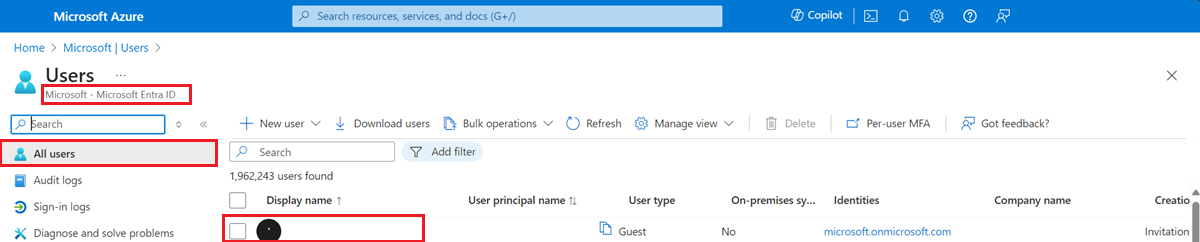
In the user profile under Properties, look at Contact info for an Email value. If it's blank:
- At the top of the page, select Edit properties.
- Enter an email address.
- At the top of the page, select Save.
You may have a limited number of email actions per action group. To check which limits apply to your situation, see Azure Monitor service limits.
When you set up the Resource Manager role:
- Assign an entity of type User or Group to the role.
- Make the assignment at the subscription level.
- Make sure an email address is configured for the user in their Microsoft Entra profile.
Note
It can take up to 24 hours for a customer to start receiving notifications after they add a new Azure Resource Manager role to their subscription.
SMS
You might have a limited number of SMS actions per action group.
- For information about rate limits, see Azure Monitor service limits.
- For important information about using SMS notifications in action groups, see the table under step 9 in Create an action group in the Azure portal.
Note
If you can't select your country/region code in the Azure portal, SMS isn't supported for your country/region. If your country/region code isn't available, you can vote to have your country/region added at Share your ideas. In the meantime, as a workaround, configure your action group to call a webhook to a third-party SMS provider that offers support in your country/region.
SMS replies
These replies are supported for SMS notifications. The recipient of the SMS can reply to the SMS with these values:
| REPLY | Description |
|---|---|
DISABLE <Action Group Short name> |
Disables further SMS from the Action Group |
ENABLE <Action Group Short name> |
Re-enables SMS from the Action Group |
| STOP | Disables further SMS from all Action Groups |
| START | Re-enables SMS from all Action Groups |
| HELP | A response is sent to the user with a link to this article. |
Note
If a user unsubscribed from SMS alerts and is then added to a new action group, they receive SMS alerts for that new action group, but remain unsubscribed from all previous action groups.
You might have a limited number of Azure app actions per action group.
Countries/Regions with SMS notification support
| Country code | Country |
|---|---|
| 61 | Australia |
| 43 | Austria |
| 32 | Belgium |
| 55 | Brazil |
| 1 | Canada |
| 56 | Chile |
| 86 | China |
| 420 | Czech Republic |
| 45 | Denmark |
| 372 | Estonia |
| 358 | Finland |
| 33 | France |
| 49 | Germany |
| 852 | Hong Kong Special Administrative Region |
| 91 | India |
| 353 | Ireland |
| 972 | Israel |
| 39 | Italy |
| 81 | Japan |
| 352 | Luxembourg |
| 60 | Malaysia |
| 52 | Mexico |
| 31 | Netherlands |
| 64 | New Zealand |
| 47 | Norway |
| 351 | Portugal |
| 1 | Puerto Rico |
| 40 | Romania |
| 7 | Russia |
| 65 | Singapore |
| 27 | South Africa |
| 82 | South Korea |
| 34 | Spain |
| 41 | Switzerland |
| 886 | Taiwan |
| 971 | UAE |
| 44 | United Kingdom |
| 1 | United States |
Voice
You might have a limited number of voice actions per action group. For important information about rate limits, see Azure Monitor service limits.
Note
If you can't select your country/region code in the Azure portal, voice calls aren't supported for your country/region. If your country/region code isn't available, you can vote to have your country/region added at Share your ideas. In the meantime, as a workaround, configure your action group to call a webhook to a third-party voice call provider that offers support in your country/region. If a country is marked with an asterisk (*), calls come from a USA based phone number.
Countries/Regions with Voice notification support
| Country code | Country |
|---|---|
| 61 | Australia |
| 43 | Austria |
| 32 | Belgium |
| 55 | Brazil |
| 1 | Canada |
| 56 | Chile |
| 86 | China* |
| 420 | Czech Republic |
| 45 | Denmark |
| 372 | Estonia |
| 358 | Finland |
| 33 | France |
| 49 | Germany |
| 852 | Hong Kong* |
| 91 | India* |
| 353 | Ireland |
| 972 | Israel |
| 39 | Italy* |
| 81 | Japan* |
| 352 | Luxembourg |
| 60 | Malaysia |
| 52 | Mexico |
| 31 | Netherlands |
| 64 | New Zealand |
| 47 | Norway |
| 351 | Portugal |
| 40 | Romania* |
| 7 | Russia* |
| 65 | Singapore |
| 27 | South Africa |
| 82 | South Korea |
| 34 | Spain |
| 46 | Sweeden |
| 41 | Switzerland |
| 886 | Taiwan* |
| 971 | United Arab Emirates* |
| 44 | United Kingdom |
| 1 | United States |
For information about pricing for supported countries/regions, see Azure Monitor pricing.
Webhook
Note
If you use the webhook action, your target webhook endpoint must be able to process the various JSON payloads that different alert sources emit. The webhook endpoint must also be publicly accessible. You can't pass security certificates through a webhook action. To use basic authentication, you must pass your credentials through the URI. If the webhook endpoint expects a specific schema, for example, the Microsoft Teams schema, use the Logic Apps action to transform the alert schema to meet the target webhook's expectations.
Webhook action groups generally follow these rules when called:
When a webhook is invoked, if the first call fails, it's retried at least 1 more time, and up to 5 times (5 retries) at various delay intervals (5, 20, 40 seconds).
Attempts Delay Between 1st and 2nd 5 seconds Between 2nd and 3rd 20 seconds Between 3rd and 4th 5 seconds Between 4th and 5th 40 seconds Between 5th and 6th 5 seconds After retries attempted to call the webhook fail, no action group calls the endpoint for 15 minutes.
The retry logic assumes that the call can be retried. The status codes 408, 429, 503, 504, or HttpRequestException, WebException,
TaskCancellationExceptionallow for the call to be retried.
Configure authentication for Secure webhook
The secure webhook action authenticates to the protected API by using a Service Principal instance in the Microsoft Entra tenant of the "AZNS AAD Webhook" Microsoft Entra application. To make the action group work, this Microsoft Entra Webhook Service Principal must be added as a member of a role on the target Microsoft Entra application that grants access to the target endpoint.
For an overview of Microsoft Entra applications and service principals, see Microsoft identity platform (v2.0) overview. Follow these steps to take advantage of the secure webhook functionality.
Note
Basic authentication isn't supported for SecureWebhook. To use basic authentication, you must use Webhook.
If you use the webhook action, your target webhook endpoint must be able to process the various JSON payloads that different alert sources emit. If the webhook endpoint expects a specific schema, for example, the Microsoft Teams schema, use the Logic Apps action to transform the alert schema to meet the target webhook's expectations.
Note
Azure AD and MSOnline PowerShell modules are deprecated as of March 30, 2024. To learn more, read the deprecation update. After this date, support for these modules are limited to migration assistance to Microsoft Graph PowerShell SDK and security fixes. The deprecated modules will continue to function through March, 30 2025.
We recommend migrating to Microsoft Graph PowerShell to interact with Microsoft Entra ID (formerly Azure AD). For common migration questions, refer to the Migration FAQ. Note: Versions 1.0.x of MSOnline may experience disruption after June 30, 2024.
Create a Microsoft Entra application for your protected web API. For more information, see Protected web API: App registration. Configure your protected API to be called by a daemon app and expose application permissions, not delegated permissions.
Note
Configure your protected web API to accept V2.0 access tokens. For more information about this setting, see Microsoft Entra app manifest.
To enable the action group to use your Microsoft Entra application, use the PowerShell script that follows this procedure.
Note
You must be assigned the Microsoft Entra Application Administrator role to run this script.
The service principal must be assigned an owner role of the Microsoft Entra application to be able to create, modify, or test the secure webhook action in the action group.
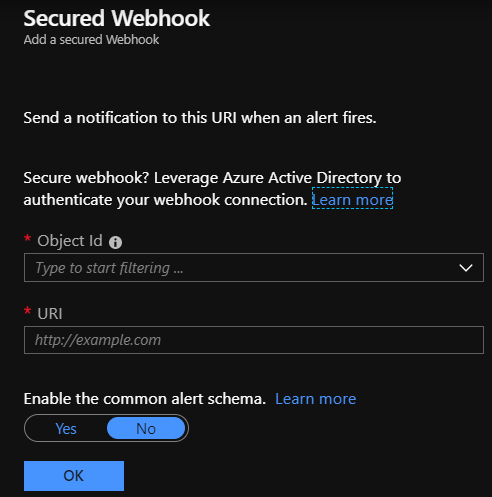
Configure the secure webhook action.
- Copy the
$myApp.ObjectIdvalue that's in the script. - In the webhook action definition, in the Object Id box, enter the value that you copied.
- Copy the
Secure webhook PowerShell script
Note
Prerequisites: Install the Microsoft Graph PowerShell SDK
How to run
- Copy and paste the following script to your machine.
- Replace your
tenantIdand theObjectIDin your App Registration. - Save as *.ps1
- Open the PowerShell command from your machine and run the *.ps1 script.
Write-Host "================================================================================================="
$scopes = "Application.ReadWrite.All"
$myTenantId = "<<Customer's tenant id>>"
$myMicrosoftEntraAppRegistrationObjectId = "<<Customer's object id from the app registration>>"
$actionGroupRoleName = "ActionGroupsSecureWebhook"
$azureMonitorActionGroupsAppId = "461e8683-5575-4561-ac7f-899cc907d62a" # Required. Do not change.

Connect-MgGraph -Scopes $scopes -TenantId $myTenantId

Function CreateAppRole([string] $Name, [string] $Description)
{
    $appRole = @{
        AllowedMemberTypes = @("Application")
        DisplayName = $Name
        Id = New-Guid
        IsEnabled = $true
        Description = $Description
        Value = $Name
    }
    return $appRole
}

$myApp = Get-MgApplication -ApplicationId $myMicrosoftEntraAppRegistrationObjectId
$myAppRoles = $myApp.AppRoles
$myActionGroupServicePrincipal = Get-MgServicePrincipal -Filter "appId eq '$azureMonitorActionGroupsAppId'"

Write-Host "App Roles before addition of new role.."
foreach ($role in $myAppRoles) { Write-Host $role.Value }

if ($myAppRoles.Value -contains $actionGroupRoleName)
{
    Write-Host "The Action Group role is already defined. No need to redefine.`n"
    # Retrieve the application again to get the updated roles
    $myApp = Get-MgApplication -ApplicationId $myMicrosoftEntraAppRegistrationObjectId
    $myAppRoles = $myApp.AppRoles
}
else
{
    Write-Host "The Action Group role is not defined. Defining the role and adding it."
    $newRole = CreateAppRole -Name $actionGroupRoleName -Description "This is a role for Action Group to join"
    $myAppRoles += $newRole
    Update-MgApplication -ApplicationId $myApp.Id -AppRole $myAppRoles

    # Retrieve the application again to get the updated roles
    $myApp = Get-MgApplication -ApplicationId $myMicrosoftEntraAppRegistrationObjectId
    $myAppRoles = $myApp.AppRoles
}

$myServicePrincipal = Get-MgServicePrincipal -Filter "appId eq '$($myApp.AppId)'"

if ($myActionGroupServicePrincipal.DisplayName -contains "AzNS AAD Webhook")
{
    Write-Host "The Service principal is already defined.`n"
    Write-Host "The action group Service Principal is: " + $myActionGroupServicePrincipal.DisplayName + " and the id is: " + $myActionGroupServicePrincipal.Id
}
else
{
    Write-Host "The Service principal has NOT been defined/created in the tenant.`n"
    $myActionGroupServicePrincipal = New-MgServicePrincipal -AppId $azureMonitorActionGroupsAppId
    Write-Host "The Service Principal is been created successfully, and the id is: " + $myActionGroupServicePrincipal.Id
}

# Check if $myActionGroupServicePrincipal is not $null before trying to access its Id property
# Check if the role assignment already exists
$existingRoleAssignment = Get-MgServicePrincipalAppRoleAssignment -ServicePrincipalId $myActionGroupServicePrincipal.Id | Where-Object { $_.AppRoleId -eq $myApp.AppRoles[0].Id -and $_.PrincipalId -eq $myActionGroupServicePrincipal.Id -and $_.ResourceId -eq $myServicePrincipal.Id }

# If the role assignment does not exist, create it
if ($null -eq $existingRoleAssignment) {
    Write-Host "Doing app role assignment to the new action group Service Principal`n"
    New-MgServicePrincipalAppRoleAssignment -ServicePrincipalId $myActionGroupServicePrincipal.Id -AppRoleId $myApp.AppRoles[0].Id -PrincipalId $myActionGroupServicePrincipal.Id -ResourceId $myServicePrincipal.Id
} else {
    Write-Host "Skip assigning because the role already existed."
}

Write-Host "myServicePrincipalId: " $myServicePrincipal.Id
Write-Host "My Azure AD Application (ObjectId): " $myApp.Id
Write-Host "My Azure AD Application's Roles"
foreach ($role in $myAppRoles) { Write-Host $role.Value }

Write-Host "================================================================================================="
Migrate Runbook action from "Run as account" to "Run as Managed Identity"
Note
Azure Automation Run as account was retired on 30 September 2023, which affects actions created with action type Automation Runbook. Existing actions linking to Run as account runbooks won't be supported after retirement. However, those runbooks would continue to execute until the expiry of "Run as" certificate of the Automation account.
To ensure you can continue using the runbook actions, you need to:
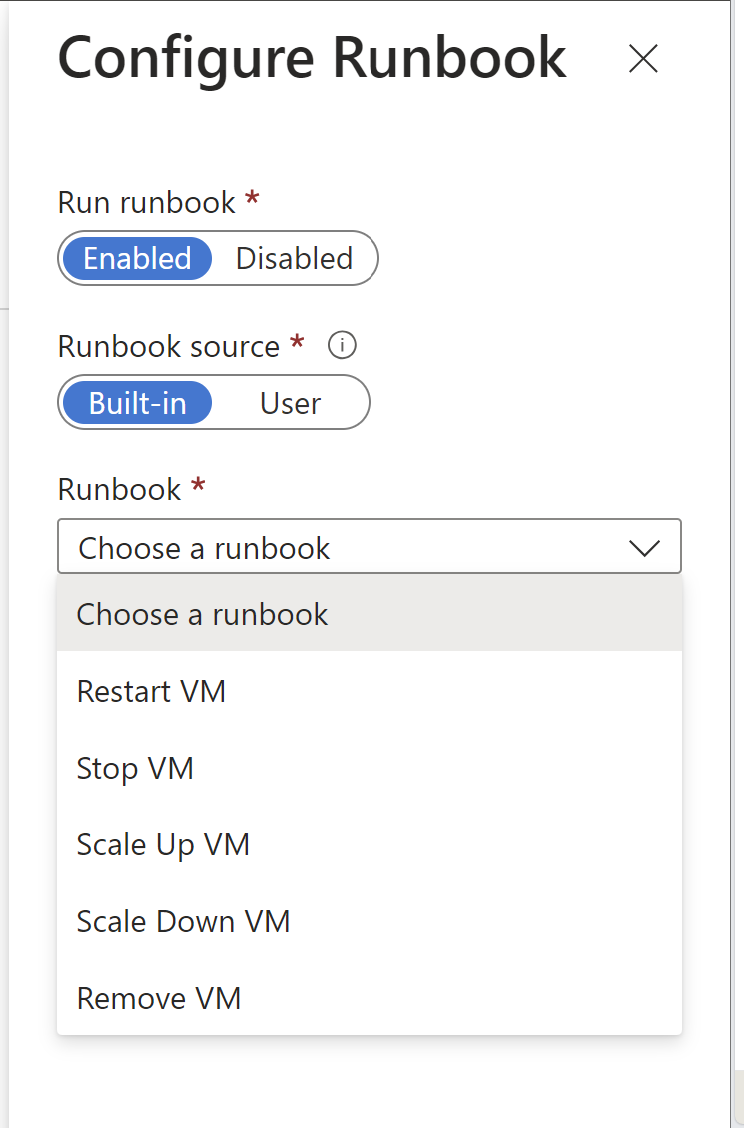
Edit the action group by adding a new action with action type "Automation Runbook" and choose the same runbook from the dropdown. (All 5 runbooks in the dropdown have been reconfigured at the backend to authenticate using Managed Identity instead of Run as account. System-assigned Managed Identity in Automation account would be enabled with VM Contributor role at the subscription level would be assigned automatically.)
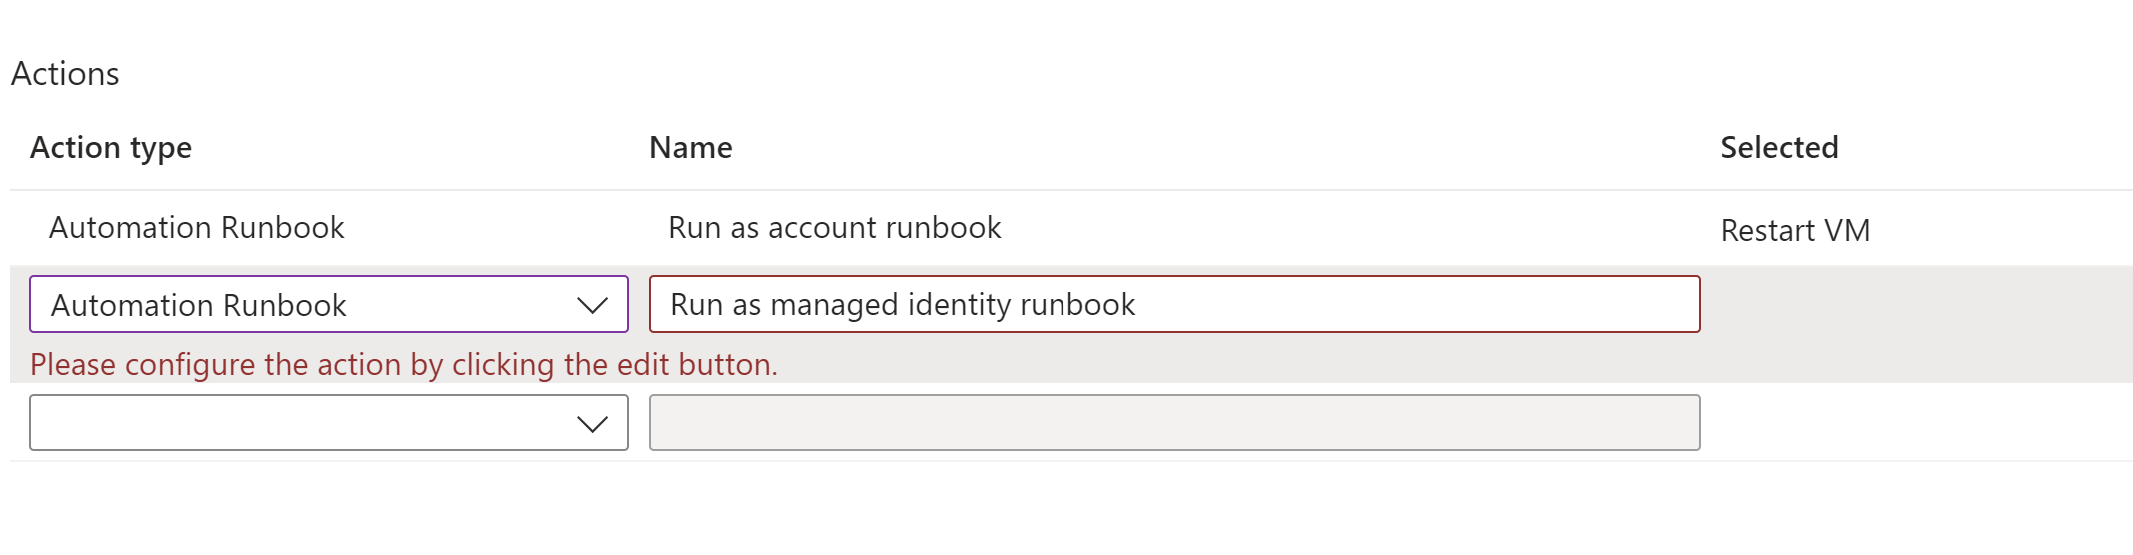
Delete old runbook action which links to a "Run as account" runbook.
Save the action group.
Next steps
- Get an overview of alerts and learn how to receive alerts.
- Learn more about the ITSM Connector.
- Learn about the activity log alert webhook schema.