Note
Access to this page requires authorization. You can try signing in or changing directories.
Access to this page requires authorization. You can try changing directories.
This article walks you through creating a Bookshelf resource, uploading documents, and indexing a knowledgebase.
A Bookshelf knowledgebase enables customers to convert unstructured private dataset in Azure blob storage into rich, summary-based index, enabling a graph-enabled retrieval-augmented generation (RAG) with rich citations. The knowledgebase can answer global queries that address the entire dataset, such as "what are the main themes in the data?", or "what are the most important implications for X?" The key components of the Bookshelf service are the Bookshelf resource and a Knowledgebase within each Bookshelf. A Knowledgebase contains a vector database and knowledge graph of your indexed artifacts. Discovery agents use knowledgebases as grounding skills for various use cases including answering questions, summarization, and reasoning.
Prerequisites
- An Azure account with an active subscription. Create an account for free.
- Access to the Azure Discovery resource provider (
Microsoft.Discovery) in your subscription. - Microsoft Discovery Platform Administrator role.
Resource quota requirements
A Bookshelf control plane resource is the top-level container that hosts a single knowledgebase data plane resource. Each Bookshelf gets a dedicated data plane endpoint for API operations on the knowledgebase. Before you create a Bookshelf resource, ensure that you have sufficient quota for the following Azure resources.
Knowledgebase indexing
Indexing builds the knowledge graph from your documents. It requires memory optimized compute, embedding model, and storage resources.
Azure Discovery workspace with a supercomputer node pool configured for indexing. Also, identify a discovery project resource for the indexing tool run on the supercomputer. Indexing is a memory-intensive operation. The following memory-optimized compute SKUs are recommended based on the size of your indexed data:
Index size Data size (text data) Recommended SKU vCPU Memory Small ~200 MB Standard_E20s_v6 20 160 GB Medium ~500 MB Standard_E64s_v6 64 512 GB Large ~1 GB Standard_E96s_v6 96 768 GB Azure OpenAI text-embedding-3-small deployment with a minimum quota of 200,000 TPM during Bookshelf creation. Before you start an indexing operation, increase your quota to 2,000,000 TPM. Higher embedding model quota speeds up the indexing operation. You can reduce the allocated quota after indexing completes.
Knowledgebase search
After you index a knowledgebase, it requires the following resources to serve search queries:
Azure AI Search Standard S1 tier with 2 replicas for availability zone support.
Azure SQL Database Hyperscale Standard-series (Gen5), 20 vCores with zone redundancy.
Zone-redundant Azure Container Apps environment. The following dedicated workload profiles are used depending on the indexed graph size:
Index size Data size (text data) Workload profile vCPU Memory Small ~200 MB E4 4 32 GiB Medium ~500 MB E8 8 64 GiB Large ~1 GB E16 16 128 GiB Azure OpenAI GPT-5.2 deployment with a minimum quota of 200,000 TPM during Bookshelf creation. For Knowledgebase search, a quota of 2,000,000 TPM is recommended.
Azure OpenAI GPT-5-mini deployment with a minimum quota of 200,000 TPM during Bookshelf creation. For Knowledgebase search, a quota of 10,000,000 TPM is recommended.
Step 1: Create a Bookshelf resource
The following steps show how to create a Bookshelf resource in the Azure portal.
Sign in with your Azure subscription in the Azure portal.
Select Create a resource and search for Microsoft Discovery Bookshelves. When you locate the service, select Create.
On the Create Bookshelf page, provide the following information for the fields on the Basics tab:
Field Description Subscription The Azure subscription to use for your Bookshelf resource. Resource group The Azure resource group to contain your Bookshelf. You can create a new group or use a preexisting group. Name A descriptive name for your Bookshelf resource, such as bkshlfleukemiaresearch. The name becomes part of the data plane endpoint URL ( https://<name>.bookshelf.discovery.azure.com).Region The location of your instance. Choose a region close to your data and users, such as UK South. 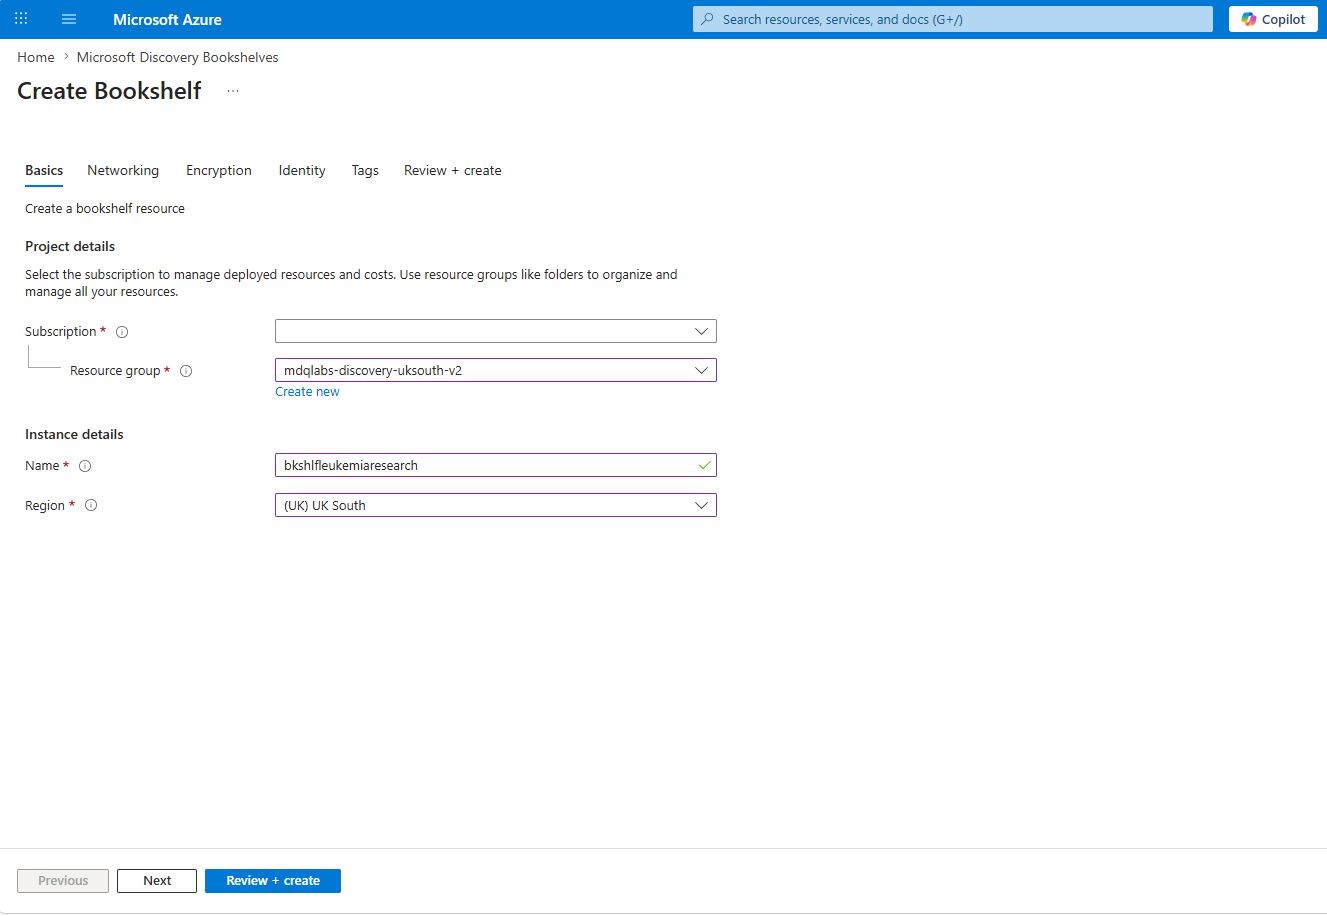
Select Next.
Configure network security
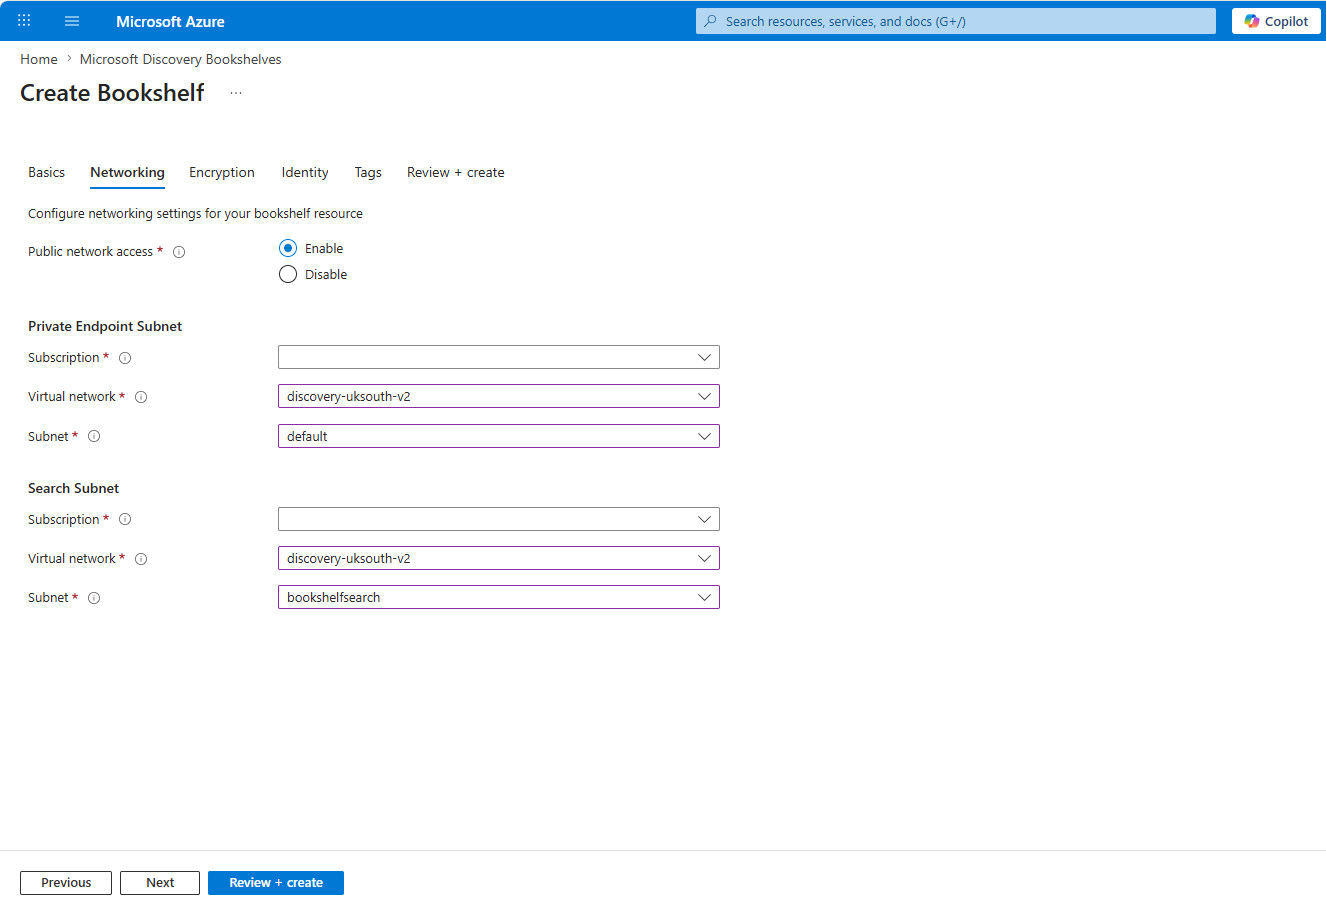
The Networking tab configures how the Bookshelf data plane endpoint is accessed and which subnets are used for private endpoints and search services.
| Field | Description |
|---|---|
| Public network access | Controls whether the data plane endpoint is accessible over the public internet |
The networking tab requires two subnet configurations:
- Private Endpoint Subnet — Used for private connectivity to the Bookshelf data plane. Select a virtual network and subnet (for example, discovery-uksouth-v2 / default).
- Search Subnet — Used by the managed AI Search service created in the Bookshelf's managed resource group. The search subnet must be different from the private endpoint subnet (for example, discovery-uksouth-v2 / bookshelfsearch).
Note
Provision a separate search subnet for each Bookshelf. You can't share search subnets across Bookshelf resources.
Select Next to continue to the Encryption tab.
Configure encryption
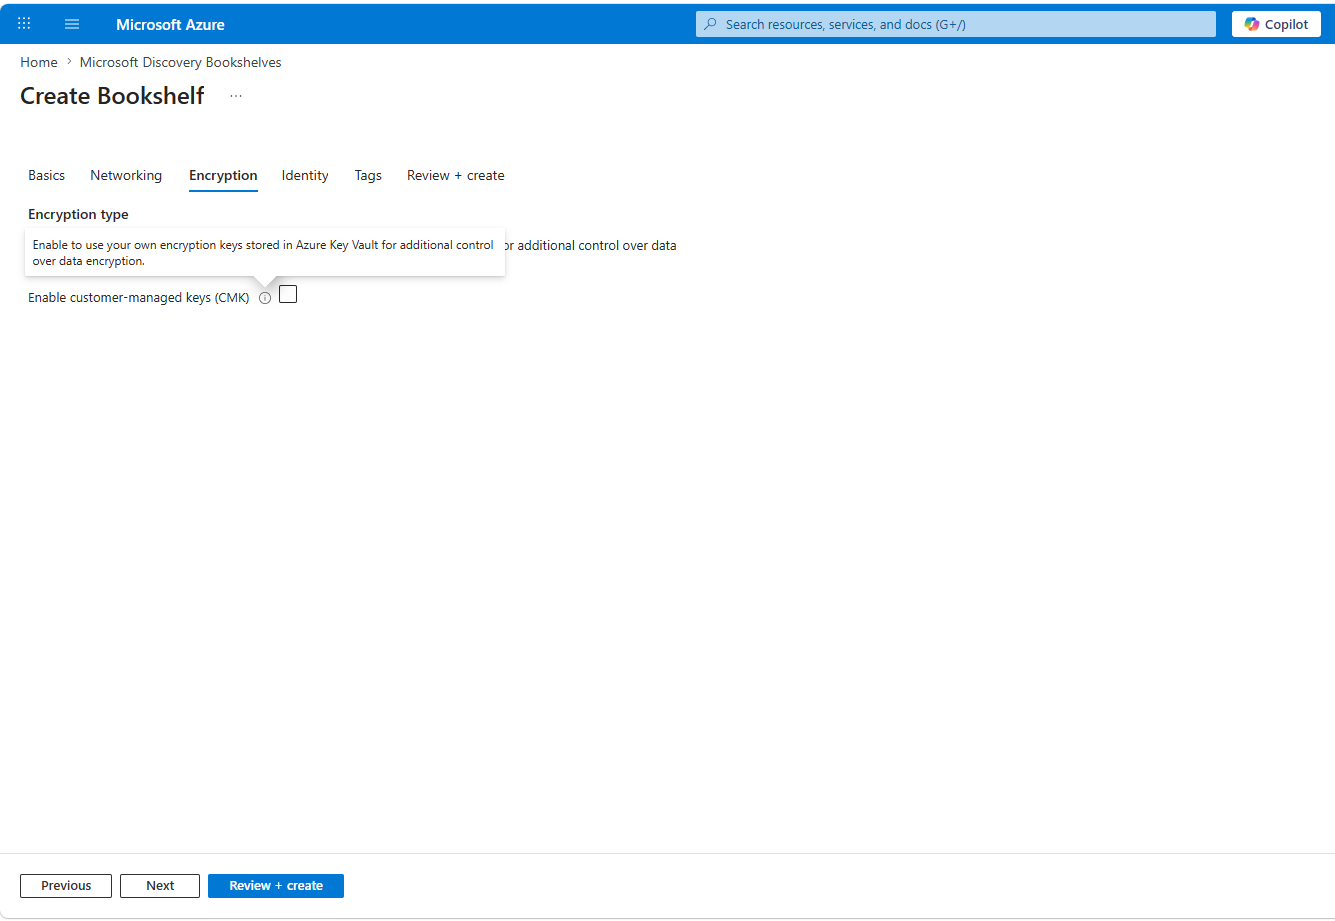
The Encryption tab lets you configure encryption settings for data at rest.
By default, data is encrypted using Microsoft-managed keys. If your organization requires customer-managed keys (CMK) for more control, select the Enable customer-managed keys (CMK) checkbox and provide your Azure Key Vault details.
Select Next to continue to the Identity tab.
Configure identity
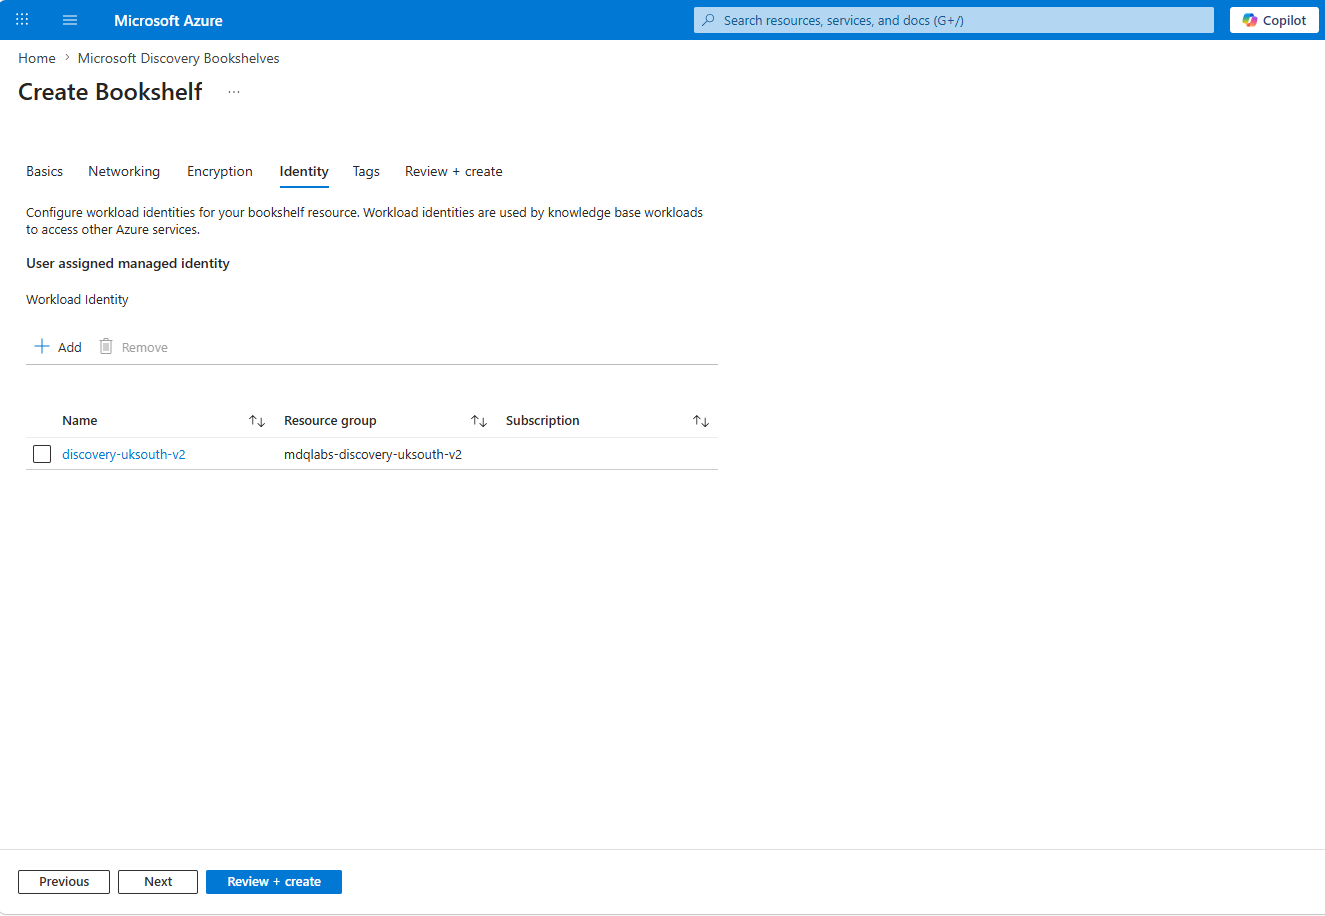
The Identity tab configures the workload identity that the Bookshelf Knowledgebase uses to access blob storage containing the private dataset.
Under User assigned managed identity, select + Add.
In the selection pane, find and select the user-assigned managed identity for your Bookshelf. For example, discovery-uksouth-v2 in the mdqlabs-discovery-uksouth-v2 resource group.
Select Add to confirm the identity assignment.
Important
This managed identity is used by Knowledgebase to access Azure Blob Storage. You must grant this identity the Storage Blob Data Contributor role on the storage account containing the private dataset. The managed identity should be created in the same region as the Bookshelf resource.
Select Next to continue to the Tags tab.
Add tags
The Tags tab lets you add optional name-value pairs to categorize your Bookshelf resource for billing and management purposes.
| Name | Value | Description |
|---|---|---|
indexSize |
small, medium, or large |
Controls the infrastructure provisioned in the managed resource group for the knowledgebase search. See the resource quota requirements tables for the compute and memory allocated at each size. |
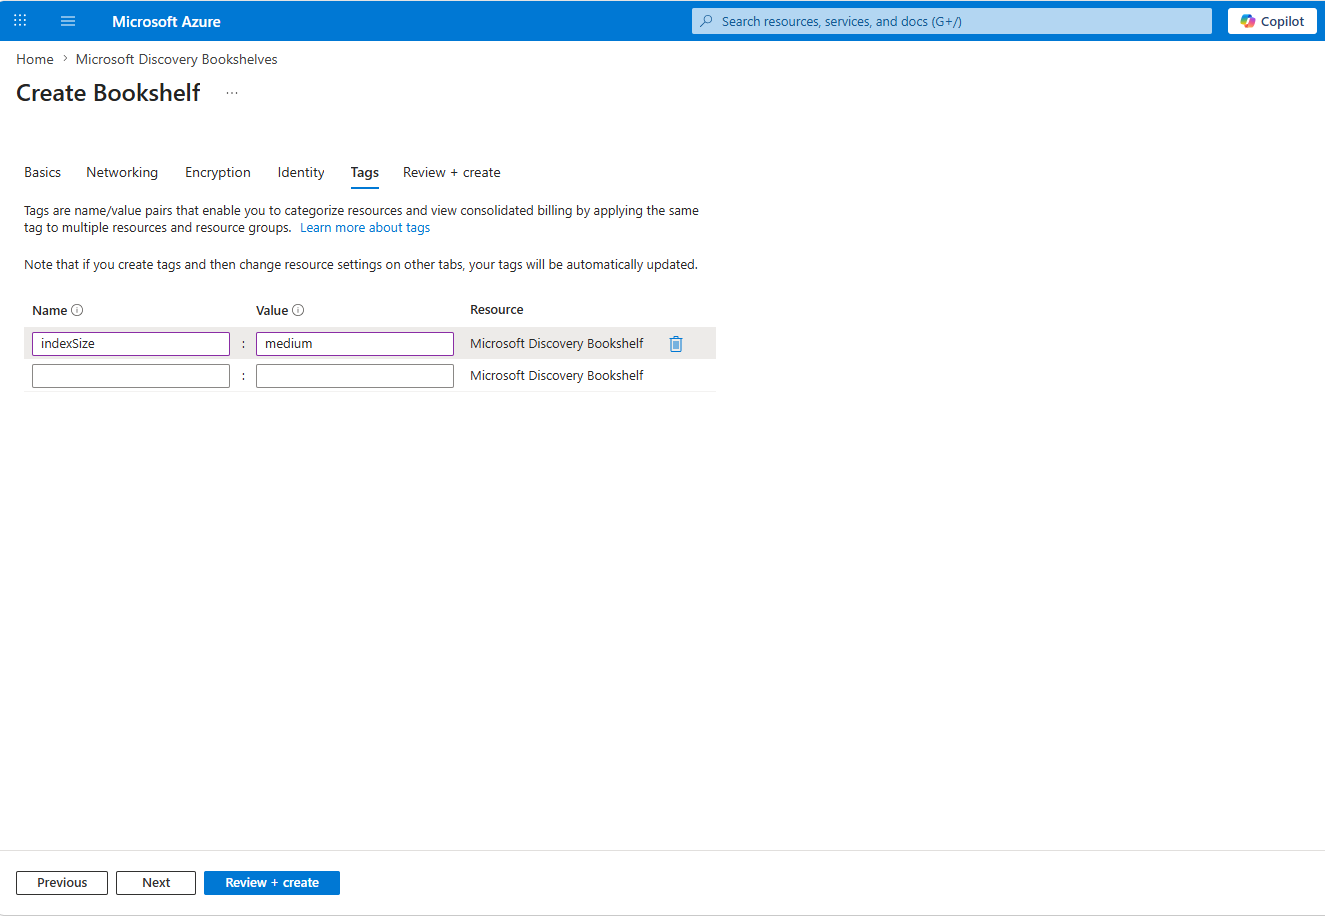
Select Review + create to validate your configuration.
Review and create
The Review + create tab displays a summary of all your settings across tabs. The portal validates your configuration and displays any errors.
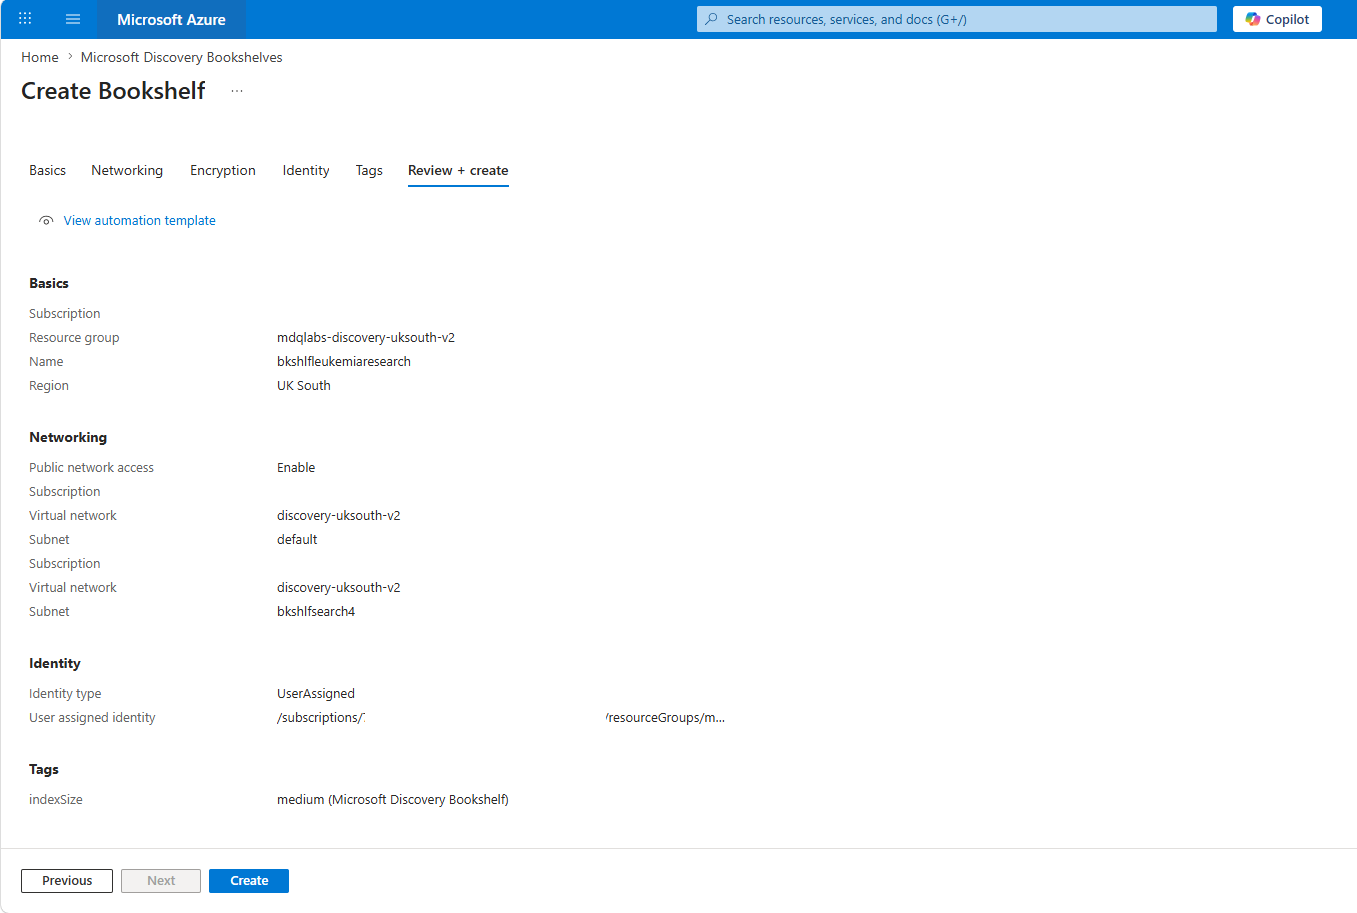
Review the settings summary. Verify that the subscription, resource group, name, region, networking, identity, and tags are all correct.
Select Create to deploy the Bookshelf resource.
After deployment completes, select Go to resource to view your Bookshelf.
Note
The Bookshelf deployment creates a managed resource group that contains infrastructure resources such as an Azure SQL database, storage account, AI Search service, and container app. You don't need to manage these resources directly.
After creation, your Bookshelf data plane endpoint is available at:
https://<bookshelf-name>.bookshelf.discovery.azure.com
Step 2: Create a storage account and upload documents
Your documents must be stored in an Azure Blob Storage container before indexing. The Bookshelf indexer reads documents from this container during the enrichment and indexing process.
Supported document formats
The Bookshelf indexer supports the following file formats:
| Format | File extensions |
|---|---|
| Documents | .pdf, .docx, .pptx, .xlsx |
| Text | .txt, .html |
Important
PDF files are limited to 2,000 pages per file. For larger documents, split them into multiple files before uploading. For more information, see Document Layout skill data limits.
Create the storage account
In the Azure portal, select Create a resource and search for Storage account.
Select Create and provide the following values:
Setting Value Subscription Select your Azure subscription. Resource group Select the same resource group as your Bookshelf resource. Storage account name Enter a unique name (for example, bkshelfstorconuk).Region Select the same region as your Bookshelf resource. Performance Select Standard. Redundancy Select Locally-redundant storage (LRS) or your preferred redundancy level. Select Review + create, and then select Create.
Create a container and upload documents
Navigate to your storage account in the Azure portal.
In the left menu, under Data storage, select Containers.
Select + Add container and create a new container (for example,
leukemia-drug-discovery).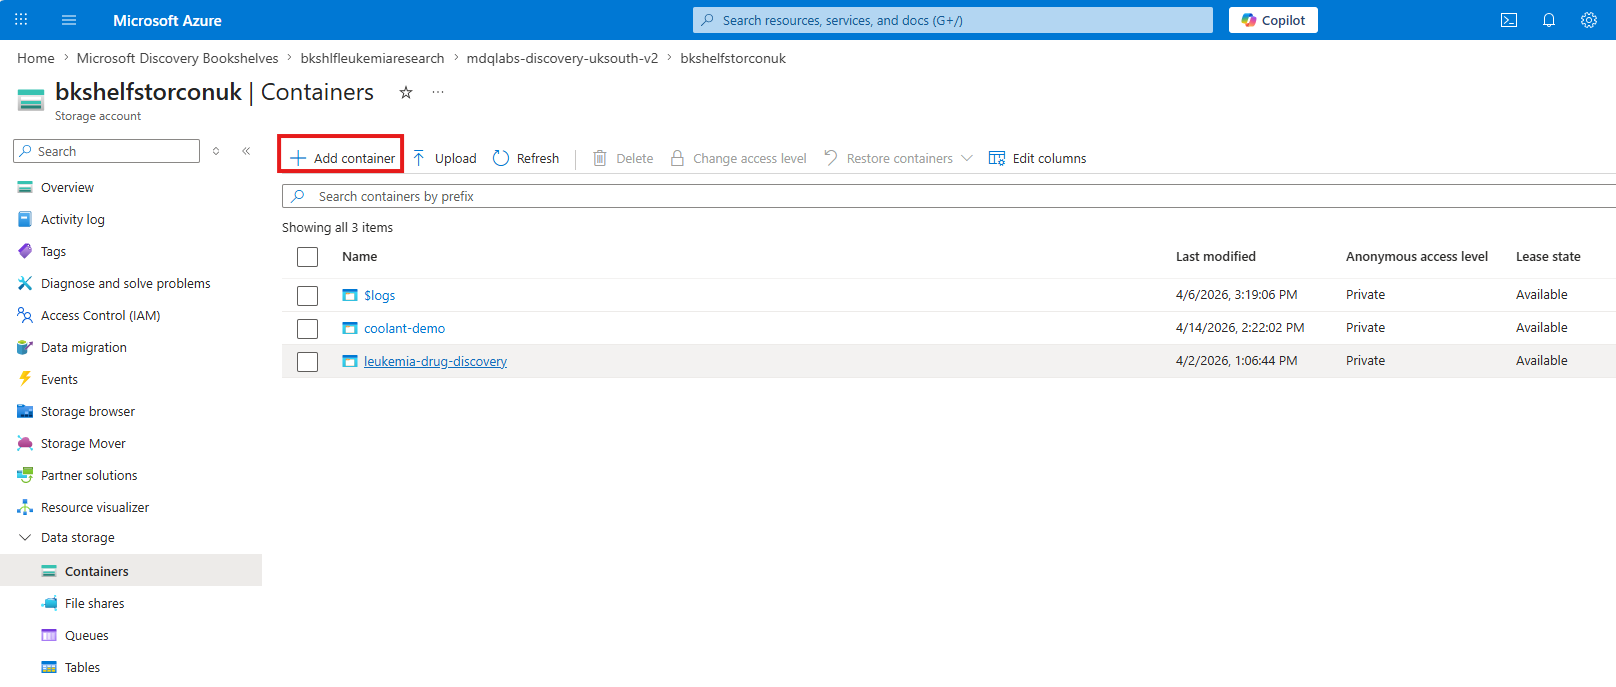
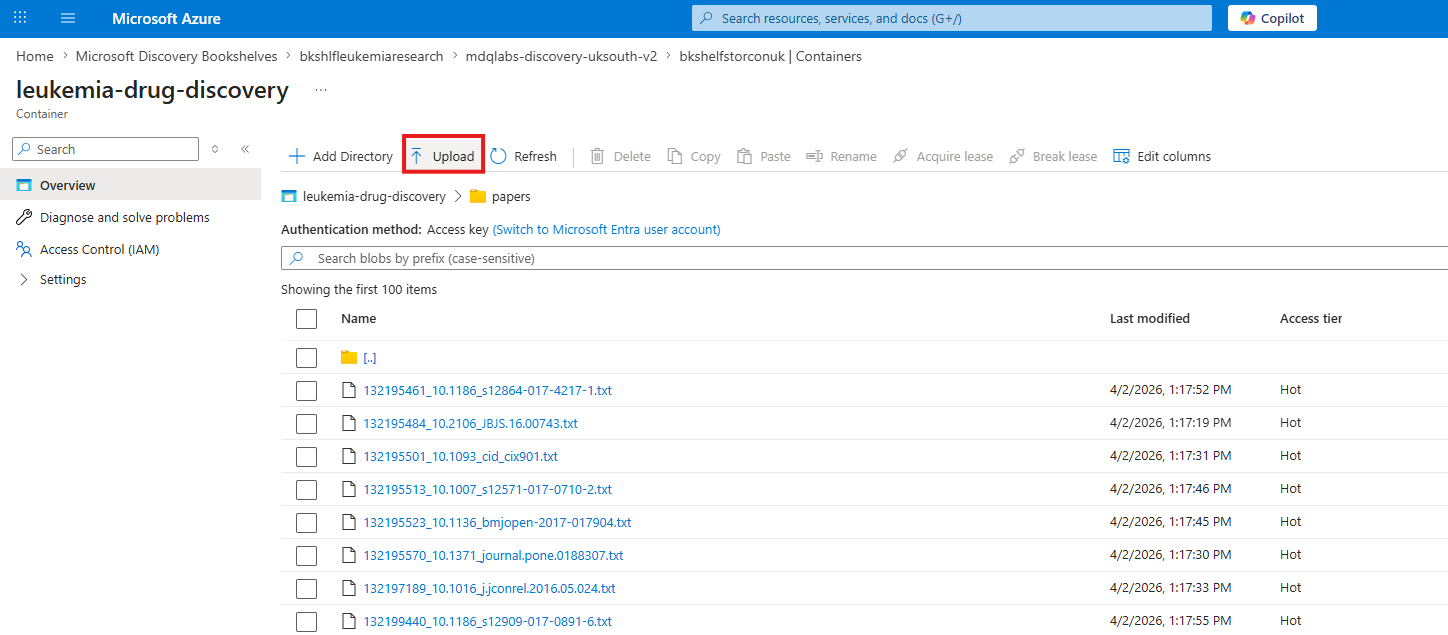
Open the container and select Upload to upload your document files.
You can upload files individually or use Azure Storage Explorer for bulk uploads.
Step 3: Configure managed identity access to storage
The Bookshelf resource uses a managed identity to read documents from your storage account. You must grant this identity the Storage Blob Data Contributor role on your storage account.
Find your Bookshelf managed identity
Navigate to your Bookshelf resource in the Azure portal.
On the Overview page, select View value as JSON under System Data to view the resource JSON. The
workloadIdentitiessection contains the managed identity resource ID, principal ID, and client ID.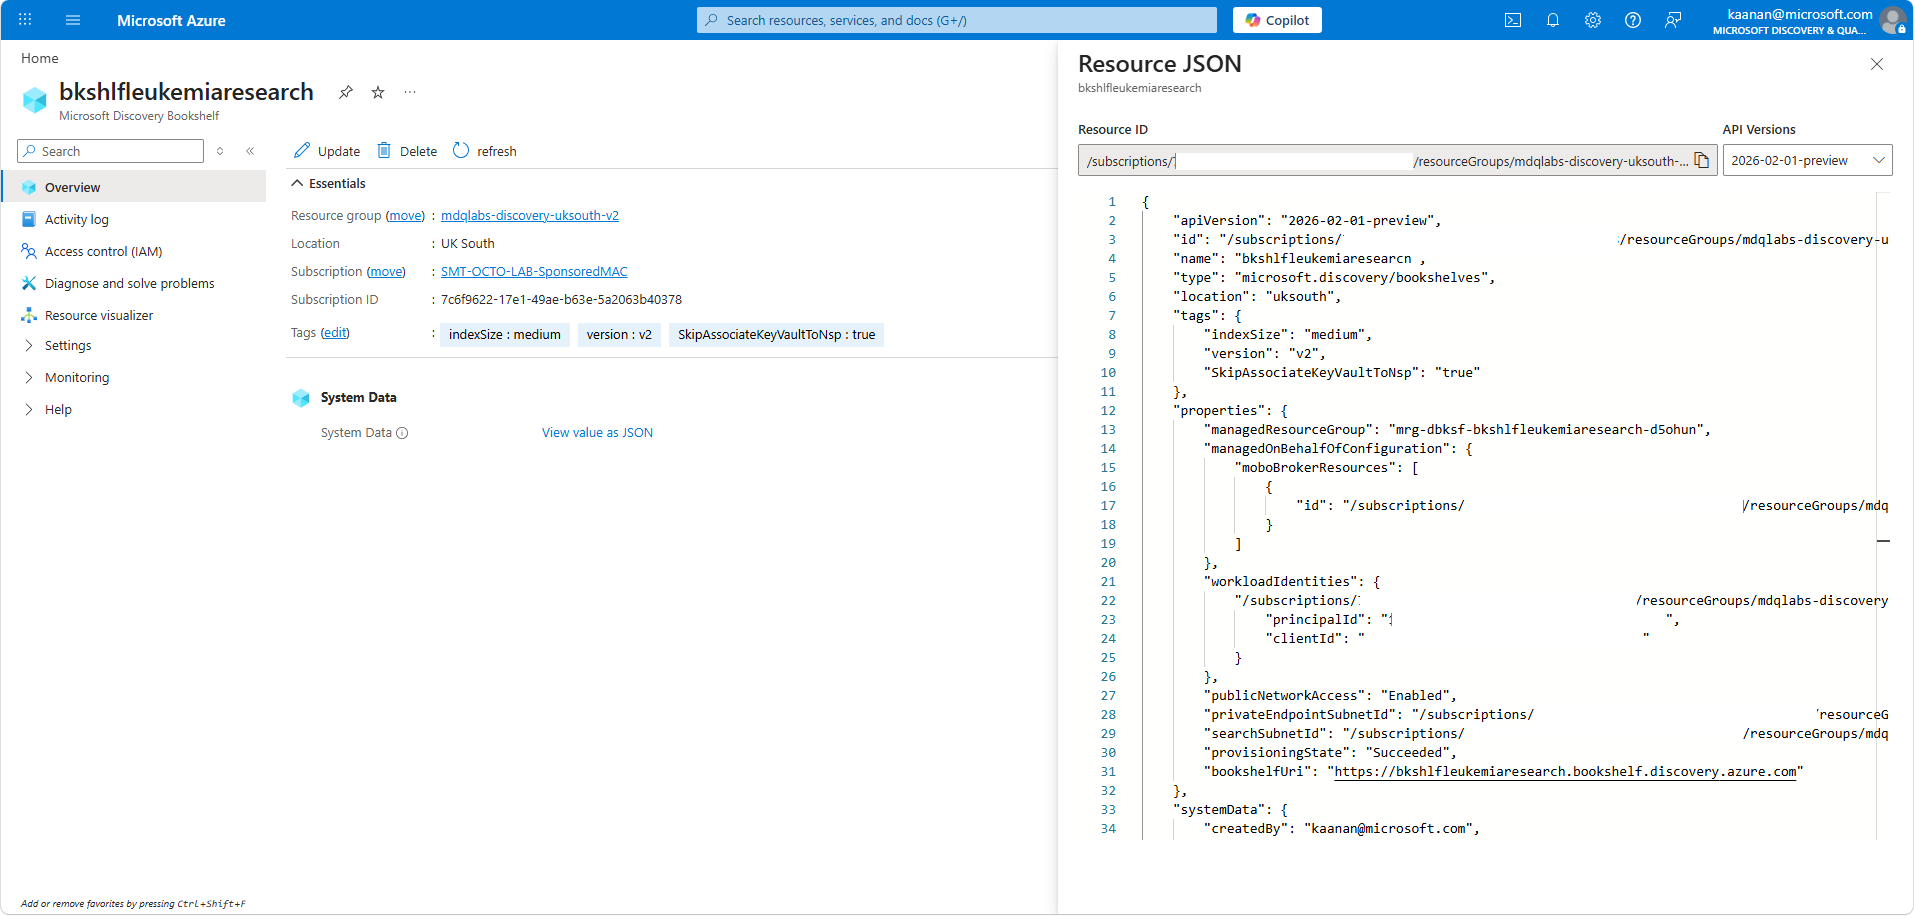
Assign the Storage Blob Data Contributor role
Navigate to your storage account in the Azure portal.
In the left menu, select Access control (IAM).
Select Add > Add role assignment.
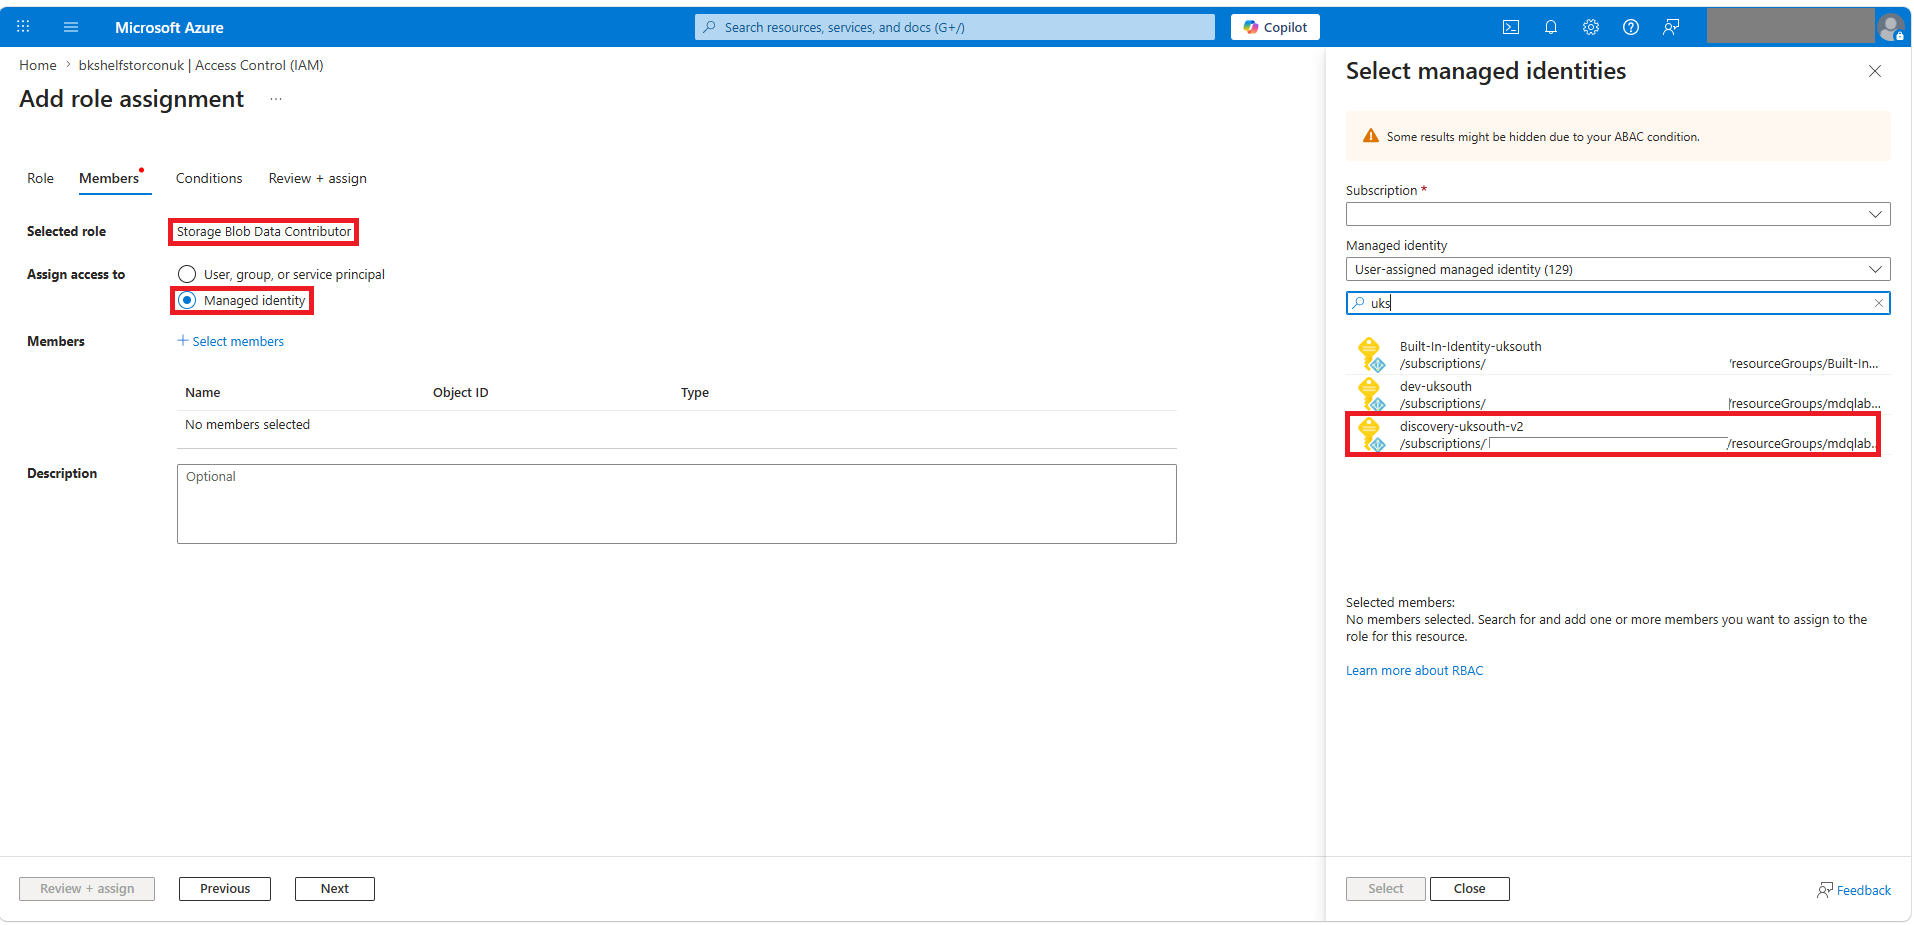
On the Role tab, search for and select Storage Blob Data Contributor.
On the Members tab, select Managed identity, then select + Select members.
Find and select the Bookshelf managed identity from the previous step.
Select Review + assign to complete the role assignment.
Note
Role assignments can take up to 10 minutes to propagate. Verify that the assignment is active before proceeding to the next step.
Step 4: Create a storage container resource and storage asset
An Azure Discovery storage container resource and storage asset provide the link between the Knowledgebase and the blob storage that holds your documents. The storage asset points to the specific blob container and uses the managed identity for authentication.
Create a discovery storage container resource
In the Azure portal, select Create a resource and search for Microsoft Discovery Storage Containers.
Select Create to open the Create Storage Container form.
On the Basics tab, provide the following values:
Field Description Subscription The Azure subscription to use for the storage container resource. Resource group Select the same resource group as your Bookshelf resource (for example, mdqlabs-discovery-uksouth-v2).Name A name for the storage container resource, such as bkshlfleukemiacontainer. Region Select the same region as your Bookshelf resource (for example, UK South).Storage store Select Azure Storage Blob. Storage account Select the storage account that contains your documents (for example, bkshelfstorconuk).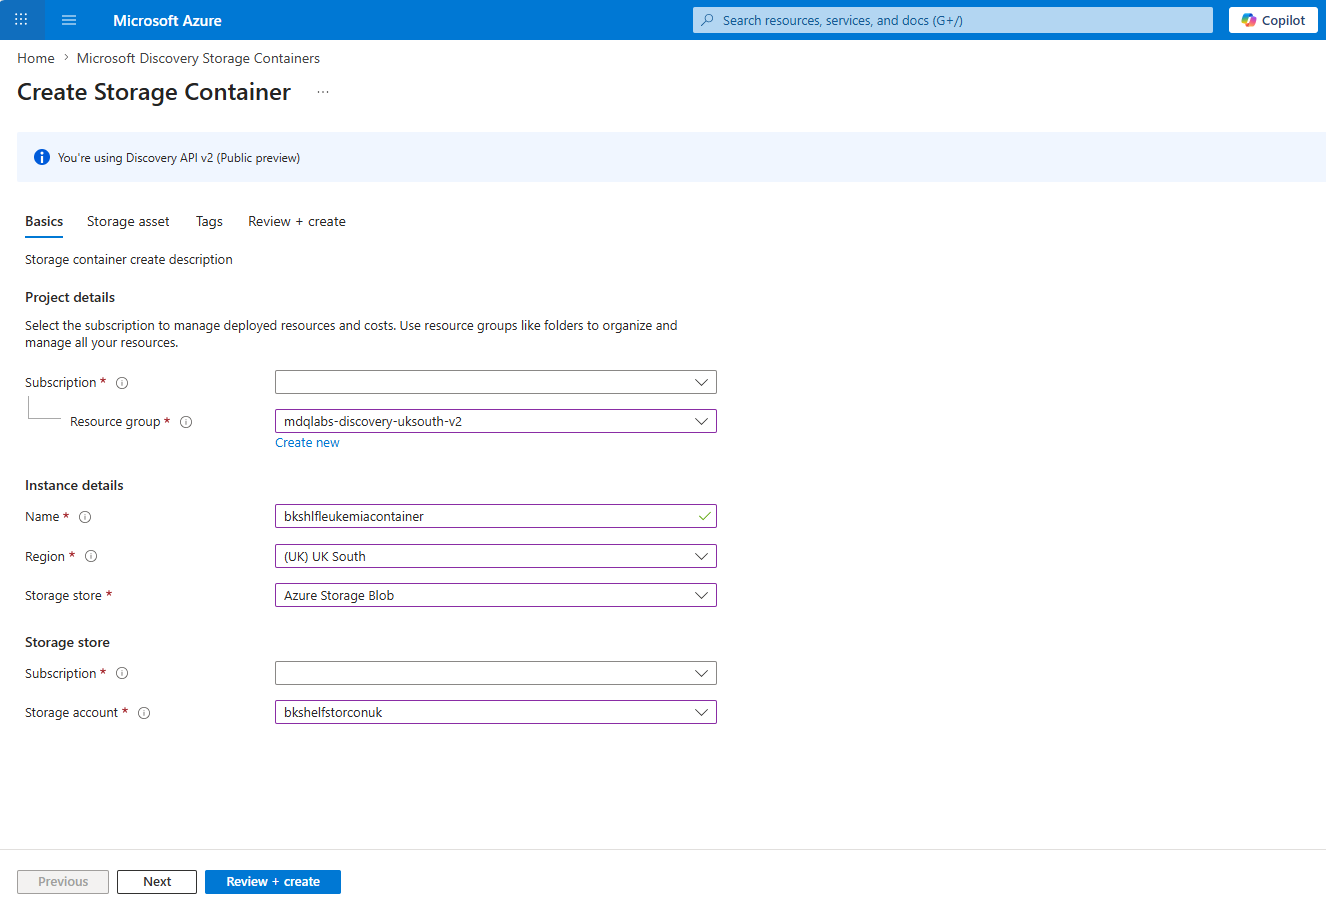
Select Next to continue to the Storage asset tab.
Create a discovery storage asset resource
The Storage asset tab defines the specific data path within the storage account that the Bookshelf uses for indexing.
On the Storage asset tab, provide the following values:
Field Description Name A name for the storage asset, such as leukemiacontainer. Data path The blob container name and optional subfolder path that contains your documents (for example, leukemia-drug-discovery/papers/).Storage asset description A description of the dataset (for example, Private dataset for Leukemia research). 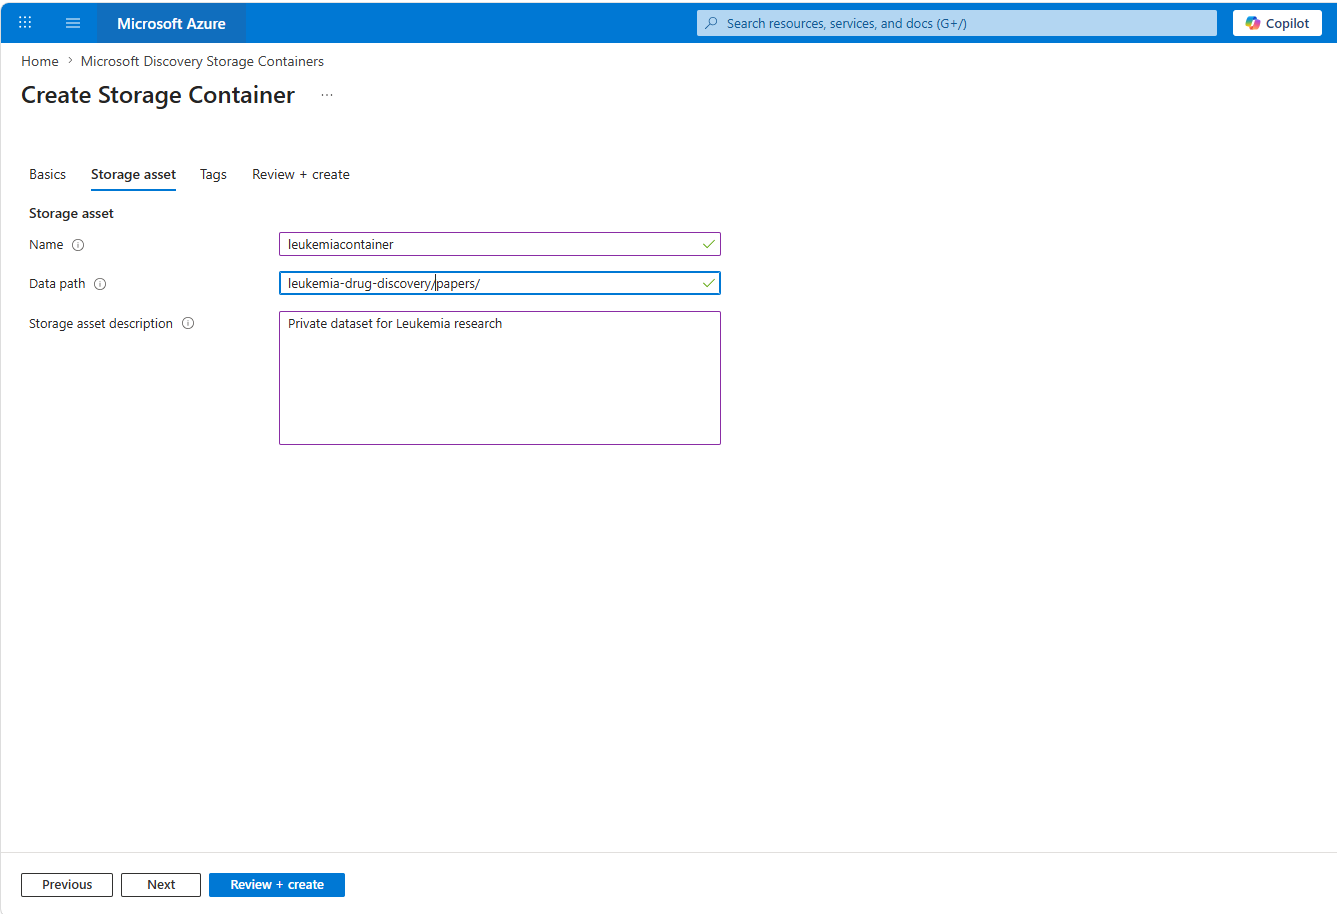
Select Review + create, and then select Create.
Step 5: Create a knowledgebase
A Knowledgebase is the searchable index built from your documents. You create it within a Bookshelf using the Discovery Studio portal and associate it with your storage asset.
Navigate to the Discovery Studio portal.
In the left menu under Resources, select Knowledge.
Select your Bookshelf from the Bookshelf dropdown (for example,
bkshlfleukemiaresearch), and then select + Create new.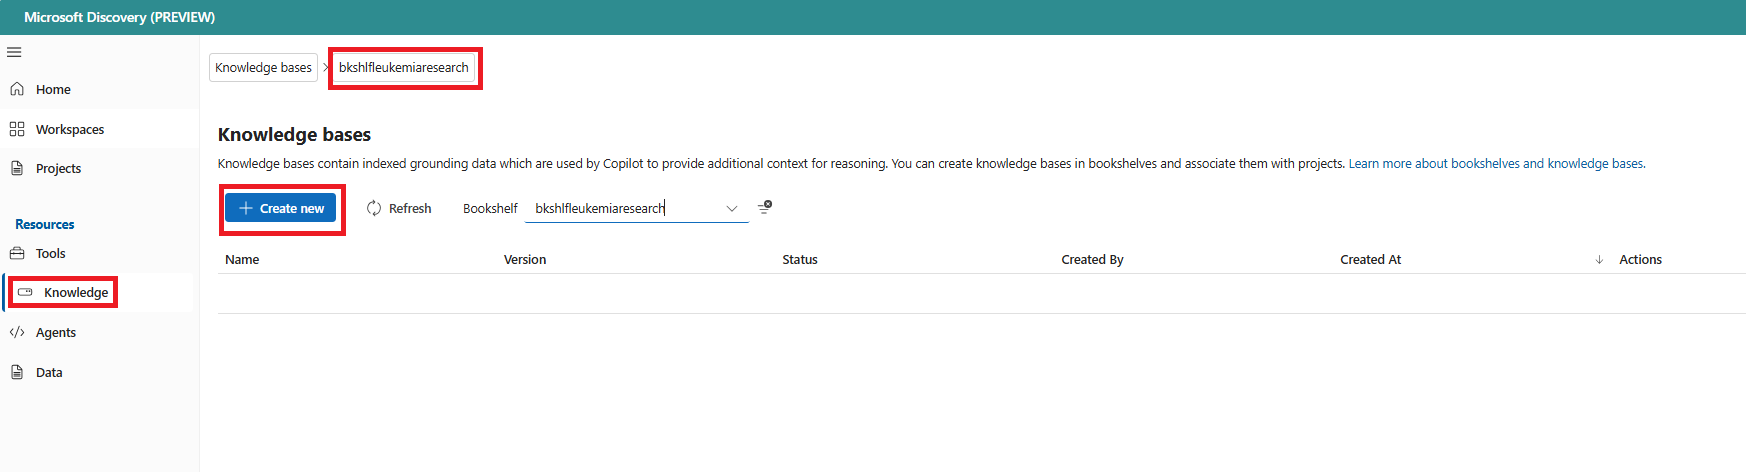
On the first page of the Create knowledge base wizard, provide the following values:
Field Description Name A unique name for your knowledgebase, such as leukemiaresearchkb. Version The version number for this knowledgebase (for example, 1).Description A description of the knowledgebase content. The description is visible in the Discovery Studio. Copilot instruction Instructions that the discovery agent uses to understand the capabilities of this knowledgebase. Provide a description that helps the agent determine when to query this knowledgebase. Bookshelf The Bookshelf resource associated with this knowledgebase (for example, bkshlfleukemiaresearch).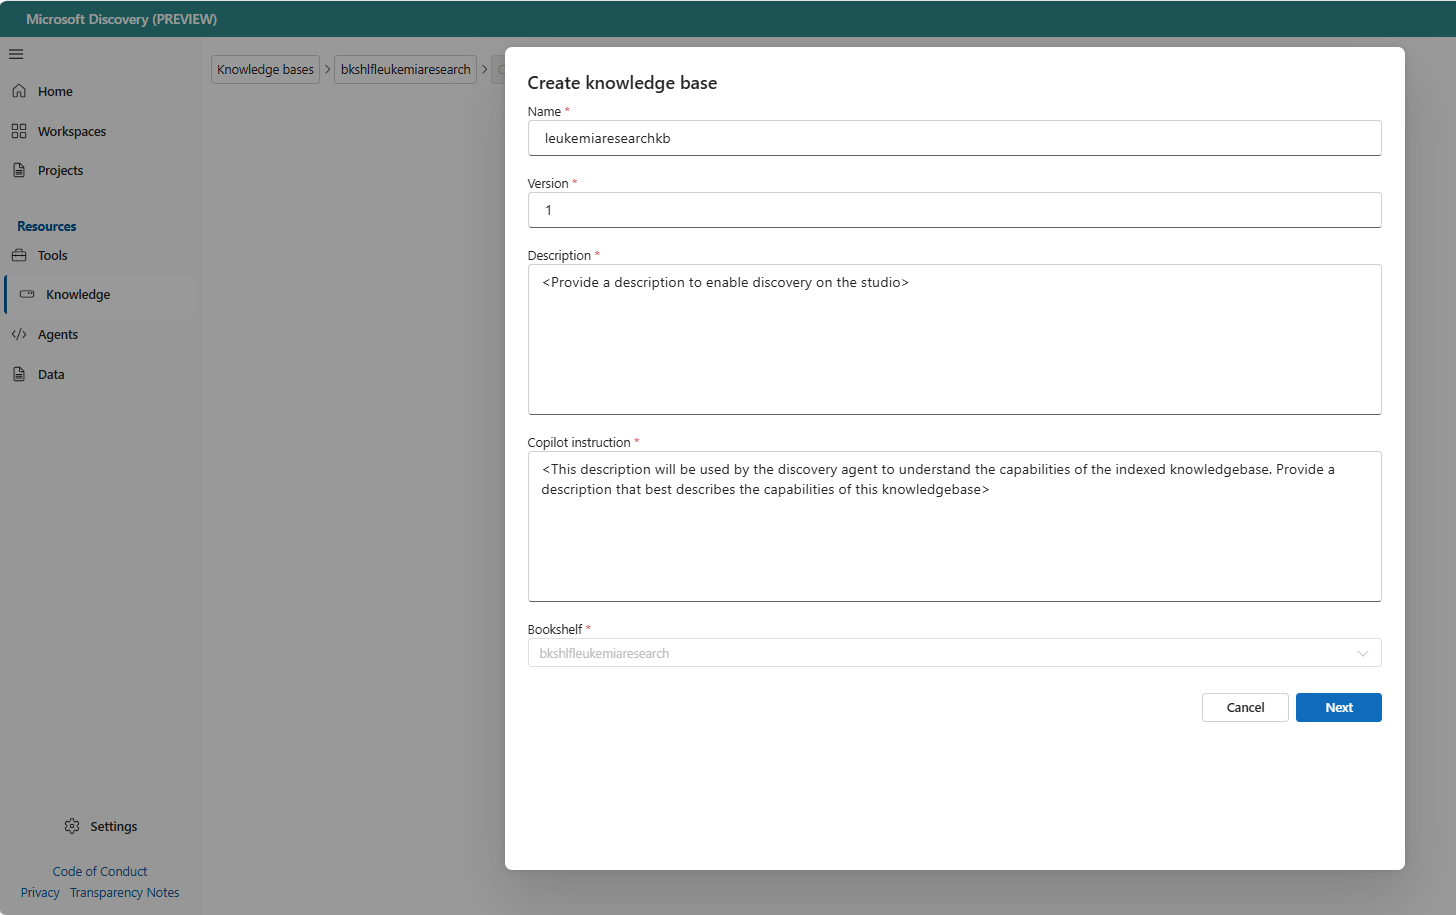
Select Next.
On the second page, configure the storage and identity settings:
Field Description Select Storage Container The storage container resource you created in Step 4. Select Storage Asset The storage asset within the container that points to your documents. User Assigned Identity The workload identity that the knowledgebase uses to access the storage account. Select the same managed identity you configured in Step 1. 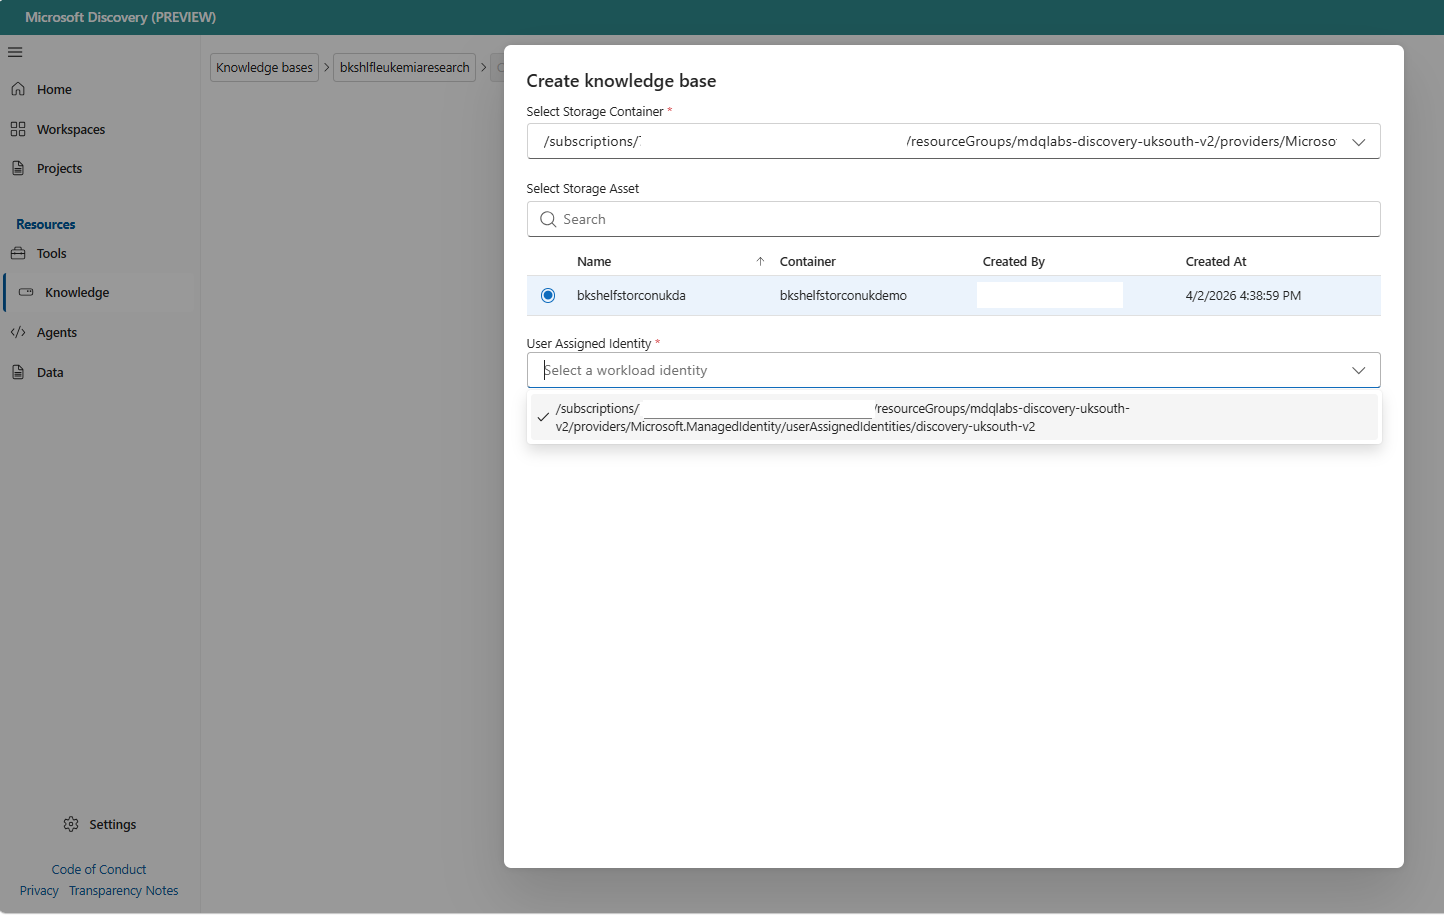
Select Create.
Step 6: Index the knowledgebase
Indexing processes your documents through an enrichment pipeline (text extraction, chunking, embedding) and builds the LazyGraphRAG search index. You can trigger indexing from Discovery Studio or by calling the REST API.
Start indexing from Discovery Studio
In Discovery Studio, navigate to your knowledgebase. The Details tab shows the knowledgebase info, status, and linked assets. Verify that the Status shows NotStarted and Provisioning State shows Succeeded.
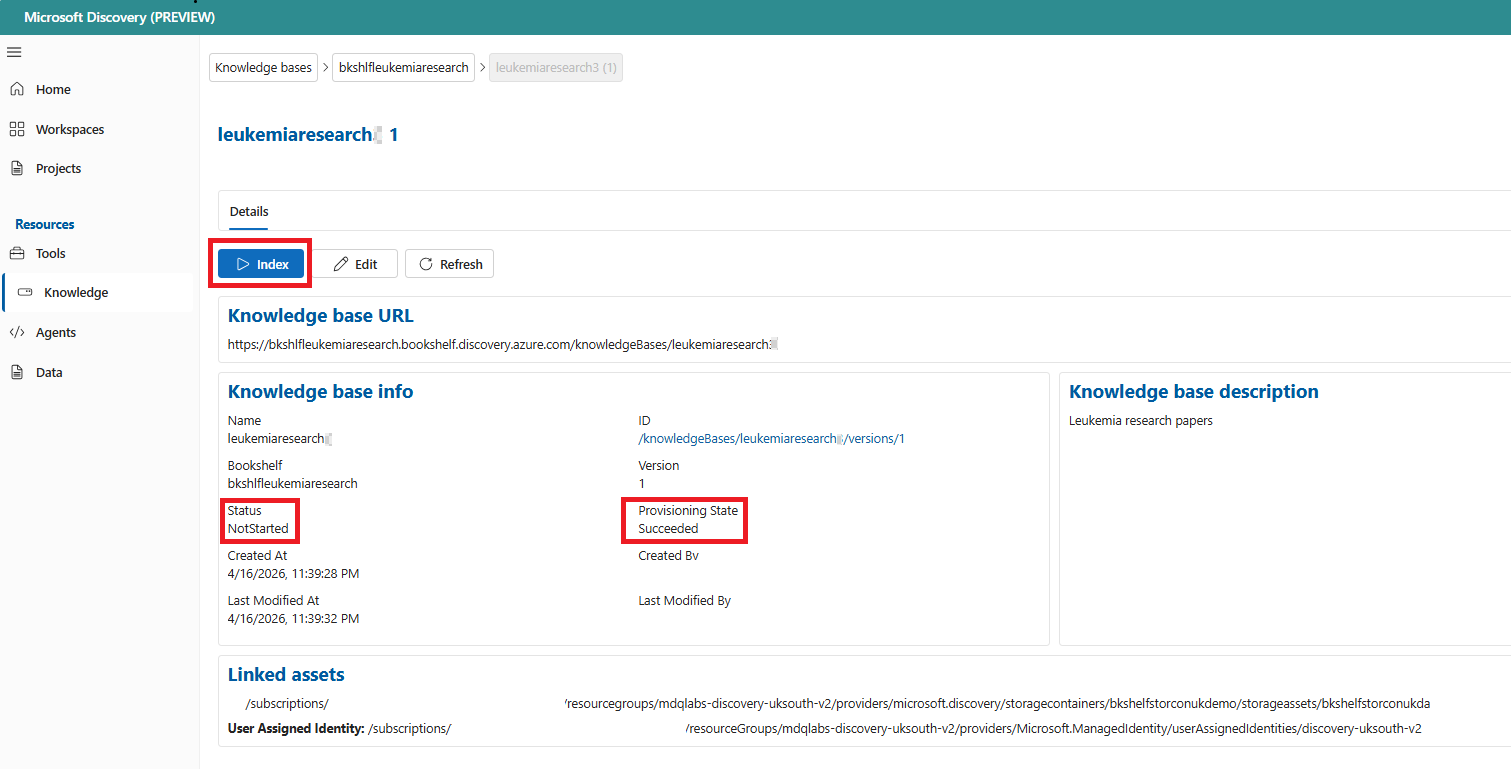
Select the Index button. In the Index Knowledge Base dialog, select the project and node pool for the indexing run.
Field Description Select Project The Discovery project used for tracking the indexing tool run. Select Node Pool The supercomputer node pool that provides compute for the indexing run. Choose a memory-optimized SKU based on your data size (see resource quota requirements). 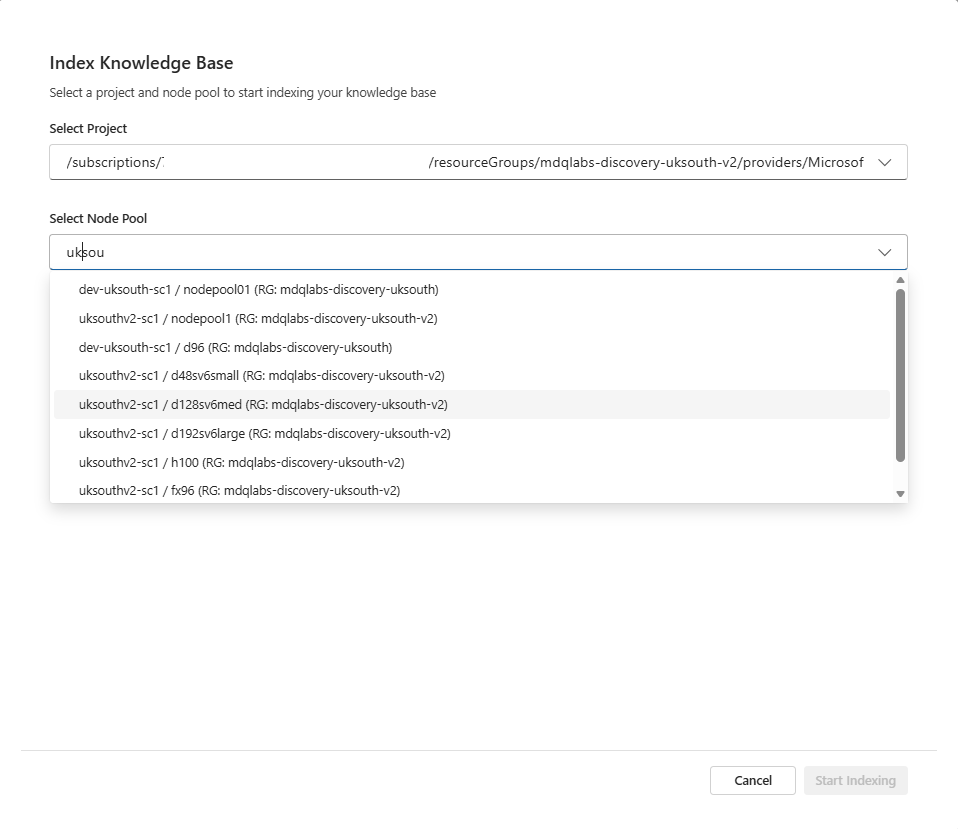
Select Start Indexing to begin the indexing operation.
Step 7: Track indexing progress
After you start indexing, the knowledgebase Status changes to Running. You can monitor the progress in Discovery Studio.
On the knowledgebase details page, select Refresh to check the current status.
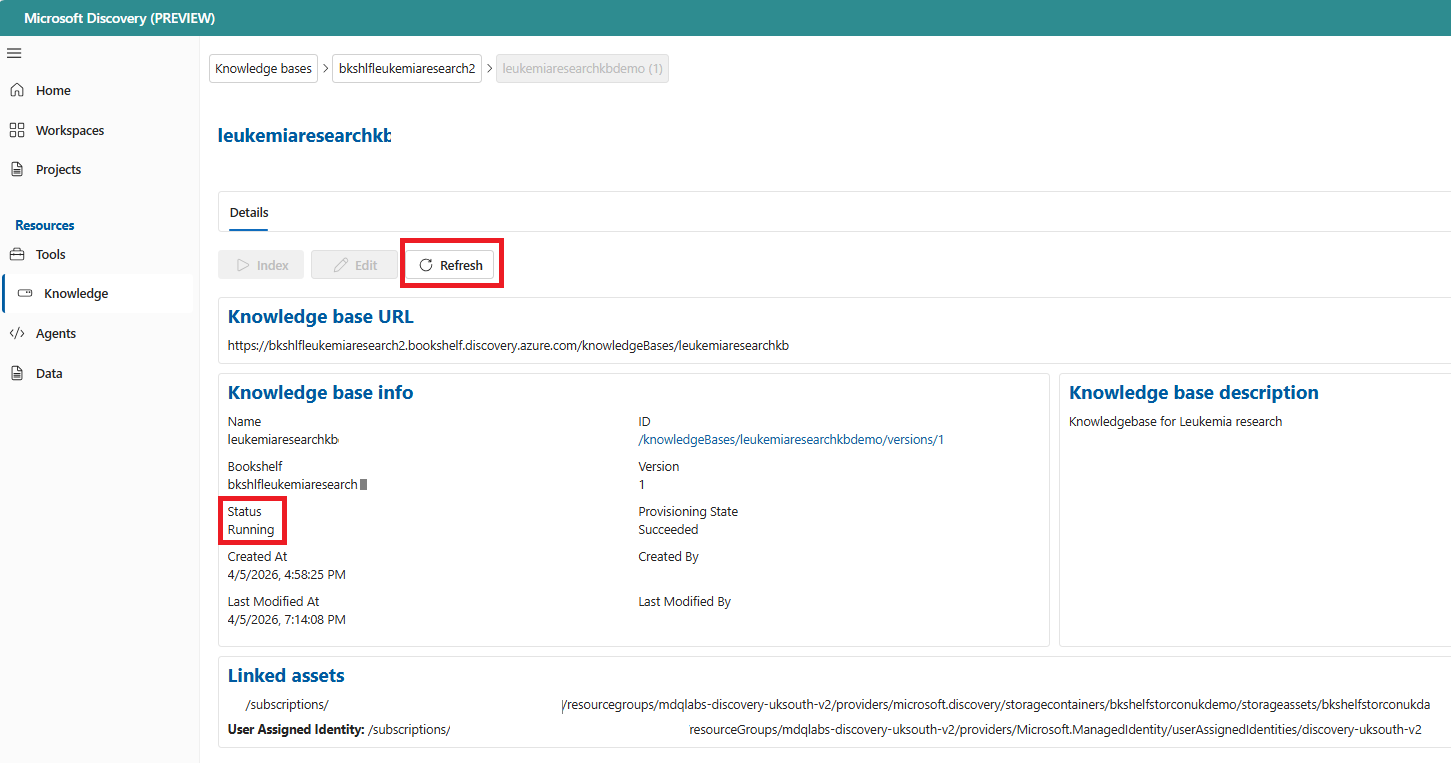
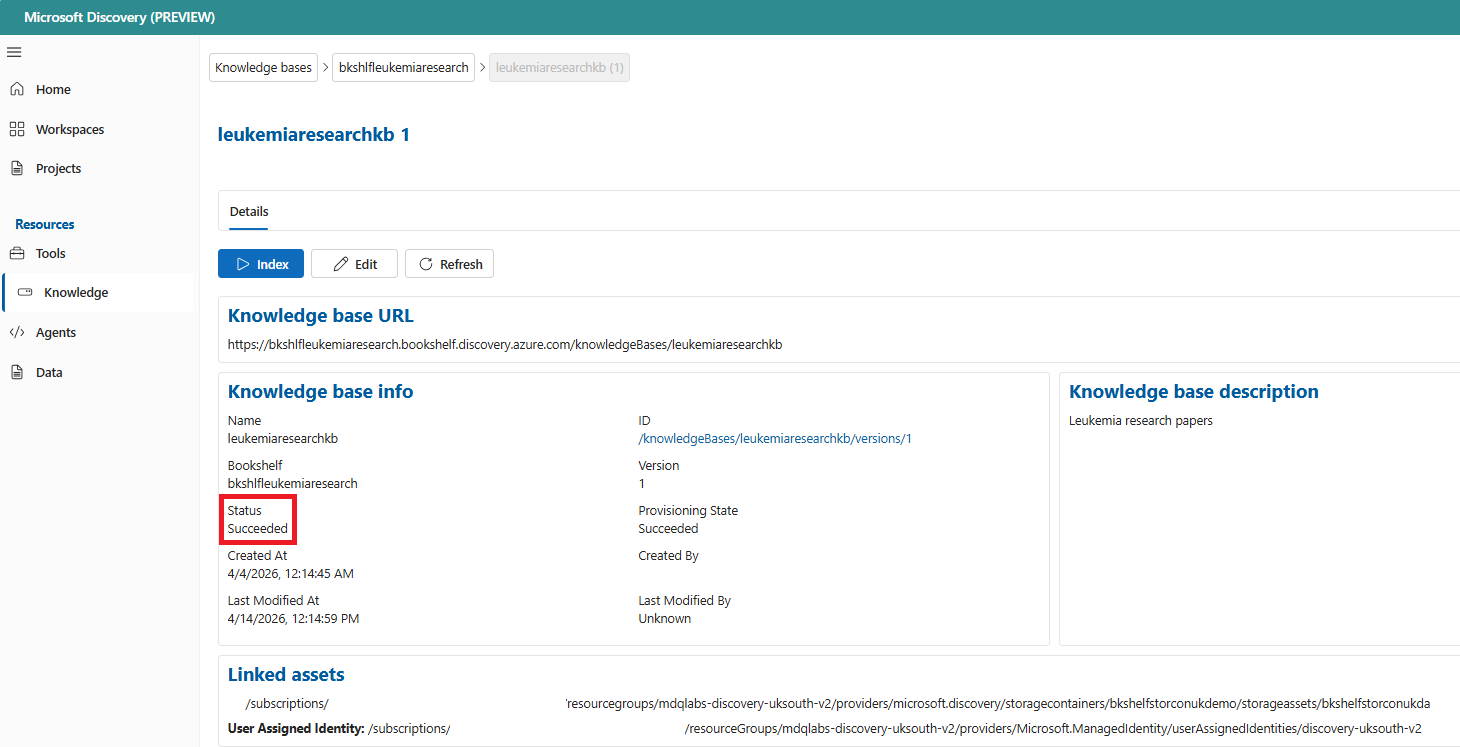
When indexing completes, the Status changes to Succeeded. Your knowledgebase is now indexed and ready to use with a Discovery agent.
Incremental enrichment and reindexing
After the initial indexing, you can add new documents to the source storage container and reindex the knowledgebase. When you select the Index button again, the following behavior applies:
- Incremental enrichment. The enrichment pipeline processes only the newly added documents (text extraction). Previously enriched documents aren't reprocessed.
- Full graph reindex. The system rebuilds the GraphRAG search index from scratch using all text documents, including both the previously enriched and newly enriched content. Ensure that the selected node pool has sufficient memory for the complete dataset, not just the new documents.
- Node pool selection. You can select a different supercomputer node pool for the reindex operation. Choose a node pool size based on the total dataset size, not just the incremental additions.
Important
Deleting files from the source storage container isn't supported. If you need to remove documents from a knowledgebase, create a new knowledgebase with a fresh storage container that contains only the desired documents, and run a full enrichment and index.