Mount NFS Azure file shares on Linux
Azure file shares can be mounted in Linux distributions using either the Server Message Block (SMB) protocol or the Network File System (NFS) protocol. This article is focused on mounting with NFS. For details on mounting SMB Azure file shares, see Use Azure Files with Linux. For details on each of the available protocols, see Azure file share protocols.
Applies to
| File share type | SMB | NFS |
|---|---|---|
| Standard file shares (GPv2), LRS/ZRS | ||
| Standard file shares (GPv2), GRS/GZRS | ||
| Premium file shares (FileStorage), LRS/ZRS |
Support
Currently, only NFS version 4.1 is supported. NFS 4.1 shares are only supported within the FileStorage storage account type (premium file shares only).
NFS Azure file shares support most features from the 4.1 protocol specification. Some features such as delegations and callback of all kinds, Kerberos authentication, and encryption-in-transit aren't supported.
Regional availability
NFS Azure file shares are supported in all the same regions that support premium file storage. See Azure products available by region.
Step 1: Create an NFS Azure file share
If you haven't already done so, create an NFS Azure file share.
Step 2: Configure network security
NFS shares can only be accessed from trusted networks. Currently, the only way to secure the data in your storage account is by using a virtual network and other network security settings. Any other tools used to secure data, including account key authorization, Microsoft Entra security, and access control lists (ACLs) can't be used to authorize an NFSv4.1 request.
Important
The NFSv4.1 protocol runs on port 2049. If you're connecting from an on-premises network, make sure that your client allows outgoing communication through port 2049. If you've granted access to specific VNets, make sure that any network security groups associated with those VNets don't contain security rules that block incoming communication through port 2049.
Create a private endpoint or service endpoint
To use NFS Azure file shares, you must either create a private endpoint (recommended) or restrict access to your public endpoint.
Disable secure transfer
Azure Files doesn't currently support encryption-in-transit with the NFS protocol and relies instead on network-level security. Therefore, you'll need to disable secure transfer on your storage account.
Sign in to the Azure portal and access the storage account containing the NFS share you created.
Select Configuration.
Select Disabled for Secure transfer required.
Select Save.


Enable hybrid access through VPN or ExpressRoute (optional)
To enable hybrid access to an NFS Azure file share, use one of the following networking solutions:
Step 3: Mount an NFS Azure file share
You can mount the share using the Azure portal. You can also create a record in the /etc/fstab file to automatically mount the share every time the Linux server or VM boots.
Mount an NFS share using the Azure portal
You can use the nconnect Linux mount option to improve performance for NFS Azure file shares at scale. For more information, see Improve NFS Azure file share performance.
Once the file share is created, select the share and select Connect from Linux.
Enter the mount path you'd like to use, then copy the script.
Connect to your client and use the provided mounting script. Only the required mount options are included in the script, but you can add other recommended mount options.

You have now mounted your NFS share.
Mount an NFS share using /etc/fstab
If you want the NFS file share to automatically mount every time the Linux server or VM boots, create a record in the /etc/fstab file for your Azure file share. Replace YourStorageAccountName and FileShareName with your information.
<YourStorageAccountName>.file.core.windows.net:/<YourStorageAccountName>/<FileShareName> /media/<YourStorageAccountName>/<FileShareName> nfs vers=4,minorversion=1,_netdev,nofail,sec=sys 0 0
For more information, enter the command man fstab from the Linux command line.
Mount options
The following mount options are recommended or required when mounting NFS Azure file shares.
| Mount option | Recommended value | Description |
|---|---|---|
vers |
4 | Required. Specifies which version of the NFS protocol to use. Azure Files only supports NFSv4.1. |
minorversion |
1 | Required. Specifies the minor version of the NFS protocol. Some Linux distros don't recognize minor versions on the vers parameter. So instead of vers=4.1, use vers=4,minorversion=1. |
sec |
sys | Required. Specifies the type of security to use when authenticating an NFS connection. Setting sec=sys uses the local UNIX UIDs and GIDs that use AUTH_SYS to authenticate NFS operations. |
rsize |
1048576 | Recommended. Sets the maximum number of bytes to be transferred in a single NFS read operation. Specifying the maximum level of 1048576 bytes will usually result in the best performance. |
wsize |
1048576 | Recommended. Sets the maximum number of bytes to be transferred in a single NFS write operation. Specifying the maximum level of 1048576 bytes will usually result in the best performance. |
noresvport |
n/a | Recommended. Tells the NFS client to use a non-privileged source port when communicating with an NFS server for the mount point. Using the noresvport mount option helps ensure that your NFS share has uninterrupted availability after a reconnection. Using this option is strongly recommended for achieving high availability. |
actimeo |
30-60 | Recommended. Specifying actimeo sets all of acregmin, acregmax, acdirmin, and acdirmax to the same value. Using a value lower than 30 seconds can cause performance degradation because attribute caches for files and directories expire too quickly. We recommend setting actimeo between 30 and 60 seconds. |
Step 4: Validate connectivity
If your mount fails, it's possible that your private endpoint wasn't set up correctly or isn't accessible. For details on confirming connectivity, see Verify connectivity.
NFS file share snapshots
Customers using NFS Azure file shares can create, list, and delete NFS Azure file share snapshots. This capability allows users to roll back entire file systems or recover files that were accidentally deleted or corrupted.
Important
You should mount your file share before creating snapshots. If you create a new NFS file share and take snapshots before mounting the share, attempting to list the snapshots for the share will return an empty list. We recommend deleting any snapshots taken before the first mount and re-creating them after you've mounted the share.
Limitations
Only file management APIs (AzRmStorageShare) are supported for NFS Azure file share snapshots. File data plane APIs (AzStorageShare) aren't supported.
Azure Backup isn't currently supported for NFS file shares.
AzCopy isn't currently supported for NFS file shares. To copy data from an NFS Azure file share or share snapshot, use file system copy tools such as rsync or fpsync.
NFS Azure file share snapshots are available in all Azure public cloud regions.
Create a snapshot
You can create a snapshot of an NFS Azure file share using the Azure portal, Azure PowerShell, or Azure CLI. A share can support the creation of up to 200 share snapshots.
To create a snapshot of an existing file share, sign in to the Azure portal and follow these steps.
In the search box at the top of the Azure portal, type and select storage accounts.
Select the FileStorage storage account that contains the NFS Azure file share that you want to take a snapshot of.
Select Data storage > File shares.
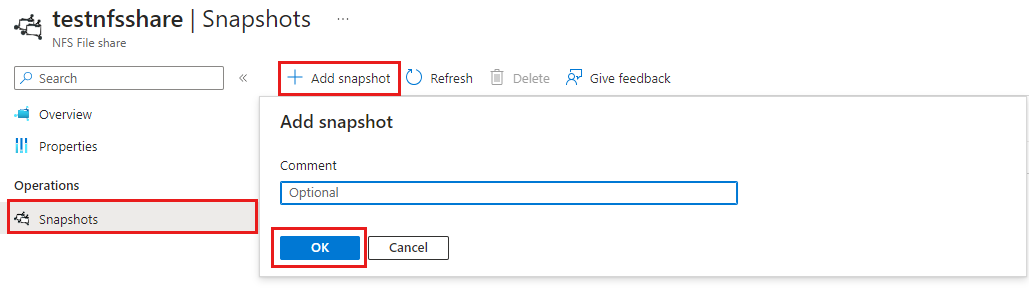
Select the file share that you want to snapshot, then select Operations > Snapshots.
Select + Add snapshot. Add an optional comment, and select OK.
List file share snapshots
You can list all the snapshots for a file share using the Azure portal, Azure PowerShell, or Azure CLI.
To list all the snapshots for an existing file share, sign in to the Azure portal and follow these steps.
In the search box at the top of the Azure portal, type and select storage accounts.
Select the FileStorage storage account that contains the NFS Azure file share that you want to list the snapshots of.
Select Data storage > File shares.
Select the file share for which you want to list the snapshots.
Select Operations > Snapshots, and any existing snapshots for the file share will be listed.
Delete snapshots
Existing share snapshots are never overwritten. They must be deleted explicitly. You can delete share snapshots using the Azure portal, Azure PowerShell, or Azure CLI.
To delete a snapshot of an existing file share, sign in to the Azure portal and follow these steps.
In the search box at the top of the Azure portal, type and select storage accounts.
Select the FileStorage storage account that contains the NFS Azure file share for which you want to delete snapshots.
Select Data storage > File shares.
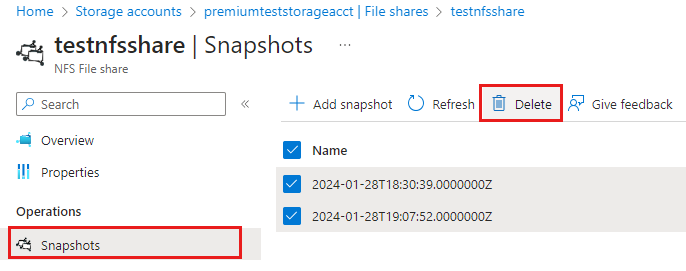
Select the file share for which you want to delete one or more snapshots, then select Operations > Snapshots. Any existing snapshots for the file share will be listed.
Select the snapshot(s) that you want to delete, and then select Delete.
Mount an NFS Azure file share snapshot
To mount an NFS Azure file share snapshot to a Linux VM (NFS client) and restore files, follow these steps.
Run the following command in a console. See Mount options for other recommended mount options. To improve copy performance, mount the snapshot with nconnect to use multiple TCP channels.
sudo mount -o vers=4,minorversion=1,proto=tcp,sec=sys $server:/nfs4account/share /media/nfsChange the directory to
/media/nfs/.snapshotsso you can view the available snapshots. The.snapshotsdirectory is hidden by default, but you can access and read from it like any directory.cd /media/nfs/.snapshotsList the contents of the
.snapshotsfolder.lsEach snapshot has its own directory that serves as a recovery point. Change to the snapshot directory for which you want to restore files.
cd <snapshot-name>List the contents of the directory to view a list of files and directories that can be recovered.
lsCopy all files and directories from the snapshot to a restore directory to complete the restore.
cp -r <snapshot-name> ../restore
The files and directories from the snapshot should now be available in the /media/nfs/restore directory.
Next step
- If you experience any issues, see Troubleshoot NFS Azure file shares.