Configure custom IPsec/IKE connection policies for S2S VPN and VNet-to-VNet: Azure portal
This article walks you through the steps to configure IPsec/IKE policy for VPN Gateway Site-to-Site VPN or VNet-to-VNet connections using the Azure portal. The following sections help you create and configure an IPsec/IKE policy, and apply the policy to a new or existing connection.
Workflow
The instructions in this article help you set up and configure IPsec/IKE policies as shown in the following diagram.

- Create a virtual network and a VPN gateway.
- Create a local network gateway for cross premises connection, or another virtual network and gateway for VNet-to-VNet connection.
- Create a connection (IPsec or VNet2VNet).
- Configure/update/remove the IPsec/IKE policy on the connection resources.
Policy parameters
IPsec and IKE protocol standard supports a wide range of cryptographic algorithms in various combinations. Refer to About cryptographic requirements and Azure VPN gateways to see how this can help ensure cross-premises and VNet-to-VNet connectivity to satisfy your compliance or security requirements. Be aware of the following considerations:
- IPsec/IKE policy only works on the following gateway SKUs:
- VpnGw1~5 and VpnGw1AZ~5AZ
- Standard and HighPerformance
- You can only specify one policy combination for a given connection.
- You must specify all algorithms and parameters for both IKE (Main Mode) and IPsec (Quick Mode). Partial policy specification isn't allowed.
- Consult with your VPN device vendor specifications to ensure the policy is supported on your on-premises VPN devices. S2S or VNet-to-VNet connections can't establish if the policies are incompatible.
Cryptographic algorithms & key strengths
The following table lists the supported configurable cryptographic algorithms and key strengths.
| IPsec/IKEv2 | Options |
|---|---|
| IKEv2 encryption | GCMAES256, GCMAES128, AES256, AES192, AES128 |
| IKEv2 integrity | SHA384, SHA256, SHA1, MD5 |
| DH group | DHGroup24, ECP384, ECP256, DHGroup14, DHGroup2048, DHGroup2, DHGroup1, None |
| IPsec encryption | GCMAES256, GCMAES192, GCMAES128, AES256, AES192, AES128, DES3, DES, None |
| IPsec integrity | GCMAES256, GCMAES192, GCMAES128, SHA256, SHA1, MD5 |
| PFS group | PFS24, ECP384, ECP256, PFS2048, PFS2, PFS1, None |
| Quick Mode SA lifetime | (Optional; default values if not specified) Seconds (integer; minimum 300, default 27,000) Kilobytes (integer; minimum 1,024, default 10,2400,000) |
| Traffic selector | UsePolicyBasedTrafficSelectors ($True or $False, but optional; default $False if not specified) |
| DPD timeout | Seconds (integer; minimum 9, maximum 3,600, default 45) |
Your on-premises VPN device configuration must match or contain the following algorithms and parameters that you specify on the Azure IPsec or IKE policy:
- IKE encryption algorithm (Main Mode, Phase 1)
- IKE integrity algorithm (Main Mode, Phase 1)
- DH group (Main Mode, Phase 1)
- IPsec encryption algorithm (Quick Mode, Phase 2)
- IPsec integrity algorithm (Quick Mode, Phase 2)
- PFS group (Quick Mode, Phase 2)
- Traffic selector (if you use
UsePolicyBasedTrafficSelectors) - SA lifetimes (local specifications that don't need to match)
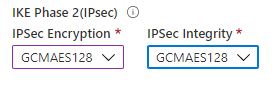
If you use GCMAES for the IPsec encryption algorithm, you must select the same GCMAES algorithm and key length for IPsec integrity. For example, use GCMAES128 for both.
In the table of algorithms and keys:
- IKE corresponds to Main Mode or Phase 1.
- IPsec corresponds to Quick Mode or Phase 2.
- DH group specifies the Diffie-Hellman group used in Main Mode or Phase 1.
- PFS group specifies the Diffie-Hellman group used in Quick Mode or Phase 2.
IKE Main Mode SA lifetime is fixed at 28,800 seconds on the Azure VPN gateways.
UsePolicyBasedTrafficSelectorsis an optional parameter on the connection. If you setUsePolicyBasedTrafficSelectorsto$Trueon a connection, it configures the VPN gateway to connect to an on-premises policy-based VPN firewall.If you enable
UsePolicyBasedTrafficSelectors, ensure that your VPN device has the matching traffic selectors defined with all combinations of your on-premises network (local network gateway) prefixes to or from the Azure virtual network prefixes, instead of any-to-any. The VPN gateway accepts whatever traffic selector the remote VPN gateway proposes, irrespective of what's configured on the VPN gateway.For example, if your on-premises network prefixes are 10.1.0.0/16 and 10.2.0.0/16, and your virtual network prefixes are 192.168.0.0/16 and 172.16.0.0/16, you need to specify the following traffic selectors:
- 10.1.0.0/16 <====> 192.168.0.0/16
- 10.1.0.0/16 <====> 172.16.0.0/16
- 10.2.0.0/16 <====> 192.168.0.0/16
- 10.2.0.0/16 <====> 172.16.0.0/16
For more information about policy-based traffic selectors, see Connect a VPN gateway to multiple on-premises policy-based VPN devices.
Setting the timeout to shorter periods causes IKE to rekey more aggressively. The connection can then appear to be disconnected in some instances. This situation might not be desirable if your on-premises locations are farther away from the Azure region where the VPN gateway resides, or if the physical link condition could incur packet loss. We generally recommend that you set the timeout to between 30 and 45 seconds.
Note
IKEv2 Integrity is used for both Integrity and PRF(pseudo-random function). If IKEv2 Encryption algorithm specified is GCM*, the value passed in IKEv2 Integrity is used for PRF only and implicitly we set IKEv2 Integrity to GCM*. In all other cases, the value passed in IKEv2 Integrity is used for both IKEv2 Integrity and PRF.
Diffie-Hellman groups
The following table lists the corresponding Diffie-Hellman groups supported by the custom policy:
| Diffie-Hellman group | DHGroup | PFSGroup | Key length |
|---|---|---|---|
| 1 | DHGroup1 | PFS1 | 768-bit MODP |
| 2 | DHGroup2 | PFS2 | 1024-bit MODP |
| 14 | DHGroup14 DHGroup2048 |
PFS2048 | 2048-bit MODP |
| 19 | ECP256 | ECP256 | 256-bit ECP |
| 20 | ECP384 | ECP384 | 384-bit ECP |
| 24 | DHGroup24 | PFS24 | 2048-bit MODP |
For more information, see RFC3526 and RFC5114.
Create S2S VPN connection with custom policy
This section walks you through the steps to create a Site-to-Site VPN connection with an IPsec/IKE policy. The following steps create the connection as shown in the following diagram. The on-premises site in this diagram represents Site6.

Step 1: Create the virtual network, VPN gateway, and local network gateway for TestVNet1
Create the following resources. For steps, see Create a Site-to-Site VPN connection.
Create the virtual network TestVNet1 using the following values.
- Resource group: TestRG1
- Name: TestVNet1
- Region: (US) East US
- IPv4 address space: 10.1.0.0/16
- Subnet 1 name: FrontEnd
- Subnet 1 address range: 10.1.0.0/24
- Subnet 2 name: BackEnd
- Subnet 2 address range: 10.1.1.0/24
Create the virtual network gateway VNet1GW using the following values.
- Name: VNet1GW
- Region: East US
- Gateway type: VPN
- VPN type: Route-based
- SKU: VpnGw2
- Generation: Generation 2
- Virtual network: VNet1
- Gateway subnet address range: 10.1.255.0/27
- Public IP address type: Basic or Standard
- Public IP address: Create new
- Public IP address name: VNet1GWpip
- Enable active-active mode: Disabled
- Configure BGP: Disabled
Step 2: Configure the local network gateway and connection resources
Create the local network gateway resource Site6 using the following values.
- Name: Site6
- Resource Group: TestRG1
- Location: East US
- Local gateway IP address: 5.4.3.2 (example value only - use the IP address of your on-premises device)
- Address Spaces 10.61.0.0/16, 10.62.0.0/16 (example value only)
From the virtual network gateway, add a connection to the local network gateway using the following values.
- Connection name: VNet1toSite6
- Connection type: IPsec
- Local network gateway: Site6
- Shared key: abc123 (example value - must match the on-premises device key used)
- IKE protocol: IKEv2
Step 3: Configure a custom IPsec/IKE policy on the S2S VPN connection
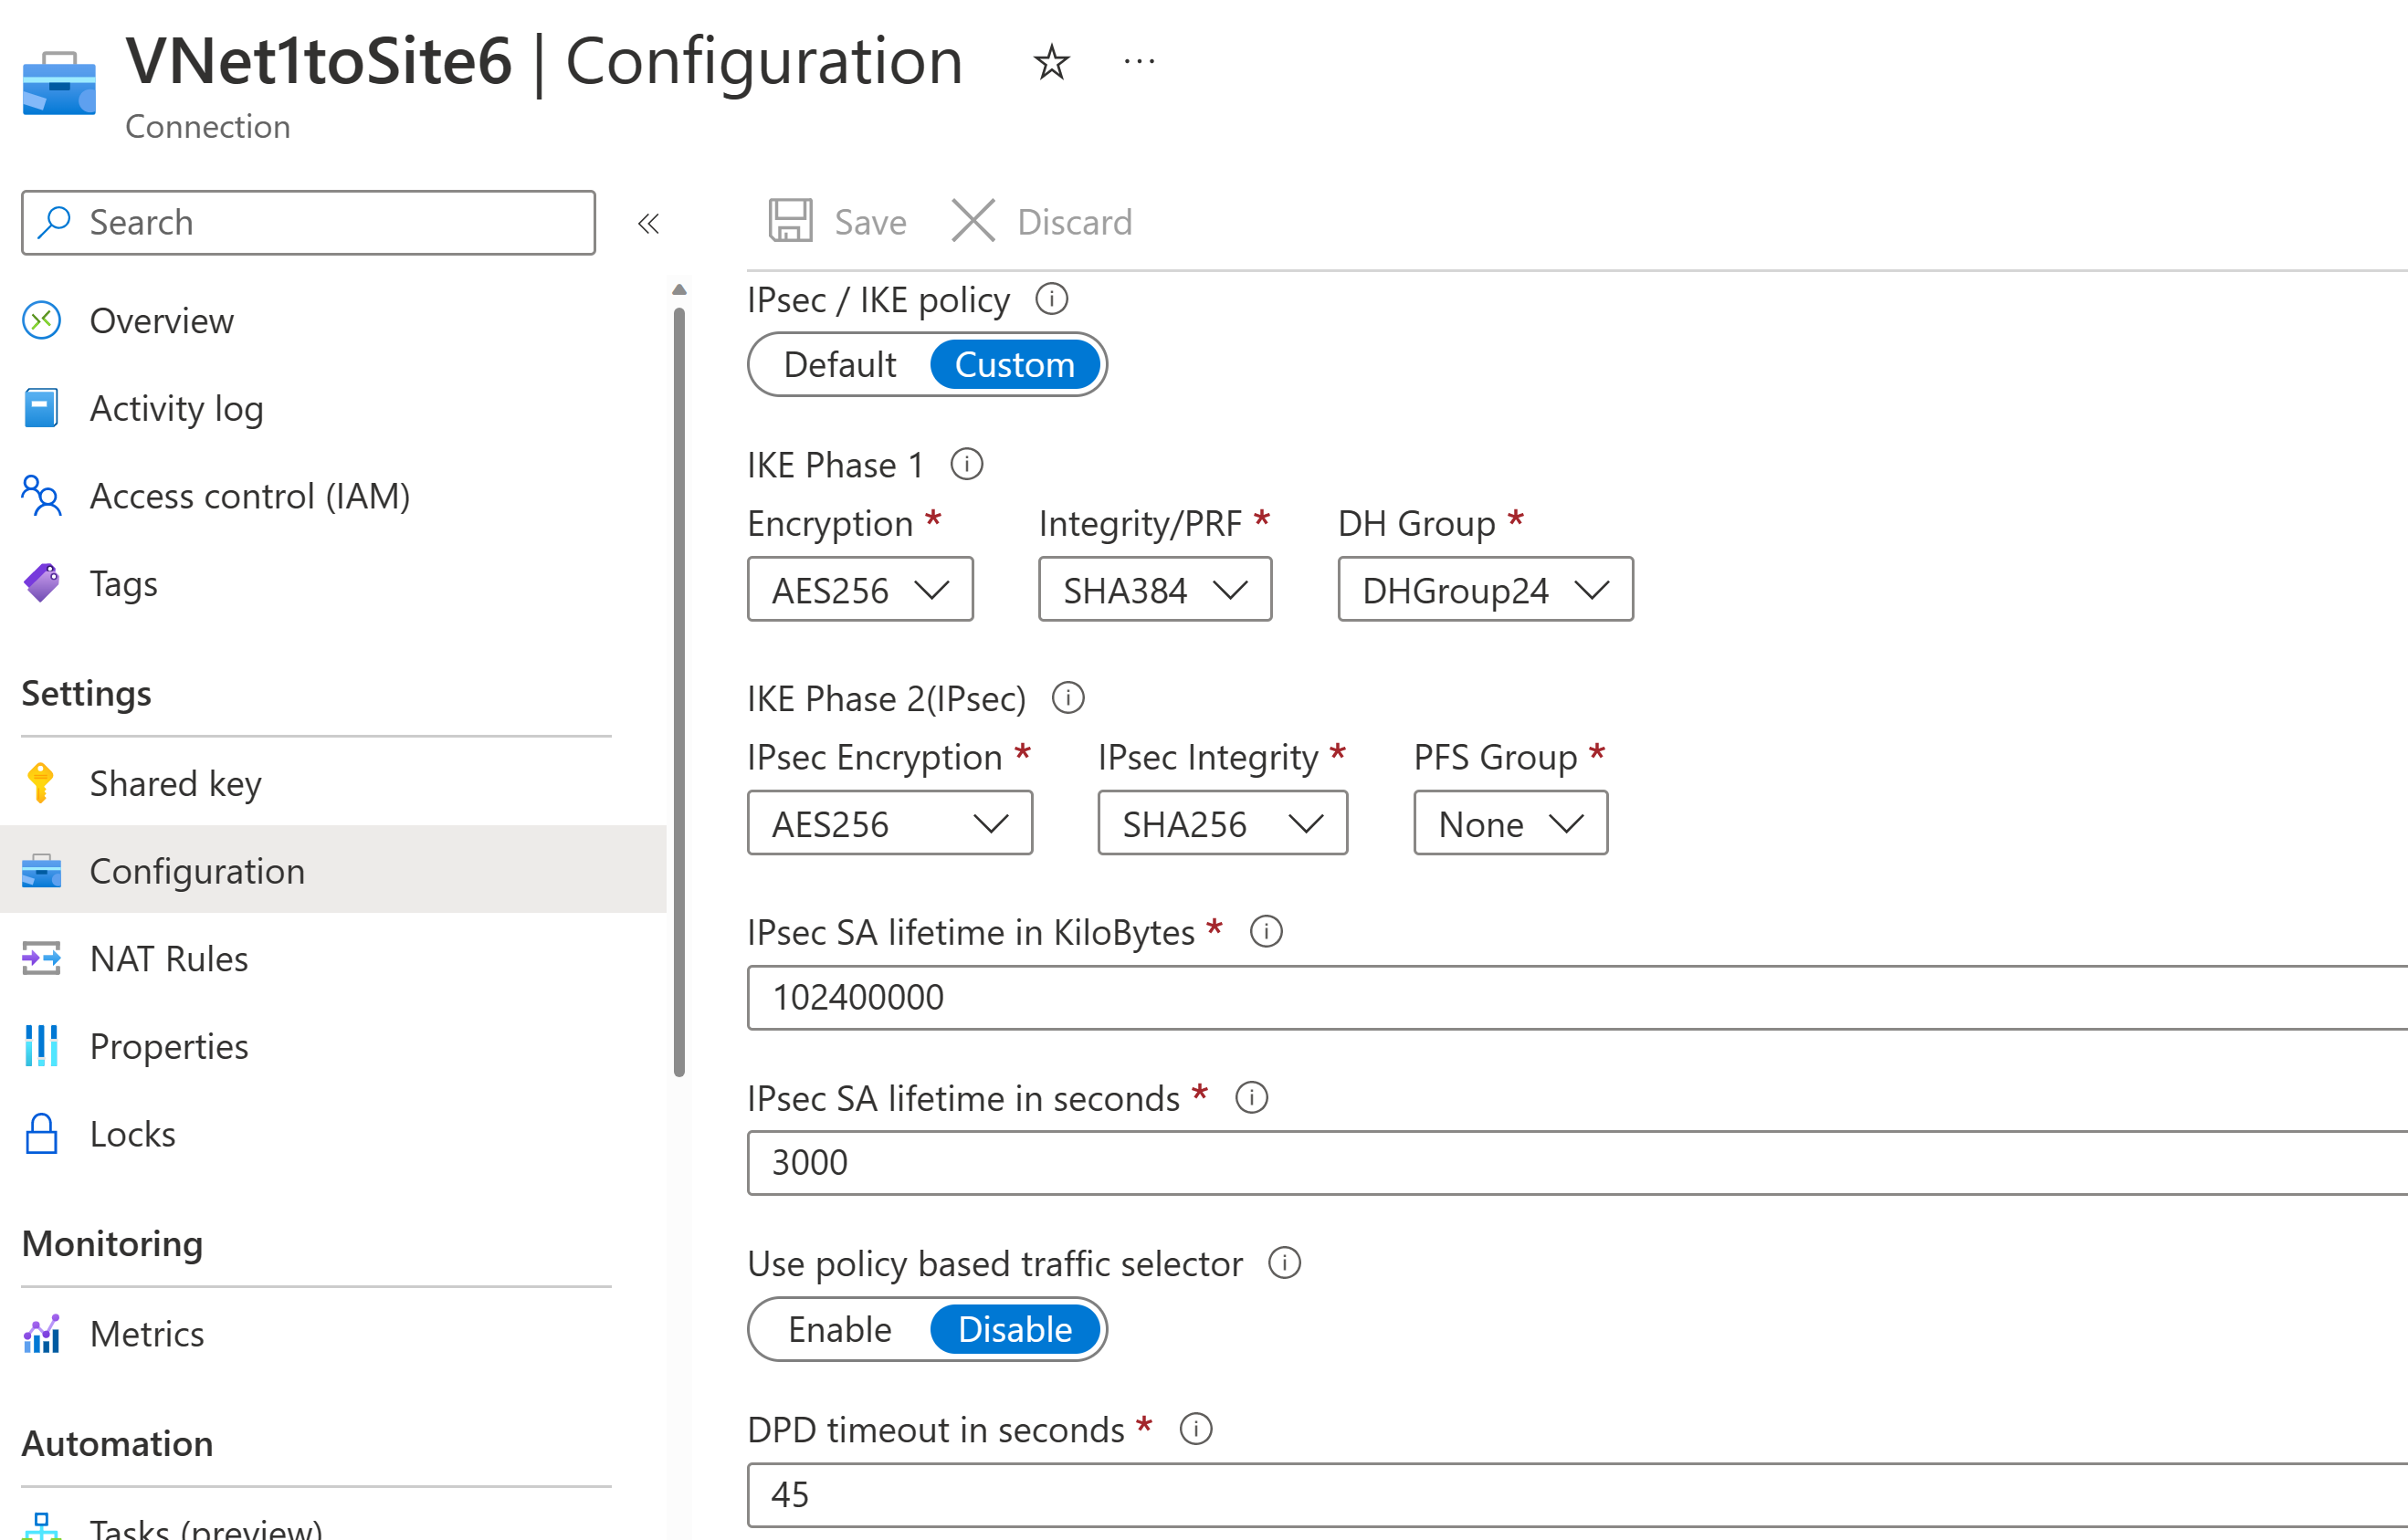
Configure a custom IPsec/IKE policy with the following algorithms and parameters:
- IKE Phase 1: AES256, SHA384, DHGroup24
- IKE Phase 2(IPsec): AES256, SHA256, PFS None
- IPsec SA Lifetime in KB: 102400000
- IPsec SA lifetime in seconds: 30000
- DPD timeout: 45 seconds
Go to the Connection resource you created, VNet1toSite6. Open the Configuration page. Select Custom IPsec/IKE policy to show all configuration options. The following screenshot shows the configuration according to the list:
If you use GCMAES for IPsec, you must use the same GCMAES algorithm and key length for both IPsec encryption and integrity. For example, the following screenshot specifies GCMAES128 for both IPsec encryption and IPsec integrity:
If you want to enable Azure VPN gateway to connect to policy-based on-premises VPN devices, you can select Enable for the Use policy based traffic selectors option.
Once all the options are selected, select Save to commit the changes to the connection resource. The policy will be enforced in about a minute.
Important
Once an IPsec/IKE policy is specified on a connection, the Azure VPN gateway will only send or accept the IPsec/IKE proposal with specified cryptographic algorithms and key strengths on that particular connection. Make sure your on-premises VPN device for the connection uses or accepts the exact policy combination, otherwise the S2S VPN tunnel will not establish.
Policy-based traffic selector and DPD timeout options can be specified with Default policy, without the custom IPsec/IKE policy.


Create VNet-to-VNet connection with custom policy
The steps to create a VNet-to-VNet connection with an IPsec/IKE policy are similar to that of an S2S VPN connection. You must complete the previous sections in Create an S2S vpn connection to create and configure TestVNet1 and the VPN gateway.

Step 1: Create the virtual network, VPN gateway, and local network gateway for TestVNet2
Use the steps in the Create a VNet-to-VNet connection article to create TestVNet2, and create a VNet-to-VNet connection to TestVNet1.
Example values:
Virtual network TestVNet2
- Resource group: TestRG2
- Name: TestVNet2
- Region: (US) West US
- IPv4 address space: 10.2.0.0/16
- Subnet 1 name: FrontEnd
- Subnet 1 address range: 10.2.0.0/24
- Subnet 2 name: BackEnd
- Subnet 2 address range: 10.2.1.0/24
VPN gateway: VNet2GW
- Name: VNet2GW
- Region: West US
- Gateway type: VPN
- VPN type: Route-based
- SKU: VpnGw2
- Generation: Generation 2
- Virtual network: TestVNet2
- Gateway subnet address range: 10.2.255.0/27
- Public IP address type: Basic or Standard
- Public IP address: Create new
- Public IP address name: VNet2GWpip
- Enable active-active mode: Disabled
- Configure BGP: Disabled
Step 2: Configure the VNet-to-VNet connection
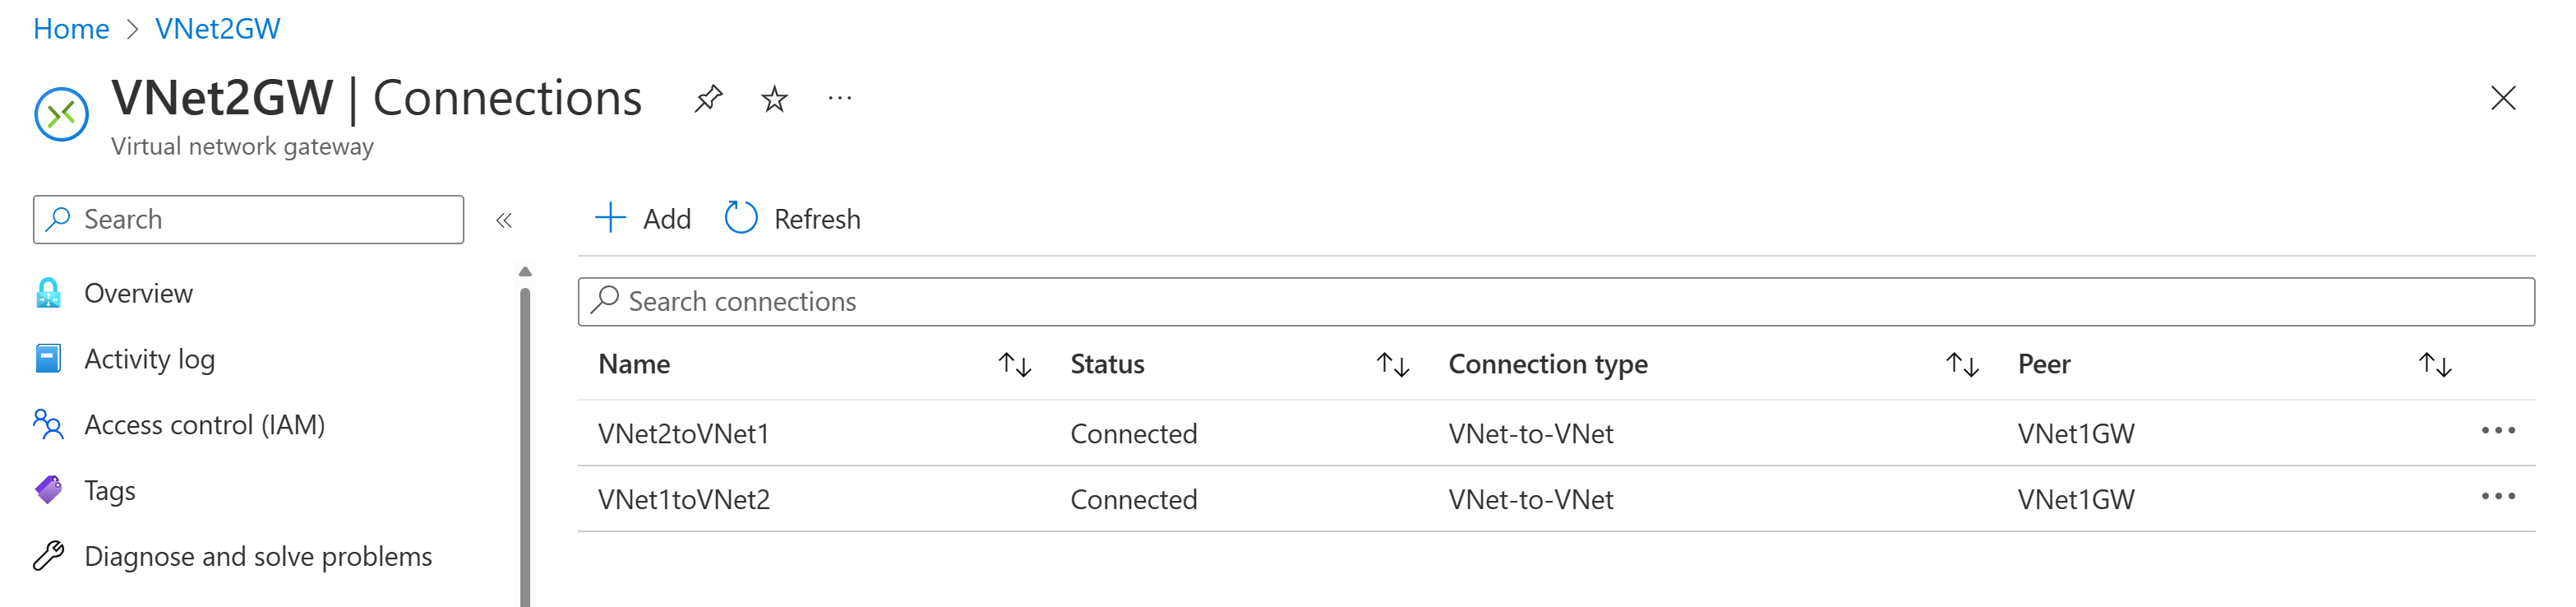
From the VNet1GW gateway, add a VNet-to-VNet connection to VNet2GW named VNet1toVNet2.
Next, from the VNet2GW, add a VNet-to-VNet connection to VNet1GW named VNet2toVNet1.
After you add the connections, you'll see the VNet-to-VNet connections as shown in the following screenshot from the VNet2GW resource:

Step 3: Configure a custom IPsec/IKE policy on VNet1toVNet2
From the VNet1toVNet2 connection resource, go to the Configuration page.
For IPsec / IKE policy, select Custom to show the custom policy options. Select the cryptographic algorithms with the corresponding key lengths. This policy doesn't need to match the previous policy you created for the VNet1toSite6 connection.
Example values:
- IKE Phase 1: AES128, SHA1, DHGroup14
- IKE Phase 2(IPsec): GCMAES128, GCMAES128, PFS2048
- IPsec SA Lifetime in KB: 102400000
- IPsec SA lifetime in seconds: 14400
- DPD timeout: 45 seconds
Select Save at the top of the page to apply the policy changes on the connection resource.
Step 4: Configure a custom IPsec/IKE policy on VNet2toVNet1
Apply the same policy to the VNet2toVNet1 connection, VNet2toVNet1. If you don't, the IPsec/IKE VPN tunnel won't connect due to policy mismatch.
Important
Once an IPsec/IKE policy is specified on a connection, the Azure VPN gateway will only send or accept the IPsec/IKE proposal with specified cryptographic algorithms and key strengths on that particular connection. Make sure the IPsec policies for both connections are the same, otherwise the VNet-to-VNet connection will not establish.
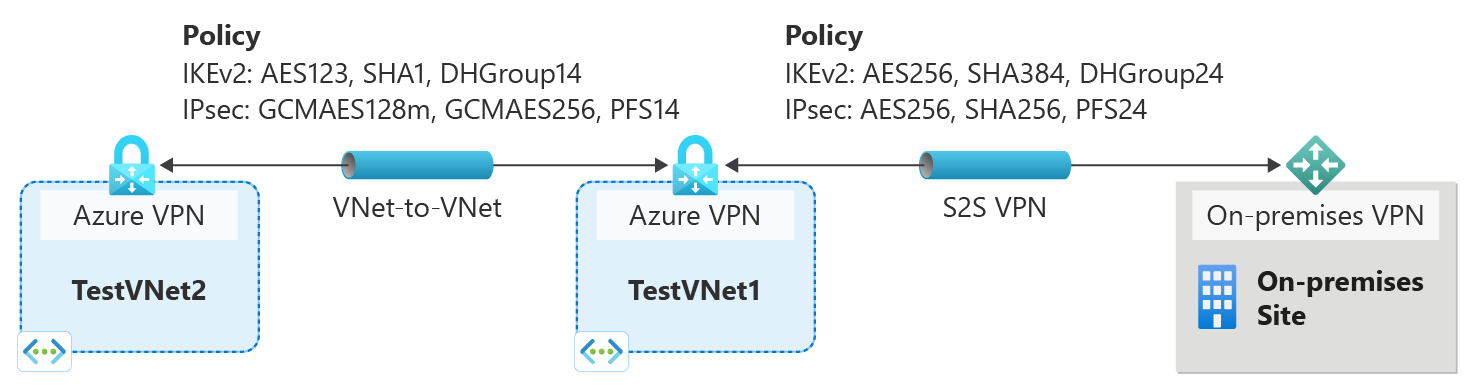
After you complete these steps, the connection is established in a few minutes, and you'll have the following network topology.
To remove custom policy from a connection
- To remove a custom policy from a connection, go to the connection resource.
- On the Configuration page, change the IPse /IKE policy from Custom to Default. This removes all custom policy previously specified on the connection, and restore the Default IPsec/IKE settings on this connection.
- Select Save to remove the custom policy and restore the default IPsec/IKE settings on the connection.
IPsec/IKE policy FAQ
To view frequently asked questions, go to the IPsec/IKE policy section of the VPN Gateway FAQ.
Next steps
For more information about policy-based traffic selectors, see Connect multiple on-premises policy-based VPN devices.