Use Power Automate flows in Business Central
With Business Central, you're given a licence to Microsoft Power Automate. This licence lets you use your Business Central data as part of a workflow in Microsoft Power Automate. You create flows and connect to your data from internal and external sources through the Business Central connector.
Power Automate flows are triggered by events, such as a record being created, modified, or deleted. Flows can also be run on a user-defined schedule or on demand.
Note
Administrators can restrict access to Power Automate. If you find that you don't have access to some or all of the features described in this article, talk to your admin. If you want to learn how you can control Power Automate access as an admin, see Set Up Power Automate Integration.
Tip
In addition to Power Automate, you can use approval workflow templates in Business Central. Although they're two separate workflow systems, any approval workflow template you create with Power Automate is added to the list of workflows within Business Central. Learn more at Workflows.
About Power Automate flows
Power Automate is a service that helps you create automated workflows (or flows) between apps and services, like Business Central. Power Automate flows require little or no coding knowledge. They can be associated with a wide range of events and responses, such as:
- Record changes
- External files updates
- Posted documents
- Different Microsoft and third-party services, like Microsoft Outlook, Excel, Dataverse, Teams, SharePoint, Power Apps, and more.
There are three different cloud flow types that you can work with:
| Flow type | Description |
|---|---|
| Automated flow | This flow type is run automatically by an event. In Business Central, an event could be when a record or document is created, modified or deleted. So, for example, a new sales invoice can trigger a flow for an approval request, which can have different events set depending on the approver's reply. A negative response sends a notification and email to the approval requester. A positive reply simultaneously updates an Excel spreadsheet located in a SharePoint folder and sends an update to a Teams chat. Automated flows can be started by both internal and external events in Business Central. |
| Approval flow | Approval flows are also automated flows in Power Automate, but they're designed specifically for requesting approval when changes are made to records and data. You can use approval flows in Power Automate as an alternative to the approval workflows feature that's part of Business Central. |
| Scheduled flow | This type of flow is also automatically run but it runs periodically at a scheduled date and time. |
| Instant flow | This flow type is run on-demand, requiring the user to run it manually from a button or action in another app or device, in this case, the Business Central client. Instant flows work similarly to batch shortcuts, performing multiple lengthy steps with a few button presses and are launched from specific pages or tables. For example, a flow can add a button to the action menu on the Vendors page to block payments to a vendor and, at the same time, send customisable emails to the vendor's contact and your company's purchasers as well as update the contact in Outlook. |
Power Automate features
You can explore all Power Automate flows currently available to you by signing in to Power Automate and selecting My flows from the navigation bar on the left. Here you find any flows you have already created yourself and flows shared with you by an admin or coworker.
Instant flows are also made available for running directly from most list, card, and document pages in Business Central. You find the instant flows in the Automate action group in the action bar of pages. To run a flow, select it, and follow the instructions presented to you. Learn more in the sections that follow.
With automated flows in Business Central, there's nothing for you to do, unless you want to change them, or turn them off. Otherwise, they just work when triggered.
Run instant flows
Instant flows open inside Business Central online so you can remain within the context of the business process you were in the middle of doing. You can run an instant flow from most lists, cards, or documents.
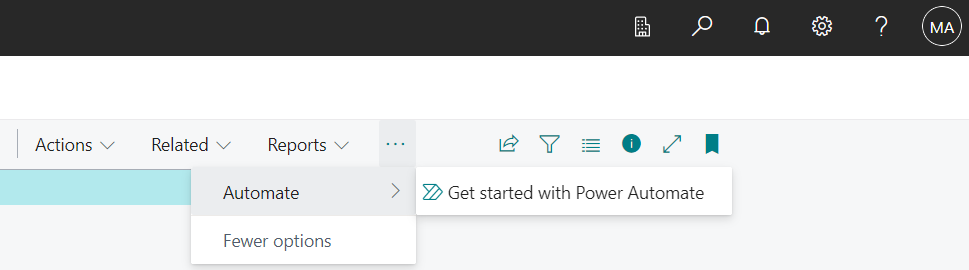
In the action bar, select Automate, then choose a flow from the list of available flows under the Power Automate action.

On some pages, Automate is nested under More options (...).
In the Run Flow pane, fill in any required fields, then select Continue to run the flow.
Note
The first time you use the Automate item, you may see only the Get started with Power Automate action. You see this action because you haven't agreed to the privacy notice for Microsoft Power Automate. To continue, select Get started with Power Automate and follow the instructions to agree or disagree.
Create, edit, and manage flows
Creating new flows or modifying and managing existing ones (like turning them on or off) can be done directly in Power Automate. But you can initiate some of these tasks from the Automate action menu in Business Central:

To create an automated flow from a list, card, or document page, select Automate > Create automated flow.
To create an approval workflow from a card or document page, select Automate > Create approval flow.
Tip
This action is only available on card and document type pages; not lists.
To create an instant flow from a list, card, or document page, select Automate > Create action based on a flow.
To open Power Automate from a list, card, or document page, select Automate > Manage flows.
These tasks are typically done by an admin or super user. The tasks require a broader knowledge of the business processes in Business Central. To learn more, go to the following articles in the Business Central Dev and IT Pro help:
- Power Automate integration
- Create automated flows (also covers approval flows)
- Create instant flows
- Manage Power Automate flows
See also
Troubleshoot Your Business Central Automated Workflows
Get Ready for Doing Business
Workflows
Import Business Data from Other Finance Systems
Assign Permissions to Users and Groups
Set Up Business Central
Financial Management
Manage Power Automate Flows
Set Up Automated Workflows
Switch on Instant Flows
Feedback
Coming soon: Throughout 2024 we will be phasing out GitHub Issues as the feedback mechanism for content and replacing it with a new feedback system. For more information see: https://aka.ms/ContentUserFeedback.
Submit and view feedback for