Integrate outbound marketing with a CMS system, Dynamics 365 Portals, or Power Apps portals
Important
This article only applies to outbound marketing, which will be removed from the product on June 30, 2025. To avoid interruptions, transition to real-time journeys before this date. More information: Transition overview
Read this topic to learn how you can run interactive marketing features for Customer Insights - Journeys by using an integrated Dynamics 365 Portal, Power Apps portals, or by using your own website or CMS system.
Note
Dynamics 365 Portals and Power Apps portals aren't available in all countries/regions. If this applies to you, then the Use Dynamics 365 Portals or a Power Apps portal option won't be available when you run the Customer Insights - Journeys setup wizard. Instead, use your CMS system to host interactive marketing features as described in this topic. If portals later become available in your country/region, you'll be able switch to them at that time, also as described in this topic.
What is the difference between Power Apps portals and Dynamics 365 Portals?
Power Apps portals is a replacement product for Dynamics 365 Portals. Both products will continue to be supported, but only Power Apps portals are available for new customers. Both products work on the same basic technical foundation and work in the same way from the perspective of Customer Insights - Journeys. However, Power Apps portals provide additional features for users (which don't affect Customer Insights - Journeys) and are licensed according to consumption (logins and page loads) rather than per instance.
For details about portal licensing, see the Power Apps and Flow licensing FAQ.
Beyond these few differences, Dynamics 365 Portals and Power Apps portals work exactly the same from the perspective of Customer Insights - Journeys, so you can consider these two terms to be interchangeable for the remainder of this topic and elsewhere in the Customer Insights - Journeys documentation.
How portal integration affects outbound marketing features
Customer Insights - Journeys provides several features that enable contacts to interact directly with the system. These are:
- Landing pages, which provide forms that contacts can use to register for mailing lists, free downloads, webinars, or other perks
- Subscription centers, which enable contacts to manage their mailing list subscriptions and personal information
- Forwarding pages, which enable contacts to forward marketing emails they have received from you (while preserving accurate tracking info)
- The event website, which enables contacts to read about and register for your events
Each of these features requires one or more webpages that are available publicly on the internet. Each page must furthermore be able to fetch information from Customer Insights - Journeys and also be able to submit data back to it. There are two ways to accomplish this:
- Use Dynamics 365 Portals or a Power Apps portal: This option is based on a Dynamics 365 add-on product that runs directly on the same tenant as your Customer Insights - Journeys instance. It enables you to go live with Customer Insights - Journeys without needing to manage or modify your own website.
- Use your own website or CMS system: This option requires that you have your own website where you can host pages, add scripts, and embed forms from Customer Insights - Journeys. You can use this option in parallel with a Dynamics 365 Portal or Power Apps portal if you wish.
The following table compares how each of the public-facing interactive features works when you implement it using a Power Apps portal or your own website.
| Feature | With Power Apps portals | Without Power Apps portals |
|---|---|---|
| Landing pages | Design and publish landing pages using the graphical page designer in Customer Insights - Journeys. The pages run directly on the portal. | Design and publish landing pages on your own website or CMS system. Enable forms by adding a Customer Insights - Journeys form-capture script or by embedding a marketing form created using the graphical form designer in Customer Insights - Journeys. Include a website-tracking script generated by Customer Insights - Journeys on all landing pages to enable page visits and submissions to be tracked, and to enable customer-journey triggers to react to landing-page interactions. |
| Subscription centers | Design and publish subscription centers using the graphical page designer in Customer Insights - Journeys. The pages run directly on the portal. | Design and publish subscription centers for your own website or CMS system using techniques similar to those for creating landing pages. Prefilling must be enabled for subscription center forms. To satisfy the legal requirement, a default subscription center is published on the service fabric used by your Customer Insights - Journeys instance. This allows you to run email marketing campaigns even without a portal or external website. You can customize this page using the graphical page designer in Customer Insights - Journeys. Include a website-tracking script generated by Customer Insights - Journeys on all subscription-center pages to enable page visits and submissions to be tracked, and to enable customer-journey triggers to react to landing-page interactions. |
| Forward-to-a-friend pages | Design and publish forwarding pages using the graphical page designer in Customer Insights - Journeys. The pages run directly on the portal. | Not supported. |
| Event website | The then-current version of the event website is published automatically on the portal when you install Customer Insights - Journeys. To update or customize the site, download the latest version as an Angular project, customize it as needed using your preferred development tools, and then publish the result on the portal. |
Download the current version of the event website as an Angular project, customize it using your preferred development tools, and then publish the result on your own website. |
Adding a Power Apps portal to an outbound marketing instance
This integration is only available in legacy outbound marketing application solutions. To add portals to an instance of outbound marketing, you must request it on the outbound marketing request form (located at Settings > Versions) at the same time you request to add outbound marketing to your real-time journeys instance. You must provide the details of the desired portal URL at the time of the request and it can be enabled for you by exception. Only new portals can be created and attached to outbound marketing. You can't attach an existing portal.
Note
If have integrated Power Apps portals with your Customer Insights - Journeys instance and the portal suddenly stops working or disappear, the portal trial license may have expired. To determine whether this is the case:
- Navigate to the Power Apps portals admin center.
- Go to the Portal Details section and check if the portals license is in an expired state.
If the portals integration is expired, you will need to purchase a paid license. You will then need to reset the portals integration on the Customer Insights - Journeys instance and re-provision.
Remove portal integration from an existing Customer Insights - Journeys instance
You can choose to remove portal integration from a Customer Insights - Journeys instance at any time. If you choose to do so, the following will occur:
- Your portal license will be released and can then be reused with another Customer Insights - Journeys instance, or another Dynamics 365 app.
- The portal will be reset during the removal process.
- All existing marketing pages in Customer Insights - Journeys will still be configured to be published on the now removed portal, so they will cease to function. However, their design and content will still be stored in Customer Insights - Journeys. If you re-add a portal, the pages will be reconfigured to use the new portal and you'll be able to publish them there.
- The event website will be removed. All events will still provide a link to the old website, so that link will no longer function. If you install the event website on your own server, it will work correctly right away (you won't have to update your event records), but if you want the links in your event records to open the new site, you must edit each record manually.
Before removing the portal, you should recreate your landing pages and subscription centers on your external website as needed, and design your customer journeys, content settings, and email messages to link to them there. If you're using event management, then you should also install the event management website on your external server. When you've confirmed that everything is working as expected on your external site, you can remove the portal from your Customer Insights - Journeys installation.
To remove portal integration from an existing Customer Insights - Journeys instance:
Access the installation management area for the instance you want to modify. You should be able to see that the Use Dynamics 365 Portals or a Power Apps portal option is currently selected.
From the Other actions panel, choose Configure your portal.
The portal admin site opens. Select Portal actions from the side navigator.

Select Reset portal and follow the instructions on your screen to reset the portal. More information: Reset a portal.
Warning
When you reset the portal, all of the existing portal content and settings will be permanently deleted.
Note
If you initially installed Customer Insights - Journeys with portal integration enabled, then you did not receive a default subscription center (which otherwise would be running on the service fabric of your Customer Insights - Journeys instance). You still won't have one after you remove the portal integration, and you can't manually create pages that run on the service fabric. You must therefore create at least one subscription center on your external website and configure your content settings to link to it before your remove the portal.
Add portal integration to an existing Customer Insights - Journeys instance
You can choose to add (or re-add) a portal to a Customer Insights - Journeys instance at any time. When you do this, the following will occur:
- All of your external marketing pages and external event website will continue to function.
- If you initially installed Customer Insights - Journeys with portal integration disabled, then you should have a default default subscription center (which runs on the service fabric of your Customer Insights - Journeys instance). It will continue to be available even after you add the portal.
- If you have any portal-based marketing page designs left over in your system from a previous portals integration, these will be reconfigured to use the new portal automatically.
- As when setting up a new instance, the setup wizard will either claim an existing Dynamics 365 Portal license to work with Customer Insights - Journeys (if a free license is available on your tenant), or create a demo Power Apps Portal for you (which will expire in 30 days, after which you must start paying for it).
To create a new portal and associate it with the Customer Insights - Journeys app:
Important
If you don't provision your portal through the Customer Insights - Journeys app, you can’t connect it later.
Access the installation management area for the instance you want to modify. You should be able to see that the Use your own webserver option is currently selected.
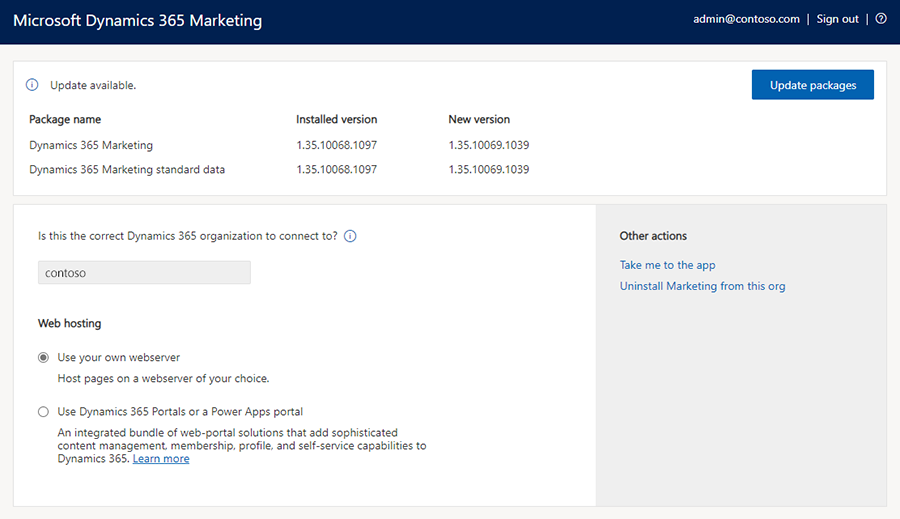
Select Use Dynamics 365 Portals or a Power Apps portal. The Portal setup dialog opens and shows some information about what to expect.

Select OK to continue. You go back to the setup wizard, which now shows the Use Dynamics 365 Portals or a Power Apps portal option selected.
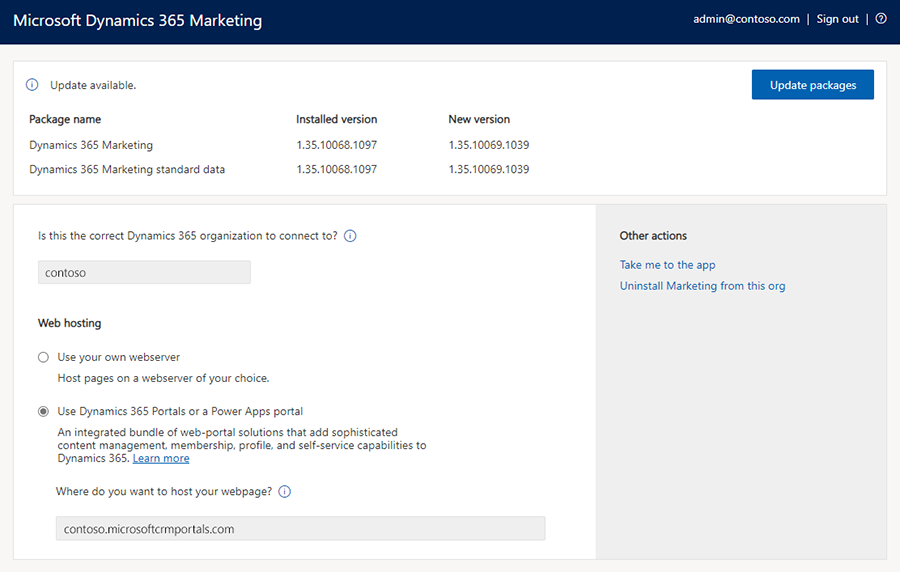
In the field now provided under the Use Dynamics 365 Portals or a Power Apps portal option, enter a prefix for your portal URL in the field provided. Your contacts and customers can see the URL when they open a portal, so you should choose a subdomain name that they will recognize, such as your organization's name.
Select Set up portal to start setting up your portal. The process may take some time. You can track its progress by leaving the page open in your browser, but installation will continue uninterrupted if you choose to close your browser.