Manage branches in Microsoft Fabric workspaces
The Fabric workspace is a shared environment that accesses live items. Any changes made directly in the workspace override and affect all other workspace users. Therefore, Git best practice is for developers to work in isolation outside of the shared workspaces. There are two ways for a developer to work in their own protected workspace.
- Develop using client tools, such as Power BI Desktop for reports and semantic models, or VS Code for Notebooks.
- Develop in a separate Fabric workspace. Each developer has their own workspace where they connect their own separate branch, sync the content into that workspace, and then commit back to the branch.
Important
This feature is in preview.
To work with branches using Git integration, first connect the shared development team’s workspace to a single shared branch. For example, if your team uses one shared workspace, connect it to the main branch in your team’s repository, and sync between the workspace and the repo. If your team’s workflow has multiple shared branches like Dev/Test/Prod branches, each branch can be connected to a different workspace.
Then, each developer can choose the isolated environment in which to work.
Prerequisites
To integrate Git with your Microsoft Fabric workspace, you need to set up the following prerequisites for both Fabric and Git.
Fabric prerequisites
To access the Git integration feature, you need one of the following:
- Power BI Premium license. A Power BI premium license supports all Power BI items only.
- Fabric capacity. A Fabric capacity is required to use all supported Fabric items. If you don't have one yet, sign up for a free trial.
In addition, the following tenant switches must be enabled from the Admin portal:
- Users can create Fabric items
- Users can synchronize workspace items with their Git repositories
- For GitHub users only: Users can synchronize workspace items with GitHub repositories
These switches can be enabled by the tenant admin, capacity admin, or workspace admin, depending on your organization's settings.
Git prerequisites
Git integration is currently supported for Azure DevOps and GitHub. To use Git integration with your Fabric workspace, you need the following in either Azure DevOps or GitHub:
- An active Azure account registered to the same user that is using the Fabric workspace. Create a free account.
- Access to an existing repository.
Develop using client tools
If the items you're developing are available in other tools, you can work on those items directly in the client tool. Not all items are available in every tool. Items that are only available in Fabric need to be developed in Fabric.
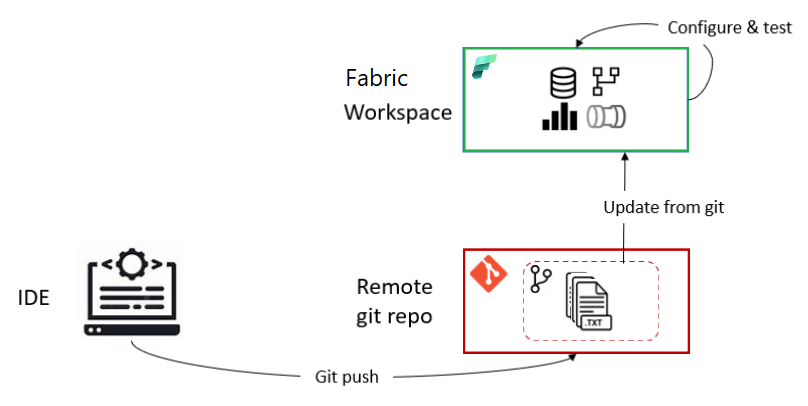
The workflow for developers using a client tool like Power BI Desktop should look something like this:
Clone the repo into a local machine. (You only need to do this step once.)
Open the project in Power BI Desktop using the local copy of the PBIProj.
Make changes and save the updated files locally. Commit to the local repo.
When ready, push the branch and commits to the remote repo.
Test the changes against other items or more data by connecting the new branch to a separate workspace, and uploading the semantic model and reports using the update all button in the source control panel. Do any tests or configuration changes there before merging into the main branch.
If no tests are required in the workspace, the developer can merge changes directly into the main branch, without the need for another workspace.
Once the changes are merged, the shared team’s workspace is prompted to accept the new commit. The changes are updated into the shared workspace and everyone can see the changes to those semantic models and reports.
For a specific guidance on how to use the new Power BI Desktop file format in git, see Source code format.
Develop using another workspace
For a developer who works in the web, the flow would be as follows:
From the Branches tab of the Source control menu, select Branch out to new workspace.
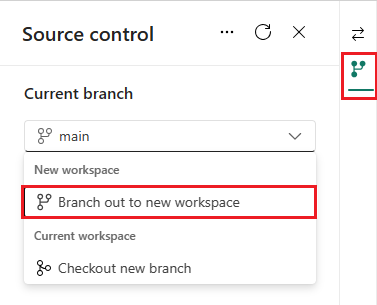
Specify the names of the branch and workspace. The new branch created based on the branch connected to the current workspace.
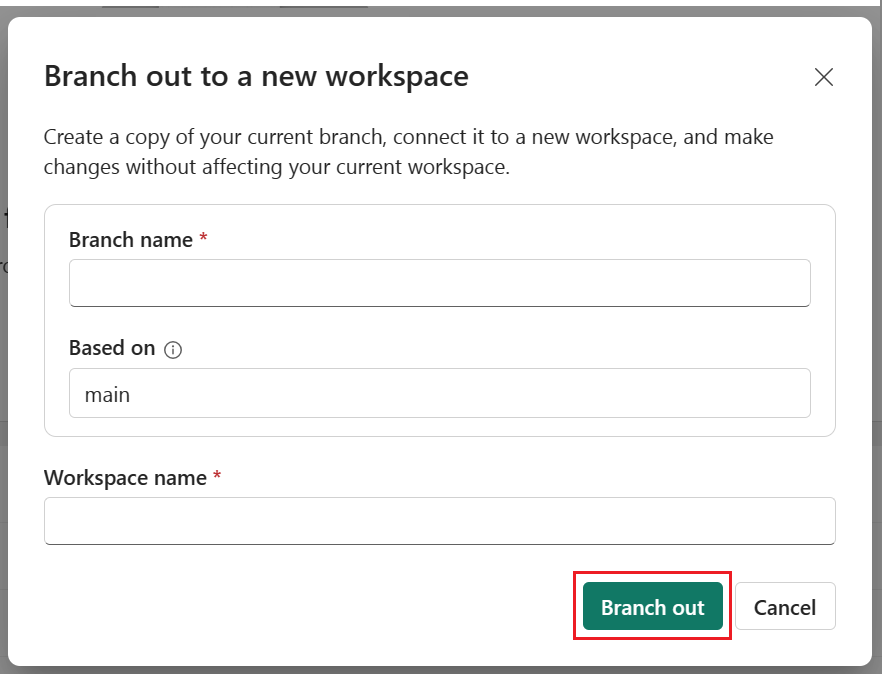
Select Branch out.
Fabric creates the new workspace and branch. You're automatically taken to the new workspace.
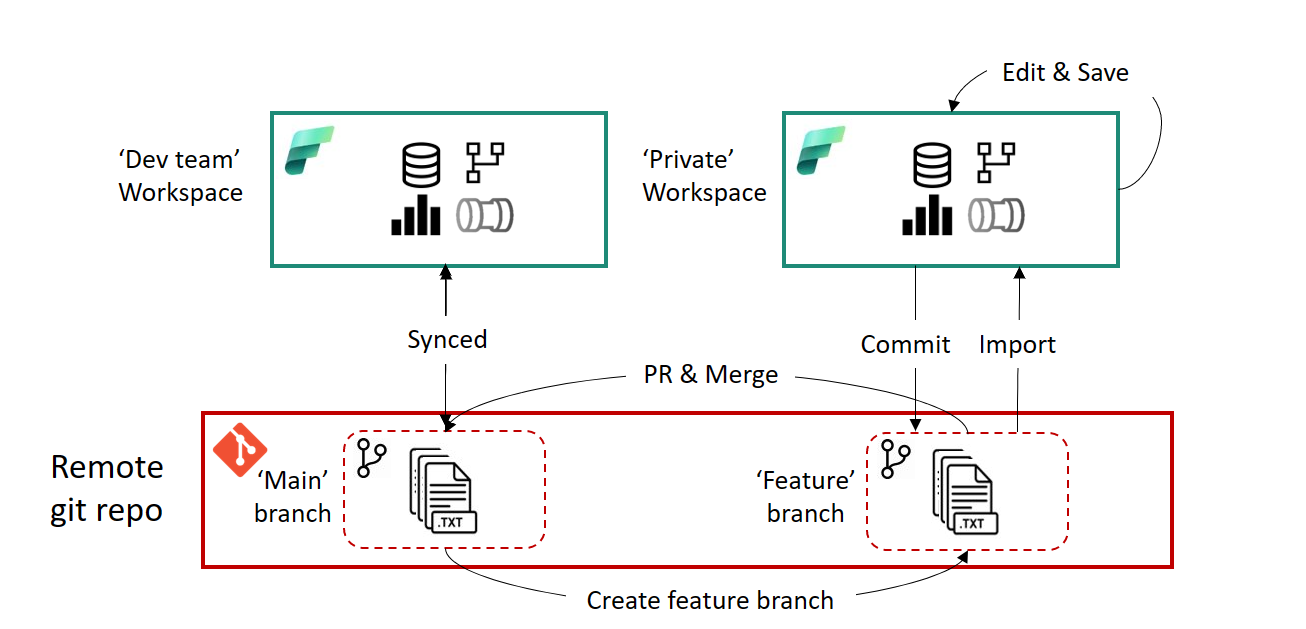
The workspace syncs with your feature branch, and becomes an isolated environment to work in, as illustrated. You can now work in this new isolated environment. This might take a few minutes. See troubleshooting tips for more information on branching out.
Save your changes and commit them into the feature branch.
When ready, create a PR to the main branch. The review and merge processes are done through Azure Repos based on the configuration your team defined for that repo.
Once the review and merge are complete, a new commit is created to the main branch. This commit prompts the user to update the content in the Dev team's workspace with the merged changes.
See branching out limitations for more information.
Switch branches
If your workspace is connected to a Git branch and you want to switch to another branch, you can do so quickly from the Source control panel without disconnecting and reconnecting.
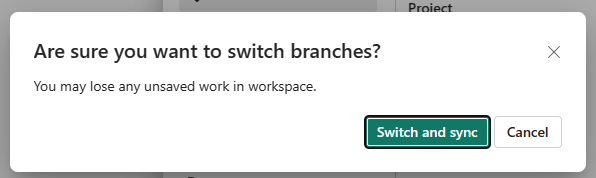
When you switch branches, the workspace syncs with the new branch and all items in the workspace are overridden. If there are different versions of the same item in each branch, the item is replaced. If an item is in the old branch, but not the new one, it gets deleted.
To switch between branches, follow these steps:
From the Branches tab of the Source control menu, select Checkout new branch.

Specify the branch you want to connect to. This branch must contain the same directory as the current branch.
Select Checkout branch.
If you have any unsaved changes in the workspace, they will be lost if you switch branches without saving them first. Select Cancel to go back and save your changes before switching branches.
Related content
Feedback
Coming soon: Throughout 2024 we will be phasing out GitHub Issues as the feedback mechanism for content and replacing it with a new feedback system. For more information see: https://aka.ms/ContentUserFeedback.
Submit and view feedback for