Get data from Azure storage
In this article, you learn how to get data from Azure storage (ADLS Gen2 container, blob container, or individual blobs) into either a new or existing table.
Prerequisites
- A workspace with a Microsoft Fabric-enabled capacity
- A KQL database with editing permissions
- A storage account
Source
On the lower ribbon of your KQL database, select Get Data.
In the Get data window, the Source tab is selected.
Select the data source from the available list. In this example, you're ingesting data from Azure storage.


Configure
Select a target table. If you want to ingest data into a new table, select + New table and enter a table name.
Note
Table names can be up to 1024 characters including spaces, alphanumeric, hyphens, and underscores. Special characters aren't supported.
To add your data source, paste your storage connection string in the URI field, and then select +. The following table lists the supported authentication methods and the permissions needed for ingesting data from Azure storage.
Authentication method Individual blob Blob container Azure Data Lake Storage Gen2 Shared Access (SAS) token Read and Write Read and List Read and List Storage account access key Note
- You can either add up to 10 individual blobs, or ingest up to 5000 blobs from a single container. You can't ingest both at the same time.
- Each blob can be a max of 1 GB uncompressed.
If you pasted a connection string for a blob container or an Azure Data Lake Storage Gen2, you can then add the following optional filters:

Setting Field description File filters (optional) Folder path Filters data to ingest files with a specific folder path. File extension Filters data to ingest files with a specific file extension only.
Select Next

Inspect
The Inspect tab opens with a preview of the data.
To complete the ingestion process, select Finish.

Optionally:
- Select Command viewer to view and copy the automatic commands generated from your inputs.
- Use the Schema definition file dropdown to change the file that the schema is inferred from.
- Change the automatically inferred data format by selecting the desired format from the dropdown. For more information, see Data formats supported by Real-Time Analytics.
- Edit columns.
- Explore Advanced options based on data type.
Edit columns
Note
- For tabular formats (CSV, TSV, PSV), you can't map a column twice. To map to an existing column, first delete the new column.
- You can't change an existing column type. If you try to map to a column having a different format, you may end up with empty columns.
The changes you can make in a table depend on the following parameters:
- Table type is new or existing
- Mapping type is new or existing
| Table type | Mapping type | Available adjustments |
|---|---|---|
| New table | New mapping | Rename column, change data type, change data source, mapping transformation, add column, delete column |
| Existing table | New mapping | Add column (on which you can then change data type, rename, and update) |
| Existing table | Existing mapping | none |

Mapping transformations
Some data format mappings (Parquet, JSON, and Avro) support simple ingest-time transformations. To apply mapping transformations, create or update a column in the Edit columns window.
Mapping transformations can be performed on a column of type string or datetime, with the source having data type int or long. Supported mapping transformations are:
- DateTimeFromUnixSeconds
- DateTimeFromUnixMilliseconds
- DateTimeFromUnixMicroseconds
- DateTimeFromUnixNanoseconds
Advanced options based on data type
Tabular (CSV, TSV, PSV):
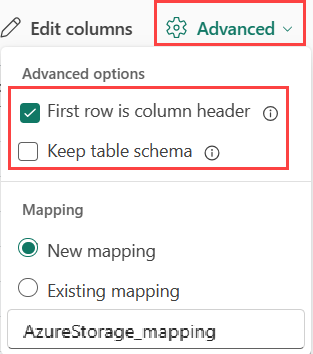
If you're ingesting tabular formats in an existing table, you can select Advanced > Keep table schema. Tabular data doesn't necessarily include the column names that are used to map source data to the existing columns. When this option is checked, mapping is done by-order, and the table schema remains the same. If this option is unchecked, new columns are created for incoming data, regardless of data structure.
To use the first row as column names, select Advanced > First row is column header.
JSON:
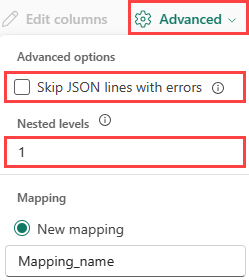
To determine column division of JSON data, select Advanced > Nested levels, from 1 to 100.
If you select Advanced > Skip JSON lines with errors, the data is ingested in JSON format. If you leave this check box unselected, the data is ingested in multijson format.
Summary
In the Data preparation window, all three steps are marked with green check marks when data ingestion finishes successfully. You can select a card to query, drop the ingested data, or see a dashboard of your ingestion summary.

Related content
- To manage your database, see Manage data
- To create, store, and export queries, see Query data in a KQL queryset
Feedback
Coming soon: Throughout 2024 we will be phasing out GitHub Issues as the feedback mechanism for content and replacing it with a new feedback system. For more information see: https://aka.ms/ContentUserFeedback.
Submit and view feedback for