Manage Windows as a service using Configuration Manager
Applies to: Configuration Manager (current branch)
In Configuration Manager, you can view the state of Windows as a service in your environment. Create servicing plans to form deployment rings, and keep Windows systems up to date when new builds are released. You can also view alerts when Windows clients are near end of support for the build version.
For more information about Windows servicing options, see Overview of Windows as a Service.
Prerequisites
For Configuration Manager version 2203 or later, the WebView2 console extension must be installed. If needed, select the notification bell in the top right corner of the console to install the extension.
Windows computers must use Configuration Manager software updates with Windows Server Update Services (WSUS) for software update management. When a computer uses Windows Update for Business or Windows Insiders, it isn't evaluated in Windows servicing plans. For more information, see Integration with Windows Update for Business.
Use a supported WSUS version:
- WSUS 10.0.14393 (role in Windows Server 2016) (2023-02 Cumulative Update, or a later cumulative update)
- WSUS 10.0.17763 (role in Windows Server 2019) (Requires Configuration Manager 1810 or later) (2023-02 Cumulative Update, or a later cumulative update)
- WSUS 10.0.20348 (role in Windows Server 2022) (2023-02 Cumulative Update, or a later cumulative update)
Enable heartbeat discovery. The data that the Windows servicing dashboard displays comes from discovery. For more information, see Configure heartbeat discovery.
Tip
The following Windows channel and build information is discovered and stored in the following attributes:
Operating System Readiness Branch: Specifies the Windows channel.
- Don't defer upgrades (
0): The semi-annual channel - targeted - Defer upgrades (
1): The semi-annual channel - LTSB (
2): The long-term servicing channel (LTSC)
- Don't defer upgrades (
Operating System Build: Specifies the OS build. For example,
10.0.18362for Windows 10, version 1903, or10.0.19041for Windows 10, version 2004.
Configure the service connection point for Online, persistent connection mode. When the site is in offline mode, you don't see data updates in the dashboard until you get Configuration Manager servicing updates. For more information, see About the service connection point.
Configure and synchronize software updates. Before any Windows feature upgrades are available in the Configuration Manager console, select the Upgrades classification, and synchronize software updates. For more information, see Prepare for software updates management.
Verify the configuration of the following client settings, to make sure they're appropriate for your environment:
Windows servicing dashboard in version 2103 or later
(Introduced in version 2103)
Starting in version 2103, the Windows Servicing dashboard was simplified to make it more relevant. Servicing plan and Windows 10 ring information were removed from the dashboard. The following charts are displayed for the selected Collection:
Feature Update Versions: Displays the distribution of Windows major releases. This chart as previously called Windows 10 Usage.
Quality Update Versions: This chart displays the top five revisions of Windows across your devices.
Windows 10 Latest Feature Update (added in 2111): This chart shows the number of devices that installed the latest feature update for Windows 10.
Windows 11 Latest Feature Update (added in 2111): This chart shows the number of devices that installed the latest feature update for Windows 11.
Latest Feature Update (versions 2103 and 2107): This chart shows the number of devices that installed the latest feature update.
Collection Errors: This tile shows the number of devices that failed with the specified error code. For more information, see Analyze SetupDiag errors.
Errors Timeline: Displays the top errors and the number of devices with each error over the course of time for the chosen collection.

Important
The Windows Servicing dashboard in Configuration Manager versions 2103 and 2107 includes Windows 11 devices with the latest version of Windows 10. They don't distinguish a version for Windows 11.
The information shown in the Windows servicing dashboard is provided for your convenience and only for use internally within your company. You should not solely rely on this information to confirm update compliance. Be sure to verify the accuracy of the information provided to you. For more detailed information about Windows builds, see the Product Lifecycle dashboard.
Windows 10 servicing dashboard in version 2010 and earlier
The Windows 10 servicing dashboard provides you with information about Windows 10 computers in your environment, servicing plans, and compliance information. The data in the Windows 10 servicing dashboard is dependent on the service connection point. The dashboard has the following tiles:
Windows 10 Usage: Provides a breakdown of public builds of Windows 10. Windows Insiders builds are listed as Other, and any builds that aren't yet known to your site. The service connection point downloads metadata that informs it about the Windows builds, and then this data is compared against discovery data.
Windows 10 Rings: Provides a breakdown of Windows 10 by channel and readiness state. The LTSC segment includes all LTSC versions.
Create Service Plan: Provides a quick way to create a servicing plan. You specify the name, collection, deployment package, and readiness state. It only displays the top 10 collections by size, smallest first, and the top 10 deployment packages by most recently modified. It uses default values for the other settings. Select Advanced Settings to start the Create Servicing Plan wizard, where you can configure all of the service plan settings.
Expired: Displays the percentage of devices that are on a build of Windows 10 that's past its end of service. Configuration Manager determines the percentage from the metadata downloaded by the service connection point and compares it against discovery data. A build that's past its end of service is no longer receiving monthly cumulative updates, which include security updates. Upgrade the computers in this category to the latest build version. Configuration Manager rounds up to the next whole number. For example, if you have 10,000 computers and only one on an expired build, the tile displays
1%.Expire Soon: Displays the percentage of computers that are on a build that's within four months of its end of service. It's similar to the Expired tile otherwise.
Alerts: Displays any active alerts.
Service Plan Monitoring: Displays servicing plans that you've created and a chart of the compliance for each. This tile gives you a quick overview of the current state of the servicing plan deployments. If an earlier deployment ring meets your expectations for compliance, then you can select a later servicing plan (deploying ring). Select Deploy Now instead of waiting for the servicing plan rules to automatically trigger.
Collection errors: Starting in version 2010, this tile shows the number of devices that failed with the specified error code. You can scope the tile to a specific collection. For more information, see Analyze SetupDiag errors.
For more detailed information about Windows 10 builds, see the Product Lifecycle dashboard.
Important
The information shown in the Windows 10 servicing dashboard is provided for your convenience and only for use internally within your company. You should not solely rely on this information to confirm update compliance. Be sure to verify the accuracy of the information provided to you.
Drill through required updates
You can drill through compliance statistics to see which devices require a specific Windows feature update. To view the device list, you need permission to view updates and the collections the devices belong to.
In the Configuration Manager console, go to the Software Library workspace, expand Windows Servicing, and select the All Windows Feature Updates node.
Select any update that is required by at least one device.
Look at the Summary tab and find the pie chart under Statistics.
To drill down into the device list, select View Required next to the pie chart. This action takes you to a temporary node under Devices. Here you can see the devices requiring the update. You can also take actions for the node such as creating a new collection from the list.
Servicing plan workflow
Windows servicing plans in Configuration Manager are much like automatic deployment rules for software updates. You create a servicing plan with the following criteria that Configuration Manager evaluates:
Upgrades classification: Only updates that are in the Upgrades classification are evaluated.
Readiness state: The readiness state defined in the servicing plan is compared with the readiness state for the upgrade. The metadata for the upgrade is retrieved when the service connection point checks for updates.
Time deferral: The number of days that you specify for How many days after Microsoft has published a new upgrade would you like to wait before deploying in your environment in the servicing plan. If the current date is after the release date plus the configured number of days, Configuration Manager evaluates whether to include an upgrade in the deployment.
When an upgrade meets the criteria, the servicing plan adds the upgrade to the deployment package, distributes the package to distribution points, and deploys the upgrade to the collection. It does these actions based on the settings that you configure in the servicing plan. Monitor the deployments with the Service Plan Monitoring tile on the Windows servicing dashboard. For more information, see Monitor software updates.
Note
Windows 10, version 1903 and later was added to Microsoft Update as its own product rather than being part of the Windows 10 product like earlier versions. This change caused you to do a number of manual steps to make sure that your clients see these updates. We've helped reduce the number of manual steps you have to take for the new product in Configuration Manager version 1906. For more information, see Configuring products for versions of Windows 10.
Windows servicing plan
As you deploy Windows, you can create one or more servicing plans. These plans define the deployment rings that you want in your environment. Then monitor them in the Windows servicing dashboard. Servicing plans use only the Upgrades software updates classification, not cumulative updates for Windows. For cumulative updates, continue to use the software updates workflow. The end-user experience with a servicing plan is the same as with software updates, including the settings that you configure in the servicing plan.
Note
You can use a task sequence to deploy an upgrade for each Windows build, but it requires more manual work. You would need to import the updated source files as an OS upgrade package, and then create and deploy the task sequence to the appropriate set of computers. However, a task sequence provides additional customized options, such as the pre-deployment and post-deployment actions.
You can create a basic servicing plan from the Windows servicing dashboard. After you specify the name, collection, deployment package, and readiness state, Configuration Manager creates the servicing plan with default values for the other settings. You can also start the Create Servicing Plan wizard to configure all of the settings.
Create a servicing plan with the Create Servicing Plan wizard
In the Configuration Manager console, go to the Software Library workspace, expand Windows Servicing, and then select the Servicing Plans node.
On the Home tab of the ribbon, in the Create group, select Create Servicing Plan.
On the General page of the Create Servicing Plan Wizard, configure the following settings:
Name: Specify the name for the servicing plan. The name must be unique, help to describe the goal of the servicing plan, and identify it from others in the Configuration Manager site. The name can't include the following characters: less than (
<), greater than (>), or ampersand (&).Description: Optionally, specify a description for the servicing plan. The description could provide an overview of the servicing plan. You might note any other relevant information that helps to identify and differentiate the plan among others in the Configuration Manager site. The description field is optional, and has a limit of 256 characters.
On the Servicing Plan page, specify the Target Collection. Members of the collection receive the Windows upgrades that the servicing plan defines.
Important
When you deploy a high-risk deployment, such as servicing plan, the Select Collection window displays only the custom collections that meet the deployment verification settings. Configure these settings in the site properties.
High-risk deployments are always limited to custom collections, collections that you create, and the built-in Unknown Computers collection. When you create a high-risk deployment, you can't select a built-in collection such as All Systems. Uncheck Hide collections with a member count greater than the site's minimum size configuration to see all custom collections that contain fewer clients than the configured maximum size. For more information, see Settings to manage high-risk deployments.
The deployment verification settings are based on the current membership of the collection. After you deploy the servicing plan, the collection membership isn't reevaluated for the high-risk deployment settings.
On the Deployment Ring page, configure the following settings:
Select one of the following options to specify the Windows readiness state to which this servicing plan should apply:
Semi-Annual Channel (Targeted): In this servicing model, feature updates are available as soon as Microsoft releases them.
Semi-Annual Channel: This servicing channel is typically used for broad deployment. Windows 10 clients in the semi-annual channel receive the same build of Windows 10 as those devices in the targeted channel, just at a later time.
For more information about servicing channels and what options are best for you, see Servicing channels.
How many days after Microsoft has published a new upgrade would you like to wait before deploying in your environment: If the current date is after the release date plus the number of days that you configure for this setting, Configuration Manager evaluates whether to include an upgrade in the deployment.
On the Upgrades page, configure the search criteria to filter the upgrades to add the service plan. It only adds upgrades that meet the specified criteria to the associated deployment. The following property filters are available:
Architecture
Language
Product Category
Required
Important
Set the Required field with a value of
>=1. Using this criteria makes sure that only applicable updates are added to the servicing plan.Superseded
Title
To view the upgrades that meet the specified criteria, select Preview.
On the Deployment Schedule page, configure the following settings:
Schedule evaluation: Specify how Configuration Manager evaluates the available time and installation deadline times. It can either use UTC or the local time of the computer that runs the Configuration Manager console.
Note
When you select local time, it uses the current time on the computer running the Configuration Manager console. If you then select As soon as possible for the Software available time or Installation deadline, it uses the current local time to evaluate when the upgrade is available or when a client installs it. If the client is in a different time zone, these actions will occur when the client's time reaches the evaluation time.
Software available time: Select one of the following settings to specify when the upgrade is available to clients:
As soon as possible: Make the upgrade available to clients right away. When you create the deployment with this setting, Configuration Manager updates the client policy. At the next client policy polling cycle, clients become aware of the deployment, and can install the upgrade. This setting is the default and most common for the available time.
Specific time: Make the upgrade available to clients at a specific time period after the servicing plan creates the deployment. When it creates the deployment with this setting, Configuration Manager updates the client policy. At the next client policy polling cycle, clients become aware of the deployment. The upgrade isn't available to install until after this specified date and time. Use this setting if you want to create the deployment several days before clients see it.
Installation deadline: Select one of the following settings to specify when to require clients to install the upgrade:
As soon as possible: Automatically install the upgrade right away. As soon as clients get this deployment, the start the upgrade.
Specific time: Automatically install the upgrade at a specific time period after the servicing plan creates the deployment. Configuration Manager determines the deadline to install the upgrade by adding the configured Specific time interval to the Software available time. This setting is the default and most common for the installation deadline. By default it's seven days. In other words, by default clients receive the upgrade deployment at the next policy refresh, and have one week before it's required.
Note
The actual installation deadline time is the displayed deadline interval plus a random amount of time up to 2 hours. This randomization reduces the potential impact of all clients in the collection installing the upgrade at the same time.
Delay enforcement of this deployment according to user preferences, up to the grace period defined on the client: Select this option to honor the Grace period for enforcement after deployment deadline (hours) client setting.
On the User Experience page, configure the following settings:
User notifications: Specify whether to display notification of the upgrade in Software Center on the client at the available time. By default, it's set to Hide in Software Center and all notifications.
Deadline behavior: Specify the behavior after the deadline and outside of any maintenance window. By default, the upgrade doesn't install and the system won't restart outside of a window. For more information about maintenance windows, see How to use maintenance windows.
Device restart behavior: Specify whether to suppress the restart after Windows installs the upgrade. By default, the device restarts after the upgrade.
Write filter handling for Windows Embedded devices: When you deploy an upgrade to Windows Embedded devices that use a write filter, configure when and how it commits the changes. When you deploy an upgrade to a Windows Embedded device, make sure that the device is a member of a collection that has a configured maintenance window.
Software updates deployment re-evaluation behavior upon restart: To force another update deployment evaluation cycle after restart, select the option: If any update in this deployment requires a system restart, run updates deployment evaluation cycle after restart.
On the Deployment Package page, first select one of the following options:
Select a deployment package: Select Browse to choose an existing deployment package for this upgrade content.
No deployment package: Clients download content from peers or the Microsoft cloud.
Create a new deployment package and configure the following additional settings:
Name: Specify the name of the deployment package. This name must be unique and describes the package content. It's limited to 50 characters.
Description: Optionally specify a description that provides additional information about the deployment package. The description is limited to 127 characters.
Package source: Specify the location of the source files. Type a network path for the source location. For example:
\\server\sharename\path. You can also select Browse to find a network location.Before you continue to the next page of the wizard, create the shared folder for the deployment package source files.
The location that you specify can't be used by another software deployment package.
The SMS Provider computer account and the user that's running the wizard to download the software updates must both have Write NTFS permissions on the download location. To reduce the risk of attackers tampering with the source files, restrict access to the download location.
After Configuration Manager creates the deployment package, you can change the package source location in the deployment package properties. Before you change it, copy the content from the original package source to the new location.
Sending priority: Specify the sending priority for the deployment package. Configuration Manager uses the sending priority when it sends the package to distribution points. It sends packages in priority order: high, medium, or low. If packages have identical priorities, the site sends them in the order in which you created them. If there's no backlog, the package processes immediately.
Enable binary differential replication. For more information, see Binary differential replication.
If you created a new deployment package, you'll see the Distribution Points page next. Specify the distribution points or distribution point groups that host the upgrade content. For more information about distribution points, see Configure a distribution point.
If you selected an existing deployment package, you'll see the Download Location page next. Select one of the following options:
Download software updates from the internet: The site server downloads the upgrade content from the internet. This setting is the default.
Download software updates from a location on the local network: Download the upgrade content from a local directory or shared folder. This setting is useful when the computer that runs the wizard doesn't have internet access. Any computer with internet access can preliminarily download the upgrade content.
If you selected an existing deployment package, you'll also see the Language Selection page. The site downloads the upgrade content for the languages that you select, only if they're available. By default, the wizard selects the languages that you configured in the software update point properties.
On the Summary page, review the settings. Select Next to create the servicing plan and complete the wizard.
After you complete the wizard, the site runs the servicing plan for the first time.
Modify a servicing plan
After you create a basic servicing plan from the Windows servicing dashboard, or you need to change the settings for an existing servicing plan, go to properties for the servicing plan.
Note
You can configure settings in the properties for the servicing plan that aren't available in the wizard. The wizard uses default settings for the following areas: download settings, deployment settings, and alerts.
In the Configuration Manager console, go to the Software Library workspace, expand Windows Servicing, and select the Servicing Plans node. Then select the servicing plan that you want to modify.
On the Home tab of the ribbon, select Properties.
The following settings are available in the servicing plan properties that weren't configured in the wizard:
Deployment Settings
Use Wake-on-LAN to wake up clients for required deployments: Enable Wake On LAN at the deployment deadline. The site will send wake-up packets to computers for the deployment. By default, this setting isn't enabled.
Warning
Before you can use this option, configure computers and networks for Wake On LAN.
Detail level: Specify the level of detail for the state messages that clients send to the site.
Download Settings
Specify whether the client downloads and installs the upgrade when it's connected to a slow network or is using a fallback content location.
Specify whether to have the client download and install the upgrade from a fallback distribution point when the content isn't available on a preferred distribution point.
Specify whether to have clients download the content from Microsoft Update, if it's not available on distribution points.
Important
Don't use this setting for Windows servicing updates. Configuration Manager fails to download the Windows servicing updates from Microsoft Update.
Specify whether to allow clients to download after an installation deadline when they use metered internet connections.
Alerts
Configure how Configuration Manager and System Center Operations Manager generate alerts for this deployment.
You can review recent alerts from the Software Updates node in the Software Library workspace.
Analyze SetupDiag errors
With the release of Windows 10, version 2004, the SetupDiag diagnostic tool is included with Windows Setup. If there's an issue with the upgrade, SetupDiag automatically runs to determine the cause of the failure.
Starting in version 2010, Configuration Manager gathers and summarizes SetupDiag results from feature update deployments with Windows servicing.
The Windows Servicing dashboard in the Software Library workspace of the Configuration Manager console includes a tile for Collection Errors. Each bar shows the number of devices that failed with the specified error code. For more information, see Windows upgrade error codes.
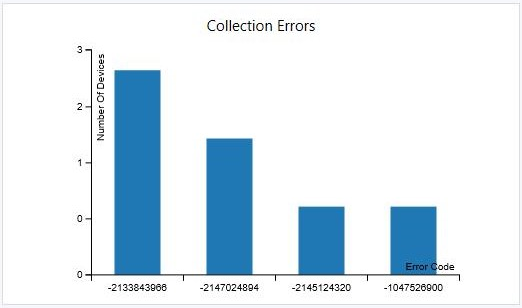
Each bar shows the number of devices that failed with the specified error code. For more information, see Windows upgrade error codes.
Next steps
For more information, see Fundamentals of Configuration Manager as a service and Windows as a service.