Set up automated device enrollment (ADE) for iOS/iPadOS
Applies to iOS/iPadOS
Corporate-owned devices purchased through Apple Business Manager or Apple School Manager can be enrolled in Intune via automated device enrollment. This enrollment option applies your organization's settings from Apple Business Manager and Apple School Manager and enrolls devices without you needing to touch them. iPhones and iPads can be shipped directly to employees and students. When they turn on their devices, the Apple Setup Assistant guides them through setup and enrollment.
This article describes how to prepare and set up automated device enrollment in Microsoft Intune.
Overview of features
The following table shows the features and scenarios supported with automated device enrollment.
| Feature | Use this enrollment option when |
|---|---|
| You want supervised mode. | ✔️ Supervised mode deploys software updates, restricts features, allows and blocks apps, and more. |
| Devices are owned by the organization or school. | ✔️ |
| You have new devices. | ✔️ |
| Need to enroll a few devices, or a large number of devices (bulk enrollment). | ✔️ |
| Devices are associated with a single user. | ✔️ |
| Devices are user-less, such as kiosk or dedicated device. | ✔️ |
| Devices are in shared device mode. | ✔️ |
| Devices are personal or bring-your-own (BYOD). | ❌ Not recommended. Applications on BYOD or personal devices can be managed using MAM, or User and Device enrollment. |
| Devices are managed by another MDM provider. | ❌ If you want to fully manage a device in Intune, users must unenroll from the current MDM provider, and then enroll in Intune. Or, you can use MAM to manage specifics apps on the device. Since these devices are owned by the organization, we recommend enrolling them in Intune. |
| You use the device enrollment manager (DEM) account. | ❌ The DEM account isn't supported. |
Certificates
This enrollment type supports the Automated Certificate Management Environment (ACME) protocol. When new devices enroll, the management profile from Intune receives an ACME certificate. The ACME protocol provides better protection than the SCEP protocol against unauthorized certificate issuance through robust validation mechanisms and automated processes, which helps reduce errors in certificate management.
Devices that are already enrolled do not get an ACME certificate unless they re-enroll into Microsoft Intune. ACME is supported on devices running:
iOS 16.0 or later
iPadOS 16.1 or later
Prerequisites
Before you create the enrollment profile, you must have:
- Access to Apple Business Manager portal or Apple School Manager portal.
- An active Apple token (.p7m file).
- For steps, see Get an Apple Automated Device Enrollment token (in this article).
- An Apple MDM push certificate in Intune.
- New or wiped devices purchased from Apple Business Manager or Apple School Manager.
Tip
Automated device enrollment applies device configurations that a device user may not be able to remove. Wipe all devices prior to enrollment to return them to an out-of-box state.
Before you begin
Read through these enrollment requirements and best practices to prepare for a successful setup and deployment.
Choose an authentication method
Before you create the enrollment profile, decide how you want users to authenticate on their devices: via the Intune Company Portal app, Setup Assistant (legacy), or Setup Assistant with modern authentication. Using the Company Portal app or Setup Assistant with modern authentication is considered modern authentication and has features like multifactor authentication.
Intune also supports just-in-time registration (JIT registration) for Setup Assistant with modern authentication, which eliminates the need for the Company Portal app for Microsoft Entra registration and compliance. To use JIT registration, you have to create a device configuration policy before you create the Apple enrollment profile and configure Setup Assistant with modern authentication.
Setup Assistant with modern authentication is supported on devices running iOS/iPadOS 13.0 and later. Older iOS/iPadOS devices given this profile will instead use Setup Assistant (legacy) for authentication.
For more information about your authentication options, see Authentication methods for automated device enrollment.
What is supervised mode?
Supervised mode provides more management control over corporate-owned devices, so you can do things like block screen captures and restrict AirDrop.
Corporate-owned devices running iOS/iPadOS 11+ and enrolled via automated device enrollment should always be in supervised mode, which you can turn on in the enrollment profile. For more information about supervised mode, see Turn on iOS/iPadOS supervised mode. Microsoft Intune ignores the is_supervised flag for devices running iOS/iPadOS 13.0 and later because these devices are automatically put in supervised mode at the time of enrollment.
Enrolling devices in shared device mode
You can set up automated device enrollment for devices in shared device mode. Shared device mode is a feature of Microsoft Entra ID that enables frontline workers to share a single device throughout the day, signing in and out as needed. For more information about how to enable enrollment for devices in Microsoft Entra shared device mode, see Automated device enrollment for shared device mode.
Deploying the Company Portal app
Important
We don't recommend using the App Store version of the Company Portal app because it isn't compatible with automated device enrollment and doesn't provide the automatic updates and availability like deployment does.
Deploying the Intune Company Portal app through Intune is the best way to provide the app to users and the only way to:
- Ensure all ADE devices, including already-enrolled ones, receive the app.
- Enable automatic app updates for the Company Portal on ADE devices.
Deploy the app as a required VPP app with device licensing. For information about how to sync, assign, and manage a VPP app, see assign a volume-purchased app.
To enable automatic app updates for Company Portal, go to your app token settings in the admin center and change Automatic app updates to Yes. See Upload an Apple VPP or Apple Business Manager location token for the steps to access your token settings. If you don't enable automatic updates, the device user must manually check for them on their own.
Device staging is used to transition a device without user affinity to a device with user affinity. To stage a device, set up VPP deployment as described earlier in this section. Then configure and deploy an app configuration policy. Make sure the policy only targets those ADE devices without user affinity.
Important
During initial enrollment, Intune automatically pushes the app configuration policy settings for devices enrolled with Setup Assistant with modern authentication, configured in the Configure the Company Portal app to support iOS and iPadOS devices enrolled with Automated Device Enrollment, when the enrollment profile setting Install Company Portal is set to yes. This configuration should not be deployed manually to users because it will cause a conflict with the configuration sent during the initial enrollment. If both are deployed, Intune will incorrectly prompt device users to sign in to the Company Portal and download a management profile they've already installed.
Limits
- Maximum enrollment profiles per token: 1,000
- Maximum Automated Device Enrollment devices per profile: 200,000 (same as the maximum number of devices per token).
- Maximum Automated Device Enrollment tokens per Intune account: 2,000
- Maximum Automated Device Enrollment devices per token: 200,000
- We recommend that you don't exceed 200,000 devices per token. Otherwise, you might have sync problems. If you have more than 200,000 devices, split the devices into multiple ADE tokens.
- Apple Business Manager and Apple School Manager sync about 3,000 devices over to Intune per minute. We recommend that you hold off manually syncing from the admin center again until enough time passes for all of the devices to finish syncing (total number of devices/3,000 devices per minute).
Troubleshoot enrollment
If you experience sync problems during the enrollment process, you can look for solutions at Troubleshoot iOS/iPadOS device enrollment problems.
Get an Apple automated device enrollment token
Before you can enroll iOS/iPadOS devices with ADE, you need an automated device enrollment token (.p7m file) from Apple. This token lets Intune sync information about ADE devices that your organization owns. It also allows Intune to upload enrollment profiles to Apple and to assign devices to those profiles.
Use Apple Business Manager (ABM) or Apple School Manager (ASM) to create a token and assign devices to Intune for management.
Note
You can use either of the Apple portals to enable ADE. The rest of this article refers to Apple Business Manager, but the steps are the same for Apple School Manager.
Step 1: Download the Intune public key certificate
In the Microsoft Intune admin center, go to Devices > Enrollment.
Select the Apple tab.
Select Enrollment Program Tokens > Add.
On the Basics tab:
Select I agree to give permission to Microsoft to send user and device information to Apple.
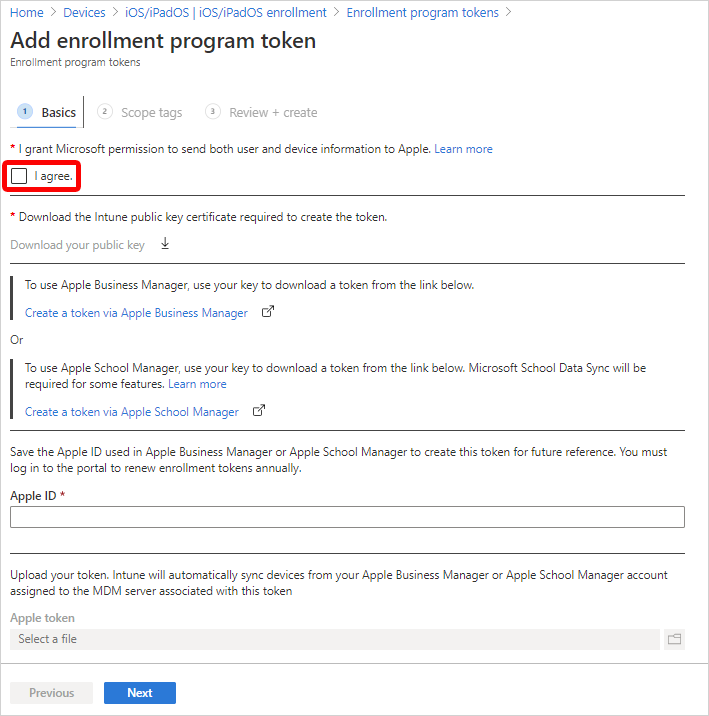
Select Download the Intune public key certificate required to create the token. This step downloads and saves the encryption key (.pem) file locally. The .pem file is used to request a trust-relationship certificate from the Apple Business Manager portal.
Later, in Step 2: Go to the Apple Business Manager portal, you upload this .pem file in Apple Business Manager.
Keep this web browser tab and page open. If you close the tab:
- The certificate you downloaded is invalidated.
- You have to repeat steps.
- On the Review + create tab, the Create button isn't available, and you can't complete this procedure.
Step 2: Go to the Apple Business Manager portal
Use the Apple Business Manager portal to create and renew your ADE token (MDM server). This token is added to Intune and communicates between Intune and Apple.
Note
The following steps describe what you need to do in Apple Business Manager. For the specific steps, refer to Apple's documentation. The Apple Business Manager User Guide (on Apple's website) might be helpful.
Download the Apple token
In Apple Business Manager, sign in with your company's Apple ID.
In this portal, complete the following steps:
In settings, all tokens are shown. Add an MDM server, and upload the public key certificate (.pem file) that you downloaded from Intune in Step 1: Download the Intune public key certificate (in this article).
Use the server name to identify the mobile device management (MDM) server. It isn't the name or URL of the Microsoft Intune service.
After you save the MDM server, select it, and then download the token (.p7m file). Later, in Step 4: Upload your token and finish, you upload the .p7m token in Intune.
Assign devices to the Apple token (MDM server)
- In Apple Business Manager > Devices, select the devices you want to assign to this token. You can sort by various device properties, like serial number. You can also select multiple devices simultaneously.
- Edit device management, and select the MDM server you just added. This step assigns devices to the token.
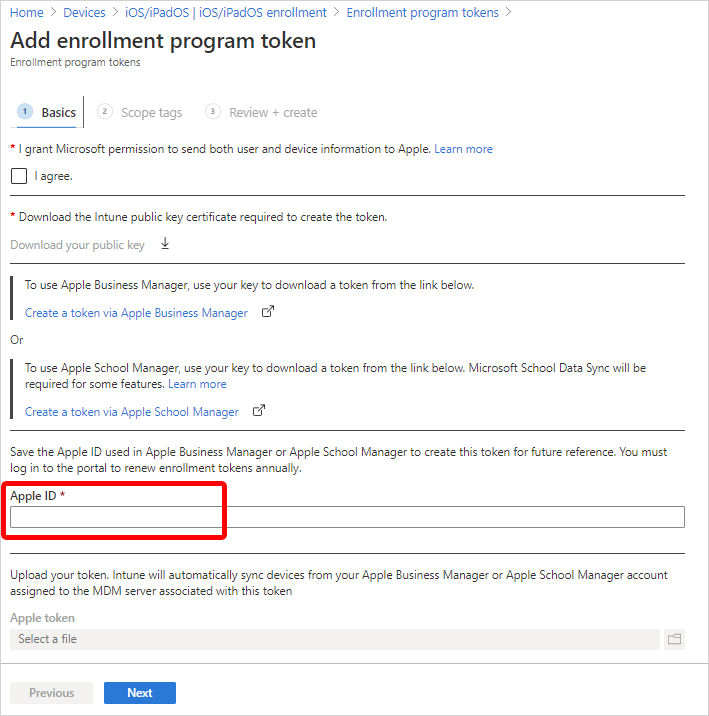
Step 3: Save the Apple ID
In your web browser, go back to the tab that has the Microsoft Intune Add enrollment program token page, where you started in Step 1: Download the Intune public key certificate.
In Apple ID, enter your ID. This step saves the ID. The ID can be used in the future.
Step 4: Upload your token and finish
In Apple token, browse to the .p7m certificate file, and then select Open.
Tip
You downloaded the token in Step 2: Go to the Apple Business Manager portal.
Select Next.
On the Review + create tab, select Create.
With the push certificate, Intune can enroll and manage iOS/iPadOS devices by pushing policies to enrolled mobile devices. Intune automatically synchronizes with Apple to access your enrollment program account.
Create an Apple enrollment profile
Now that you've installed your token, you can create an enrollment profile for automated device enrollment. A device enrollment profile defines the settings applied to a group of devices during enrollment. There's a limit of 1,000 enrollment profiles per enrollment token.
Note
Devices will be blocked from enrolling if there aren't enough Company Portal licenses for a VPP token or if the token expires. Intune alerts you when a token is about to expire or licenses are running low.
In Microsoft Intune admin center, go to Devices > Enrollment.
Select the Apple tab.
Choose Enrollment Program Tokens.
Choose a token, and then select Profiles.
Select Create profile > iOS/iPadOS.
For Basics, give the profile a Name and Description for administrative purposes. Users don't see these details.
Select Next.
Important
If you make changes to an existing enrollment profile, the new settings won't take effect on assigned devices until devices are reset back to factory settings and reactivated. The device name template setting is the only setting you can change that doesn't require a factory reset to take effect. Changes to the naming template take effect at the next check-in.
In the User Affinity list, select an option that determines whether devices with this profile must enroll with or without an assigned user.
Enroll with User Affinity: Select this option for devices that belong to users who want to use the Company Portal for services like installing apps.
Enroll without User Affinity: Select this option for devices that aren't affiliated with a single user. Use this option for devices that don't access local user data. This option is typically used for kiosk, point of sale (POS), or shared-utility devices.
In some situations, you might want to associate a primary user with devices enrolled without user affinity. To do this task, you can send the
IntuneUDAUserlessDevicekey to the Company Portal app in an app configuration policy for managed devices. The first user that signs in to the Company Portal app is established as the primary user. If the first user signs out and a second user signs in, the first user remains the primary user of the device. For more information, see Configure the Company Portal app to support iOS and iPadOS ADE devices.Enroll with Microsoft Entra ID shared mode: Select this option to enroll devices that will be in shared mode.
If you selected Enroll with User Affinity for the User Affinity field, you have the option to choose the authentication method employees must use. For more information about each authentication method, see Authentication methods for automated device enrollment.
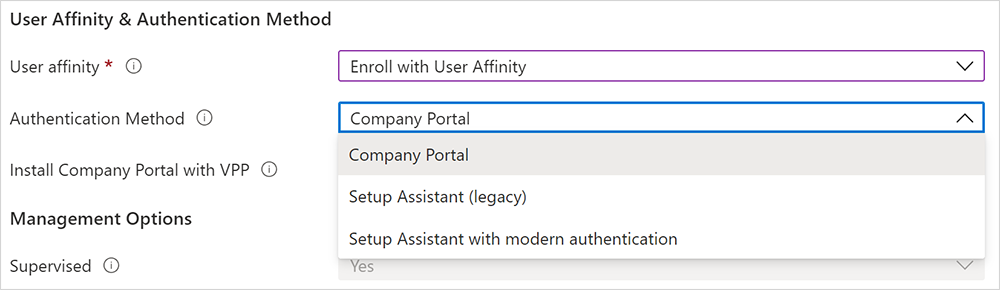
Your options:
- Company Portal
- Setup Assistant (legacy)
- Setup Assistant with modern authentication
If you selected Setup Assistant (legacy) for the authentication method but you also want to use Conditional Access or deploy company apps on the devices, you need to install Company Portal on the devices and sign in to complete the Microsoft Entra registration. To do so, select Yes for Install Company Portal. If you want users to receive Company Portal without having to authenticate into the App Store, in Install Company Portal with VPP, select a VPP token. Make sure the token doesn't expire and that you have enough device licenses for the Company Portal app to deploy correctly.
If you select a token for Install Company Portal with VPP, you can lock the device in Single App Mode (specifically, the Company Portal app) right after the Setup Assistant completes. Select Yes for Run Company Portal in Single App Mode until authentication to set this option. To use the device, the user must first authenticate by signing in to the Company Portal.
Note
Multifactor authentication isn't supported on a single device locked in Single App Mode. This limitation exists because the device can't switch to a different app to complete the second factor of authentication. If you want multifactor authentication on a Single App Mode device, the second factor must be on a different device.
This feature is supported only for iOS/iPadOS 11.3.1 and later.

If you want devices using this profile to be supervised, select Yes in the Supervised list.

Supervised devices give you more management options and disabled Activation Lock by default. Microsoft recommends that you use ADE as the mechanism for enabling supervised mode, especially if you're deploying large numbers of iOS/iPadOS devices. Apple Shared iPad for Business devices must be supervised.
Users are notified that their devices are supervised in the Settings app. In the app at the top of their screen, a static message tells them This iPhone is supervised and managed by
<your organization>.Note
If a device is enrolled without supervision, you need to use Apple Configurator if you want to set it to supervised. To reset the device in this way, you need to connect it to a Mac with a USB cable. For more information, see Apple Configurator Help.
In the Locked enrollment list, select Yes or No. Locked enrollment disables iOS/iPadOS settings that allow the management profile to be removed. If you enable locked enrollment, the button in the Settings app that lets users remove a management profile will be hidden and users won't be able to unenroll their device. If you're setting up devices in Microsoft Entra ID shared mode, select Yes.
Locked enrollment works a little differently, at first, on devices not originally purchased through Apple Business Manager but later added to be a part of automated device enrollment: users on these devices can see the remove management button in the Settings app for the first 30 days after activating their device. After that provisional period, this option is hidden. For more information, see Prepare devices manually (opens Apple Configurator Help docs).
Important
This setting is different from the remove and reset options in the Company Portal app. Regardless of how you configure locked enrollment, the Remove Device or Factory Reset options in the Company Portal app remain unavailable on devices enrolled through automated device enrollment. Users won't be able to remove the device on the Company Portal website either. For more information about the self-service actions available on enrolled devices, see Self-service actions.
If you selected Enroll without User Affinity and Supervised in the previous steps, you need to decide whether to configure the devices to be Apple Shared iPad for Business devices. Select Yes for Shared iPad to enable multiple users to sign in to a single device. Users authenticate by using their Managed Apple IDs and federated authentication accounts or by using a temporary session (like the Guest account). This option requires iOS/iPadOS 13.4 or later. With Shared iPad, all Setup Assistant panes after activation are automatically skipped.
Note
- A device wipe will be required if an iOS/iPadOS enrollment profile with Shared iPad enabled is sent to an unsupported device. Unsupported devices include any iPhone models, and iPads running iPadOS/iOS 13.3 and earlier. Supported devices include iPads running iPadOS 13.3 and later.
- To set up Apple Shared iPad for Business, configure these settings:
- In the User Affinity list, select Enroll without User Affinity.
- In the Supervised list, select Yes.
- In the Shared iPad list, select Yes.
If you're setting up Apple Shared iPad for Business devices, also configure:
Maximum cached users: Enter the number of users that you expect to use the shared iPad. You can cache up to 24 users on a 32-GB or 64-GB device. If you choose a low number, it might take a while for your users' data to appear on their devices after they sign in. If you choose a high number, your users could run out of disk space.
Maximum seconds after screen lock before password is required: Enter the amount of time in seconds. Accepted values include: 0, 60, 300, 900, 3600, and 14400. If the screen lock exceeds this amount of time, a device password will be required to unlock the device. Available for devices in Shared iPad mode running iPadOS 13.0 and later.
Maximum seconds of inactivity until user session logs out: The minimum allowed value for this setting is 30. If there isn't any activity after the defined period, the user session ends and signs the user out. If you leave the entry blank or set it to zero (0), the session will never end due to inactivity. Available for devices in Shared iPad mode running iPadOS 14.5 and later.
Require Shared iPad temporary session only: Configures the device so that users only see the guest version of the sign-in experience and must sign in as guests. They can't sign in with a Managed Apple ID. Available for devices in Shared iPad mode running iPadOS 14.5 and later.
When set to Yes, this setting cancels out the following shared iPad settings, because they aren't applicable in temporary sessions:
- Maximum cached users
- Maximum seconds after screen lock before password is required
- Maximum seconds of inactivity until user session logs out
Maximum seconds of inactivity until temporary session logs out: The minimum allowed value for this setting is 30. If there isn't any activity after the defined period, the temporary session ends and signs the user out. If you leave the entry blank or set it to zero (0), the session will never end due to inactivity. Available for devices in Shared iPad mode running iPadOS 14.5 and later.
This setting is available when Require Shared iPad temporary session only is set to Yes.
Note
- If temporary sessions are enabled, all of the user's data is deleted when they sign out of the session. This means that all targeted policies and apps will come down to the user when they sign-in, and they'll be erased when the user sign outs.
- To alter a Shared iPads configuration to not have temporary sessions, the device will need to be fully reset and a new enrollment profile with the updated configurations will need to be sent down to the iPad.
In the Sync with computers list, select an option for the devices that use this profile. If you select Allow Apple Configurator by certificate, you need to choose a certificate under Apple Configurator Certificates.
Note
If you set Sync with computers to Deny all, the port will be limited on iOS and iPadOS devices. The port will be limited to only charging. It will be blocked from using iTunes or Apple Configurator 2.
If you set Sync with computers to Allow Apple Configurator by certificate, make sure you have a local copy of the certificate that you can use later. You won't be able to make changes to the uploaded copy, and it's important to retain an copy of this certificate. If you want to connect to the iOS/iPadOS device from a Mac device, the same certificate must be installed on the device making the connection to the iOS/iPadOS device.
If you selected Allow Apple Configurator by certificate in the previous step, choose an Apple Configurator certificate to import. The limit is 10 certificates.
For Await final configuration, your options are:
Yes: Enable a locked experience at the end of Setup Assistant to ensure your most critical device configuration policies are installed on the device. Just before the home screen loads, Setup Assistant pauses and lets Intune check in with the device. The end-user experience locks while users await final configurations.
The amount of time that users are held on the Awaiting final configuration screen varies, and depends on the total number of policies and apps you apply to the device. The more policies and apps assigned to the device, the longer the waiting time. Setup Assistant and Microsoft Intune do not enforce a minimum or maximum time limit during this portion of setup. During product validation, most devices we tested were released and able to access the home screen within 15 minutes. If you enable this feature and are using someone outside of Microsoft to help you provision devices, tell them about the potential for increased provisioning time.
Note
Only device configuration policies start installing during the awaiting final configuration screen, and applications are not included in this.
The locked experience works on devices targeted with new and existing enrollment profiles. Supported devices include:
- iOS/iPadOS 13+ devices enrolling with Setup Assistant with modern authentication
- iOS/iPadOS 13+ devices enrolling without user affinity
- iOS/iPadOS 13+ devices enrolling with Microsoft Entra ID shared mode
This setting is applied once during the out-of-box automated device enrollment experience in Setup Assistant. The device user doesn't experience it again unless they re-enroll their device. Yes is the default setting for new enrollment profiles.
No: The device is released to the home screen when Setup Assistant ends, regardless of policy installation status. Device users might be able to access the home screen or change device settings before all policies are installed. No is the default setting for existing enrollment profiles.
The await configuration setting is unavailable in profiles with this combination of configurations:
- User affinity: Enroll without user affinity (Step 6 in this section)
- Shared iPad: Yes (Step 12 in this section)
Optionally, create a device name template to quickly identify devices assigned this profile in the admin center. Intune uses your template to create and format device names. The names are given to devices when they enroll and upon each successive check-in. To create a template:
Under Apply device name template, select Yes .
In the Device Name Template box, enter the template you want to use to construct device names. The template can include the device type and serial number. It can't contain more than 63 characters, including the variables. Example:
{{DEVICETYPE}}-{{SERIAL}}You can activate a cellular data plan. This setting applies to devices running iOS/iPadOS 13.0 and later. Configuring this option sends a command to activate cellular data plans for your eSim-enabled cellular devices. Your carrier must provision activations for your devices before you can activate data plans using this command. To activate cellular data plan, select Yes, and then enter your carrier’s activation server URL.
Select Next.
On the Setup Assistant tab, configure the following profile settings:
Department setting Description Department Appears when users tap About Configuration during activation. Department Phone Appears when users tap the Need Help button during activation. You can hide Setup Assistant screens on the device during user setup. For a description of all screens, see Setup Assistant screen reference (in this article).
- If you select Hide, the screen isn't shown during setup. After setting up the device, the user can still go to the Settings menu to set up the feature.
- If you select Show, the screen is shown during setup, but only if there are steps to complete after the restore or after the software update. Users can sometimes skip the screen without taking action. They can then later go to the device's Settings menu to set up the feature.
- With Shared iPad, all Setup Assistant panes after activation are automatically skipped regardless of the configuration.
Select Next.
To save the profile, select Create.
Dynamic groups in Microsoft Entra ID
You can use the enrollment Name field to create a dynamic group in Microsoft Entra ID. For more information, see Microsoft Entra dynamic groups.
You can use the profile name to define the enrollmentProfileName parameter to assign devices with this enrollment profile.
Before device setup, and to ensure quick delivery to devices with user affinity, make sure the enrolling user is a member of a Microsoft Entra user group.
If you assign dynamic groups to enrollment profiles, there might be a delay in delivering applications and policies to devices after the enrollment.
Setup Assistant screen reference
The following table describes the Setup Assistant screens shown during automated device enrollment for iOS/iPadOS. You can show or hide these screens on supported devices during enrollment. For more information about how each Setup Assistant screen affects the user experience, see these Apple resources:
- Apple Platform Deployment guide: Manage Setup Assistant for Apple devices
- Apple Developer documentation: ShipKeys
| Setup Assistant screen | What happens when visible |
|---|---|
| Passcode | Shows the passcode and password lock pane to users, and prompts users for a passcode. Always require a passcode for unsecured devices unless access is controlled in some other way (such as through a kiosk mode configuration that restricts the device to one app). This screen is available for iOS/iPadOS 7.0 and later, with some limitations. For more information, see Limitations in this article. |
| Location Services | Shows the location services setup pane, where users can enable location services on their device. For iOS/iPadOS 7.0 and later. |
| Restore | Shows the apps and data setup pane. On this screen, users setting up devices can restore or transfer data from iCloud Backup. For iOS/iPadOS 7.0 and later. |
| Apple ID | Shows the Apple ID setup pane, which gives users to the option to sign in with their Apple ID and use iCloud. For iOS/iPadOS 7.0 and later. |
| Terms and conditions | Shows the Apple terms and conditions pane, and requires users to accept them. For iOS/iPadOS 7.0 and later. |
| Touch ID and Face ID | Shows the biometric setup pane, which gives users the option to set up fingerprint or facial identification on their devices. For iOS/iPadOS 8.1 and later, with some limitations. For more information, see Limitations in this article. |
| Apple Pay | Shows the Apple Pay setup pane, which gives users the option to set up Apple Pay on their devices. For iOS/iPadOS 7.0 and later. |
| Zoom | Shows the zoom setup pane, which gives users the option to configure zoom settings. For iOS/iPadOS 8.3 and later, and deprecated in iOS/iPadOS 17. |
| Siri | Shows the Siri setup pane to users. For iOS/iPadOS 7.0 and later. |
| Diagnostics Data | Shows the diagnostics pane where users can opt-in to send diagnostic data to Apple. For iOS/iPadOS 7.0 and later. |
| Display Tone | Shows the display tone setup pane, where users can configure the display's white balance settings. For iOS/iPadOS 9.3.2 and later, and deprecated in iOS/iPadOS 15. |
| Privacy | Shows the privacy setup pane to the user. For iOS/iPadOS 11.3 and later. |
| Android Migration | Shows a setup pane meant for previous Android users. On this screen, users can migrate data from an Android device. For iOS/iPadOS 9.0 and later. |
| iMessage & FaceTime | Shows the setup pane for iMessage and FaceTime. For iOS/iPadOS 9.0 and later. |
| Onboarding | Shows onboarding informational screens for user education, such as Cover Sheet and Multitasking and Control Center. For iOS/iPadOS 11.0 and later. |
| Screen Time | Shows the Screen Time screen. For iOS/iPadOS 12.0 and later. |
| SIM Setup | Shows the cellular setup pane, where users can add a cellular plan. For iOS/iPadOS 12.0 and later. |
| Software Update | Shows the mandatory software update screen. For iOS/iPadOS 12.0 and later. |
| Watch Migration | Shows the Apple Watch migration pane, where users can migrate data from an Apple Watch. For iOS/iPadOS 11.0 and later. |
| Appearance | Shows the appearance setup pane. For iOS/iPadOS 13.0 and later. |
| Device to Device Migration | Shows the device-to-device migration pane. On this screen, users can transfer data from an old device to their current device. The option to transfer data directly from a device isn't available for devices running iOS 13 or later. |
| Restore Completed | Shows users the Restore Completed screen after a backup and restore is performed during Setup Assistant. |
| Software Update Completed | Shows users all software updates that happen during Setup Assistant. |
| Get Started | Shows users the Get Started welcome screen. |
| Terms of Address | Shows the terms of address pane, which gives users the option to choose how they want to be addressed throughout the system: feminine, masculine, or neutral. This Apple feature is available for select languages. For more information, see Key Features and Enhancements(opens Apple website). For iOS/iPadOS 16.0 and later. |
| Emergency SOS | Shows the safety setup pane. For iOS/iPadOS 16.0 and later. |
| Action button | Shows the configuration pane for the action button. For iOS/iPadOS 17.0 and later. |
| Intelligence | Shows the Apple Intelligence setup pane, where users can configure Apple Intelligence features. For iOS/iPadOS 18.0 and later. |
Sync managed devices
Now that Intune has permission to manage your devices, you can synchronize Intune with Apple to see your managed devices in Intune in the Azure portal.
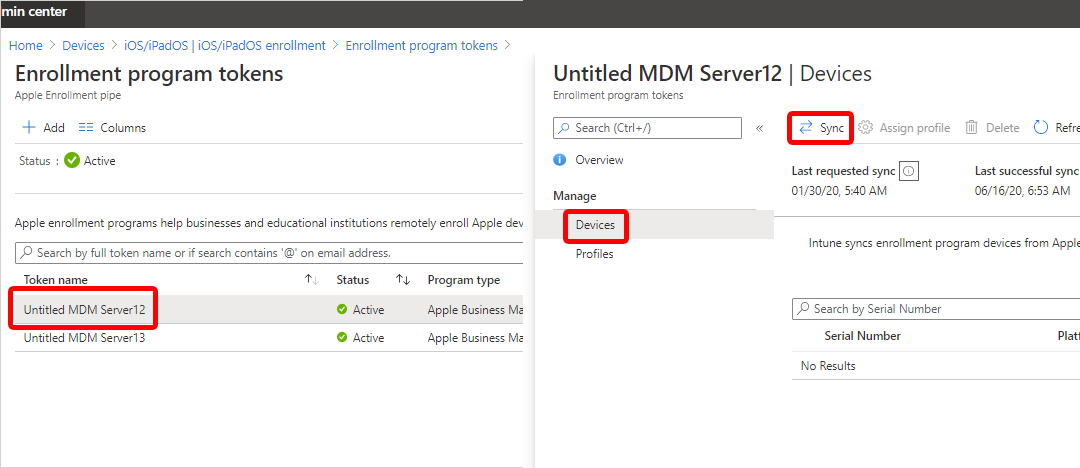
In Microsoft Intune admin center, go to Devices > Enrollment.
Select the Apple tab.
Choose Enrollment Program Tokens.
Select a token in the list, and then select Devices > Sync.
To follow Apple's terms for acceptable enrollment program traffic, Intune imposes the following restrictions:
- A full sync can run no more than once every seven days. During a full sync, Intune fetches the complete updated list of serial numbers assigned to the Apple MDM server connected to Intune.
Important
If a device is deleted from Intune, but remains assigned to the ADE enrollment token in the ASM/ABM portal, it will reappear in Intune on the next full sync. If you don't want the device to reappear in Intune, unassign it from the Apple MDM server in the ABM/ASM portal.
- If a device is released from ABM/ASM, it can take up to 45 days for it to be automatically deleted from the devices page in Intune. You can manually delete released devices from Intune one by one if needed. Released devices are accurately reported as being removed from ABM/ASM in Intune until they're automatically deleted within 30-45 days.
- A delta sync is run automatically every 12 hours. You can also trigger a delta sync by selecting the Sync button (no more than once every 15 minutes). All sync requests have 15 minutes to finish. The Sync button becomes inactive until the sync is done. Syncing refreshes the existing device status and imports new devices assigned to the Apple MDM server. If a delta sync fails for any reason, the next sync is a full sync and could resolve any issues.
- A full sync can run no more than once every seven days. During a full sync, Intune fetches the complete updated list of serial numbers assigned to the Apple MDM server connected to Intune.

Assign an enrollment profile to devices
Before devices can be enrolled, you need to assign an enrollment profile to them.
Note
You can also assign serial numbers to profiles in the Apple Serial Numbers pane.
- In Microsoft Intune admin center, go to Devices > Enrollment.
- Select the Apple tab.
- Choose Enrollment program tokens.
- Select an enrollment token.
- Select Devices.
- Select all devices you want to assign, and then select Assign profile.
- Under Assign profile, choose the automated device enrollment profile you created for the devices, and then select Assign.
Assign a default profile
You can pick a default profile to be applied to all devices that enroll with a specific token.
- In the admin center, return to Enrollment program tokens.
- Select an enrollment token.
- Select Set Default Profile.
- Select a profile in the list, and then select Save. From here, Intune applies the profile to all devices that enroll with the selected enrollment token.
Note
Ensure that Device Type Restrictions under Enrollment Restrictions does not have the default All Users policy set to block the iOS/iPadOS platform. This setting will cause automated enrollment to fail and your device will show as Invalid Profile, regardless of user attestation. To permit enrollment only by company-managed devices, block only personally owned devices, which will permit corporate devices to enroll. Microsoft defines a corporate device as a device that's enrolled via a Device Enrollment Program or a device that's manually entered under Corporate device identifiers.
Distribute devices
You enabled management and syncing between Apple and Intune and assigned a profile so your ADE devices can be enrolled. You're now ready to distribute devices to users. Some things to know:
To use devices enrolled with user affinity, users must have an Intune license assigned.
Devices enrolled without user affinity typically don't have any associated users. These devices need to have an Intune device license. If a device without user affinity is used by an Intune-licensed user, a device license isn't needed.
To summarize, if a device has a user, the user needs to have an assigned Intune license. If the device doesn't have an Intune-licensed user, the device needs to have an Intune device license.
For more information on Intune licensing, see Microsoft Intune licensing and the Intune planning guide.
A device that is already activated needs to be wiped before it can enroll properly with automated device enrollment. After you wipe it but before activating it again, you can apply the enrollment profile. See Set up an existing iPhone, iPad, or iPod touch
If you're enrolling with ADE and user affinity, the following error can happen during setup:
The SCEP server returned an invalid response.You can resolve this error by trying to download the management again within 15 minutes. After 15 minutes, you have to factory reset the device to resolve the error. This error occurs because of a 15 minute time limit on SCEP certificates, which is enforced for security.
For information on the end-user experience, see Enroll your iOS/iPadOS device in Intune by using ADE.
Re-enroll a device
Complete these steps to re-enroll a device that already went through automated device enrollment.
- There are two options for resetting the device:
- Wipe the device in the Microsoft Intune admin center.
- Retire the device in the admin center, and then reset the device to factory settings using the Settings app, Apple Configurator 2, or iTunes.
- Turn on the device and follow the onscreen steps in Setup Assistant to retrieve the remote management profile.
Renew an Automated Device Enrollment token
It's important to renew your enrollment program token yearly. The Intune admin center shows the expiration date.
- If the Apple ID password changes for the user who set up the token in Apple Business Manager, renew your enrollment program token in Intune and Apple Business Manager.
- If the user who set up the token in Apple Business Manager leaves the organization, renew your enrollment program token in Intune and Apple Business Manager.
- When you change the Apple ID used to create the ADE token, the change doesn't affect currently enrolled devices with that token, until they re-enroll. This behavior is unlike the Apple Push Notification Service (APNS) certificate used for the tenant. The APNS certificate can be changed with help from Apple Support. Otherwise, to make changes, all devices must re-enroll.
Renew your tokens
Go to business.apple.com and sign in with an account that has an Administrator or Device Enrollment Manager role.
Select Settings. Under MDM Servers, select the MDM server associated with the token file that you want to renew. Select Download Token.
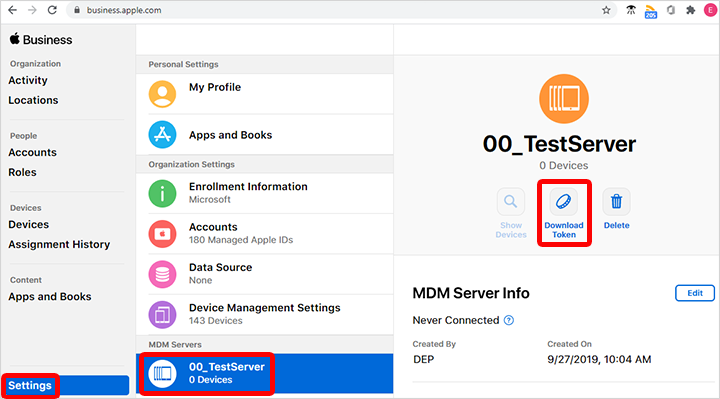
Select Download Server Token.
Note
As it says in the prompt, don't select Download Server Token if you don't intend to renew the token. Doing so will invalidate the token being used by Intune (or any other MDM solution). If you already downloaded the token, be sure to continue with the next steps until the token is renewed.
After you download the token, go to Microsoft Intune admin center.
Select Devices > Enrollment.
Choose Enrollment program tokens.
Select the token.
Select Renew token. Enter the Apple ID used to create the original token (if it's not already filled-in):
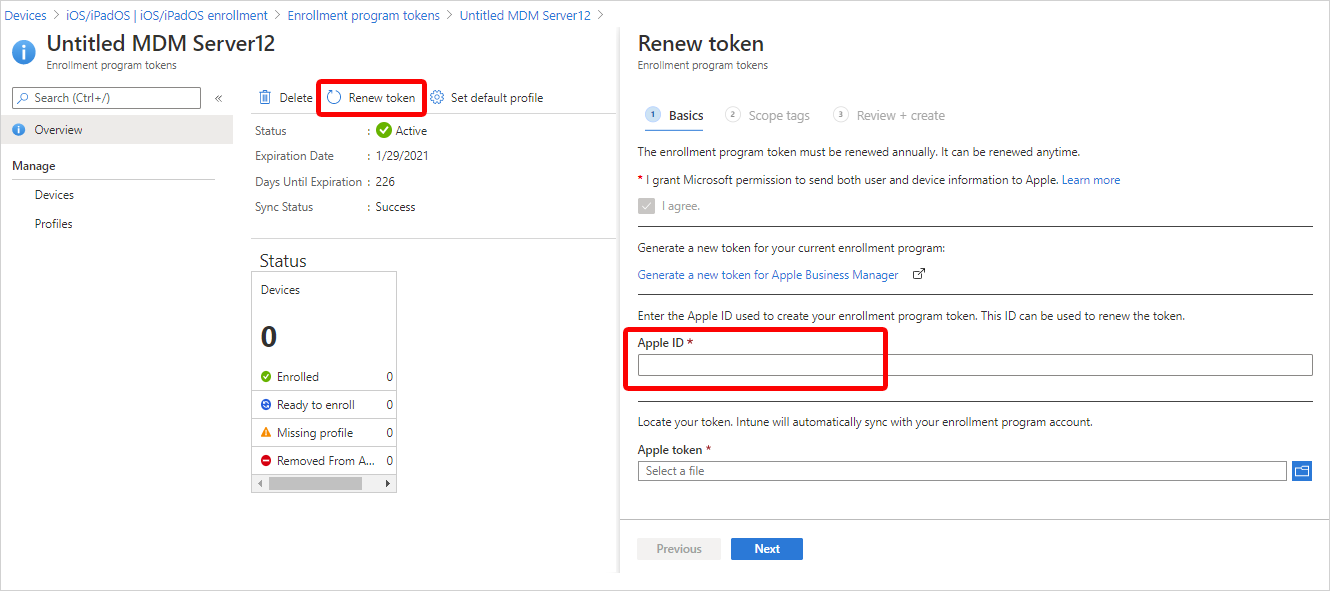
Upload the newly downloaded token.
Select Next to go to the Scope tags page. Assign scope tags if you want to.
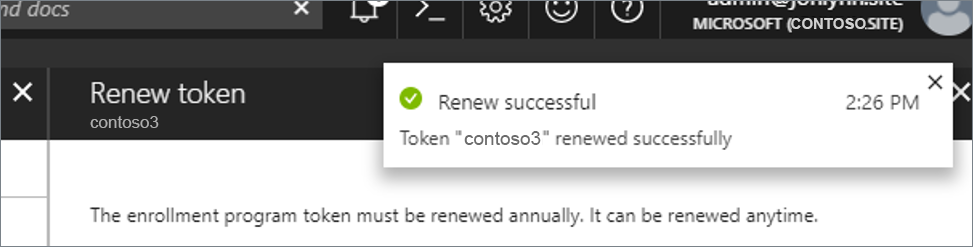
Select Renew token. Wait for confirmation that the token renewal is done.

Delete an Automated Device Enrollment token from Intune
You can delete an enrollment profile token from Intune as long as:
- No devices are assigned to the token.
- No devices are assigned to the default profile.
- There are no enrollment profiles under that token.
To delete an enrollment profile token:
- In Microsoft Intune admin center, go to Devices > Enrollment.
- Select the Apple tab.
- Choose Enrollment Program Tokens
- Select the token, and then select Devices.
- Delete all the devices assigned to the token.
- Return to Enrollment program tokens. Select the token, and then select Profiles.
- If there's a default profile or any other enrollment profile, they must all be deleted.
- Return to Enrollment program tokens. Select the token, and then select Delete.
Limitations
These Setup Assistant screens don't work correctly on devices running iOS/iPadOS 14.5 and later:
- Passcode
- Touch ID and Face ID
Hide both screens on devices running iOS/iPadOS 14.5 and later. If you want to require passcodes on those devices, create a device configuration policy or a compliance policy with passcode requirements. After the user enrolls and receives the policy, the passcode requirement will kick in.
Next steps
For an overview of requirements for device users, see ADE end user tasks.