Note
Access to this page requires authorization. You can try signing in or changing directories.
Access to this page requires authorization. You can try changing directories.
Using Microsoft Intune, you can manage and secure macOS endpoints owned by your organization or school. When you or your organization manage the devices, you can deploy the apps your end users need, configure the device features you want, and use policies that help protect your devices & organization from threats.
This article applies to:
- macOS devices owned by your organization
This article is an end-to-end guide to help you get started with your macOS endpoints. It focuses on:
- Endpoints managed with Apple Business Manager or Apple School Manager
- Devices enrolled in Intune using Automated Device Enrollment with user affinity. User affinity is typically used for devices with one primary user.
This article guides you through the end-to-end steps to create and manage your macOS endpoints using Microsoft Intune.
How to use this guide
This guide has seven phases. Each phase has a set of steps that help build your macOS endpoint configuration and deployment. Each phase builds on the previous phase.
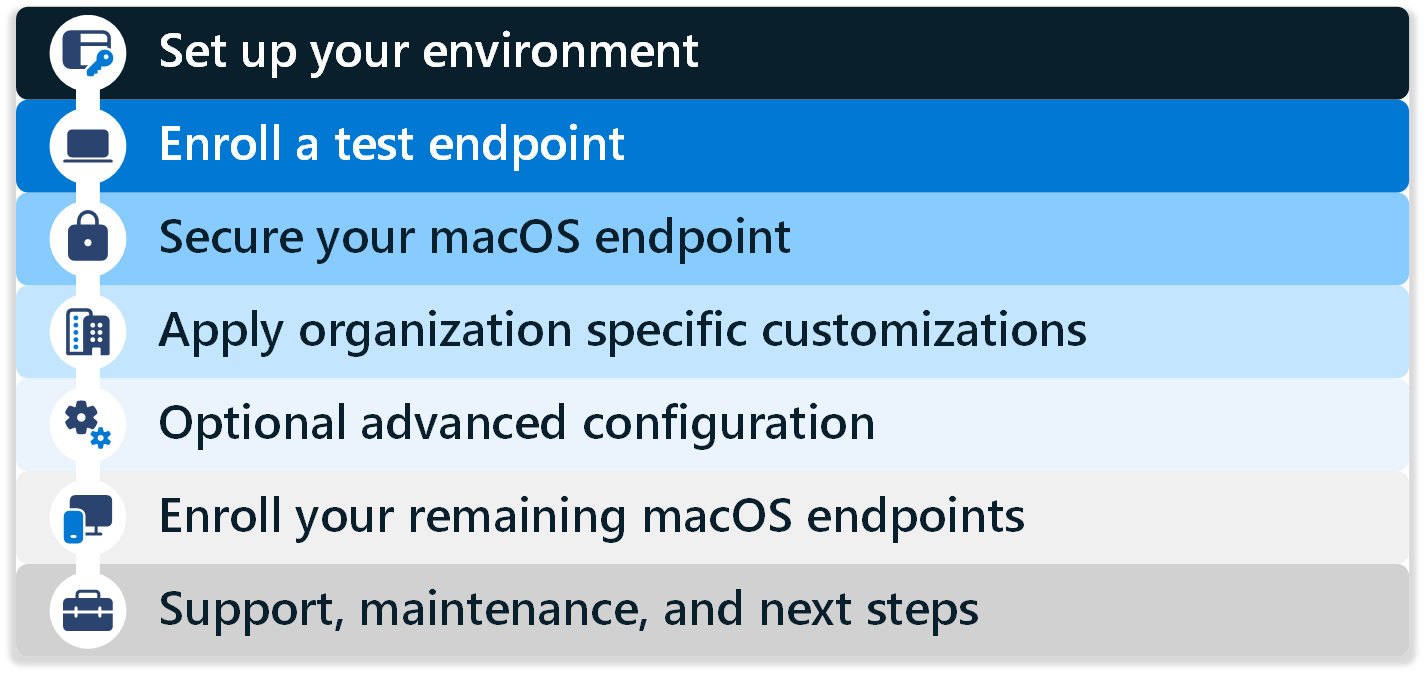
Complete the phases and steps in order. The phases include:
- Phase 1 - Set up your environment
- Phase 2 - Enroll a test endpoint
- Phase 3 - Secure your macOS endpoint
- Phase 4 - Apply organization specific customizations
- Phase 5 - Optional advanced configuration
- Phase 6 - Enroll your remaining macOS endpoints
- Phase 7 - Support, maintenance and next steps
At the end of this guide, you have a macOS endpoint enrolled into Intune and ready to start validating in your scenarios.
Phase 1 - Set up your environment
Before you build your first macOS endpoint, there are some requirements and configuration features that you configure.
In this phase, you check the requirements, integrate Intune with Apple Business Manager (or Apple School Manager), configure some features, and add some apps to Intune.
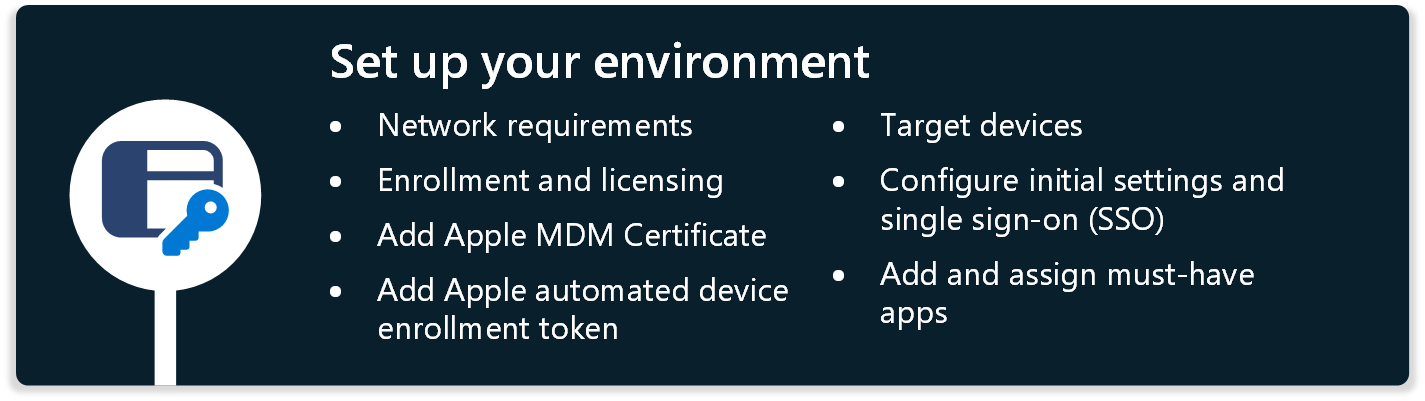
Step 1 - Network requirements
✅ Set up your network
To successfully prepare and deploy your macOS endpoint, the endpoint requires access to several public Internet services.
Start your testing on an open network. Or, in your organization network, provide access to all the endpoints listed at Network endpoints for Microsoft Intune. Then, you can use your organization network to test your configuration.
If your wireless network requires certificates, you can start with an Ethernet connection during testing. The Ethernet connection gives you some time to determine the best approach for the wireless connections that devices need.
Caution
SSL inspection can cause access to Microsoft and Apple services to fail. For more information on Apple's requirements, go to Use Apple products on enterprise networks.
Step 2 - Enrollment and licensing
✅ Create a new group, configure enrollment restrictions, and assign licenses
To get the endpoints ready for enrollment, you need to make sure the correct endpoints are targeted and that the endpoints are licensed correctly.
Specifically:
Create a new group
Create a new Microsoft Entra test group, like Intune MDM Users. Then, add test user accounts to this group. To limit who can enroll devices while you set up your configuration, target the configurations to this group.
To create a Microsoft Entra group, use the Intune admin center. When you create a group in Intune, you're creating an Entra group. You don't see the Entra branding, but that's what you're using.
For more information, go to Create a group to manage users in Intune.
Enrollment Restrictions
Enrollment restrictions allow you to control the types of devices that can enroll into Intune management. For this guide to be successful, in an enrollment restriction, make sure macOS (MDM) enrollment is allowed, which is the default configuration. Assign this enrollment restriction to the new group you created.
If needed/wanted, you can also prevent specific devices from enrolling.
For information on configuring Enrollment Restrictions, go to Set enrollment restrictions in Microsoft Intune.
Licensing
Users enrolling macOS devices require a Microsoft Intune or Microsoft Intune for Education license. To assign licenses, go to Assign Microsoft Intune licenses. Assign the licenses to the test accounts you created.
Note
Both types of licenses are typically included with licensing bundles, like Microsoft 365 E3 (or A3) and higher. For more information, go to Compare Microsoft 365 Enterprise Plans.
Step 3 - Add the Apple MDM Certificate
✅ Add the push certificate with a Managed Apple ID
To manage macOS devices, Apple requires the Intune tenant be configured with an MDM push certificate. If you currently manage iOS/iPadOS devices in this same tenant, then this step is done.
Make sure you use a Managed Apple ID with the Apple Business Manager (or Apple School Manager) instance.
Don't use a personal Apple ID. Management of the Apple Push Notification Service certificate is critical over the life of your device management solution. Access with a personal Apple ID can become unavailable, as staff does change over time.
For information on configurating an Apple MDM push certificate, go to Get an Apple MDM Push certificate for Intune.
Step 4 - Add the Apple automated device enrollment token
✅ Link Apple token for Automated Device Enrollment
To manage devices enrolled through Apple Business Manager (or Apple School Manager), you need to set up an MDM token and link the token with Intune.
This token is required for Automated Device Enrollment (ADE) in Intune. The token:
- Lets Intune sync ADE device information from your Apple Business Manager (or Apple School Manager) account.
- Allows Intune to upload enrollment profiles to Apple.
- Allows Intune to assign devices to those profiles.
If you currently manage iOS/iPadOS devices in this same tenant using ADE, then some of these steps might be done.
For information on configuring Apple Business Manager with Intune, go to Enroll macOS devices - Apple Business Manager or Apple School Manager.
The high-level steps to configure Apple Business Manager (or Apple School Manager) with Intune are:
- Connect Intune to Apple Business Manager (or Apple School Manager).
- In Intune, create ADE profiles for the Apple Business Manager token.
- In Apple Business Manager, assign devices to your Intune MDM.
- In Intune, assign the ADE profiles to your macOS devices.
When you use macOS ADE enrollment profiles, we recommend configuring macOS account configuration with LAPS to enable newly enrolled devices to have a local admin and standard account and encrypted admin password that you can manage with Intune.
Step 5 - Target devices
✅ Target specific groups using user groups, Intune filters or dynamic groups
macOS devices with user affinity can be targeted for profiles and apps using user or device groups. There are two common options for how organizations dynamically target devices:
Option 1 - All devices groups with an assignment filter on enrollmentProfileName
For critical apps and policies that must apply immediately after enrollment (security settings, restrictions, the Company Portal app), you can assign the policies to the built-in Intune All Devices group. Create an assignment filter using the enrollment profile you created in Step 4 - Add the Apple automated device enrollment token.
Policies and apps targeted to the All Devices group apply faster after enrollment than dynamic groups. Not all configuration profiles (like macOS scripts) support filters.
For more information on assignment filters, go to Create filters in Microsoft Intune.
Option 2 – Microsoft Entra dynamic group based on enrollmentProfileName
To limit the configurations from this guide to the test devices that you import through Apple Business Manager, create a dynamic Microsoft Entra group. You can then target all your configurations and apps to this group.
Open the Microsoft Intune admin center.
Select Groups > New Group, and enter the following details:
- Group type: Select Security.
- Group Name: Enter macOS endpoints.
- Membership type: Select Dynamic Device.
For Dynamic device members, select Add dynamic query and enter the following properties:
- Property: Select enrollmentProfileName.
- Operator: Select equals.
- Value: Enter your enrollment profile name.
Select OK > Save > Create.
When you create apps and policies, you can target the policies to this new dynamic Microsoft Entra group.
Note
After changes occur, Dynamic groups can take several minutes to populate. In large organizations, it can take longer. After creating a new group, wait several minutes before you check if the device is a member of the group.
For more information about dynamic groups for devices, go to Dynamic membership rules for groups in Microsoft Entra ID: Rules for devices.
Step 6 - Configure initial settings and single sign-on (SSO)
✅ Optimize first run experience
Using Intune, you can optimize the first run experience using built-in settings within the ADE enrollment profile. Specifically, when you create the enrollment profile, you can:
- Preconfigure end user information in Setup Assistant.
- Use the Await final configuration feature. This feature prevents end users from accessing restricted content or changing settings until the Intune device configuration policies apply.
For more information on this feature and ADE enrollment, go to Automatically enroll Macs with Apple Business Manager or Apple School Manager.
✅ Reduce app sign-in prompts with SSO
In Intune, you can configure settings that reduce the number of sign-in prompts end users receive when using apps, including Microsoft 365 apps. There are two parts to this configuration:
Part 1 - Use the Microsoft Enterprise SSO plug-in to provide single sign-on (SSO) to apps and websites that use Microsoft Entra ID for authentication, including Microsoft 365 apps.
There are two options for configuring SSO for Mac - Enterprise SSO plug-in and Platform SSO.
Platform SSO builds on top of the existing capabilties in the Enterprise SSO plug-in. Platform SSO allows for device-bound credentials, smart card or password sync authentication options. On macOS 14, Platform SSO also supports creating new user accounts from the macOS login screen.
For more information, go to:
Configure Platform SSO for macOS devices in Microsoft Intune
Platform SSO on Apple's web site (opens Apple's website)
Part 2 - Use the Intune settings catalog to configure the following settings that reduce sign-in prompts, including Microsoft AutoUpdate (MAU) and Microsoft Office.
Devices > Manage devices > Configuration > Create > New policy > Settings catalog > Microsoft AutoUpdate (MAU): Add and configure the following settings:
Automatically acknowledge data collection policy: Select Acknowledge – send required and optional data.
For more information about this setting, go to Use preferences to manage privacy controls for Office for Mac
Enable AutoUpdate: Select True.
This setting forces Microsoft AutoUpdate to on. For more information about Microsoft AutoUpdate, which updates Microsoft 365 Apps and Company Portal, go to Deploy updates for Office for Mac.
Devices > Manage devices > Configuration > Create > New policy > Settings catalog > Microsoft Office > Microsoft Office: Add and configure the following settings:
- Office Activation Email Address: Enter
{{userprincipalname}}. - Enable automatic sign-in: Select True.
These settings streamline the sign in process when opening Office apps for the first time. For more information on these settings, go to Set suite-wide preferences for Office for Mac.
- Office Activation Email Address: Enter
For more information on the settings catalog, including how to create a policy, go to Use the settings catalog to configure settings in Microsoft Intune.
Step 7 - Add and assign must-have apps
✅ Add a minimum set of apps to Intune
Your organization might have some apps that your macOS devices must have. Your organization can require these apps be installed on all devices managed by Intune.
In this step, add these apps to Intune and assign them to your group.
Some must-have apps include:
Company Portal app
Microsoft recommends you deploy the Intune Company Portal app to all devices as a required application. The Company Portal app is the self-service hub for users. In the Company Portal app, users can install apps, sync their device with Intune, check compliance status, and more.
The Company Portal app is also required for the SSO extension that you configure in Step 6 - Configure initial settings and single sign-on (SSO) (in this article).
To deploy the Company Portal app as a required app, go to Add the Company Portal for macOS app.
Microsoft 365 Apps
Microsoft 365 apps, like Word, Excel, OneDrive, and Outlook, can easily be deployed to devices using the built-in Microsoft 365 apps for macOS app profile in Intune.
To deploy Microsoft 365 Apps, go to:
Phase 2 - Enroll a test endpoint
The next phase enrolls a test macOS device into Intune. This phase gets you familiar with the initial steps so you're ready when it's time to enroll all your macOS devices in Intune.

To enroll your first organization macOS endpoint, make sure the macOS device is:
The high-level steps to enroll your first macOS endpoint with Intune are:
Erase or reset the macOS endpoint. This step is required for existing devices. If you enroll a macOS device that is already set up, then the device is considered a personal device. So, you must erase or reset the device before you can enroll it into Intune.
For new devices that aren't set up, you can skip this step. If you aren't sure if the device is set up, then reset the device.
Go through Setup Assistant.
Open the Company Portal app and sign in with your organization account (
user@contoso.com).
When the user signs in, the enrollment policy applies. When it completes, your macOS endpoint is enrolled in Intune.
Phase 3 - Secure your macOS endpoints
In this phase, you configure security settings and features that help protect your endpoints, including keeping devices current with updates.
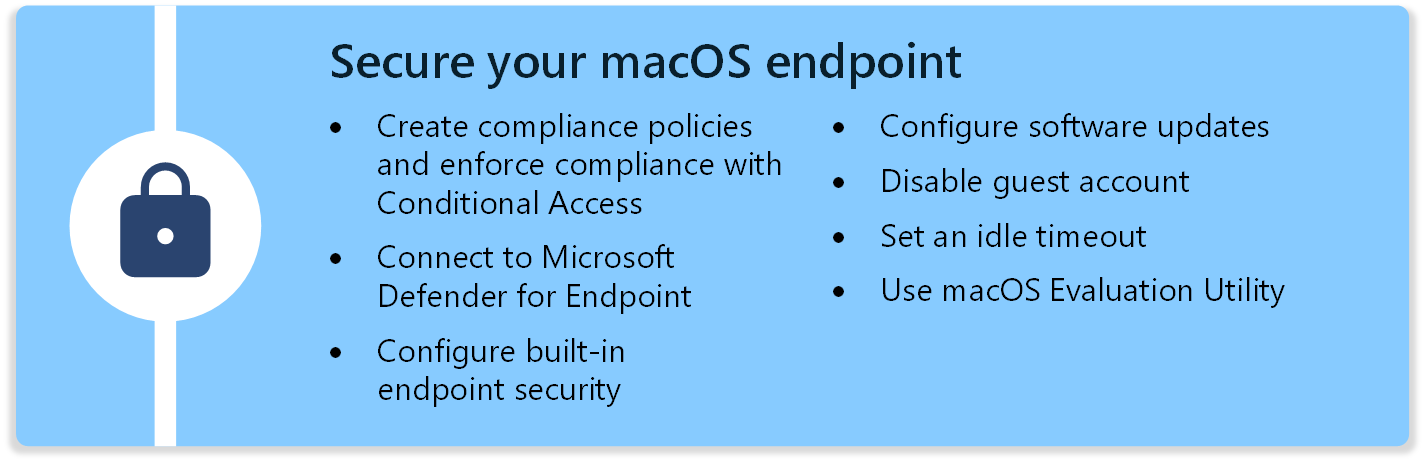
This section focuses on the different endpoint security features in Microsoft Intune, including:
- Compliance and Conditional Access policies
- Microsoft Defender for Endpoint
- FileVault, Firewall, and Gatekeeper endpoint security
- Software Updates
- Guest account
- Idle login
- Mac Evaluation Utility
Compliance and Conditional Access policies
✅ Create compliance policies and enforce compliance with Conditional Access
Compliance policies verify the device settings you configure and can remediate some settings that aren't compliant. For example, you can create compliance policies that check password complexity, jailbroken status, threat levels, enrollment status, and more.
If there are configuration settings that conflict between compliance policies and other policies, then the compliance policy takes precedence. For more information, go to Compliance and device configuration policies that conflict.
Conditional Access can be used to enforce the compliance policies you create. When combined, end users can be required to enroll their devices and meet a minimum security standard before accessing organization resources. If a device is noncompliant, then you can block access to resources, like email, or require the user to enroll their device and fix the issue.
Note
To confirm you're enforcing the proper device controls, work with your team that manages your Entra Conditional Access policies.
You can create compliance and Conditional Access policies in the Intune admin center.
For more information, go to:
- Use compliance policies to set rules for devices you manage with Intune
- Conditional Access and Intune
- How to require a compliant device or MFA
- What is Conditional Access in Microsoft Entra ID?
Microsoft Defender for Endpoint
✅ Use Microsoft Defender for Endpoint for threat defense
Microsoft Defender for Endpoint is a mobile threat defense solution that helps protect your devices from security threats.
In Intune, you can connect to your Microsoft Defender for Endpoint service, create Intune policies using Microsoft Defender for Endpoint settings, and then deploy the policies to your devices.
For more information, go to:
- Configure Microsoft Defender for Endpoint in Intune
- Deploy Microsoft Defender for Endpoint on macOS with Microsoft Intune
Built-in endpoint security
✅ Encrypt devices with FileVault disk encryption
FileVault is a whole-disk encryption feature that helps prevent unauthorized access. The FileVault settings are built into the Intune settings catalog and are available as compliance policies.
So, you can configure FileVault, check for compliance, and deploy the policies to your devices.
To create these policies, in the Intune admin center, go to:
- Devices > Manage devices > Configuration > Create > New policy > Settings catalog > Full Disk Encryption
- Devices > Manage devices > Compliance > Create policy > System security > Require encryption of data storage on device
For more information about FileVault, go to:
- Encrypt macOS devices with FileVault disk encryption with Intune
- Use FileVault to encrypt the startup disk on your Mac (opens Apple's website)
✅ Configure the firewall
The firewall is an application firewall and helps prevent incoming attacks. The firewall settings are built into the Intune settings catalog and are available as compliance policies.
So, you can configure the firewall, check for compliance, and deploy the policies to your devices.
To create these policies, in the Intune admin center, go to:
Devices > Manage devices > Configuration > Create > New policy > Settings catalog:
- Networking > Firewall
- Security > Security preferences
Devices > Manage devices > Compliance > Create policy > System Security > Firewall
For more information about the macOS firewall, go to:
- Firewall policy for endpoint security in Intune
- Change Firewall settings on Mac (opens Apple's website)
✅ Configure Gatekeeper
Gatekeeper makes sure that only trusted software runs on the device. The Gatekeeper settings are built into the Intune settings catalog and are available as compliance policies.
So, you can configure Gatekeeper, check for compliance, and deploy the policies to your devices.
To create these policies, in the Intune admin center, go to:
Devices > Manage devices > Configuration > Create > New policy > Settings catalog > System policy > System Policy Control:
- Allow Identified Developer: Select True.
- Enable Assessment: Select True.
Devices > Manage devices > Configuration > Create > New policy > Settings catalog > System policy > System Policy Managed:
- Disable Override: Select True.
Devices > Manage devices > Compliance > Create policy > System Security > Gatekeeper
For more information about Gatekeeper, go to:
- Use the settings catalog to configure settings in Microsoft Intune
- Gatekeeper and runtime protection in macOS (opens Apple's website)
Software Updates
✅ Configure Software Updates
On devices, software updates are critical and you must determine how the updates are installed. You have some options.
When you configure these settings, you enforce and restrict the behavior in the Settings app > Software Update node on the device.
Option 1 - macOS 14.0 and newer devices (recommended) - On macOS 14.0 and newer devices, use the Intune settings catalog to create a managed software updates policy. This feature uses Apple's declarative device management (DDM), and is the recommended approach to update macOS devices.
Specifically, in the Intune admin center, you configure the following settings:
Devices > Manage devices > Configuration > Create > New policy > Settings catalog > Declarative Device Management > Software Update
Optional - At Devices > Manage devices > Configuration > Create > New policy > Settings catalog > Restrictions, you can use the following settings to delay how long after an update is released that users can manually install the updates. These settings use Apple's MDM settings:
- Enforced Software Update Minor OS Deferred Install Delay: 0-30
- Enforced Software Update Major OS Deferred Install Delay: 0-30
- Enforced Software Update Non OS Deferred Install Delay: 0-30
The Settings Catalog > Declarative Device Management > Software Update settings take precedence over the Settings Catalog > Restrictions settings.
Option 2 - macOS 13.0 and older (recommended) - On macOS 13.0 and older devices, you can use a combination of the Intune settings catalog and an Intune software updates policy. These features use Apple's MDM settings.
Specifically, in the Intune admin center, you can configure the following settings:
Devices > Manage updates > Apple updates > macOS updates policy
Devices > Manage devices > Configuration > Create > New policy > Settings catalog > Software Update
Some of the settings in both policy types (Software updates vs. Settings catalog) can overlap. So, pay attention to what you configure in each policy. The settings in the macOS updates policy take precedence over the Settings Catalog > Software Update settings.
Option 3 (not recommended) - End users manually install the updates. This approach relies on end users to decide when to install the updates. And, they can install an update that your organization doesn't approve.
For more information on planning your macOS update strategy, go to Software updates planning guide for managed macOS devices in Microsoft Intune.
Guest account
✅ Disable the guest account
You should disable the guest account on macOS endpoints. You can disable the guest account using the Intune settings catalog:
- Devices > Manage devices > Configuration > Create > New policy > Settings catalog > Accounts > Accounts:
- Disable Guest Account: Select True.
Idle timeout
✅ Set an idle timeout
Using the Intune settings catalog, you control the time period after idle that macOS prompts for a password:
Devices > Manage devices > Configuration > Create > New policy > Settings catalog > System Configuration > Screensaver:
- Ask for Password: Select True.
- Login Windows Idle Time: Enter something like
300, which is 5 minutes. - Ask for Password Delay: Enter something like
5. - Module Name: Enter the name of the screensaver module, like Flurry.
Devices > Manage devices > Configuration > Create > New policy > Settings catalog > User Experience > Screensaver User:
- Idle Time: Enter something like
300, which is 5 minutes. - Module Name: Enter the name of the screensaver module, like Flurry.
- Idle Time: Enter something like
For your desktop and laptop devices, there are settings that can help save energy:
Devices > Manage devices > Configuration > Create > New policy > Settings catalog > System Configuration > Energy Saver:
- Desktop Power > Display Sleep Timer
- Laptop Battery Power > Display Sleep Timer
- Laptop Power > Display Sleep Timer
Tip
To find the screensaver module name, set the screensaver, open the Terminal app, and run the following command:
defaults -currentHost read com.apple.screensaver
macOS Evaluation Utility
✅ Use the macOS Evaluation Utility
The Mac Evaluation Utility confirms that your Mac has the configuration and settings recommended by Apple. To access the Mac Evaluation Utility, sign into Apple Seed for IT (opens Apple's website) > Resources.
Phase 4 - Apply organization specific customizations
In this phase, you apply organization-specific settings and apps, and review your on-premises configuration.

The phase helps you customize any features specific to your organization. Notice the various components of macOS. There are sections for each of the following areas:
- Apps
- Device configuration for the dock, notifications, preference files & custom policies, and wallpaper
- Device name
- Certificates
- Wi-Fi
Apps
✅ Add more apps to Intune
In Phase 1 - Set up your environment, you added some apps that the devices must have. In this step, add other apps that can improve the end user experience or productivity.
Line of business (LOB) apps
In Intune, you can deploy LOB apps using the following options:
- Add the app package (
.pkg) to Intune, and use a shell script to deploy the app. This feature uses the Intune Management Extension. It can deploy unsigned packages and packages without a payload and supports pre- and post- scripts. - Add the app disk image (
.dmg) to Intune, and use Intune policy to deploy the app - Apps licensed with Apple's Volume Purchase Plan (VPP) and use Intune policy to deploy the app
- Add the app package (
.pkg) to Intune, and use Intune policy to deploy the app
- Add the app package (
Microsoft Edge
You can deploy Microsoft Edge to macOS endpoints using the built-in deployment type. For more information, go to Add Microsoft Edge to macOS devices using Microsoft Intune.
You can also configure Microsoft Edge settings using the Intune settings catalog:
- Devices > Manage devices > Configuration > Create > New policy > Settings catalog > Microsoft Edge
Microsoft OneDrive
In Phase 1 - Set up your environment, you added Microsoft 365 apps, which include Microsoft OneDrive. So, if you previously added Microsoft OneDrive, then you don't need to add it again. If you didn't previously add it, then you can also deploy Microsoft OneDrive separately using a downloaded app package (
.pkg).You can also configure the Microsoft OneDrive settings using the Intune settings catalog. For example, the following settings might apply to your organization:
Devices > Manage devices > Configuration > Create > New policy > Settings catalog > Microsoft Office > Microsoft OneDrive:
- Automatically and silently enable the Folder Backup feature (Known Folder Move): Enter your <Microsoft Entra tenant ID>.
- Enable Files On-Demand: Select True.
- Open at login: Select True.
Devices > Manage devices > Configuration > Create > New policy > Settings catalog > App Management > NS Extension Management:
- Allowed Extensions: Enter
com.microsoft.OneDrive.FinderSync.
If you're deploying the VPP version of OneDrive, then enter
com.microsoft.OneDrive-Mac.FinderSync.During Microsoft OneDrive configuration, end users are prompted to allow sync icons by enabling the Finder Sync extension. There's a sample script that can configure the finder extension for the user. For more information on the script, go to the GitHub - Microsoft Intune Shell samples.
- Allowed Extensions: Enter
Device Configuration
The settings catalog simplifies how you create a policy, and how you can see all the available settings. In different phases and steps in this guide, you use the Intune settings catalog to configure device features and settings.
For example, we used the settings catalog to configure the following feature areas:
- Microsoft Edge browser settings
- Microsoft AutoUpdate
- Microsoft Office
- Software Updates
- User Experience
There are many device settings you can configure using the settings catalog, including:
✅ Dock
- Devices > Manage devices > Configuration > Create > New policy > Settings catalog > User Experience > Dock
You can also add or remove items from the dock using a GitHub - Microsoft Intune dock shell sample or partner command line tools like GitHub - DockUtil.
✅ Notification prompts
Devices > Manage devices > Configuration > Create > New policy > Settings catalog > User Experience > Notifications > Notification Settings
You should enter the bundle ID for each application you want to control notifications for.
For more information, go to Notifications MDM payload settings for Apple devices (opens Apple's website).
✅ Preference files and custom policies
Preference files define app properties or settings that you want to preconfigure. In the Intune settings catalog, there are many built-in settings for apps, like Microsoft Edge and Microsoft Office. So, you might not need a preference file.
Microsoft recommends you use the built-in settings in the settings catalog. If the settings catalog doesn't have the settings you need, then add a preference file to Intune.
For more information, go to Add a property list file to macOS devices using Microsoft Intune
Custom profiles are designed to add device settings and features that aren't built in to Intune.
Microsoft recommends you use the built-in settings in the settings catalog. If the settings catalog doesn't have the settings you need, then use a custom profile.
For more information, go to custom profiles.
✅ Wallpaper
You can enforce a wallpaper on macOS using a combination of a sample script and the settings catalog:
- Devices > Manage devices > Configuration > Create > New policy > Settings catalog > User Experience > Desktop:
- Override Picture Path: 'Enter the <path of the image>'.
The image file must exist on the macOS endpoint. To download a picture from a web location, you can use a sample script at GitHub - Microsoft Intune wallpaper shell sample. You can also use an app package tool to copy a file and then deploy it using the unmanaged PKG deployment feature.
Device name
✅ Rename devices
Using a shell script, you can rename the devices to include specific information, like the device serial number combined with the country/region code.
For more information, go to GitHub - Microsoft Shell scripts to rename Mac devices.
Certificates
✅ Add certificates for certificate based authentication
If you use certificate based authentication for a password-less experience, then you can use Intune to add and deploy certificates.
For more information, go to Types of certificate available in Microsoft Intune.
Wi-Fi
✅ Preconfigure a Wi-Fi connection
Using Intune, you can create a Wi-Fi connection that includes your network information, and then deploy the connection to your macOS devices. If your devices connect to the organization using Wi-Fi, then create a Wi-Fi connection policy.
For more information, go to Configure Wi-Fi settings for macOS devices in Microsoft Intune.
Phase 5 - Caching (optional)
There are some caching features you can use to help reduce your network bandwidth.

✅ Use content caching
If you have a large number of macOS or iOS/iPadOS devices on your network, you can deploy Apple Content Cache to help reduce your Internet bandwidth. Apple Content Cache can cache content that is hosted on Apple services, like Software Updates and VPP apps.
For more information, go to Intro to content caching (opens Apple's website).
✅ AutoUpdate local cache
Many Microsoft apps on macOS are updated using the Microsoft AutoUpdate application. This app can reference a different URL for content.
You can use the GitHub - Microsoft AutoUpdate Cache Admin to configure a local cache for Microsoft AutoUpdate.
For more information, go to GitHub - Microsoft AutoUpdate Cache Admin.
Phase 6 - Enroll your remaining macOS endpoints
So far, you created your configuration and added apps. Now you're ready to enroll all your macOS endpoints with an Automated Device Enrollment policy using Microsoft Intune.

✅ Create the Automated Device Enrollment policy
The enrollment policy is assigned to your new group. When the devices receive the enrollment policy, the enrollment process starts, and the app & configuration policies you created are applied.
For more information on Automated Device Enrollment, and to get started, go to Automatically enroll Macs with Apple Business Manager or Apple School Manager.
Phase 7 - Support, maintenance, and next steps
The final phase is to support and maintain your macOS devices. This phase includes using Intune features, like remote help, monitoring your Apple certificates, and more.

Intune manages macOS devices using the built-in operating system MDM capabilities and the Intune Management Extension (IME) agent.
These two components offer separate functionality and communicate with the macOS device through different channels. Enrollment is orchestrated through Apple Business Manager, MDM is orchestrated through the Apple Push Notification Service, and the IME communicates directly with Intune.
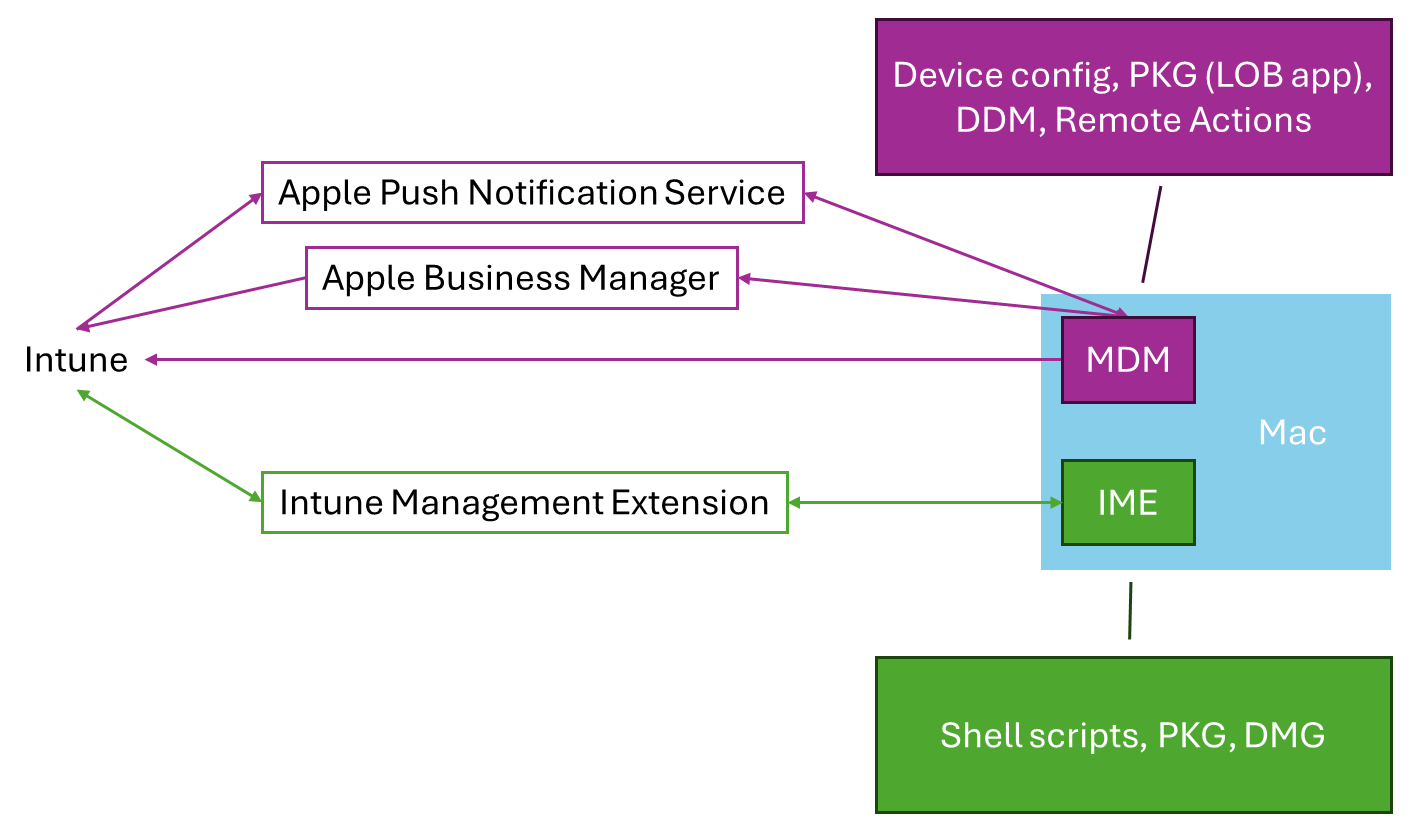
For more information about the Intune Management Extension, go to Understanding Microsoft Intune management agent for macOS.
macOS enrollment maintenance
✅ Renew Apple certificates and sync ADE tokens
For your Mac devices to maintain their connection to Intune and continue enrolling, there are several important areas you should check in the console periodically and take action as needed:
Apple Push Notification Service certificate expiry
Apple's Push Notification Service certificate must be renewed yearly. When this certificate expires, Intune can't manage devices that enrolled using that certificate. Make sure you renew this certificate every year.
For more information, go to Get an Apple MDM Push certificate for Intune.
Apple Automated Device Enrollment certificate expiry
When you set up a connection between Apple Business Manager (or Apple School Manager) and Intune, a certificate is used. This certificate must be renewed yearly. If this certificate isn't renewed, changes from Apple Business Manager (or Apple School Manager) can't sync to Intune.
For more information, go to Enroll macOS devices - Apple Business Manager or Apple School Manager.
Apple Automated Device Enrollment sync status
Apple suspends syncing of ADE tokens when the terms and conditions are changed in Apple Business Manager (or Apple School Manager). They can change after a major OS release, but it can happen anytime.
You should monitor the sync status for any problems that require attention.
For more information, go to sync managed devices.
Remote Help
✅ Enable remote help
Remote Help is a cloud-based solution for secure help desk connections that use role-based access controls. With the connection, your support staff can remote connect to end user devices.
For more information, go to:
- Use Remote Help on macOS to assist authenticated users
- Role-based access control (RBAC) with Microsoft Intune
Custom attributes
✅ Use custom properties to get reporting information
In Intune, you can use shell scripts to collect custom properties from managed macOS devices. This feature is a great way to get custom reporting information.
For more information, go to Use shell scripts on macOS devices in Microsoft Intune.
Configure Apple Business Manager for automatic user provisioning
✅ Use Entra user accounts for ABM administration and Managed Apple IDs
Microsoft Entra ID can be configured to automatically provision and deprovision users to Apple Business Manager (ABM) using the Microsoft Entra provisioning service.
For more information, go to Tutorial: Configure Apple Business Manager for automatic user provisioning.