Understanding and configuring the page transformation model
The heart of the page transformation solution is the model that feeds the transformation: the model tells the engine which web part properties are important, allows you to manipulate these properties and dynamically choose a mapping for your web part. The page transformation model is expressed in XML and comes with a schema that's used to validate the correctness of the model.
Important
SharePoint PnP Modernization is part of the PnP Framework and is continuously evolving, checkout the release notes to stay up to date on the latest changes. If you encounter problems please file an issue in the PnP Framework GitHub issue list.
Page transformation high level architecture
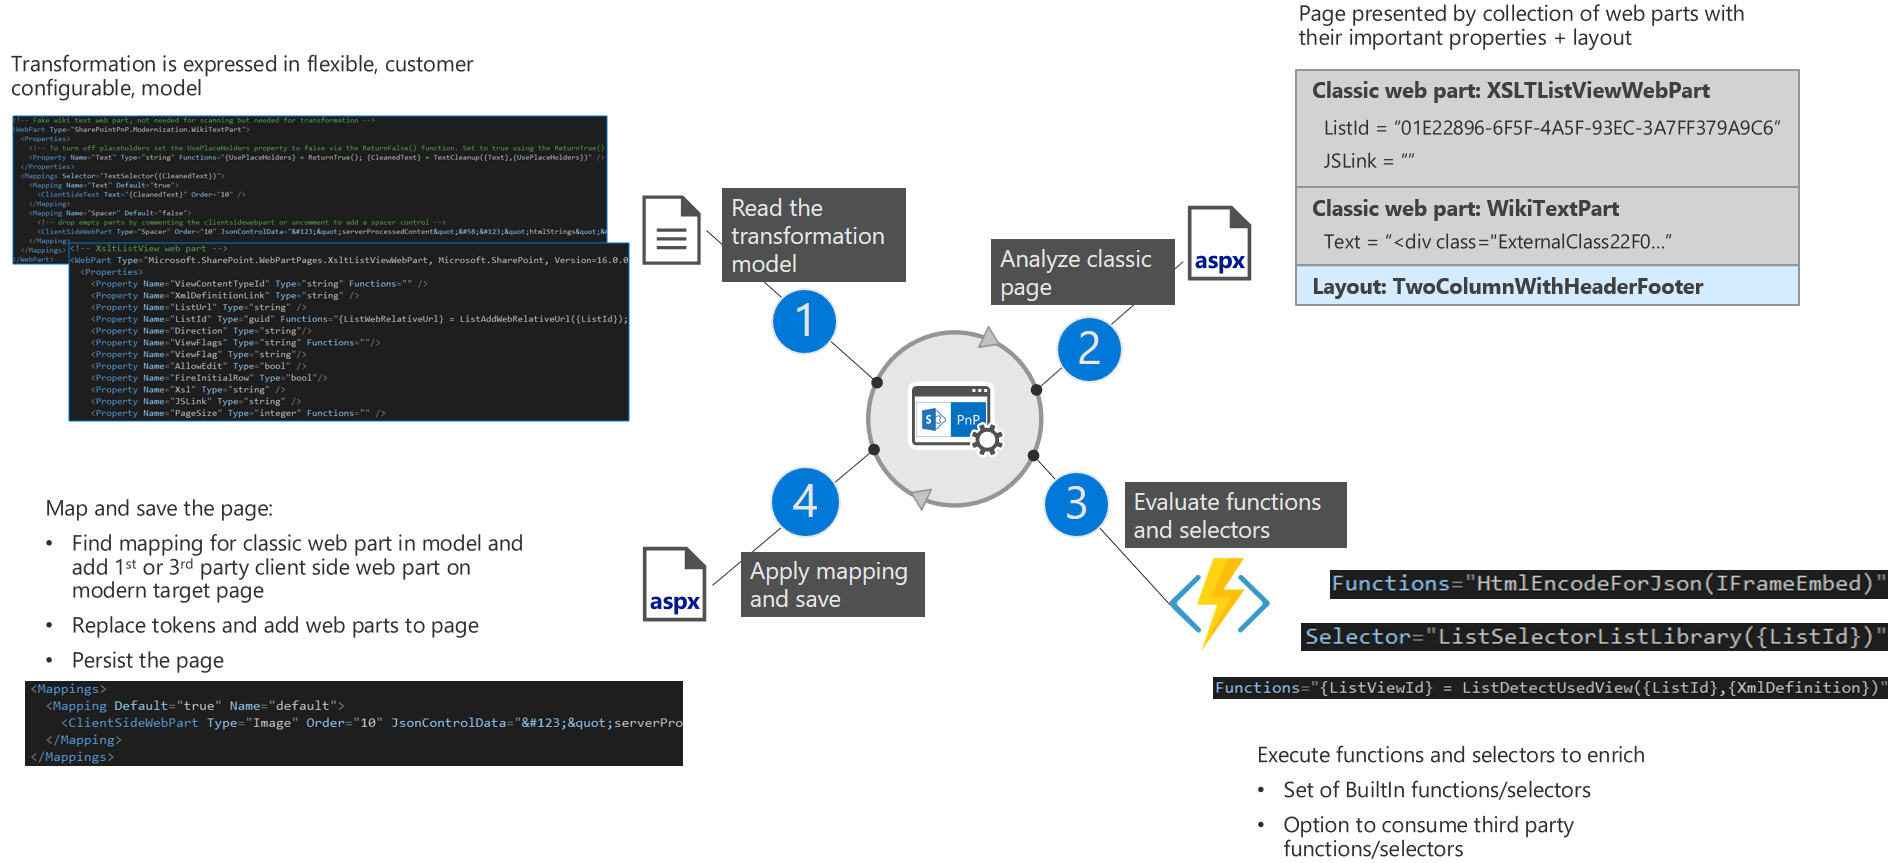
Below picture explains the page transformation in 4 steps:
- At the start you need to tell the transformation engine how you want to transform pages and that's done by providing a page transformation model. This model is an XML file which describes how each classic web part needs to be mapped to a modern equivalent. Per classic web part the model contains a list of relevant properties and mapping information. See the Understanding and configuring the page transformation model article to learn more. If you want to understand how classic web parts compare to modern web parts it's recommended to checkout the Classic and modern web part experiences article.
- Next step is analyzing the page you want to transform: the transformation engine will break down the page in a collection of web parts (wiki text is broken down in one or more wiki text web parts) and it will try to detect the used layout.
- The information retrieved from the analysis in step 2 is often not sufficient to map the web part to a modern equivalent and therefor in step 3 we'll enhance the information by calling functions: these functions take properties retrieved in step 2 and generate new properties based upon the inputted properties from step 2. After step 3 we have all the needed information to map the web part...except we optionally need to call the defined selector to understand which mapping we'll need in case one classic web part can be mapped to multiple modern configurations.
- The final step is creating and configuring the modern page followed by adding the mapped modern web parts to it.
Page transformation model structure
When you open the page transformation model the following top level elements are present:
BaseWebPart: this element contains the configuration that applies to all web parts e.g. it describes that the property "Title" will be fetched for all web parts. It's also the place that defines the default web part mapping: if a web part has no mapping defined the engine will fall back to this mapping to represent the web part on the target page.
AddOns: as user of page transformation you might have needed to apply custom logic to realize your needs e.g. you need to transform a given property in a way that it can work with your custom SPFX web part. The framework supports this by allowing you to add your assemblies with functions and selectors...simply defining them in the AddOn section and then referencing your custom functions and selectors later on by prefixing them with the given name will make the page transformation use your custom code.
WebParts: this element contains information for each web part that you want to transform. For each web part you'll find a definition of the properties to use, the functions to execute on those properties, the possible mappings that define the target of the transformation combined with a selector that you dynamically select the needed mapping.
Upcoming chapters will provide more details.
WebPart definition in the page transformation model
Let's analyze how a web part is configured in the page transformation model, which is best done based upon a simplified sample of the XsltListViewWebPart definition:
<!-- XsltListView web part -->
<WebPart Type="Microsoft.SharePoint.WebPartPages.XsltListViewWebPart, Microsoft.SharePoint, Version=16.0.0.0, Culture=neutral, PublicKeyToken=71e9bce111e9429c">
<Properties>
<Property Name="XmlDefinitionLink" Type="string" />
<Property Name="ListUrl" Type="string" />
<Property Name="ListId" Type="guid" Functions="{ListWebRelativeUrl} = ListAddWebRelativeUrl({ListId}); {ListServerRelativeUrl} = ListAddServerRelativeUrl({ListId})"/>
<Property Name="Direction" Type="string"/>
<Property Name="GhostedXslLink" Type="string" />
<Property Name="DisableViewSelectorMenu" Type="bool"/>
<Property Name="XmlDefinition" Type="string" Functions="{ListViewId} = ListDetectUsedView({ListId},{XmlDefinition})"/>
<Property Name="SelectParameters" Type="string"/>
</Properties>
<!-- This selector outputs: Library, List -->
<Mappings Selector="ListSelectorListLibrary({ListId})">
<Mapping Name="List" Default="true">
<ClientSideText Text="You can map a source web part ({Title}) to a combination of modern web parts :-)" Order="10" />
<ClientSideWebPart Type="List" Order="20" JsonControlData="{"serverProcessedContent":{"htmlStrings":{},"searchablePlainTexts":{},"imageSources":{},"links":{}},"dataVersion":"1.0","properties":{"isDocumentLibrary":false,"selectedListId":"{ListId}","listTitle":"{Title}","selectedListUrl":"{ListServerRelativeUrl}","webRelativeListUrl":"{ListWebRelativeUrl}","webpartHeightKey":4,"selectedViewId":"{ListViewId}"}}" />
</Mapping>
<Mapping Name="Library" Default="false">
<ClientSideWebPart Type="List" Order="10" JsonControlData="{"serverProcessedContent":{"htmlStrings":{},"searchablePlainTexts":{},"imageSources":{},"links":{}},"dataVersion":"1.0","properties":{"isDocumentLibrary":true,"selectedListId":"{ListId}","listTitle":"{Title}","selectedListUrl":"{ListServerRelativeUrl}","webRelativeListUrl":"{ListWebRelativeUrl}","webpartHeightKey":4,"selectedViewId":"{ListViewId}"}}" />
</Mapping>
</Mappings>
</WebPart>
Properties element
For each web part the model defines the properties that might be useful to configure the target modern web part(s). If you miss certain properties you can simply extend them in the model. On some of the properties you'll see a Functions attribute: this attribute contains one or more functions (separate functions via a ;) that are executed when the source web part is mapped to a target modern web part. The anatomy of a function is the following:
{Output} = FunctionName({Input1}, {Input2})
A function can have one or more input values which can be:
- Properties defined on this web part (e.g. {ListId})
- Properties defined on the base web part (e.g. {Title})
- Properties that were the output of previous function executions (e.g. {ListWebRelativeUrl})
- Default site scoped properties: {Host}, {Web}, {Site}, {WebId}, {SiteId}
When a function runs its output will either be:
- A single string value: this value ({Output} in the presented model) will be added to the list of web part properties with name "Output" and value the value that was returned from running
FunctionName. - A list of key/value pairs (Dictionary<string,string>): in this case each returned key/value pair is added to the list of web part properties
If the function does not define the output parameter then value of the web part property that defines the function will be overwritten with the function result.
Let's clarify with a sample:
<Property Name="ListId" Type="guid" Functions="FormatGuid({ListId})"/>
Let's assume that the web part property originally contains a guid formatted like {AAFAD7D0-D57A-4BB1-8706-969A608C686B}. After FormatGuid has been executed the value will be set to the output of FormatGuid (e.g. a guid without brackets AAFAD7D0-D57A-4BB1-8706-969A608C686B).
If a function returns multiple values then each returned key/value pair that already exists as web part property overwrites that properties value.
Note
All the out-of-the box functions are described in Page Transformation Functions and Selectors
Mappings element
This element defines one or more possible target configurations for the given source web part. Since you can define multiple targets there needs to be a mechanism to determine which mapping to use:
- If the mapping element contains a filled Selector attribute then the output of the selector execution is used to find the correct mapping by name (e.g. selector function
ListSelectorListLibraryreturn string "Library" which results in the mapping with name "Library" being used). Selectors are identical to functions that return a single value, so you can specify any web part attribute as input to your selector function - If there's only one mapping then that's taken if there was no selector result
- If there's no selector result and there are multiple mappings defined then the mapping marked as Default is taken
Note
All the out-of-the box selectors are described in Page Transformation Functions and Selectors
Next up is explain the Mapping element itself.
Mapping element
Inside a Mapping element you can have one or more ClientSideText or ClientSideWebPart elements as shown in below snippet. Note that you can run functions on a Mapping, which is handy in case you want to do processing only if a particular mapping was selected.
<Mapping Name="List" Default="true" Functions="{SampleVariable} = SampleFunction({ListId})>
<ClientSideText Text="You can map a source web part ({Title}) to a combination of modern web parts :-)" Order="10" />
<ClientSideWebPart Type="List" Order="20" JsonControlData="{"serverProcessedContent":{"htmlStrings":{},"searchablePlainTexts":{},"imageSources":{},"links":{}},"dataVersion":"1.0","properties":{"isDocumentLibrary":false,"selectedListId":"{ListId}","listTitle":"{Title}","selectedListUrl":"{ListServerRelativeUrl}","webRelativeListUrl":"{ListWebRelativeUrl}","webpartHeightKey":4,"selectedViewId":"{ListViewId}"}}" />
</Mapping>
In above sample the source XSLTListView web part is mapped to a modern text part (ClientSideText) and a modern web part (ClientSideWebPart):
- Use the
Orderattribute to determine which one comes first - For a
ClientSideWebPartyou need to specify theTypeof the web part, if you chooseCustomas type you'll also need to specify theControlIdproperty to identify the needed custom web part - The
Text,JsonControlDataandControlIdproperties can contain tokens in the form of {Token} which are replaced by actual values at runtime. Each token defined needs be able as web part property or function result as explained earlier on
AddOns definition in the page transformation model
Add-ons allow you to insert your custom logic into the mapping model by following these 2 steps:
- Create a custom assembly hosting your custom functions/selectors
- Declare this custom assembly in the AddOns elements
Create your custom functions/selectors assembly
To create your own functions you'll need to reference the SharePoint.Modernization.Framework assembly in your project and then create a class inheriting the SharePointPnP.Modernization.Framework.Functions.FunctionsBase class:
using Microsoft.SharePoint.Client;
using SharePointPnP.Modernization.Framework.Functions;
using System;

namespace Contoso.Modernization
{
    public class MyCustomFunctions: FunctionsBase
    {
        public MyCustomFunctions(ClientContext clientContext) : base(clientContext)
        {
        }

        public string MyListAddServerRelativeUrl(Guid listId)
        {
            if (listId == Guid.Empty)
            {
                return "";
            }
            else
            {
                var list = this.clientContext.Web.GetListById(listId);
                list.EnsureProperties(p => p.RootFolder.ServerRelativeUrl);
                return list.RootFolder.ServerRelativeUrl;
            }
        }

    }
}
Declare your custom assembly
Before custom functions can be used they need to be declared in the model by adding one reference per library/class into the AddOns element:
<AddOn Name="Custom" Type="Contoso.Modernization.MyCustomFunctions" Assembly="Contoso.Modernization.dll" />
or (note the fully qualified path)
<AddOn Name="Custom" Type="Contoso.Modernization.MyCustomFunctions" Assembly="c:\transform\Contoso.Modernization.dll" />
Note that each declaration has a name, "Custom" in above sample.
Use your custom functions/selectors
Now that the assembly has been defined you can use your functions and selectors be referencing them by the name like you see the "Custom" prefix in below sample:
<Property Name="ListId" Type="guid" Functions="{ListServerRelativeUrl} = Custom.MyListAddServerRelativeUrl({ListId})"/>
Feedback
Coming soon: Throughout 2024 we will be phasing out GitHub Issues as the feedback mechanism for content and replacing it with a new feedback system. For more information see: https://aka.ms/ContentUserFeedback.
Submit and view feedback for