Adjust inventory with inventory documents
Besides using item journals to adjust inventory, you can also use the following documents:
Inventory receipts
Inventory shipments
You create these documents by entering information on the header and on the lines, and when you're ready, you can post them, which will create posted inventory receipts and posted inventory shipments. This means that they have a process flow, like other documents, like sales and purchase invoices. They also share functions like printing, release and reopen, and assigning dimensions in the header.
You can use inventory documents only for locations with Require Receive and Require Shipment disabled.
Increase inventory with an inventory receipt
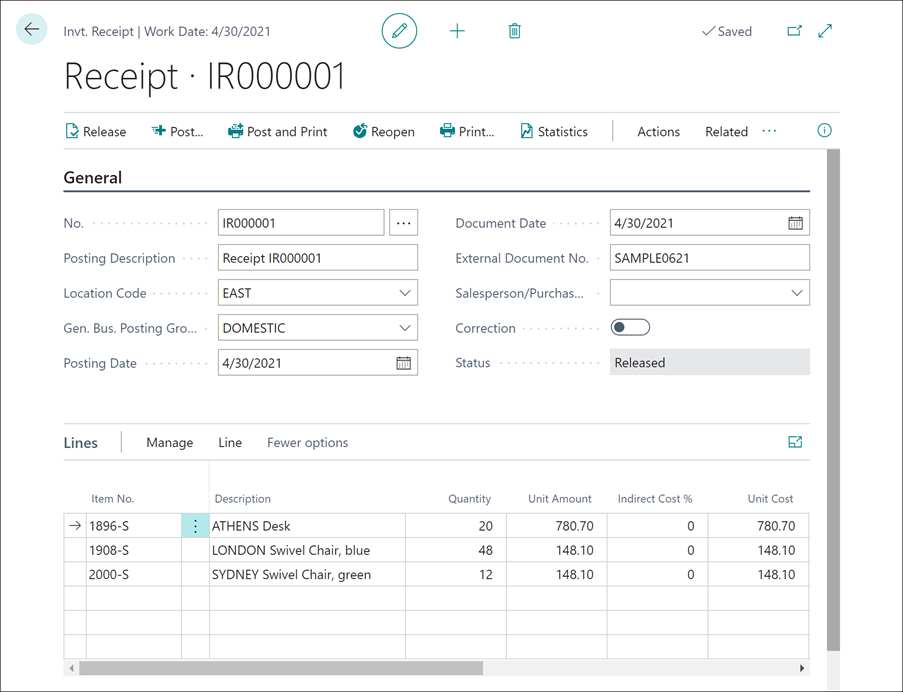
To increase the inventory with an inventory receipt document, follow these steps:
Select the Search for page icon in the top-right corner of the page, enter inventory receipts, and then select the related link.
Select New.
In the Location Code field, enter the location for which to increase the inventory.
In the Gen. Bus. Posting Group field, select the code you want to use. With this field, you can specify from which combination of the general posting setup the G/L accounts are posted. If the general posting setup has a combination with a blank general business posting group, you can also leave this field blank.
Enter the posting date and the document date. The posting date is used for the posted entries and the document date for the posted inventory receipt.
If necessary, enter an external document number.
If necessary, enter a salesperson/purchaser code.
Select the Correction field if you need to post a corrective entry to an account.
On the Lines FastTab, you can enter the items that you want to increase in inventory.
On the Dimensions FastTab, you can enter the global dimensions. You can enter any dimension and dimension value as follows:
On the header - select Related, Receipt, Dimensions. You can copy the dimensions that you enter on the header to the lines.
On the lines - select Line, Dimensions.
Before posting the inventory receipt, you can first release it. On a released inventory receipt, it isn't possible to change fields like the item number and quantity. If you need to update these field, you can select Reopen to change the status to Open.
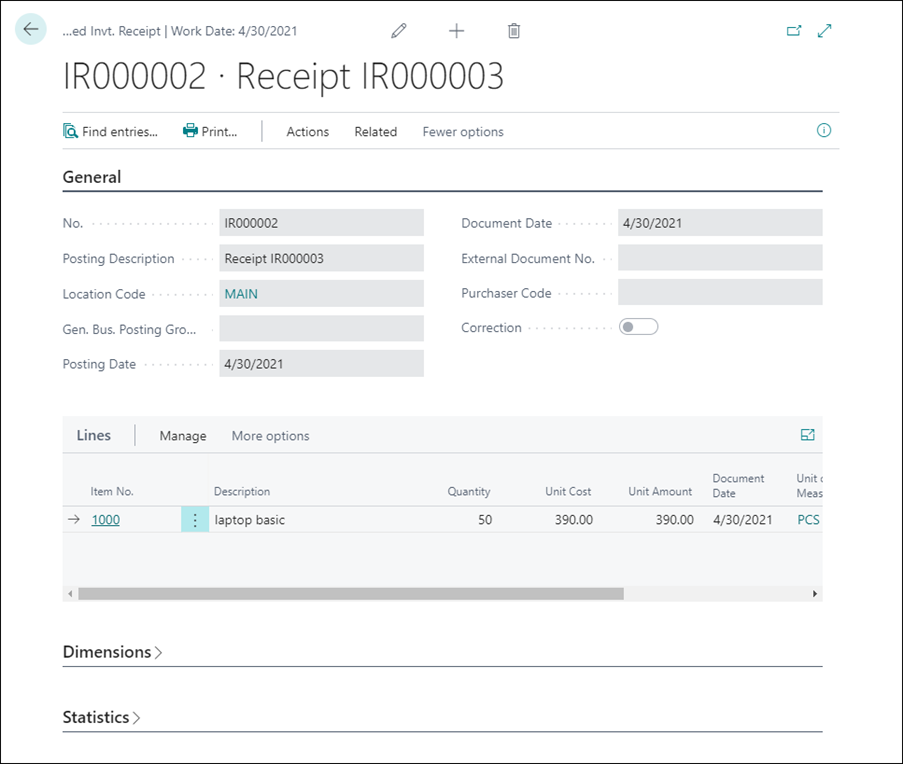
To post the inventory receipt, Select Post or Post and Print. The program creates a posted inventory receipt, from where you print the receipt document, find entries, and check the document statistics.
To access the posted inventory receipt, Select the Search for page icon in the top-right corner of the page, enter posted inventory receipts, and then select the related link.
Decrease inventory with an inventory shipment
To decrease the inventory with an inventory shipment document, follow these steps:
Select the Search for page icon in the top-right corner of the page, enter inventory shipments, and then select the related link.
Select New.
In the Location Code field, enter the location for which to decrease the inventory.
In the Gen. Bus. Posting Group field, select the code you want to use. With this field, you can specify from which combination of the general posting setup the G/L accounts are posted. If the general posting setup has a combination with a blank general business posting group, you can also leave this field blank.
Enter the posting date and the document date. The posting date is used for the posted entries and the document date for the posted inventory receipt.
If necessary, enter an external document number.
If necessary, enter a salesperson/purchaser code.
Select the Correction field if you need to post a corrective entry to an account.
On the Lines FastTab, you can enter the items that you want to decrease in inventory. In the Reason Code field, you can specify the reason for the inventory decrease.
On the Dimensions FastTab, you can enter the global dimensions. You can enter any dimension and dimension value as follows:
On the header - Select Related, Receipt, Dimensions. You can copy the dimensions that you enter on the header to the lines.
On the lines - Select Line, Dimensions.
Before posting the inventory receipt, you can first release it. On a released inventory receipt, it isn't possible to change fields like the item number and quantity. If you need to update these field, you can choose Reopen to change the status to Open.
To post the inventory receipt, choose Post or Post and Print. The program creates a posted inventory shipment. To access the posted inventory receipt, select the Search for page icon in the top-right corner of the page, enter posted inventory shipments, and then select the related link.

