Exercise - Manage request lifecycle
Tailwind Traders needs their application to have some basic security. The Express app should differentiate between registered customers who have access, and other users who shouldn't have access. Other features, like role management, might be added at a later date.
Add basic authorization to an Express framework
Most applications have parts that anyone can access. But, some parts need to be protected. There are different ways to protect an application. In this exercise, you'll implement a simple protection system to understand how the mechanism of middleware works in the Express framework.
Create a web server
In this exercise, continue to use the dev container. A sample project that has product files and starter application code is provided for you. You'll fill in the missing parts of the project to complete the app updates for the customer.
Open the node-essentials/nodejs-http/exercise-express-middleware folder in a terminal by right-clicking the folder name and selecting Open in integrated terminal.
This folder has three files: app.js, client.js, and package.json.
The package.json file contains a dependency named
express. Run the following command to install the dependency:npm installnpmreads from thedependenciessection in the package.json file and installs the required packages.In a code editor, open the app.js file and inspect the contents:
const express = require("express");
const app = express();
const port = 3000;

app.get("/", (req, res) => res.send("Hello World!"));

app.get("/users", (req, res) => {
  res.json([
    {
      id: 1,
      name: "User Userson",
    },
  ]);
});

app.get("/products", (req, res) => {
  res.json([
    {
      id: 1,
      name: "The Bluest Eye",
    },
  ]);
});

app.listen(port, () => console.log(`Example app listening on port ${port}!`));
The code contains a functioning Express application with three routes: slash
/,/users, and/products.
Create a client application
In a code editor, open the client.js application file and inspect the contents:
const http = require('http');

const options = {
  port: 3000,
  hostname: 'localhost',
  path: '/users',
  headers: {}
};

const req = http.get(options, (res) => {
  console.log(`Connected - Status Code ${res.statusCode}`);

  res.on('data', (chunk) => {
    console.log("Chunk data: ", chunk.toString());
  });

  res.on('end', () => {
    console.log('No more data');
  });

  res.on('close', () => {
    console.log('Connection closed');
  });
});

req.on('error', (error) => {
  console.error('An error occurred: ', error);
});

req.end();
This code is a simple HTTP client that connects to the Express application. It's not a web browser. It doesn't render HTML. It just connects to the server and reads the data that's returned. It is a good example of using the HTTP module from Node.js.
The client application code connects to the address http://localhost:3000/users for the /users route. The client listens for three events: data, end, and close. When emitting an event, all of the functions attached to that specific event are called synchronously. This ensures the proper sequencing of events and helps avoid race conditions and logic errors. When appropriate, listener functions can switch to an asynchronous mode of operation using the setImmediate() or process.nextTick() methods. This is not covered in this module.
Run the Express program
Now you're ready to try the Express program with a client application.
In the terminal, start the Express server program by entering this command:
node app.jsNote
Make sure you're running the app.js file located at
/nodejs-http/exercise-express-middleware.Open a second terminal and start the client application:
node client.jsIn the second terminal, you should see the following output from the client:
connected - statusCode: 200
chunk [{"id":1,"name":"User Userson"}]
No more data
Closing connection
The Express server responds with some user data,
chunk [{"id":1,"name":"User Userson"}]. All the parts of the application work.The client application ends after it displays the output.
In the first terminal (the Express server), press Ctrl + C to stop the program.
Protect the route
To protect this route, we'll add some code to the Express application.
In a code editor, open the /nodejs-http/exercise-express-middleware/app.js file. Locate the
const app = express()statement. After this statement, add the following code:function isAuthorized(req, res, next) { const authHeader = req.headers.authorization; if (!authHeader || authHeader !== 'secretpassword') { return res.status(401).send('Unauthorized: Access Denied'); } next(); }Next, locate the following section of code in the same file:
app.get("/users", (req, res) => {
  res.json([
    {
      id: 1,
      name: "User Userson",
    },
  ]);
});
Replace this section with the following code so that the
isAuthorizedmiddleware is the second argument:app.get("/users", isAuthorized, (req, res) => { res.json([ { id: 1, name: "User Userson", }, ]); });
Run the Express program and invoke the middleware
Try the client application again with the updated server program.
In the first terminal, run the following command to restart the Express program:
node app.jsIn the second terminal, restart the client application:
node client.jsIn the second terminal, you should see the following output:
connected - statusCode: 401
chunk Not permitted
No more data
Closing connection
This time, the
isAuthorized()middleware is invoked and looks for anauthorizationheader that has a specific value. Because you didn't provide a specific value as part of your request, the code didn't respond with specific user data. Instead, the response waschunk Not permitted. You'll add specific authorization in the next section.In the first terminal, press Ctrl + C to stop the program.
Add authorization header
You need to add an authorization header for a specific value.
In a code editor, open the nodejs-http/exercise-express-middleware/client.js file again. Locate the following statement:
headers: {},Replace this statement with the following code:
headers: {
  authorization: 'secretpassword'
},
Run the Express program with client authorization
Try the client again with an authorization header.
In the first terminal, run the following command to restart the Express program:
node app.jsIn the second terminal, run the following command to run the client again:
node client.jsIn the second terminal, you should now see the following output:
connected - statusCode: 200
chunk [{"id":1,"name":"User Userson"}]
No more data
Closing connection
The user data is returned because you passed an
authorizationheader with an accepted value.In the first terminal, press Ctrl + C to stop the program.
Congratulations! You learned how to use middleware in Express to add preprocessing, basic authorization, to your Express program.
Caution
Be aware that an authentication/authorization meant for real world use needs to be a more robust than this example. It's worth looking up concepts such as OAuth, JSON Web Tokens, JWT and the library bcrypt to make sure your app has protection from unauthorized users.
Cleanup development container
After completing the project, you may wish to clean up your development environment or return it to its typical state.
Deleting the GitHub Codespaces environment ensures that you can maximize the amount of free per-core hours entitlement you get for your account.
Important
For more information about your GitHub account's entitlements, see GitHub Codespaces monthly included storage and core hours.
Sign into the GitHub Codespaces dashboard (https://github.com/codespaces).
Locate your currently running Codespaces sourced from the
MicrosoftDocs/node-essentialsGitHub repository.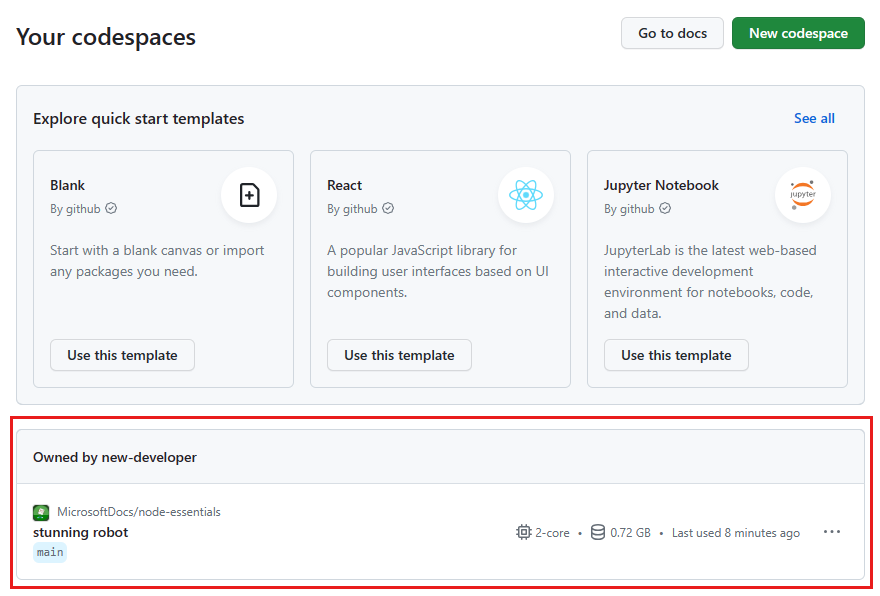
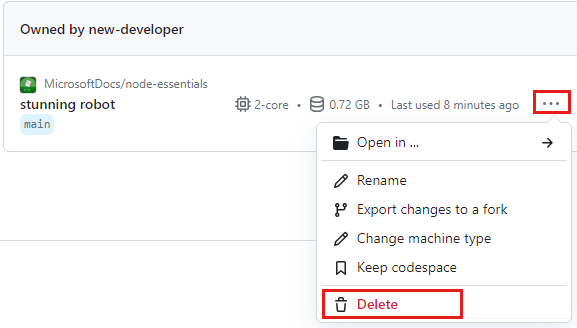
Open the context menu for the codespace and select Delete.