Exercise - Use shared access signatures to delegate access to Azure Storage
Azure Storage enables you to authorize access to files with a shared key, with a shared access signature (SAS), or via Microsoft Entra ID. With a SAS, you control what a client can do with the files and for how long.
Your company's image diagnostic system accesses its patient images internally via a shared key. You need to create an API to allow third parties access to diagnostic images. You create a test page on your web app to see how a SAS can help you grant secure access to third-party clients.
In this exercise, you create a storage account and upload some example patient images. You deploy your team's existing web app and test that it can access the storage. The last step is to add C# and JavaScript code to generate a SAS token on demand to view the images securely.

Create a storage account and upload images
Using Azure Cloud Shell, enter the following code to create a storage account for patient images. The code generates a storage account name.
export STORAGENAME=medicalrecords$RANDOM

az storage account create \
    --name $STORAGENAME \
    --access-tier hot \
    --kind StorageV2 \
    --resource-group "<rgn>[sandbox resource group name]</rgn>"
Create a container under the storage account for storing the images.
az storage container create \
    --name patient-images \
    --account-name $STORAGENAME \
    --public-access off
Clone your team's existing web app. This repository contains example images used by your team for testing.
git clone https://github.com/MicrosoftDocs/mslearn-control-access-to-azure-storage-with-sas.git sasUse the Azure CLI upload-batch command to upload the images into your storage account.
az storage blob upload-batch \
    --source sas \
    --destination patient-images \
    --account-name $STORAGENAME \
    --pattern *.jpg
Test the patient diagnostic image system
Open the appsettings.json file in code editor so we can add the connection string for your storage account.
code sas/appsettings.jsonIn Cloud Shell, enter the following code to obtain the connection string to your storage account.
az storage account show-connection-string --name $STORAGENAMEYou should see a response in this format:
{
  "connectionString": "DefaultEndpointsProtocol=https;EndpointSuffix=core.windows.net;AccountName=medicalrecords3215;AccountKey=UGLNuJWUBtodz+VbhhFcMwkzDpX49Wf7FxtuQDTOHhH+LpCtSQ2LBP0Ju8TQby5CeOt7DMYBgH45SX9yFwqPvA=="
}
Copy the connectionString value, including the quotation marks.
In code editor, replace the ConnectionString value
"[connection string]"with the string you copied.Copy the value for
AccountName=in the body of the connection string.Replace the value for the AccountName parameter with the account name value you copied.
Copy the value for
AccountKey=in the body of the connection string (don't include the quotation mark). Make sure to include the==at the end of the value.Replace the value of the AccountKey parameter with the account key value you copied.
The appsettings.json file should now look similar to this output.
{
  "Logging": {
    "LogLevel": {
      "Default": "Warning"
    }
  },
  "AllowedHosts": "*",
  "StorageAccount": {
    "ConnectionString": "DefaultEndpointsProtocol=https;AccountName=medicalrecords3215;AccountKey=UGLNuJWUBtodz+VbhhFcMwkzDpX49Wf7FxtuQDTOHhH+LpCtSQ2LBP0Ju8TQby5CeOt7DMYBgH45SX9yFwqPvA==;EndpointSuffix=core.windows.net",
    "Container" : "patient-images",
    "AccountName":"medicalrecords3215",
    "AccountKey":"UGLNuJWUBtodz+VbhhFcMwkzDpX49Wf7FxtuQDTOHhH+LpCtSQ2LBP0Ju8TQby5CeOt7DMYBgH45SX9yFwqPvA=="
  }
}
Save and close the code editor by selecting Ctrl+S, and then selecting Ctrl+Q.
Open a port so you can access your web app when it's running in Cloud Shell.
curl -X POST http://localhost:8888/openPort/8000;This command returns a
urlwhere your app can be accessed.{"message":"Port 8000 is open","url":"https://gateway11.northeurope.console.azure.com/n/cc-4016c848/cc-4016c848/proxy/8000/"}Run your app.
cd sas
dotnet run
When the app has compiled, the Cloud Shell console displays details similar to the following example.
Hosting environment: Development
Content root path: /home/<yourusername>/sas
Now listening on: https://localhost:8001
Now listening on: http://localhost:8000
Application started. Press Ctrl+C to shut down.
In a browser, paste the URL returned by the previous cURL command. Make sure you include the slash (/) at the end of the address.
The URL should be in this format:
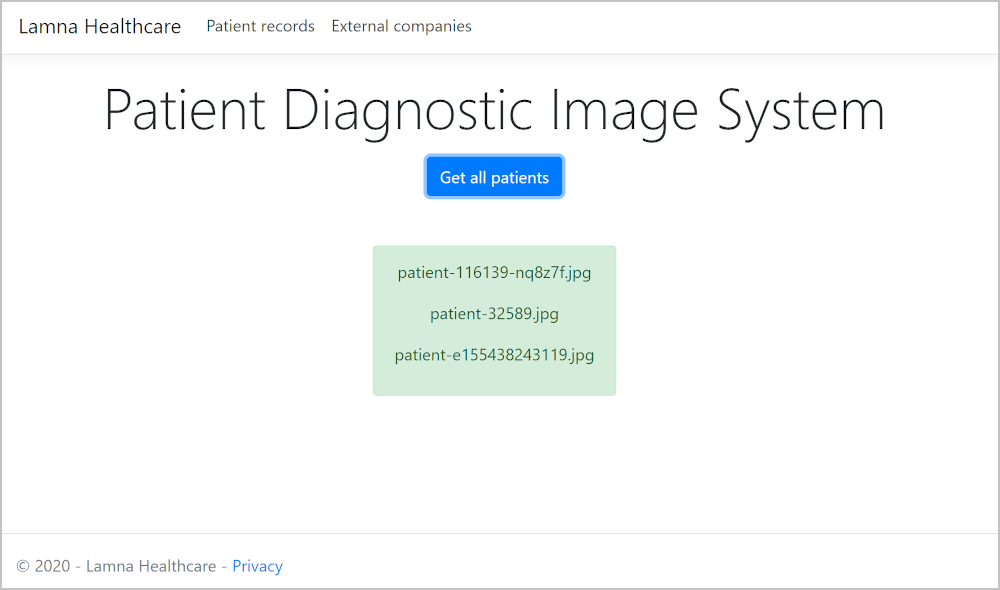
https://gateway11.northeurope.console.azure.com/n/cc-4016c848/cc-4016c848/proxy/8000/.If you're prompted to sign in, refresh your browser window. The Lamna Healthcare Patient Diagnostic Image System appears.
Select Get all patients to view a listing of all the images in the storage account.
Add code to create a SAS
In the Cloud Shell, stop the web app by selecting Ctrl+C.
Let's enhance the PatientRecordController class to create an on-demand SAS and return it to the front end of the web app.
Enter the following code to open the PatientRecordController.cs file in the code editor.
code Controllers/PatientRecordController.csAdd the following code to the bottom of the class under the
GET PatientRecord/patient-nnnnnnmethod.// GET PatientRecord/patient-nnnnnn/secure [HttpGet("{Name}/{secure}")] public PatientRecord Get(string name, string flag) { BlobClient blob = _container.GetBlobClient(name); return new PatientRecord { name=blob.Name, imageURI=blob.Uri.AbsoluteUri, sasToken=GetBlobSas(blob) }; }This method returns the requested patient image with a SAS that can be used to access it.
Add a method that creates the SAS for the blob.
// Build a SAS token for the given blob
private string GetBlobSas(BlobClient blob)
{
    // Create a user SAS that only allows reading for a minute
    BlobSasBuilder sas = new BlobSasBuilder
    {
        BlobContainerName = blob.BlobContainerName,
        BlobName = blob.Name,
        Resource = "b",
        ExpiresOn = DateTimeOffset.UtcNow.AddMinutes(1)
    };
    // Allow read access
    sas.SetPermissions(BlobSasPermissions.Read);

    // Use the shared key to access the blob
    var storageSharedKeyCredential = new StorageSharedKeyCredential(
        _iconfiguration.GetValue<string>("StorageAccount:AccountName"),
        _iconfiguration.GetValue<string>("StorageAccount:AccountKey")
    );

    return '?' + sas.ToSasQueryParameters(storageSharedKeyCredential).ToString();
}
This method uses the passed
BlobClientobject to create aBlobSasBuilderto generate a SAS that is read-only and expires in one minute.Save the file by selecting Ctrl+S, and then and quit the editor by selecting Ctrl+Q.
Add code to use the SAS
Let's add code to the webpage to request the SAS for the image.
Enter the following command to edit the external.cshtml page.
code Pages/external.cshtmlNear the end of the file, in the click listener for
#btn-submit, modify the$.getline to add+ '/secure':$('#btn-submit').click(function(){ $('#result').empty(); $.get('api/PatientRecords/' + $('#patientID').val() + '/secure', function (data) { var imageURL = data.imageURI + $('#sasKey').val(); $('#result').html('<img id="patientScan" class="alert alert-success" src="' + imageURL + '" alt="patient scan" onerror="this.classList.remove(\'alert-success\'); this.classList.add(\'alert-danger\')"//>'); }, 'json'); });Below the
#btn-submitclick listener function, at the bottom of the file, above the</script>tag, add the following code:$('#btn-getKey').click(function(){ $.get('api/PatientRecords/' + $('#patientID').val() + '/secure', function (data) { $('#sasKey').val(data.sasToken); }, 'json'); });This jQuery code adds a click listener on the
btn-getKeybutton. The code executes an Ajax call to the new secure URL for the given image file. When it returns, it populates the key input box with the SAS.Save the changes by selecting Ctrl+S, and then and quit the editor by selecting Ctrl+Q.
Test your changes
Run your updated app.
dotnet runIn your browser, refresh the tab for your web site. Select Get all patients, and then copy one of the image filenames.
In the menu at the top of the web page, select External companies.
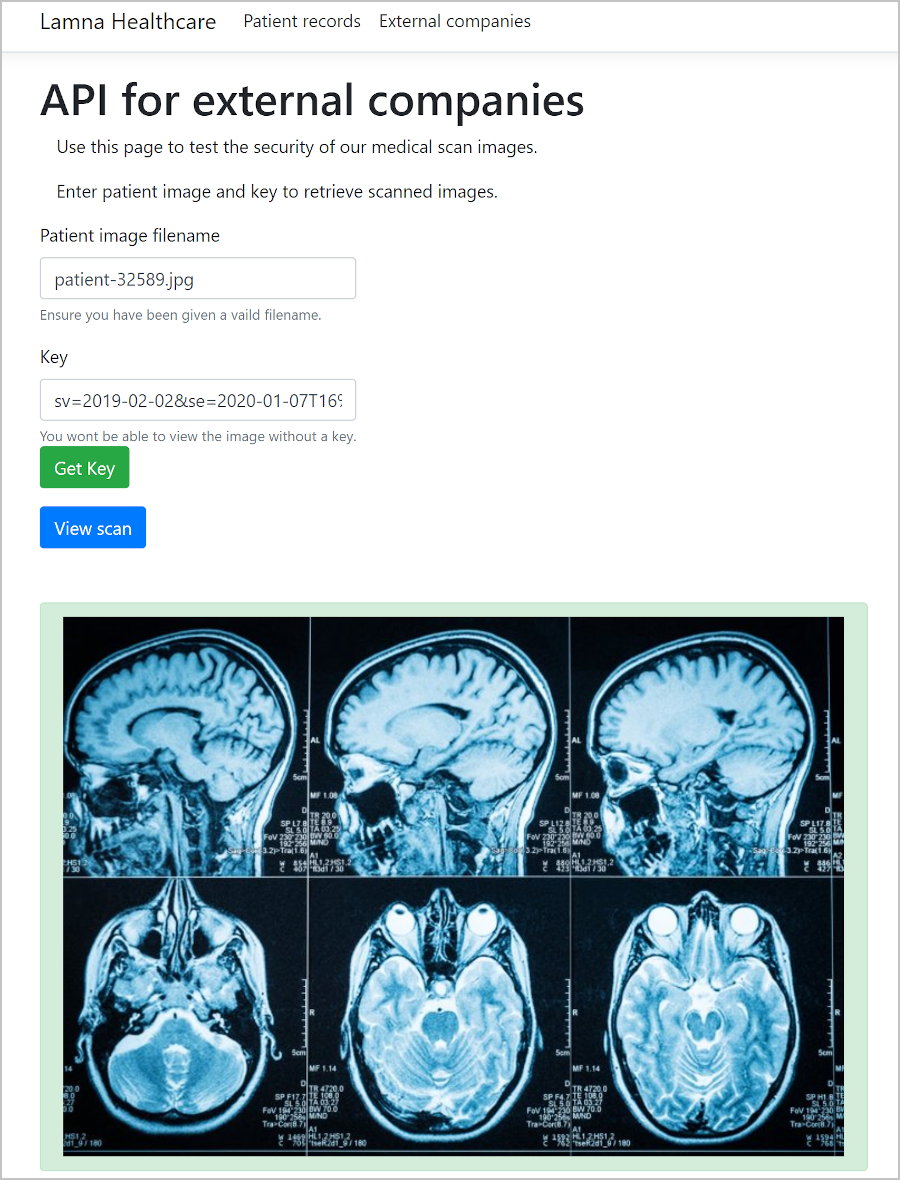
Paste the filename into the Patient image filename field.
Select View scan. The patient scan image isn't accessible because you haven't created a SAS.
Note
If you are viewing the console in your browser, you'll see the web server returned a 404 error-code message.
Select Get Key, which should populate the Key field with a SAS.
Select View scan. The patient's diagnostic image should appear.

In your browser, right-click the image and copy the image address.
Open a new browser tab, paste the copied image address in the address bar, and press Enter. If it's been longer than a minute since you created the SAS, you should see an error message. If it's been less than a minute, the image should display.
Note
You might need to refresh the page.
<Error>
    <Code>AuthenticationFailed</Code>
    <Message>Server failed to authenticate the request. Make sure the value of Authorization header is formed correctly, including the signature.
    RequestId:03eda893-f01e-0028-2d73-c5c947000000
    Time:2021-01-07T16:02:55.3752851Z</Message>
    <AuthenticationErrorDetail>Signed expiry time [Tue, 07 Jan 2021 16:02:00 GMT] must be after signed start time [Tue, 07 Jan 2021 16:02:55 GMT]</AuthenticationErrorDetail>
</Error>
Note
To view this error message from some browsers, you may need to open a new browser window that won't have cached the image.
In Cloud Shell, quit the web app by selecting Ctrl+C.