Exercise - Set up your Azure DevOps environment
In this section, you'll lean how to set up your Azure DevOps organization and create the Azure App Service environment that you'll deploy to.
You'll learn how to:
- Set up your Azure DevOps project.
- Manage your work items with Azure Boards.
- Create your Azure App Service environment.
- Create pipeline variables in Azure Pipelines.
- Create a service connection to authenticate with your Azure subscription.
Add a user to Azure DevOps
To complete this module, you need your own Azure subscription. You can get started with Azure for free.
You don't need an Azure subscription to work with Azure DevOps, but in this module you'll use Azure DevOps to deploy to Azure resources. To simplify the process, use the same Microsoft account to sign in to both Azure and Azure DevOps.
If you use different Microsoft accounts to sign in to Azure and Azure DevOps, add a user with Basic access level to your DevOps organization under the Microsoft account that you use to sign in to Azure. See Add users to your organization or project for more details.
Then, sign out of Azure DevOps and sign back in using the same account you used to sign in to your Azure subscription.
Get the Azure DevOps project
Here, you'll ensure that your Azure DevOps organization is set up to complete the rest of this module. To do so, you'll run a template that creates a project in Azure DevOps.
The modules in this learning path form a progression. You follow the Tailspin web team through their DevOps journey. For learning purposes, each module has its own Azure DevOps project.
Run the template
Run a template that sets up your Azure DevOps organization:
From the Azure DevOps Demo Generator site, follow these steps to run the template:
Select Sign In and accept the usage terms.
On the Create New Project page, select your Azure DevOps organization. Enter a project name such as Space Game - web - Docker.
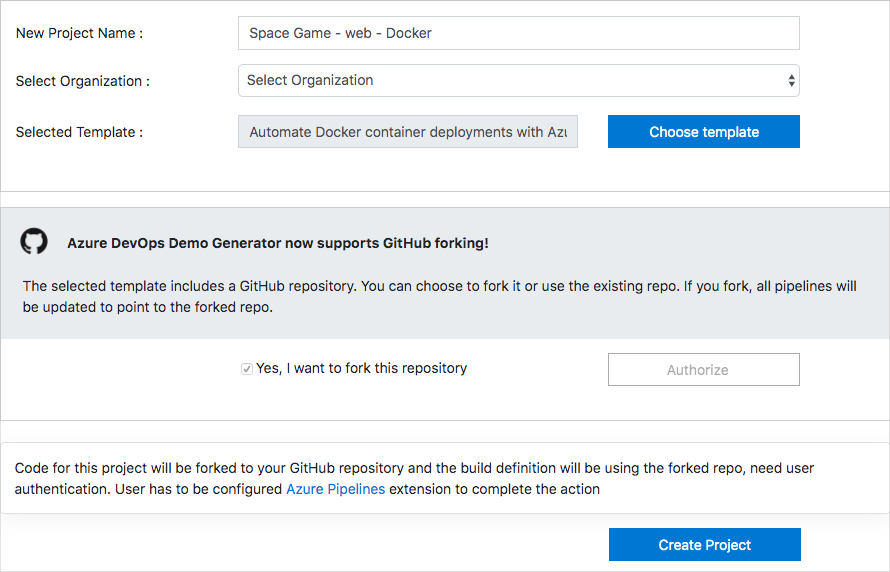
Select Yes, I want to fork this repository > Authorize. If prompted, authorize access to your GitHub account.
Important
You need to select this option so the template can connect to your GitHub repository. Make sure to select the checkbox even if you've already forked the Space Game repository. The template will use your existing fork.
Select Create Project.
Select Navigate to project to go to your project in Azure DevOps.
Important
In this module, the Clean up your Azure DevOps environment page contains important cleanup steps. Cleaning up helps ensure that you don't run out of free build minutes. Be sure to follow the cleanup steps even if you don't complete this module.
Set your project's visibility
Initially, your fork of the Space Game repository on GitHub is set to public while the project created by the Azure DevOps template is set to private. A public repository on GitHub can be accessed by anyone, while a private repository is only accessible to you and the people you choose to share it with. Similarly, on Azure DevOps, public projects provide read-only access to non-authenticated users, while private projects require users to be granted access and authenticated to access the services.
At the moment, it is not necessary to modify any of these settings for the purposes of this module. However, for your personal projects, you must determine the visibility and access you wish to grant to others. For instance, if your project is open source, you may choose to make both your GitHub repository and your Azure DevOps project public. If your project is proprietary, you would typically make both your GitHub repository and your Azure DevOps project private.
Later on, you may find the following resources helpful in determining which option is best for your project:
- Use private and public projects
- Quickstart: Make your private project public
- Setting repository visibility
Move the work item to Doing
Here, you'll assign a work item to yourself on Azure Boards. You'll also move the work item to the Doing state. In practice, you and your team would create work items at the start of each sprint, or work iteration.
This work assignment gives you a checklist to work from. It gives other team members visibility into what you're working on and how much work is left. The work item also helps enforce work-in-progress (WIP) limits so that the team doesn't take on too much work at one time.
Here, you'll move the first item, Create container version of web site using Docker, to the Doing column, then assign yourself to the work item.
To set up the work item:
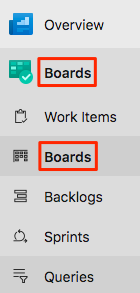
From Azure DevOps, navigate to Boards. Then select Boards from the menu.
In the Create container version of web site using Docker work item, select the down arrow at the bottom of the card, then assign the work item to yourself.

Move the work item from the To Do column to the Doing column.
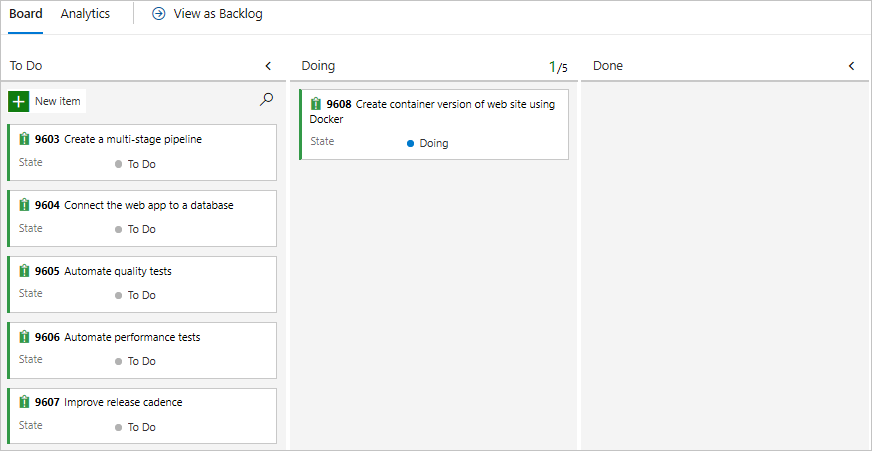
At the end of this module, you'll move the card to the Done column after you complete the task.
Create the Azure App Service environment
In the Create a release pipeline with Azure Pipelines module, you created an App Service instance using Azure portal. Although the portal is an excellent tool for exploring Azure's offerings, setting up components like App Service can become cumbersome.
In this module, you'll employ the Azure CLI to launch the resources necessary for deploying and running an App Service instance. You can access the Azure CLI from a terminal or through Visual Studio Code.
Important
You must have your own Azure subscription to complete the exercises in this module.
Launch Cloud Shell inn Azure portal
Navigate to the Azure portal and sign in.
Select the Cloud Shell from the menu bar, and then select the Bash experience.

Note
Cloud Shell requires an Azure storage resource to persist any files that you create in Cloud Shell. When you first open Cloud Shell, you're prompted to create a resource group, storage account, and Azure Files share. This setup is automatically used for all future Cloud Shell sessions.
Select an Azure region
A region is one or more Azure datacenters located within a particular geographic location. East US, West US, and North Europe are a few examples of regions. Each Azure resource, such as an App Service instance, is allocated to a specific region.
To simplify the process of running commands, begin by selecting a default region. Once the default region is specified, subsequent commands will use that region by default unless a different region is explicitly specified.
Run the following command to list the available regions for your Azure subscription.
az account list-locations \
  --query "[].{Name: name, DisplayName: displayName}" \
  --output table
Select a region that is in proximity to your location from the Name column in the output. For example, you can choose eastasia or westus2.
Run the following command to set your default region. Replace the placeholder with the name of the region you've selected.
az configure --defaults location=<REGION>This example sets westus2 as the default region:
az configure --defaults location=westus2
Create Bash variables
In this section, you'll create Bash variables to make the setup process more convenient and less error-prone. Using variables for shared text strings helps avoid accidental typos.
From Cloud Shell, generate a random number. This will make it easier to create globally unique names for certain services in the next step.
resourceSuffix=$RANDOMCreate globally unique names for your App Service Web App and Azure Container Registry. Using double quotes in these commands prompts Bash to interpolate the variables using the inline syntax.
webName="tailspin-space-game-web-${resourceSuffix}"
registryName="tailspinspacegame${resourceSuffix}"
Create two more Bash variables to store the names of your resource group and App Service plan.
rgName='tailspin-space-game-rg'
planName='tailspin-space-game-asp'
Create the Azure resources
Note
For learning purposes, you'll the default network settings here. These settings make your site accessible from the internet. In practice, you could configure an Azure virtual network that places your website in a network that's not internet routable and that only you and your team can access. Later, you could reconfigure your network to make the website available to your users.
Run the following
az group createcommand to create a resource group using the name defined earlier.az group create --name $rgNameRun the following
az acr createcommand to create an Azure Container Registry using the name defined earlier.az acr create --name $registryName \ --resource-group $rgName \ --sku Standard \ --admin-enabled trueRun the following
az appservice plan createcommand to create an App Service plan using the name defined earlier.az appservice plan create \ --name $planName \ --resource-group $rgName \ --sku B1 \ --is-linuxThe
--skuargument specifies the B1 plan. This plan runs on the Basic tier. The--is-linuxargument specifies to use Linux workers.Important
If the B1 SKU isn't available in your Azure subscription, choose a different plan, such as S1 (Standard).
Run the following
az webapp createcommand to create the App Service instance.az webapp create \ --name $webName \ --resource-group $rgName \ --plan $planName \ --deployment-container-image-name $registryName.azurecr.io/web:latestRun the following
az webapp listcommand to list the host name and state of the App Service instance.az webapp list \ --resource-group $rgName \ --query "[].{hostName: defaultHostName, state: state}" \ --output tableNote the host name for the running service. You'll need it later when you verify your work. Here's an example:
HostName                                        State
----------------------------------------------  -------
tailspin-space-game-web-4692.azurewebsites.net  Running
Run the following
az acr listcommand to list the login server of the Azure Container Registry instance. You'll need this server name when creating pipeline variables later.az acr list \ --resource-group $rgName \ --query "[].{loginServer: loginServer}" \ --output tableNote the login server. You'll need it later when you configure the pipeline. Here's an example:
LoginServer
---------------------------------
tailspinspacegame4692.azurecr.io
Important
The Clean up your Azure DevOps environment page in this module contains important cleanup steps. Cleaning up helps ensure that you're not charged for Azure resources after you complete this module. Be sure to perform the cleanup steps even if you don't complete this module.
Create pipeline variables in Azure Pipelines
In Create a release pipeline with Azure Pipelines, you added a variable to your pipeline that stores the name of your web app in App Service. You'll do the same thing here. In addition, you'll add the name of your Azure Container Registry.
You could hard-code these names in your pipeline configuration, but if you define them as variables, your configuration will be more reusable. Plus, if your instance names change, you can update the variables and trigger your pipeline without modifying your configuration.
To add the variables:
In Azure DevOps, go to your Space Game - web - Docker project.
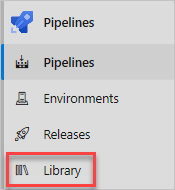
Under Pipelines, select Library.
Select + Variable group.
Under Properties, enter Release for the variable group name.
Under Variables, select + Add.
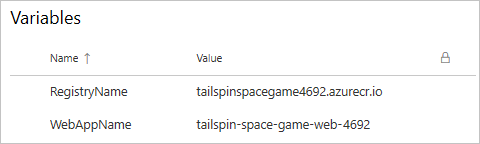
For the name of your variable, enter WebAppName. For the value, enter the name of the App Service instance created above, such as tailspin-space-game-web-4692.
Important
Set the name of the App Service instance, not its host name. In this example, you would enter tailspin-space-game-web-4692 and not tailspin-space-game-web-4692.azurewebsites.net.
Repeat the process to add another variable named RegistryName with the value of your Azure Container Registry login server, such as tailspinspacegame4692.azurecr.io.
Select Pipeline permissions, and then select the
+sign to add a pipeline. Select mslearn-tailspin-spacegame-web-docker to give your pipeline permission to access the variable group.Select Save at the top of the page to save your variables. Your variable group should look like the following:
Create required service connections
Here, you'll create a service connection that enables Azure Pipelines to access your Azure subscription. Azure Pipelines uses this service connection to deploy the website to App Service. You created a similar service connection in the previous module. You'll also create a Docker Registry connection to publish your container to the Azure Container Registry.
Important
Ensure that you're signed in to both the Azure portal and Azure DevOps under the same Microsoft account.
In Azure DevOps, go to your Space Game - web - Docker project.
From the bottom corner of the page, select Project settings.
Under Pipelines, select Service connections.
Select New service connection, then choose Azure Resource Manager, then select Next.
Near the top of the page, Service principal (automatic). Then select Next.
Fill in these fields:
Field Value Scope level Subscription Subscription Your Azure subscription Resource Group tailspin-space-game-rg Service connection name Resource Manager - Tailspin - Space Game During the process, you might be prompted to sign in to your Microsoft account.
Ensure that Grant access permission to all pipelines is selected.
Select Save.
Azure DevOps performs a test connection to verify that it can connect to your Azure subscription. If Azure DevOps can't connect, you have the chance to sign in a second time.
Select New service connection, then choose Docker Registry, then select Next.
Near the top of the page, select Azure Container Registry.
Fill in these fields:
Field Value Subscription Your Azure subscription Azure container registry Select the one you created earlier Service connection name Container Registry Connection Ensure that Grant access permission to all pipelines is selected.
Select Save when you're done.