Lab - Extend an EDT
Read this first - before you start the lab!
Important
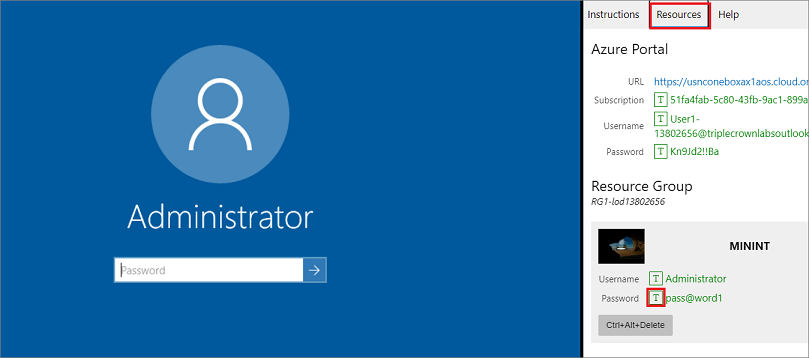
For this lab, you CANNOT sign in with your own credentials. Use the following steps to sign in to your lab environment with the correct credentials.
Ensure that you are signed in to Microsoft Learn.
Select Launch VM mode or Sign in to launch VM mode in this unit.
In the Resources tab on the lab side bar, select the T icon next to Password in the MININT box, to have the administrator password for the Virtual Machine entered for you.

Select Enter.
Microsoft Edge will open. Wait for it to navigate to the Sign in page for finance and operations.
On the Microsoft Sign in page in finance and operations, place your mouse cursor into the Username field.
On the Resources tab of the lab side bar, below the Azure portal heading, select the T icon next to Username, then press Enter.

Your mouse cursor will now be in the Password page.
On the Resources tab of the lab side bar, below the Azure portal heading, select the T icon next to select Password, then press Enter.

Don't stay signed in or store the password on the virtual machine.
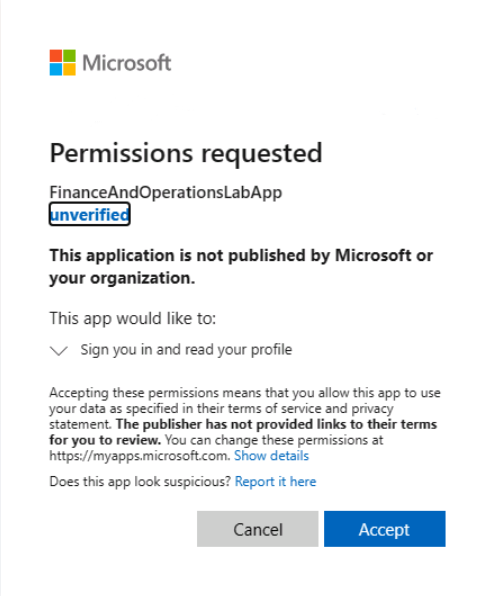
Select Accept in the Permissions requested page.

To see the lab instructions, select the Instructions tab on the lab side bar.
You can now begin your work on this lab.
Scenario
The finance and operations apps developer has been asked by the Fleet
Management company to change a number-entry field on the Customer page. The Agency location code field only accepts 12 digits, and the company needs to be able to enter 14 digits. Because the company doesn't need a new field, the developer will create an extension of the AgencyLocationCode EDT in Visual Studio.
Create a new project
- Close the Microsoft Edge window and finance and operations.
- Select Run as administrator to open Visual Studio.
- Select Continue without code at the bottom of the page to open Visual studio.
- To ensure the correct applications suite is referenced, select Extensions in the toolbar, and then select Dynamics 365.
- Select Model Management > Update model parameters
- Select the FleetManagement model from the Model name drop-down list.
- Select Next, then ensure ApplicationSuite is selected in the Select referenced packages drop-down list. Leave any other selections as is.
- Select Next three times.
- Open the File menu and select New > Project.
- Search for Finance Operations if it is not already showing in the latest projects list, and then select Next.
- In the Configure your new project dialog box enter FleetManagementExtensionProject in the Project name field.
- Select Create.
- Select Dynamics 365 in the Extensions menu at the top of the page.
- Select Options.
- Under the Dynamics 365 node on the left pane, select Projects.
- Ensure the check boxes for Organize projects by element type and Synchronize database on build for newly created project are selected. If others are selected, just leave them as is.
- Select OK.
Extend the AgencyLocationCode EDT
Select View in the ribbon to open the Application Explorer. In the search bar, in the Application Explorer window, expand the AOT node and then expand the Data Types node.
In the Data types node, expand the Extended Data Types node.
Select the AgencyLocationCode EDT.
Right-click the AgencyLocationCode EDT and select Create extension. An element named AgencyLocationCode.FleetManagement will be added to your FleetManagementExtensionProject in Solution Explorer. For demonstration purposes, you will keep the default name.
Note
We recommend that you rename the extension to avoid conflict with any extensions that are rolled out during application updates. For example, you should rename AgencyLocationCode.Extension to AgencyLocationCode.abcExtension.
Double-click the AgencyLocationCode.FleetManagement element in the Solution Explorer window to open it in the element designer window.
With the AgencyLocationCode.FleetManagement main node selected, go to the Properties window and change the String size property to 14.
Perform a build by right-clicking the project FleetManagementExtensionProject in the Solution Explorer window and then selecting Build.
Close the lab environment
- Select Done in the Instructions pane in the lab side bar.
- In the Lab is complete window, select Continue, and then select Leave to return to the next unit in the module.