Exercise - Create a build agent that runs on Azure
In this unit, to configure a build agent that you can use in Microsoft Azure Pipelines, you'll use a virtual machine that runs on Microsoft Azure. We provide a virtual machine that you can use for the duration of this module.
In this unit, you will:
- Create an Ubuntu virtual machine on Azure to serve as your build agent.
- Create an agent pool in Microsoft Azure DevOps.
- Create an access token to authenticate your agent with Azure DevOps.
- Configure your agent with the software that's required to build the Space Game website.
- Configure your agent to connect to Azure DevOps so that it can receive build jobs.
- Verify that the agent is connected to Azure DevOps and ready to receive build jobs.
There are many ways to create a virtual machine on Azure. In this unit, you'll create an Ubuntu virtual machine by using an interactive terminal called Cloud Shell.
To configure your VM, you have several choices:
- For a Linux VM, you can connect directly over SSH and interactively configure your system.
- You can automate the deployment by using an ARM template, Bicep, or other automated provisioning tool.
- If you need to deploy many build agents, you can create a VM image that has all the software pre-installed.
Configuring a system interactively is a good way to get started because it helps you understand the process and what's needed. To simplify the process, connect to your Ubuntu VM over SSH and run shell scripts to set up your build agent.
Note
If you're unfamiliar with connecting to or configuring Linux systems, just follow along. You can apply the same concepts to Windows build agents.
Create a Linux virtual machine
In this section, you create a VM that's running Ubuntu 20.04, which will serve as your build agent. The VM isn't yet set up to be a build agent or have any of the tools that are required to build the Space Game web application. You'll set that up shortly.
Bring up Cloud Shell through the Azure portal
Important
To complete the exercises in this module, you need your own Azure subscription.
Go to the Azure portal and sign in.
From the menu, select Cloud Shell. When prompted, select the Bash experience.

Note
Cloud Shell requires an Azure storage resource to persist any files that you create in the Cloud Shell. When you first open the Cloud Shell, you're prompted to create a resource group, storage account, and Azure Files share. This setup is automatically used for all future Cloud Shell sessions.
Select an Azure region
A region is one or more Azure datacenters within a geographic location. East US, West US, and North Europe are examples of regions. Every Azure resource, including an Azure VM, is assigned a region.
To make commands easier to run, start by selecting a default region. After you specify the default region, later commands use that region unless you specify a different region.
From the Cloud Shell, to list the regions that are available from your Azure subscription, run the following
az account list-locationscommand:az account list-locations \ --query "[].{Name: name, DisplayName: displayName}" \ --output tableFrom the
Namecolumn in the output, select a region that's close to you. For example, chooseeastasiaorwestus2.Run
az configureto set your default region. Replace<REGION>with the name of the region you selected:az configure --defaults location=<REGION>This example sets
westus2as the default region:az configure --defaults location=westus2
Create a resource group
Create a resource group to contain the resources used in this training module.
To create a resource group that's named tailspin-space-game-rg, run the following
az group createcommand:az group create --name tailspin-space-game-rg
Create the VM
To create your VM, run the following az vm create command:
az vm create \
    --name MyLinuxAgent \
    --resource-group tailspin-space-game-rg \
    --image canonical:0001-com-ubuntu-server-focal:20_04-lts:latest \
    --size Standard_DS2_v2 \
    --admin-username azureuser \
    --generate-ssh-keys
Your VM will take a few minutes to come up.
Standard_DS2_v2 specifies the VM's size. A VM's size defines its processor speed, amount of memory, initial amount of storage, and expected network bandwidth. This is the same size that's provided by Microsoft-hosted agents. In practice, you can choose a size that provides more computing power or additional capabilities, such as graphics processing.
The --resource-group argument specifies the resource group that holds all the things that we need to create. A resource group enables you to administer all the VMs, disks, network interfaces, and other elements that make up our solution as a unit.
Create the agent pool
Recall that an agent pool organizes build agents. In this section, you'll create the agent pool in Azure DevOps. Later, you'll specify the name of the agent pool when you configure your agent so that it can register itself to the correct pool.
In Azure DevOps, go to the Space Game - web - Agent project.
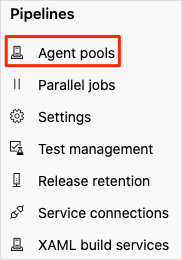
Select Project settings.
Under Pipelines, select Agent pools.
Select Add pool.
In the Add pool window:
- Under Pool to link, select New.
- Under Pool type, select Self-hosted.
- Under Name, enter MyAgentPool.
In practice, you'd choose a more descriptive name for your pool.
Select Create. The new agent pool appears in the list.
Create a personal access token
For your build agent to register itself with Azure DevOps, you need a way for it to authenticate itself.
To do that, you can create a personal access token. A personal access token—or PAT—is an alternative to a password. You can use the PAT to authenticate with services such as Azure DevOps.
Important
As you would with a password, be sure to keep your access token in a safe place. In this section, you'll store your access token as an environment variable so that it doesn't appear in your shell script.
In Azure DevOps, open your profile settings, and then select Personal access tokens.

Select New Token.
Enter a name for your token, such as Build agent.
Under Scopes, select the Show all scopes link at the bottom.
Look for Agent Pools, then select Read & manage.
Select Create.
Copy the token to a safe place.
Shortly, you'll use your token to enable your build agent to authenticate access to Azure Pipelines.
Connect to your VM
In this section, you'll connect to your Linux VM over SSH so that you can configure it.
Recall that you can't interactively sign in to a Microsoft-hosted agent. Because a private build agent is your own, you can sign in to and configure it however you'd like.
The ability to connect to your build agent lets you configure it with the tools you need to build your software. It also allows you to troubleshoot issues as you build out your pipeline configuration.
To get your VM's IP address, run
az vm showin Cloud Shell:IPADDRESS=$(az vm show \ --name MyLinuxAgent \ --resource-group tailspin-space-game-rg \ --show-details \ --query [publicIps] \ --output tsv)This command stores the IP address in a Bash variable named
IPADDRESS.Print the VM's IP address to the console:
echo $IPADDRESSCreate an SSH connection to your VM. In place of $IPADDRESS, enter the IP address you received in the previous step. At the prompt, enter yes to continue connecting.
ssh azureuser@$IPADDRESSYou're now connected to your VM over SSH.
This command works because you provided the
--generate-ssh-keysoption when you ranaz vm createearlier. This option creates an SSH key pair, which enables you to sign in to the VM.
Install build tools on your VM
In this section, you'll configure your VM with the tools that are required to build the Space Game website.
Recall that your existing build process uses these tools:
- .NET SDK, which is used to build the application
- Node.js, which is used to perform build tasks
- npm, the package manager for Node.js
- gulp, a Node.js package that's used to minify JavaScript and CSS files
These are the primary tools that the build process requires. To install them, you'll download and run a shell script from GitHub.
Note
The build process uses other tools, such as node-sass, to convert Sass (.scss) files to CSS (.css) files. However, Node.js installs these tools when the build runs.
Let's start by updating the Ubuntu package manager, named apt. This action fetches the latest information from the package repositories and is ordinarily the first thing you do when you set up a new Ubuntu system.
In your SSH connection, update the apt package manager cache:
sudo apt-get updatesudoruns the command with administrator, or root, privileges.To download a shell script named build-tools.sh from GitHub, run the following
curlcommand:curl https://raw.githubusercontent.com/MicrosoftDocs/mslearn-tailspin-spacegame-web/main/.agent-tools/build-tools.sh > build-tools.shPrint the script to the terminal so that you can examine its contents:
cat build-tools.shThe following result is displayed:
#!/bin/bash
set -e

# Select a default .NET version if one is not specified
if [ -z "$DOTNET_VERSION" ]; then
  DOTNET_VERSION=6.0.300
fi

# Add the Node.js PPA so that we can install the latest version
curl -sL https://deb.nodesource.com/setup_16.x | bash -

# Install Node.js and jq
apt-get install -y nodejs

apt-get install -y jq

# Install gulp
npm install -g gulp

# Change ownership of the .npm directory to the sudo (non-root) user
chown -R $SUDO_USER ~/.npm

# Install .NET as the sudo (non-root) user
sudo -i -u $SUDO_USER bash << EOF
curl -sSL https://dot.net/v1/dotnet-install.sh | bash /dev/stdin -c LTS -v $DOTNET_VERSION
EOF
The script installs Node.js, npm, gulp, and .NET Core.
By setting the
DOTNET_VERSIONenvironment variable, you can specify the .NET version to install. If you don't set this variable, the script installs the version that your existing build configuration uses. For learning purposes, you don't set this variable. You allow the script to use the default version.Make the script executable, then run the script:
chmod u+x build-tools.sh
sudo ./build-tools.sh
The script takes a few minutes to run.
In practice, you could now run commands to verify that each software component was successfully installed.
Install agent software on your VM
Now it's time to install the agent software on your VM. This software enables the VM to act as a build agent and receive build jobs from Azure Pipelines.
The registration process checks for installed software before it registers the agent with Azure Pipelines. Therefore, it's important to set up the agent after you install all other software. In practice, you can register the agent a second time if you need to install additional software.
The documentation explains how to manually set up self-hosted Linux agents as well as macOS and Windows agents. You run a shell script to configure your agent in much the same way you set up build tools in the preceding section.
Important
The script that you run here is for learning purposes. In practice, you should first understand how each command in the scripts you build affects the overall system. At the end of the module, we'll point to documentation that more completely describes your options.
To download a shell script named build-agent.sh from GitHub, run the following
curlcommand:curl https://raw.githubusercontent.com/MicrosoftDocs/mslearn-tailspin-spacegame-web/main/.agent-tools/build-agent.sh > build-agent.shPrint the script to the terminal so that you can examine its contents:
cat build-agent.shThe following result is displayed:
#!/bin/bash
set -e

# Select a default agent version if one is not specified
if [ -z "$AZP_AGENT_VERSION" ]; then
  AZP_AGENT_VERSION=2.187.2
fi

# Verify Azure Pipelines token is set
if [ -z "$AZP_TOKEN" ]; then
  echo 1>&2 "error: missing AZP_TOKEN environment variable"
  exit 1
fi

# Verify Azure DevOps URL is set
if [ -z "$AZP_URL" ]; then
  echo 1>&2 "error: missing AZP_URL environment variable"
  exit 1
fi

# If a working directory was specified, create that directory
if [ -n "$AZP_WORK" ]; then
  mkdir -p "$AZP_WORK"
fi

# Create the Downloads directory under the user's home directory
if [ -n "$HOME/Downloads" ]; then
  mkdir -p "$HOME/Downloads"
fi

# Download the agent package
curl https://vstsagentpackage.azureedge.net/agent/$AZP_AGENT_VERSION/vsts-agent-linux-x64-$AZP_AGENT_VERSION.tar.gz > $HOME/Downloads/vsts-agent-linux-x64-$AZP_AGENT_VERSION.tar.gz

# Create the working directory for the agent service to run jobs under
if [ -n "$AZP_WORK" ]; then
  mkdir -p "$AZP_WORK"
fi

# Create a working directory to extract the agent package to
mkdir -p $HOME/azp/agent

# Move to the working directory
cd $HOME/azp/agent

# Extract the agent package to the working directory
tar zxvf $HOME/Downloads/vsts-agent-linux-x64-$AZP_AGENT_VERSION.tar.gz

# Install the agent software
./bin/installdependencies.sh

# Configure the agent as the sudo (non-root) user
chown $SUDO_USER $HOME/azp/agent
sudo -u $SUDO_USER ./config.sh --unattended \
  --agent "${AZP_AGENT_NAME:-$(hostname)}" \
  --url "$AZP_URL" \
  --auth PAT \
  --token "$AZP_TOKEN" \
  --pool "${AZP_POOL:-Default}" \
  --work "${AZP_WORK:-_work}" \
  --replace \
  --acceptTeeEula

# Install and start the agent service
./svc.sh install
./svc.sh start
You don't need to understand how each line works, but here's a brief summary of what this script does:
- It downloads the agent package as a .tar.gz file and extracts its contents.
- In the extracted files, the script:
- Runs a shell script named installdependencies.sh to install the agent software.
- Runs a shell script named config.sh to configure the agent and register the agent with Azure Pipelines.
- Runs a shell script named svc.sh to install and start the agent service.
The script uses environment variables to enable you to provide details about your Azure DevOps organization. Here's a summary:
Bash variable Description Default AZP_AGENT_VERSIONThe version of the agent software to install The version we last used to test this module AZP_URLThe URL of your Azure DevOps organization (None) AZP_TOKENYour personal access token (None) AZP_AGENT_NAMEYour agent's name as it appears in Azure DevOps The system's hostname AZP_POOLThe name of your agent pool Default AZP_WORKThe working directory for the agent to perform build tasks _work If the script doesn't provide a default value for a variable that's not set, the script prints an error message and immediately exits.
In the steps that follow, set these environment variables:
AZP_AGENT_VERSIONAZP_URLAZP_TOKENAZP_AGENT_NAMEAZP_POOL
For now, we recommend that you leave the other variables unset.
Set the
AZP_AGENT_NAMEenvironment variable to specify your agent's name. We recommend MyLinuxAgent.export AZP_AGENT_NAME=MyLinuxAgentSet the
AZP_URLenvironment variable to specify the URL to your Azure DevOps organization.Replace <organization> with yours. You can get the name from the browser tab that displays Azure DevOps.
export AZP_URL=https://dev.azure.com/organizationSet the
AZP_TOKENenvironment variable to specify your personal access token (the long token value that you copied earlier in this unit).Replace <token> with your token.
export AZP_TOKEN=tokenSet the
AZP_POOLenvironment variable to specify the name of your agent pool. Earlier, you created a pool named MyAgentPool.export AZP_POOL=MyAgentPoolSet the
AZP_AGENT_VERSIONenvironment variable to specify the latest version of the agent.export AZP_AGENT_VERSION=$(curl -s https://api.github.com/repos/microsoft/azure-pipelines-agent/releases | jq -r '.[0].tag_name' | cut -d "v" -f 2)A YAML pipeline on a Linux machine must be using the latest version of the agent, even if it's pre-release. The agent software is constantly updated, so you
curlthe version information from the GitHub repo. The command usesjqto read the latest version from the JSON string that's returned.Print the agent version to the console. Optionally, check to make sure this is the latest version.
echo $AZP_AGENT_VERSIONMake the script executable, then run it:
chmod u+x build-agent.sh sudo -E ./build-agent.shsudoenables the script to run as the root user. The-Eargument preserves the current environment variables, including the ones you set, so that they're available to the script.As the script runs, you can see the agent connect to Azure DevOps, see it added to the agent pool, and see the agent connection be tested.
Verify that the agent is running
You've successfully installed the build tools and the agent software on your VM. As a verification step, go to Azure DevOps and see your agent in the agent pool.
In Azure DevOps, go to the Space Game - web - Agent project.
Select Project settings.
Under Pipelines, select Agent pools.
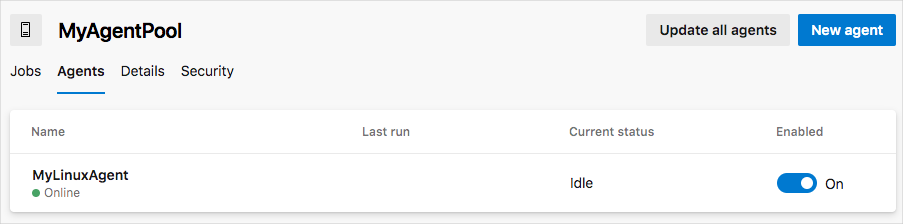
Select MyAgentPool.
Select the Agents tab.
You can see that your agent is online and ready to accept build jobs.
Tip
If your build agent shows as Offline, try waiting a few moments and then refreshing the page.
Select your agent, MyLinuxAgent.
Select the Capabilities tab.
During setup, the configuration process scanned your build agent for tool capabilities. You see that
npmis listed as one of them. Recall that your original build configuration specified thatnpmmust be installed on the agent.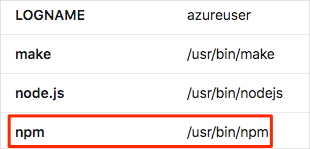
When you specify which agent pool to use, you can include any of these entries in your
demandssection. Including them ensures that Azure Pipelines chooses a build agent that has the software you need to build your application. It also enables you to create agent pools with various software configurations. Azure Pipelines will select the correct configuration based on your requirements.