Manage Microsoft 365 Groups creation
There are many ways to create a Microsoft 365 group. Beyond the Microsoft 365 admin center, users can create Microsoft 365 groups in the following primary communication applications in Microsoft 365:
Outlook - Collaboration through email with a shared group inbox and calendar.
Microsoft Teams - A persistent chat-based workspace where you can have informal, real-time, conversations around various topics, organized by specific subgroups.
SharePoint - A central repository for information, links and content relating to your group.
Viva Engage - Enterprise social experience for collaboration.
While users can create a Microsoft 365 group from Outlook or other apps, as an admin, you may need to create or delete groups, add or remove members, and customize how they work. The Microsoft 365 admin center is the place to do this.
Create a new Microsoft 365 group
You can create a new Microsoft 365 group using Microsoft 365 admin center or PowerShell.
Use Microsoft 365 admin center
In the Microsoft 365 admin center, on the left navigation pane, select Teams & groups > Active teams & groups.
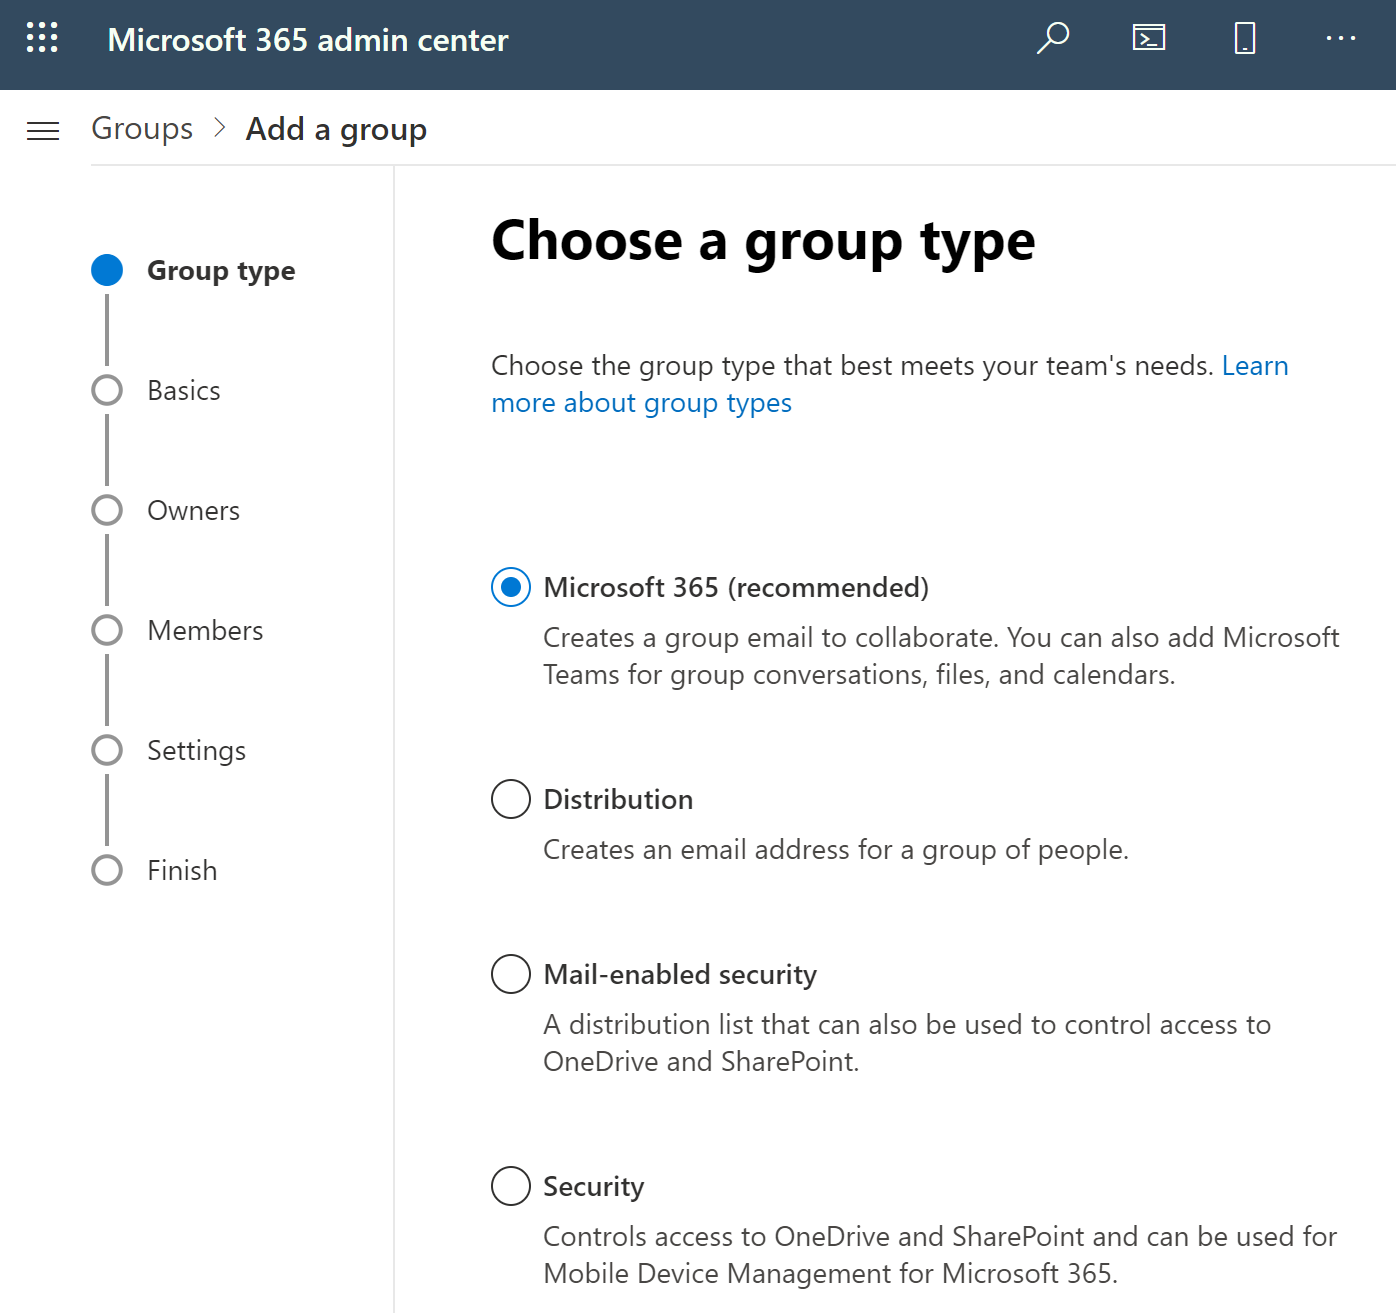
On the Active teams and groups page, select Add a group.
On the Choose a group type page, select Microsoft 365, and select Next.
On the Set up the basics page, type a name for the group, and, optionally, a description. Select Next.
On the Assign owners page, select + Assign owners and add the name of one or more people who will be designated to manage the group.
On the Add members page, you can select + Add members to add the members of the group or skip to the next step.
On the Edit settings page, type a unique email address for the group, choose a privacy option and whether you want to add Microsoft Teams, and then select Next.
In the Group email address field, type an email address for the group, for example SalesDepartment@contoso.com and optionally enter a description in the Description field.
From the Privacy drop-down menu, choose Private or Public.
Under Owner section, select Select owner, then choose the user who will be the owner of the group, and then select Add.
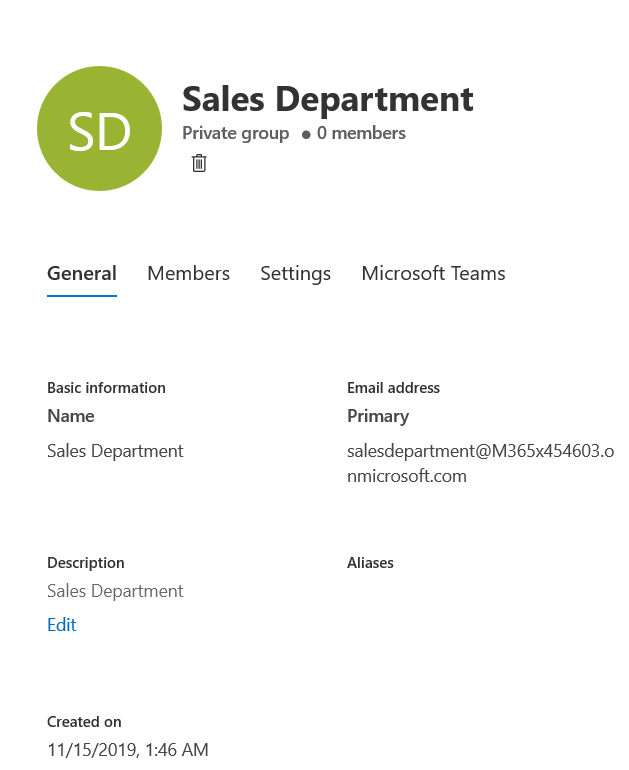
Once the group is created, it will appear in Outlook with members assigned to it.
Use PowerShell
To create a Microsoft 365 group with PowerShell, use the New-UnifiedGroup cmdlet when connected to Exchange Online. For example, to create a new Microsoft 365 group with the name "Sales Department" and alias Sales department, run the following cmdlet:
New-UnifiedGroup -DisplayName "Sales Department" -Alias Salesdepartment
Upgrade a distribution list to a Microsoft 365 group
Distribution lists have a long history in messaging for organizing people into groups to facilitate communication and collaboration. But distribution lists are limited to email messages, and available in SharePoint for distribution only. Turning a Distribution List into a Microsoft 365 group adds more collaboration capabilities for users. It also has the benefit of keeping permissions and membership intact instead of creating a new group that you must add to your Access Control.
Note
If you upgrade distribution lists to a Microsoft 365 group, existing users will not receive a welcome mail when joining this group.
Use Exchange admin center
To upgrade a distribution list to a Microsoft 365 group, you need to sign in to the Exchange admin center as an administrator such as Microsoft 365 global admin or Exchange admin and follow these steps:
Go to the Exchange admin center.
In the Exchange admin center, go to Recipients > Groups.
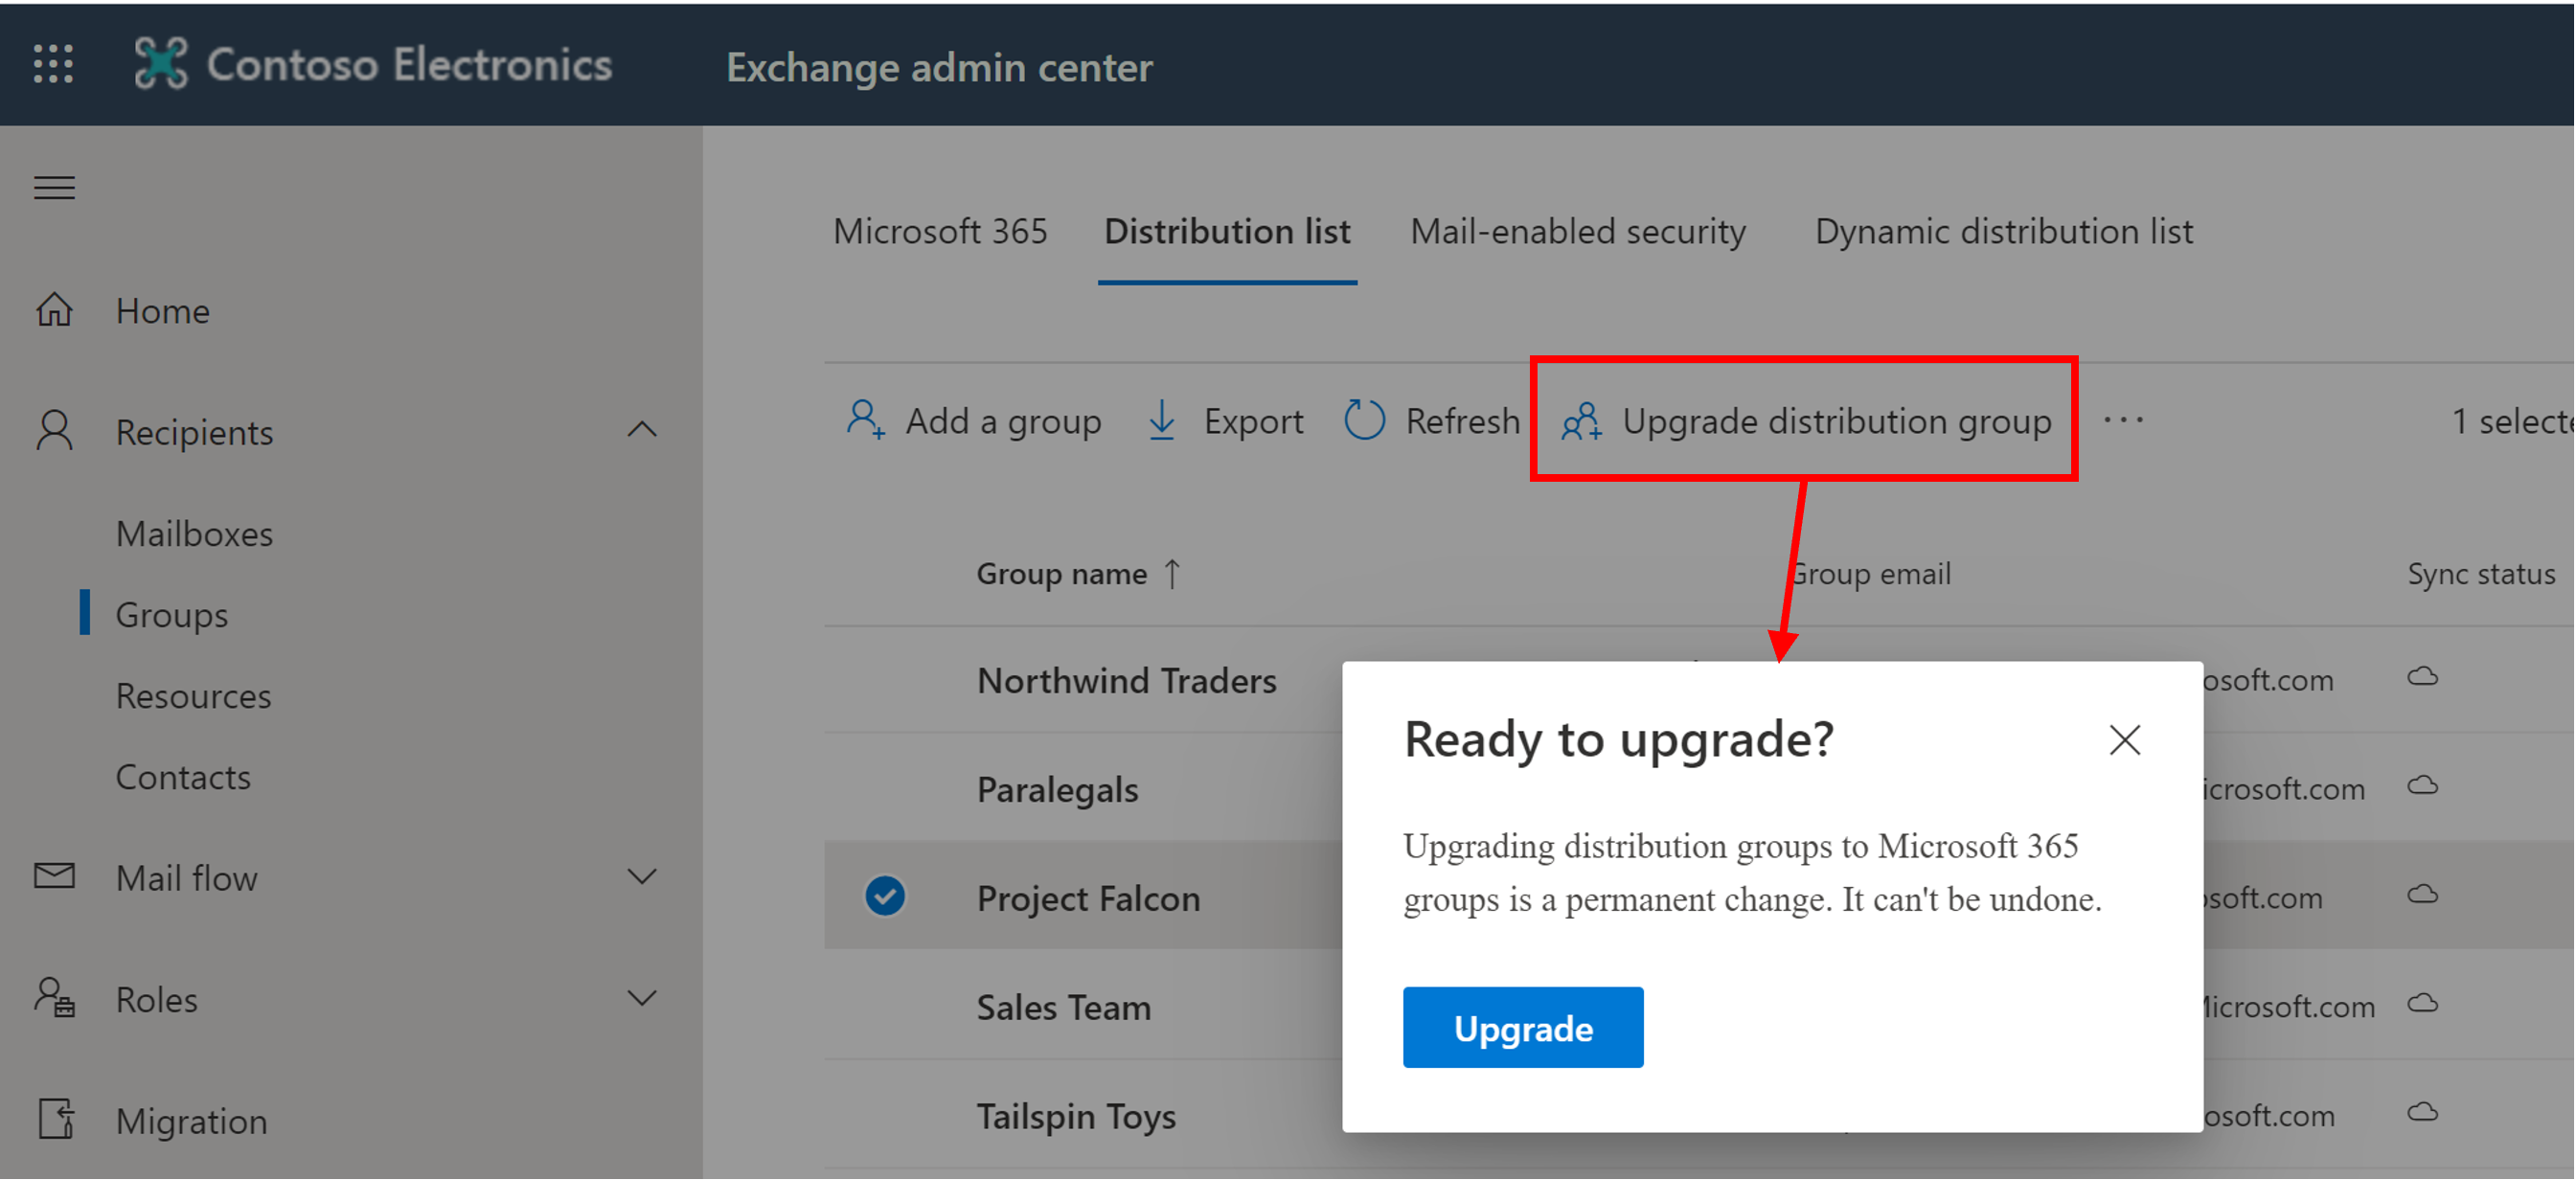
On the Groups page, select the Distribution list tab. You'll see a distribution lists (also called distribution groups ) that are eligible to be upgraded to Microsoft 365 groups.
Select a distribution group list (also called a distribution group) that you want to upgrade to a Microsoft 365 group.
Select the Upgrade distribution group option from the top menu.
On the information dialog, select Upgrade to confirm the upgrade. The process begins immediately. Depending on the size and number of DLs, the process can take several minutes or up to hours.
Use Microsoft Graph PowerShell
Note
Azure AD PowerShell or MSOnline are planned for deprecation. Please use the Microsoft Graph PowerShell commands below as replacements.
- To upgrade one or more distribution lists, run the
Update-MgGroupcmdlet. - Alternatively, you can also run the
New-MgGroupcmdlet to convert a single distribution group.
You can also pass multiple DLs as a batch and upgrade them together. For example, if you want to upgrade two distribution lists with SMTP address marketing-dl@contoso.com and finance-dl@contoso.com, run the following command:
Update-MgGroup -DlIdentities marketing-dl@contoso.com, finance-dl@contoso.com
Upgrade all eligible DLs
Below is a way in which you can upgrade all the eligible DLs.
Get the list of all DLs and upgrade only the eligible DLs
Get-MgGroup| Foreach-Object{
Update-MgGroup -DlIdentities $_.PrimarySMTPAddress
}
A distribution list will not be eligible for an upgrade if it fulfills any of the following criteria:
| Property | Eligible? |
|---|---|
| On-premises managed distribution list. |
No |
| Nested distribution lists. Distribution list either has child groups or is a member of another group. |
No |
| Distribution lists with member RecipientTypeDetails other than UserMailbox, SharedMailbox, TeamMailbox, MailUser. |
No |
| Distribution list that has more than 100 owners. |
No |
| Distribution list that only has members but no owner. |
No |
| Distribution list that has alias containing special characters. |
No |
| If the distribution list is configured to be a forwarding address for Shared Mailbox. |
No |
| If the DL is part of Sender Restriction in another DL. |
No |
| Security groups. |
No |
| Dynamic Distribution lists. |
No |
| Distribution lists that were converted to RoomLists. |
No |
Manage a Microsoft 365 group
After the group has been created, administrators can add members and configure other settings. Also, users can add themselves or request approval for membership.
Use Microsoft 365 admin center
In the Microsoft 365 admin center, on the Groups page, select the group that you want to configure.
On the selected group page, you can edit the settings, such as managing members and owners, changing group privacy, changing email sending permissions, or creating a team from the group.
Use Microsoft Graph PowerShell
Note
Azure AD PowerShell or MSOnline are planned for deprecation. Please use the Microsoft Graph PowerShell commands below as replacements.
To create and manage Microsoft 365 Group with PowerShell, use the New-MgGroup cmdlet. For example, to configure "Sales Department" group to receive mail from unauthenticated (external) senders, run the following cmdlet:
New-MgGroup` -displayName "Sales Department" -RequireSenderAuthenticationEnabled $false
Strategies for Microsoft 365 Groups creation
Organizations may have specific requirements about who can create Microsoft 365 groups. The following table lists the advantages of the different provisioning models:
| Model | Advantages | When to use |
|---|---|---|
| Open (default) | Users can create their own groups as needed | Most common if you do not want to restrict group creation in any way. |
| IT-led | Users can request a group from IT department, which will lead them in selecting the best collaboration tools for their needs | Very often done in large enterprises to control group creation centrally, and maybe add additional information such as internal back-charging numbers to charge for each group. |
| Controlled | Group creation restricted to specific people, teams, or services | An ideal approach to prevent uncontrolled group creation by users but be not as restrictive as with the IT-led model. For example, each department can decide on their own how to handle group creation. |
Restrict creation of teams by modifying group creation permissions
You can restrict Microsoft 365 Group creation, for example, to the members of a particular security group.
To restrict the creation of new teams, you need to modify the Microsoft 365 Groups creation permissions since all teams are based on Microsoft 365 Groups.
If you run the following script in your environment, you will stop users from creating new Microsoft 365 groups unless they are a member of the security group you specified in the first line of the script.
The script will perform the following actions:
Run
Connect-MgGraphto connect to the Microsoft Graph PowerShell.Get the ObjectID of the Directory Setting for Microsoft 365 Groups (unified groups) using
Get-MgDirectorySetting.Use
New-MgDirectorySettingto create the setting from a template if it does not exist.Use
Set-MgDirectorySettingto set theEnableGroupCreationsetting to false and block the creation of Microsoft 365 groups.Allow a specific Security group to override the group creation restriction by modifying the Setting before applying it.
Display the results of the change.
$GroupName = "<SecurityGroupName>"
$AllowGroupCreation = "False"

Connect-MgGraph

$settingsObjectID = (Get-MgDirectorySetting | Where-Object -Property Displayname -Value "Group.Unified" -EQ).id

if (!$settingsObjectID) {
    $template = Get-MgDirectorySettingTemplate | Where-Object {$_.displayname -eq "group.unified"}
    $settingsCopy = $template.CreateDirectorySetting()
    New-MgDirectorySetting -DirectorySetting $settingsCopy
    $settingsObjectID = (Get-MgDirectorySetting | Where-Object -Property Displayname -Value "Group.Unified" -EQ).id
}

$settingsCopy = Get-MgDirectorySetting -Id $settingsObjectID
$settingsCopy["EnableGroupCreation"] = $AllowGroupCreation

if ($GroupName) {
    $settingsCopy["GroupCreationAllowedGroupId"] = (Get-MgGroup -SearchString $GroupName).objectid
}

Set-MgDirectorySetting -Id $settingsObjectID -DirectorySetting $settingsCopy

(Get-MgDirectorySetting -Id $settingsObjectID).Values
For more information, see Manage who can create Microsoft 365 groups.