Exercise - Access user information from Microsoft Graph by using Graph Explorer
In the following exercise, you'll get a hands-on look at Graph Explorer and see key Microsoft Graph APIs that your application can call.
Get started with Graph Explorer
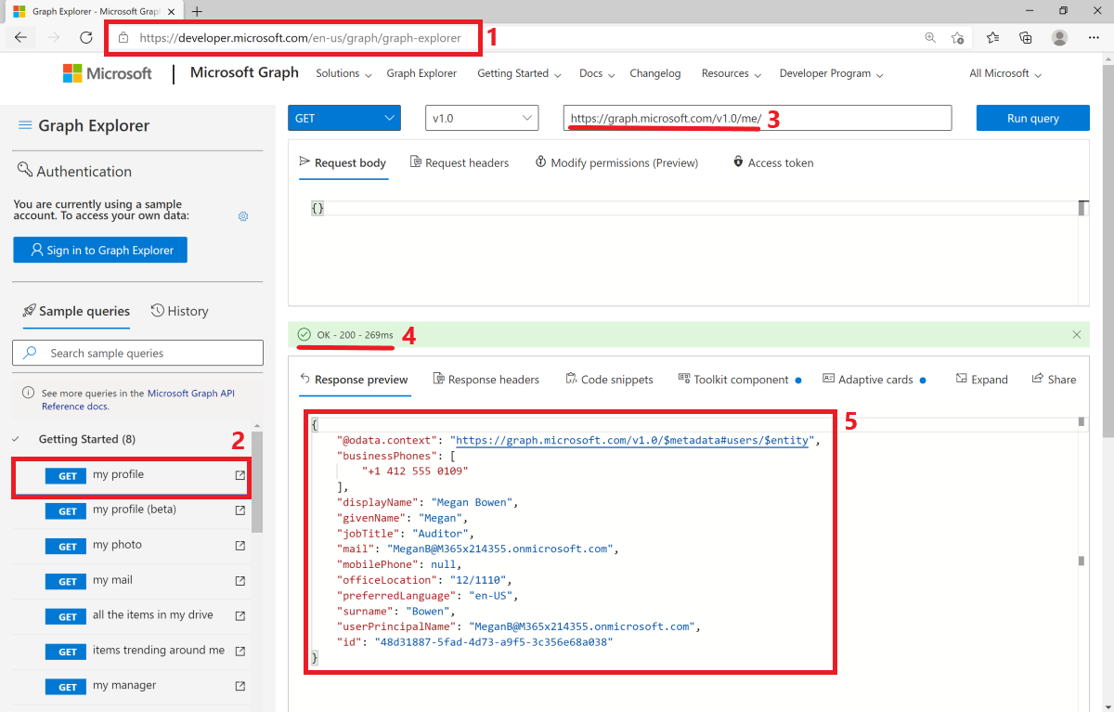
Let's say a salesperson wants to see profile information that includes name, job title, mail, and mobile phone. Here's the process for getting a user's profile in Graph Explorer:
- Visit the Graph Explorer website.
- Under Sample queries on the left, select any Microsoft Graph API.
- The selected query automatically runs in Graph Explorer. Notice the URL for the API that you chose to test.
- When your query runs successfully, you get an OK – 200 notification.
- The request result appears under Response preview.
Test queries with your own account in Graph Explorer
For this exercise, let's assume that a salesperson is looking for documents shared in meetings, Teams chats, or e-mail. The sales company also wants to have an easier way to view trending documents around users. As a developer, you can test getting trending items by using the Microsoft Graph API for insights in Graph Explorer.
Graph Explorer uses sample account data by default. To test queries that get your own data, you can sign in with your account. You can accomplish the test by using the authentication feature in Graph Explorer.
Note
Make sure that you've created a Microsoft 365 developer tenant. It's one of the prerequisites for this module.
Select the Sign in to Graph Explorer button on the left, sign in with your Microsoft 365 developer tenant account, and then select Accept to provide consent for requested permissions by Graph Explorer.
After you've signed in, your profile information appears on the left.
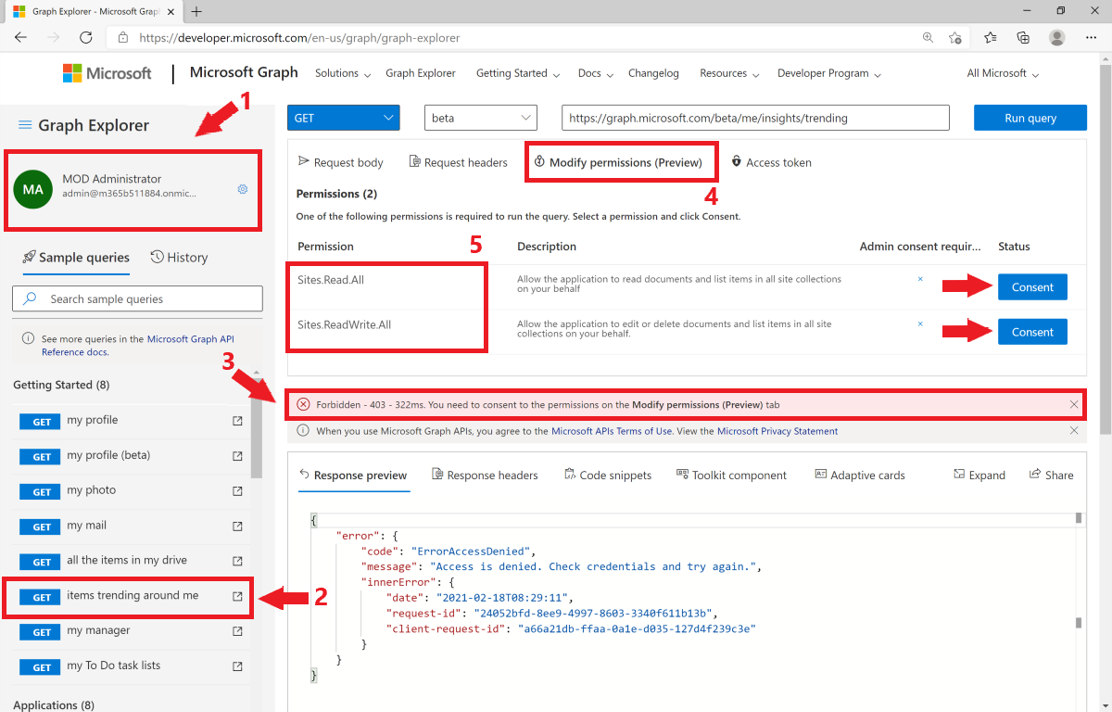
Select GET items trending around me from the sample queries.
You receive a warning that means the Microsoft Graph API for insights requires some permissions to run the query.
Select Modify permissions. The required permissions appear for the selected query.
Select Consent to provide consent for each permission.
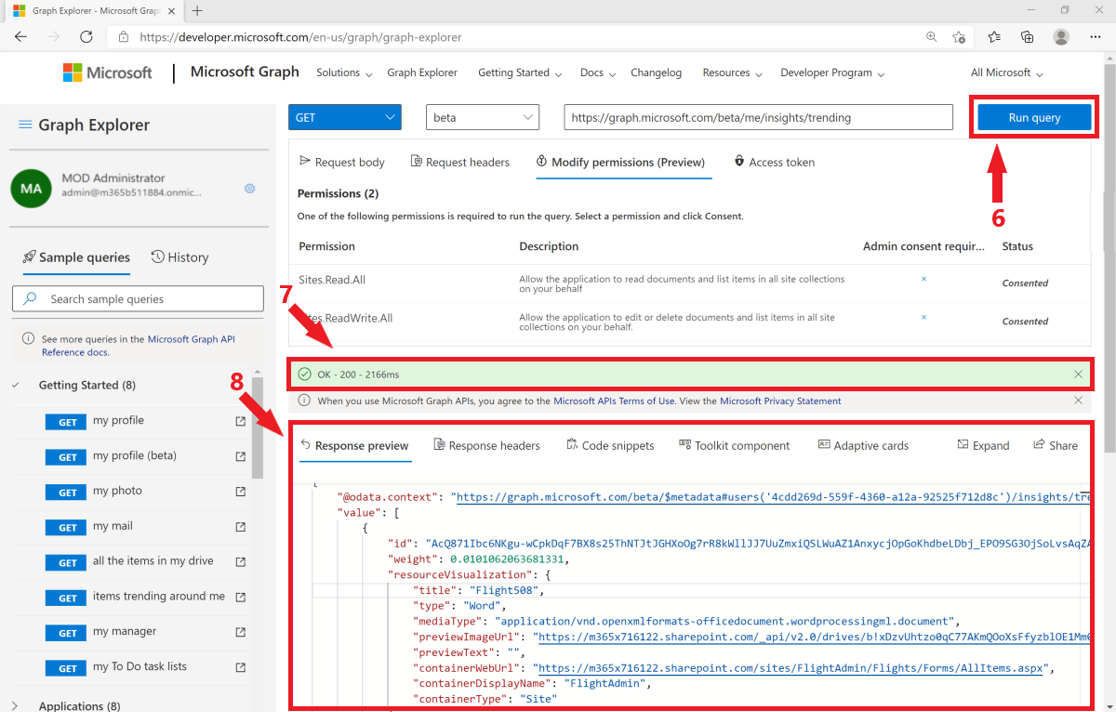
Select Run query.
After the Insights API runs, you get an OK – 200 message.
You see your own trending items as a result on the Response preview tab.
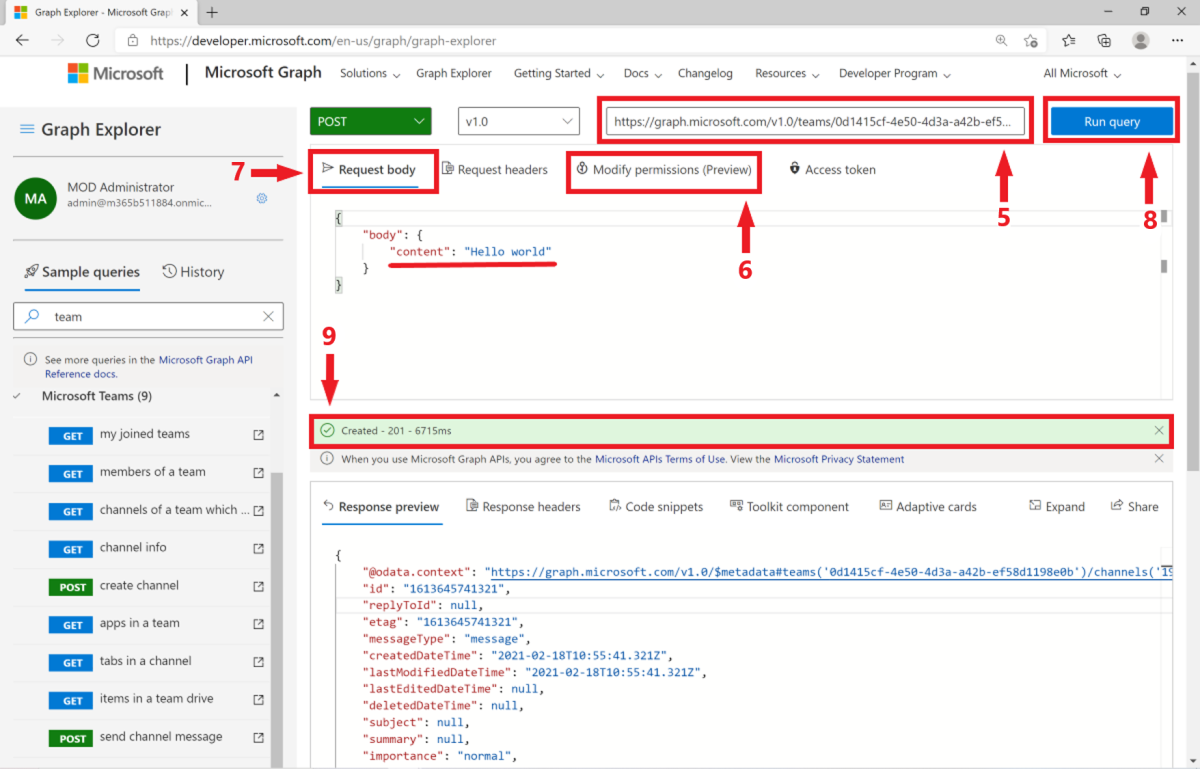
Try a POST request in Graph Explorer
Every time a new salesperson is added in the sales team channel on Teams, you can automate sending a message to the channel to welcome the new salesperson. To send a message to a channel on Microsoft Teams, you can use a POST request in Graph Explorer:
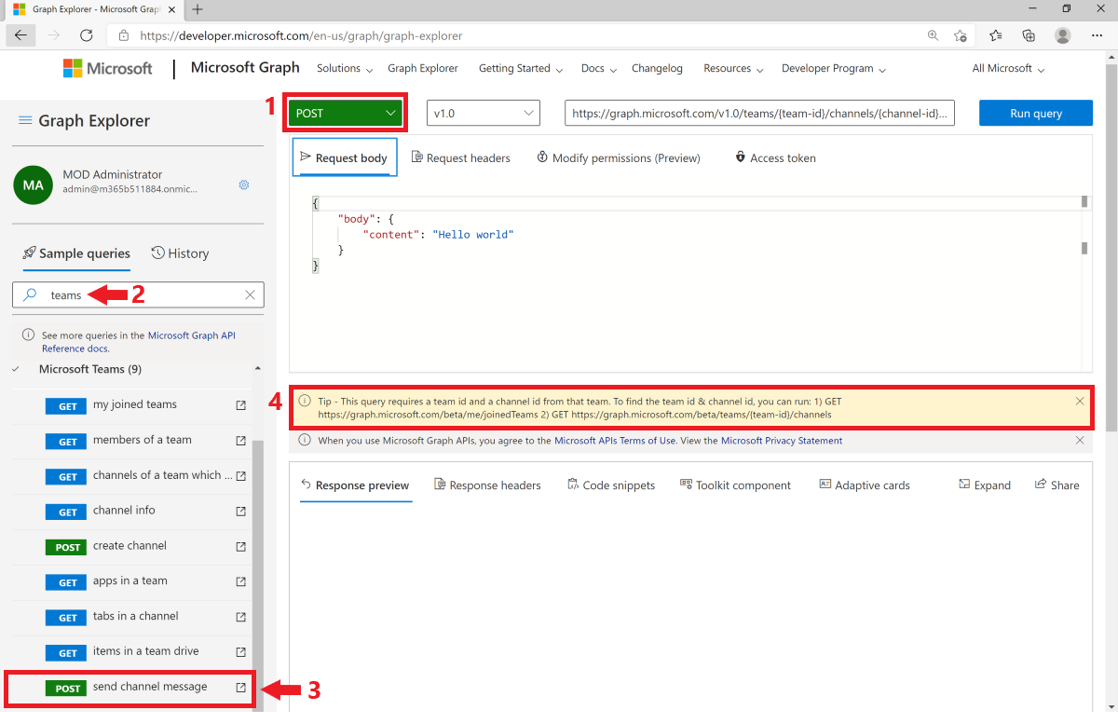
Select POST from the HTTP verb drop-down list.
Search for “teams” under Sample queries.
Select POST send channel message under the Microsoft Teams dropdown list.
You'll see a tip popping up, letting you know that you'll need the team ID and channel ID for this query. It also recommends running GET my joined teams and GET channel of a team which I am member of to get the required team ID and channel ID.
After you get the team ID and channel ID, edit the query using the query editor. Make sure to replace
{team-id}and{channel-id}with your IDs.Provide consent for required permissions from the Modify permissions tab.
In the Request body, there's default content such as "Hello world". This is the message you'll send to your channel on Microsoft Teams. Feel free to change the content in the request body with any sentence you prefer to send.
Select Run query to run the request.
When the request is successfully completed, you'll see a message Created – 201.
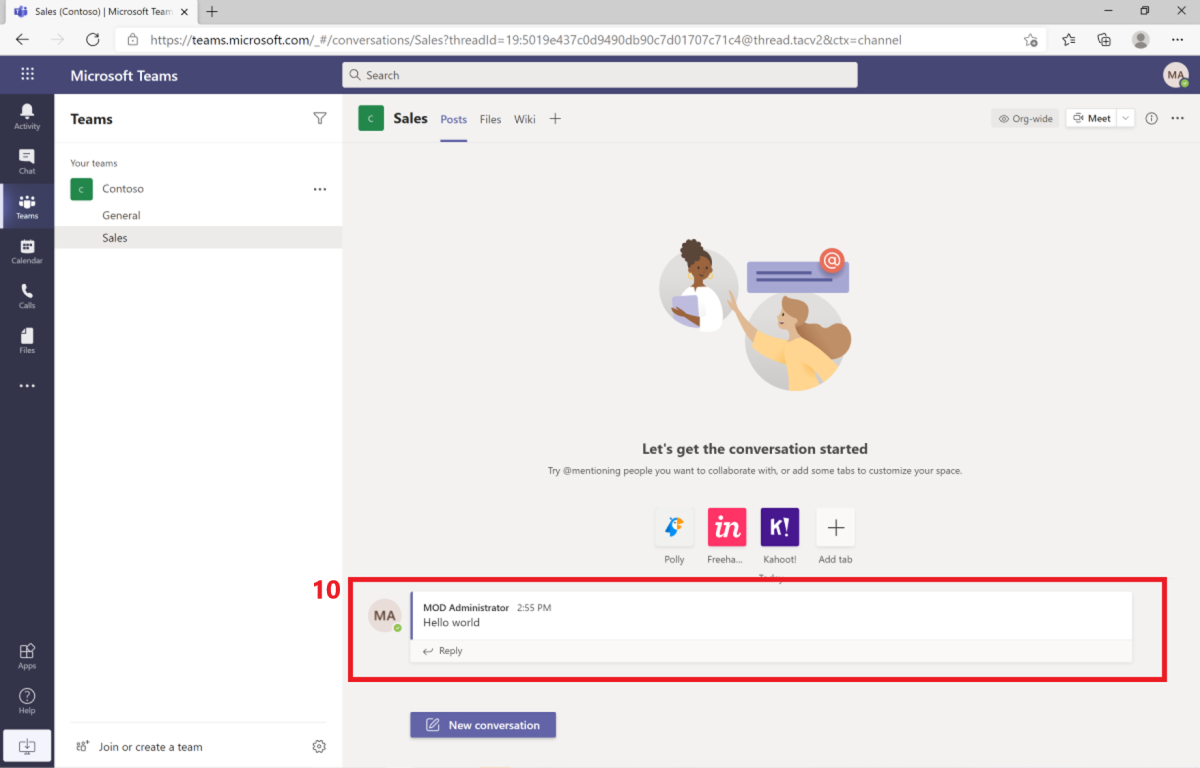
To see the results, go to https://teams.microsoft.com and select Teams on the left-hand side menu. Find the team and channel you picked to send a message and select on the channel name. You should see the "Hello world” message sent by you under the channel Posts:
Consume Microsoft Graph in your apps with the help of Graph Explorer
Graph Explorer has other features that can help you connect your apps with Microsoft Graph:
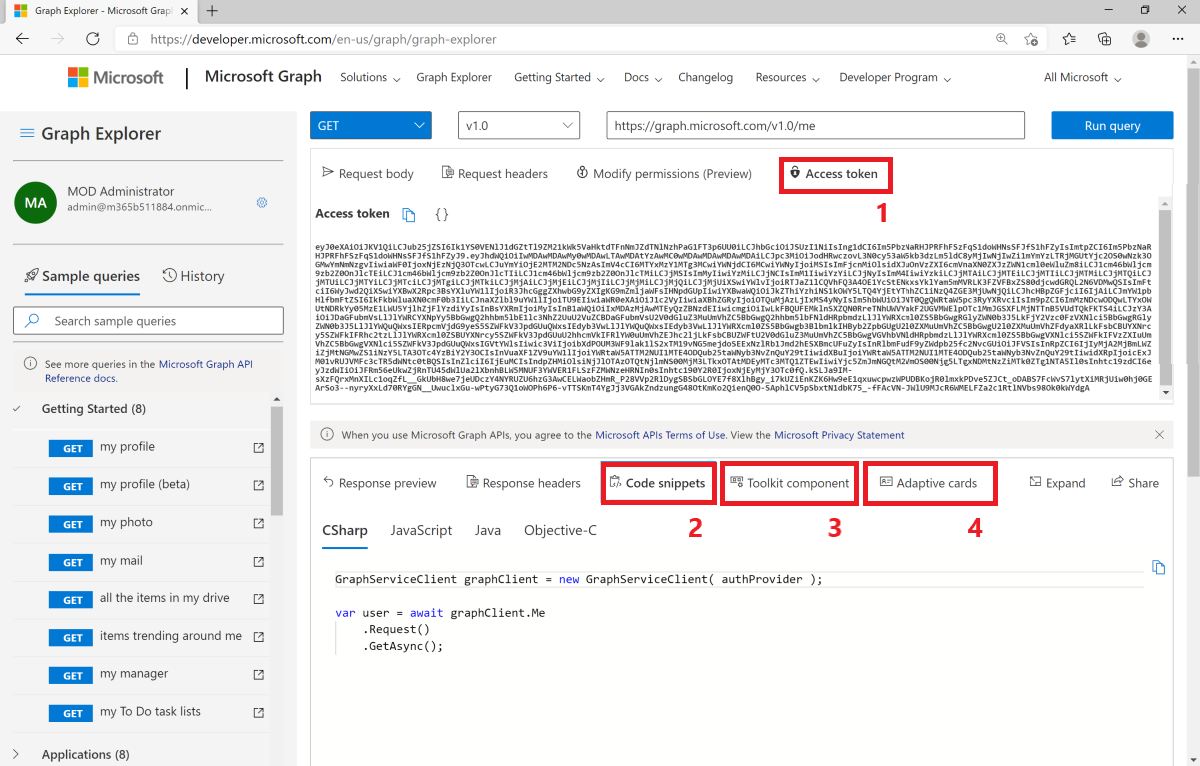
Access token: Microsoft Graph APIs use access tokens to establish the user's identity and to perform authentication and authorization. From the Access token tab, you can copy your own access/authentication token.
Code snippets: If you test any Microsoft Graph query in Graph Explorer and you want to consume the same query in your app, you can go to the Code snippets tab to get the related code to add in your app. Code snippets are available in C#, JavaScript, Java, and Objective-C for all sample queries.
Toolkit component: Microsoft Graph Toolkit components are web components that aren't tied to any framework and that help you access Microsoft Graph. You can use the Toolkit component tab to test these HTML components and consume them in your web apps for retrieving Microsoft 365 data through Microsoft Graph. When you run a query and a toolkit component is available for the query, a blue dot appears on the right side of the tab.
Adaptive cards: Adaptive cards are UI components that aren't tied to any platform and that are used in bots. If you want to consume Microsoft Graph in your chatbots, such as the calendar bot example given earlier, you can use the Adaptive cards tab to get the UI snippet. If you run a query and an adaptive card is available for the query, a blue dot appears on the right side of the tab.
Graph Explorer is a continuously evolving tool with many features that help make learning and practicing easy for people who are discovering Microsoft Graph features.