Exercise - Add a business process flow
In this exercise, you add a business process flow to the Machine Order table to help guide the back-office worker through the task of managing procurement of the requested device.
In discovery meetings with the back-office staff, you've learned that a machine request goes through the following tasks as the staff gets the requestor their machine.
Machine Requested - Currently, this task involves sending an email to back-office personnel about the machine request. In the new Power Apps system, this task involves a Machine Order row in Microsoft Dataverse.
Place Order - After the back-office personnel receive the request, they'll place an order with a supplier and get an order ID.
Receive Machine - This task occurs when the machine is received, and the back-office workers send it to the technician to be set up with the standard configuration.
Distribute Machine - After the machine has been set up, it needs to be sent to the employee who requested it. Additionally, the back-office worker needs to survey the employee to make sure that they're satisfied with the machine.
Each task represents a milestone and will become stages in the business process flow. In a more complex scenario, you'd likely compress or potentially reimagine the business process to make it more optimal than the current process that the staff performs with their existing process.
For this lab, the Receive Machine and Distribute Machine stages are marked as optional. While you'd need to create these stages for a full implementation of the scenario, to save time, you can skip them or do them as a take-home exercise.
The completed business process flow resembles the following image.

Note
To complete the exercises, you'll need to use a few files. Download the App in a Day files for use in this module. The file folders that are in this download include:
- Completed modules with instructions - Package files to import the completed exercise steps.
- Machine-Order-Data.xlsx - File used in the exercises.
Task: Create business process flow
To create a business process flow, follow these steps:
Select Solutions and then open the Contoso Coffee solution.
Select + New and then select Automation > Process > Business process flow.

Enter
Machine Procurement Processin the Display name field, select Machine Order from the Table dropdown menu, and then select Create. When you create the business process flow behind the scenes, it creates another table with the same name as the business process flow to track the progress of each business process on the row. Therefore, make sure that you choose your name carefully; for example, you wouldn't want to use the same name as your table (such as Machine Order). For this exercise, enter the name asMachine Procurement Process.Note
After you select OK, a new window will be loaded with the designer. If you have pop-up blockers enabled, this window might be blocked. Additionally, the window might not immediately have focus, so you might need to manually bring it into focus.

Select the Machine Order New Stage, change the Display Name to
Machine Requested, and then select Apply.
Select the Details drop down within the step.

Select the Data Step, select Request Date from the Data Field dropdown menu, and then select Apply. The Step Name field is filled in for you automatically.

Select Add and then select Add Data Step.
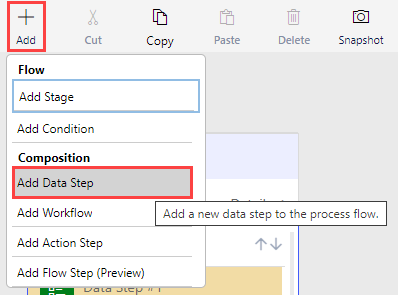
Select the plus (+) icon under Data Step 1.

Select Approval Status from the Data Field dropdown menu and then select Apply.
Add another data step, select Price from the Data Field dropdown menu, and then select Apply.

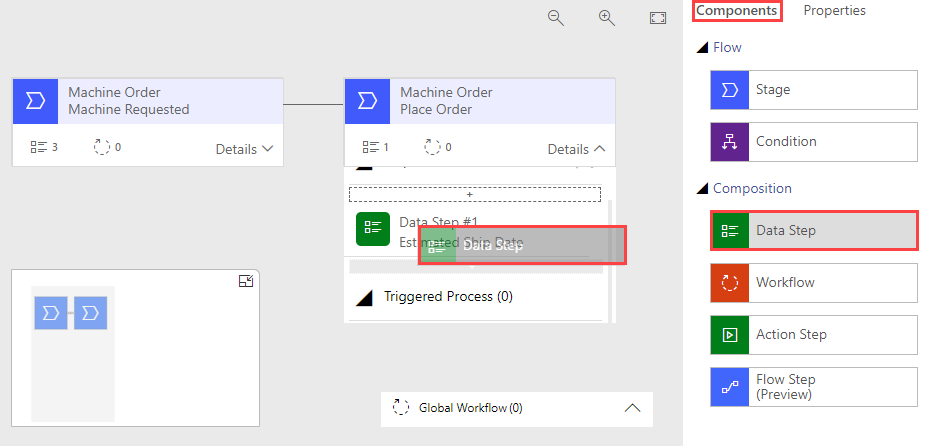
Select the Components tab.

Drag Stage to the canvas and then place it to the right of the Machine Requested stage.

Select the new stage, change the Display Name to
Place Order, and then select Apply.
Select Details.
Select the existing Data Step, select Estimated Ship Date from the Data Field dropdown menu, and then select Apply.

Select the Components tab, and then drag Data Step to the canvas and place it under the Estimated Ship Date step.
Select Supplier Order ID from the Data Field dropdown menu, select the Required checkbox, and then select Apply. This column isn't required; however, by selecting it at this point, you'll require users to fill out the column before they can advance to the next stage. However, the column won't block saving the row if a data value hasn't populated, as it would if the column was marked as Required on the column definition.

Note
All steps from hereon, until you reach Task: Add a branch condition, are optional. These steps add two more stages to the business process by using the same technique that you've already learned. You can skip ahead to Task: Add a branch condition.
Select the Components tab and then drag Stage to the right side of the Place Order stage.

Select the new stage, change the Display Name to
Receive Machine, and then select Apply.
Select the Details drop-down within the Receive Machine stage.
Select the existing Data Step, select Machine Received from the Data Field dropdown menu, and then select Apply.
Select the Components tab, and then drag Data Step to the Receive Machine stage and place it under the Machine Received step.
Select Machine Configured from the Data Field dropdown menu and then select Apply.

Add another stage to the right of the Receive Machine stage, and name it
Distribute Machine.Add two data steps: Machine Delivered and Send Survey.


Task: Add a branch condition
In this task, you add a conditional branch to your business process flow. When you did the discovery, you learned that if the price was greater than $10K, then other steps would be in place to get capital approval prior to placing the order. In this task, you determine how to modify the flow that you built to accommodate this scenario.
Select the Components tab, and then drag Condition and place it between Machine Requested and Place Order.

Select the Condition and change the Display Name to
Check Price.
In the Rules section, select Price from the Field dropdown menu, select Is greater than for the Operator, select Value for Type, enter
10,000.00in the Value field, and then select Apply. Columns that you use in the rules on the condition must be in the prior Stages steps, which is one reason the price was entered previously.
Select Save from the tool bar at the top of the screen.

A new stage is added.

Select the new stage, change the Display Name to
Capital Approval, and then select Apply.Select Details within the new Capital Approval stage.

Select the existing data step within the stage, choose Capital Approved from the Data Field dropdown menu, and then select Apply.

Select Save again from the tool bar.
Then, select Activate from the same tool bar.

Confirm the activation.

Close the process editor.


